
Setup and specification guide
Page 2
...and connector specifications...12 Communication specifications...13 Video specifications...13 Audio specifications...14 Storage specifications...14 Storage combinations...14 Power supply specifications...14 Security hardware...14 Regulatory and Environmental Compliance...15 4 System setup...16 Accessing System Setup...16 ... options...19 Secure Boot screen options...20 Intel Software Guard Extensions screen options...20 Performance screen options...21 Power Management screen options...21 POST Behavior screen options...22 Virtualization support screen options...22 Wireless screen options...23...
...and connector specifications...12 Communication specifications...13 Video specifications...13 Audio specifications...14 Storage specifications...14 Storage combinations...14 Power supply specifications...14 Security hardware...14 Regulatory and Environmental Compliance...15 4 System setup...16 Accessing System Setup...16 ... options...19 Secure Boot screen options...20 Intel Software Guard Extensions screen options...20 Performance screen options...21 Power Management screen options...21 POST Behavior screen options...22 Virtualization support screen options...22 Wireless screen options...23...

Setup and specification guide
Page 10
... specifications • Memory specifications • Port and connector specifications • Communication specifications • Video specifications • Audio specifications • Storage specifications • Storage combinations • Power supply specifications • Security hardware • Regulatory and Environmental Compliance Physical specifications Table 2. System information Feature Chipset DRAM bus width FLASH EPROM PCIe bus External bus...
... specifications • Memory specifications • Port and connector specifications • Communication specifications • Video specifications • Audio specifications • Storage specifications • Storage combinations • Power supply specifications • Security hardware • Regulatory and Environmental Compliance Physical specifications Table 2. System information Feature Chipset DRAM bus width FLASH EPROM PCIe bus External bus...

Setup and specification guide
Page 14
...Storage combinations Primary/Boot drive M.2 Drive + SATA Secondary drive M.2 128GB Solid State Drive+ 1TB 7200 rpm Hard Drive Power supply specifications Table 13. Security hardware Feature Security HW Specifications • Data wipe via BIOS (Secure Erase) • Support ...and Proactive Systems Management • Discrete TPM 2.0 (optional) • BIOS disable TPM (China Only) 14 Technical specifications Audio specifications Table 10. Power supply Feature Input Voltage Specifications 100-240VAC, 200-240VAC, 50-60 Hz Wattage • 200 W APFC High voltage • 200 W APFC 100V-240V...
...Storage combinations Primary/Boot drive M.2 Drive + SATA Secondary drive M.2 128GB Solid State Drive+ 1TB 7200 rpm Hard Drive Power supply specifications Table 13. Security hardware Feature Security HW Specifications • Data wipe via BIOS (Secure Erase) • Support ...and Proactive Systems Management • Discrete TPM 2.0 (optional) • BIOS disable TPM (China Only) 14 Technical specifications Audio specifications Table 10. Power supply Feature Input Voltage Specifications 100-240VAC, 200-240VAC, 50-60 Hz Wattage • 200 W APFC High voltage • 200 W APFC 100V-240V...

Service Manual
Page 4
ePSA diagnostics 75 Running the ePSA Diagnostics...75 Diagnostics...75 Diagnostic error messages...76 System error messages...79 5 Getting help...80 Contacting Dell...80 4 Contents M.2 SATA SSD ...41 Removing M.2 SATA SSD ...41 Installing M.2 SATA SSD ...41 WLAN card...42 Removing... modules...48 Removing the memory module...48 Installing the memory module...49 Power switch...50 Removing power switch...50 Installing the power switch...52 Power supply unit...54 Removing the power supply unit PSU...54 Installing the power supply unit PSU...57 Coin cell battery...60 Removing the coin cell battery...
ePSA diagnostics 75 Running the ePSA Diagnostics...75 Diagnostics...75 Diagnostic error messages...76 System error messages...79 5 Getting help...80 Contacting Dell...80 4 Contents M.2 SATA SSD ...41 Removing M.2 SATA SSD ...41 Installing M.2 SATA SSD ...41 WLAN card...42 Removing... modules...48 Removing the memory module...48 Installing the memory module...49 Power switch...50 Removing power switch...50 Installing the power switch...52 Power supply unit...54 Removing the power supply unit PSU...54 Installing the power supply unit PSU...57 Coin cell battery...60 Removing the coin cell battery...

Service Manual
Page 10
Vostro 3470 Component System board Power Supply Unit 3.5-inch hard drive chassis Drive cage Cover IO bracket 3.5-inch hard drive to optical drive bracket WLAN card M2x2 M2x3.5 Quantity 6 3 2 1 2 1 2 1 4 3 1 Image Color Black ...
Vostro 3470 Component System board Power Supply Unit 3.5-inch hard drive chassis Drive cage Cover IO bracket 3.5-inch hard drive to optical drive bracket WLAN card M2x2 M2x3.5 Quantity 6 3 2 1 2 1 2 1 4 3 1 Image Color Black ...

Service Manual
Page 54
... After working inside your computer. 2 Remove the: a cover b front bezel c cooling shroud d 3.5-inch hard drive chassis e drive cage 3 Perform the following steps to remove the power supply unit (PSU) from the computer: a Disconnect the PSU cables from the metal clips [2,,4]. 54 Removing and installing components 5 Install the: a drive cage b 3.5-inch hard drive...
... After working inside your computer. 2 Remove the: a cover b front bezel c cooling shroud d 3.5-inch hard drive chassis e drive cage 3 Perform the following steps to remove the power supply unit (PSU) from the computer: a Disconnect the PSU cables from the metal clips [2,,4]. 54 Removing and installing components 5 Install the: a drive cage b 3.5-inch hard drive...
Service Manual
Page 57
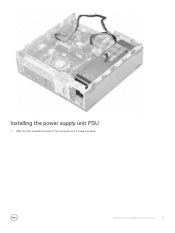
Installing the power supply unit PSU 1 Slide the PSU towards the back of the computer until it snaps into place. Removing and installing components 57
Installing the power supply unit PSU 1 Slide the PSU towards the back of the computer until it snaps into place. Removing and installing components 57

Service Manual
Page 58
2 Replace the three 6-32xL6.35 screws to secure the power supply unit to the computer. 58 Removing and installing components
2 Replace the three 6-32xL6.35 screws to secure the power supply unit to the computer. 58 Removing and installing components


