
Setup and Quick Reference Guide
Page 2
...States and/or other countries; Models PP36S, PP36L, and PP36X July 2008 P/N T607F Rev. Information in this text: Dell, the DELL logo, Dell MediaDirect, DellConnect, and Vostro are registered trademarks and Core is a trademark of this copyright protection technology must be used in this document is intended...trademarks of Bluetooth SIG Inc. Other trademarks and trade names may be authorized by Macrovision, and is subject to Microsoft® Windows® operating systems are either potential damage to hardware or loss of data and tells you make better use of Microsoft ...
...States and/or other countries; Models PP36S, PP36L, and PP36X July 2008 P/N T607F Rev. Information in this text: Dell, the DELL logo, Dell MediaDirect, DellConnect, and Vostro are registered trademarks and Core is a trademark of this copyright protection technology must be used in this document is intended...trademarks of Bluetooth SIG Inc. Other trademarks and trade names may be authorized by Macrovision, and is subject to Microsoft® Windows® operating systems are either potential damage to hardware or loss of data and tells you make better use of Microsoft ...

Setup and Quick Reference Guide
Page 3
Contents 1 About Your Computer 7 Front View 7 Dell™ Vostro™ 1310 7 Vostro 1510 8 Vostro 1710 9 Back View 10 Dell™ Vostro™ 1310 10 Vostro 1510 11 Vostro 1710 12 Battery Removal 13 Wireless Switch 14 2 Setting Up Your Computer 15 Quick Setup 15 Connecting to the Internet 17 Setting Up Your Internet Connection 18 Transferring Information to a New Computer 19 Microsoft® Windows® XP Operating System . . . 19 Microsoft Windows Vista 22 Contents 3
Contents 1 About Your Computer 7 Front View 7 Dell™ Vostro™ 1310 7 Vostro 1510 8 Vostro 1710 9 Back View 10 Dell™ Vostro™ 1310 10 Vostro 1510 11 Vostro 1710 12 Battery Removal 13 Wireless Switch 14 2 Setting Up Your Computer 15 Quick Setup 15 Connecting to the Internet 17 Setting Up Your Internet Connection 18 Transferring Information to a New Computer 19 Microsoft® Windows® XP Operating System . . . 19 Microsoft Windows Vista 22 Contents 3
Setup and Quick Reference Guide
Page 4
3 Specifications 23 4 Troubleshooting 35 Tools 35 Power Lights 35 Beep Codes 35 Error Messages 37 Dell Diagnostics 42 Solving Problems 44 Power Problems 45 Memory Problems 46 Lockups and Software Problems 47 Dell™ Technical Update Service 49 Dell Support Utility 49 5 Reinstalling Software 51 Drivers 51 Identifying Drivers 51 Reinstalling Drivers and Utilities 51 Restoring Your Operating System 54 Using Microsoft Windows System Restore . . . . . 54 Using Dell™ PC Restore and Dell Factory Image Restore 56 Using the Operating System Media 59 4 Contents
3 Specifications 23 4 Troubleshooting 35 Tools 35 Power Lights 35 Beep Codes 35 Error Messages 37 Dell Diagnostics 42 Solving Problems 44 Power Problems 45 Memory Problems 46 Lockups and Software Problems 47 Dell™ Technical Update Service 49 Dell Support Utility 49 5 Reinstalling Software 51 Drivers 51 Identifying Drivers 51 Reinstalling Drivers and Utilities 51 Restoring Your Operating System 54 Using Microsoft Windows System Restore . . . . . 54 Using Dell™ PC Restore and Dell Factory Image Restore 56 Using the Operating System Media 59 4 Contents
Setup and Quick Reference Guide
Page 18
If you cannot connect to the Internet, see the Dell Technology Guide. NOTE: Have your ISP to check the service status, ...and close any open files, and exit any open programs. 2 Double-click the ISP icon on the Microsoft® Windows® desktop. 3 Follow the instructions on the screen to complete the setup. If you selected Set up my connection...setup. 18 Setting Up Your Computer Otherwise, follow the instructions on the screen to complete the setup. Microsoft® Windows® XP Operating System 1 Save and close any open files, and exit any open programs. 2 Click Start&#...
If you cannot connect to the Internet, see the Dell Technology Guide. NOTE: Have your ISP to check the service status, ...and close any open files, and exit any open programs. 2 Double-click the ISP icon on the Microsoft® Windows® desktop. 3 Follow the instructions on the screen to complete the setup. If you selected Set up my connection...setup. 18 Setting Up Your Computer Otherwise, follow the instructions on the screen to complete the setup. Microsoft® Windows® XP Operating System 1 Save and close any open files, and exit any open programs. 2 Click Start&#...
Setup and Quick Reference Guide
Page 19
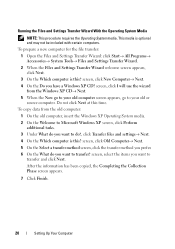
... Start button → Control Panel 3 Under Network and Internet, click Connect to the Internet. 4 In the Connect to the Internet window, click either Broadband (PPPoE) or Dial-up, depending on how you want to the input/output (I/O) ports of connection to select, click Help me ...Up Your Computer 19 NOTE: If you do not know which type of the two computers. Transferring Information to a New Computer Microsoft® Windows® XP Operating System Windows XP provides the Files and Settings Transfer Wizard to move data from an old computer to a new computer by your ISP. 5 Follow the...
... Start button → Control Panel 3 Under Network and Internet, click Connect to the Internet. 4 In the Connect to the Internet window, click either Broadband (PPPoE) or Dial-up, depending on how you want to the input/output (I/O) ports of connection to select, click Help me ...Up Your Computer 19 NOTE: If you do not know which type of the two computers. Transferring Information to a New Computer Microsoft® Windows® XP Operating System Windows XP provides the Files and Settings Transfer Wizard to move data from an old computer to a new computer by your ISP. 5 Follow the...
Setup and Quick Reference Guide
Page 20
...screen, click New Computer→ Next. 4 On the Do you want to do you have a Windows XP CD? screen, click I will use the wizard from the old computer: 1 On the old computer, insert the Windows XP Operating System media. 2 On the Welcome to your old or source computer. To copy data... from the Windows XP CD→ Next. 5 When the Now go to your old computer screen appears, go to Microsoft Windows XP screen, click Perform additional tasks. 3 Under What do ?, click Transfer files and settings→...
...screen, click New Computer→ Next. 4 On the Do you want to do you have a Windows XP CD? screen, click I will use the wizard from the old computer: 1 On the old computer, insert the Windows XP Operating System media. 2 On the Welcome to your old or source computer. To copy data... from the Windows XP CD→ Next. 5 When the Now go to your old computer screen appears, go to Microsoft Windows XP screen, click Perform additional tasks. 3 Under What do ?, click Transfer files and settings→...
Setup and Quick Reference Guide
Page 21
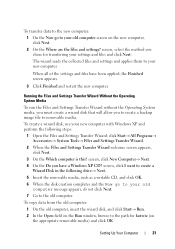
...appears, click Next. 3 On the Which computer is this? To create a wizard disk, use your new computer. When all of the settings and files have a Windows XP CD? To copy data from the old computer: 1 On the old computer, insert the wizard disk, and click Start→ Run. 2 In the Open... appears, do not click Next. 7 Go to removable media. The wizard reads the collected files and settings and applies them to your new computer with Windows XP and perform the following drive→ Next. 5 Insert the removable media, such as a writable CD, and click OK. 6 When the disk creation completes ...
...appears, click Next. 3 On the Which computer is this? To create a wizard disk, use your new computer. When all of the settings and files have a Windows XP CD? To copy data from the old computer: 1 On the old computer, insert the wizard disk, and click Start→ Run. 2 In the Open... appears, do not click Next. 7 Go to removable media. The wizard reads the collected files and settings and applies them to your new computer with Windows XP and perform the following drive→ Next. 5 Insert the removable media, such as a writable CD, and click OK. 6 When the disk creation completes ...
Setup and Quick Reference Guide
Page 22
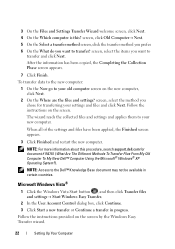
...has been copied, the Completing the Collection Phase screen appears. 7 Click Finish. Follow the instructions provided on the screen by the Windows Easy Transfer wizard. 22 Setting Up Your Computer screen, select the items you chose for document #154781 (What Are The Different Methods... Files From My Old Computer To My New Dell™ Computer Using the Microsoft® Windows® XP Operating System?). Microsoft Windows Vista® 1 Click the Windows Vista Start button , and then click Transfer files and settings→ Start Windows Easy Transfer. 2 In the User Account Control...
...has been copied, the Completing the Collection Phase screen appears. 7 Click Finish. Follow the instructions provided on the screen by the Windows Easy Transfer wizard. 22 Setting Up Your Computer screen, select the items you chose for document #154781 (What Are The Different Methods... Files From My Old Computer To My New Dell™ Computer Using the Microsoft® Windows® XP Operating System?). Microsoft Windows Vista® 1 Click the Windows Vista Start button , and then click Transfer files and settings→ Start Windows Easy Transfer. 2 In the User Account Control...
Setup and Quick Reference Guide
Page 40
...attempting to run the program again. N O B O O T S E C T O R O N H A R D D R I O N E R R O R - Close all windows and open . M EMORY A L L O C A T I V E - Run the System Set tests in the Dell Diagnostics (see the software documentation. A memory module may be faulty or improperly seated. If the error message still appears, see... AT ADDRESS, READ VALUE EXPECTING VALUE - Reinstall the memory modules and, if necessary, replace them. Contact Dell (see "Contacting Dell" on page 42). Try to use. 40 Troubleshooting NOT ENOUGH MEMORY OR RESOURCES. The software you want to...
...attempting to run the program again. N O B O O T S E C T O R O N H A R D D R I O N E R R O R - Close all windows and open . M EMORY A L L O C A T I V E - Run the System Set tests in the Dell Diagnostics (see the software documentation. A memory module may be faulty or improperly seated. If the error message still appears, see... AT ADDRESS, READ VALUE EXPECTING VALUE - Reinstall the memory modules and, if necessary, replace them. Contact Dell (see "Contacting Dell" on page 42). Try to use. 40 Troubleshooting NOT ENOUGH MEMORY OR RESOURCES. The software you want to...
Setup and Quick Reference Guide
Page 41
...The operating system cannot find a specific track on the hard drive. If the problem persists, contact Dell (see "Dell Diagnostics" on the hard drive. Windows Vista: 1 Click the Windows Vista Start button → Control Panel→ Programs→ Programs and Features. 2 Select the program...S YS T E M N O T F O U N D - Reinstall the hard drive (see "Dell Diagnostics" on page 42). The optional ROM has failed. Contact Dell (see your Service Manual at support.dell.com). Windows XP: 1 Click Start→ Control Panel→ Add or Remove Programs→ Programs and Features. 2...
...The operating system cannot find a specific track on the hard drive. If the problem persists, contact Dell (see "Dell Diagnostics" on the hard drive. Windows Vista: 1 Click the Windows Vista Start button → Control Panel→ Programs→ Programs and Features. 2 Select the program...S YS T E M N O T F O U N D - Reinstall the hard drive (see "Dell Diagnostics" on page 42). The optional ROM has failed. Contact Dell (see your Service Manual at support.dell.com). Windows XP: 1 Click Start→ Control Panel→ Add or Remove Programs→ Programs and Features. 2...
Setup and Quick Reference Guide
Page 43
... from your computer. See your Service Manual at support.dell.com to review your computer's configuration information, and ensure that the device that you see the Microsoft® Windows® desktop, and then shut down your computer and try again. NOTE: If you wait too long and the ... 43 It is recommended that you print these procedures before you see a message stating that no diagnostics utility partition has been found, run the Dell Diagnostics from the Drivers and Utilities media. 4 Press any key to start menu and press . NOTE: The Drivers and Utilities media is known...
... from your computer. See your Service Manual at support.dell.com to review your computer's configuration information, and ensure that the device that you see the Microsoft® Windows® desktop, and then shut down your computer and try again. NOTE: If you wait too long and the ... 43 It is recommended that you print these procedures before you see a message stating that no diagnostics utility partition has been found, run the Dell Diagnostics from the Drivers and Utilities media. 4 Press any key to start menu and press . NOTE: The Drivers and Utilities media is known...

Setup and Quick Reference Guide
Page 44
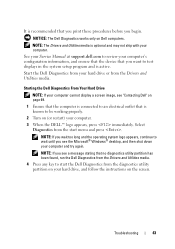
...message. This message may not apply if you set your computer. 7 When the Dell Diagnostics Main Menu appears, select the test that you want to the Windows Classic view. 44 Troubleshooting Starting the Dell Diagnostics From the Drivers and Utilities Media 1 Insert the Drivers and Utilities media....only. NOTE: The procedures in this document were written for the Windows default view, so they may help support personnel to proceed. 6 Select Run the 32 Bit Dell Diagnostics from the numbered list. When the DELL logo appears, press immediately. Solving Problems Follow these tips when ...
...message. This message may not apply if you set your computer. 7 When the Dell Diagnostics Main Menu appears, select the test that you want to the Windows Classic view. 44 Troubleshooting Starting the Dell Diagnostics From the Drivers and Utilities Media 1 Insert the Drivers and Utilities media....only. NOTE: The procedures in this document were written for the Windows default view, so they may help support personnel to proceed. 6 Select Run the 32 Bit Dell Diagnostics from the numbered list. When the DELL logo appears, press immediately. Solving Problems Follow these tips when ...
Setup and Quick Reference Guide
Page 48
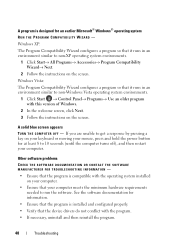
...Program Compatibility Wizard→ Next. 2 Follow the instructions on your computer. • Ensure that the program is compatible with this version of Windows. 2 In the welcome screen, click Next. 3 Follow the instructions on your keyboard or moving your mouse, press and hold the power button... If you are unable to get a response by pressing a key on the screen. Windows Vista: The Program Compatibility Wizard configures a program so that it runs in an environment similar to non-Windows Vista operating system environments. 1 Click Start → Control Panel→ Programs→ Use...
...Program Compatibility Wizard→ Next. 2 Follow the instructions on your computer. • Ensure that the program is compatible with this version of Windows. 2 In the welcome screen, click Next. 3 Follow the instructions on your keyboard or moving your mouse, press and hold the power button... If you are unable to get a response by pressing a key on the screen. Windows Vista: The Program Compatibility Wizard configures a program so that it runs in an environment similar to non-Windows Vista operating system environments. 1 Click Start → Control Panel→ Programs→ Use...
Setup and Quick Reference Guide
Page 51
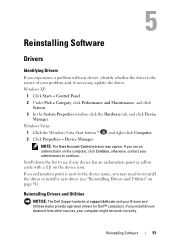
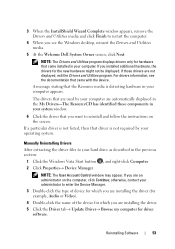
...on the device icon. If an exclamation point is the source of your Drivers and Utilities media provide approved drivers for Dell™ computers. If you install drivers obtained from other sources, your administrator to reinstall the driver or install a new ...correctly. NOTE: The User Account Control window may need to continue. Reinstalling Software Drivers Identifying Drivers If you experience a problem with a [!]) on the computer, click Continue; Reinstalling Drivers and Utilities NOTICE: The Dell Support website at support.dell.com and your problem and, if necessary...
...on the device icon. If an exclamation point is the source of your Drivers and Utilities media provide approved drivers for Dell™ computers. If you install drivers obtained from other sources, your administrator to reinstall the driver or install a new ...correctly. NOTE: The User Account Control window may need to continue. Reinstalling Software Drivers Identifying Drivers If you experience a problem with a [!]) on the computer, click Continue; Reinstalling Drivers and Utilities NOTICE: The Dell Support website at support.dell.com and your problem and, if necessary...
Setup and Quick Reference Guide
Page 52
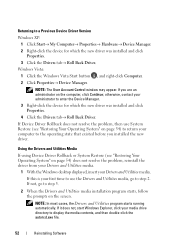
...display the media contents, and then double-click the autorcd.exe file. 52 Reinstalling Software NOTE: The User Account Control window may appear. Windows Vista: 1 Click the Windows Vista Start button , and right-click Computer. 2 Click Properties→ Device Manager. If not, go to step 2.... most cases, the Drivers and Utilities program starts running automatically. If you installed the new driver. Returning to a Previous Device Driver Version Windows XP: 1 Click Start→ My Computer→ Properties→ Hardware→ Device Manager. 2 Right-click the device for which the...
...display the media contents, and then double-click the autorcd.exe file. 52 Reinstalling Software NOTE: The User Account Control window may appear. Windows Vista: 1 Click the Windows Vista Start button , and right-click Computer. 2 Click Properties→ Device Manager. If not, go to step 2.... most cases, the Drivers and Utilities program starts running automatically. If you installed the new driver. Returning to a Previous Device Driver Version Windows XP: 1 Click Start→ My Computer→ Properties→ Hardware→ Device Manager. 2 Right-click the device for which the...
Setup and Quick Reference Guide
Page 53
... want to reinstall and follow the instructions on the computer, click Continue; NOTE: The User Account Control window may appear. For drivers information, see the Windows desktop, reinsert the Drivers and Utilities media. 5 At the Welcome Dell System Owner screen, click Next. A message stating that came installed in your hard drive as described...
... want to reinstall and follow the instructions on the computer, click Continue; NOTE: The User Account Control window may appear. For drivers information, see the Windows desktop, reinsert the Drivers and Utilities media. 5 At the Welcome Dell System Owner screen, click Next. A message stating that came installed in your hard drive as described...

Setup and Quick Reference Guide
Page 54
...in this document were written for restoring your operating system and preserving data files. • Dell PC Restore by Symantec (available in Windows XP) and Dell Factory Image Restore (available in Windows Vista) returns your hard drive to the operating state it to restore your operating system.... NOTE: Set your computer are completely reversible. Any changes that System Restore makes to your Dell™ computer to the Windows Classic view. 54 Reinstalling Software Restoring Your Operating System You can use it was in an undesirable operating state....
...in this document were written for restoring your operating system and preserving data files. • Dell PC Restore by Symantec (available in Windows XP) and Dell Factory Image Restore (available in Windows Vista) returns your hard drive to the operating state it to restore your operating system.... NOTE: Set your computer are completely reversible. Any changes that System Restore makes to your Dell™ computer to the Windows Classic view. 54 Reinstalling Software Restoring Your Operating System You can use it was in an undesirable operating state....
Setup and Quick Reference Guide
Page 55
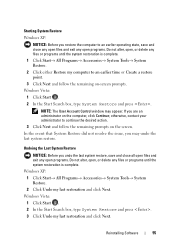
...my last restoration and click Next. otherwise, contact your administrator to continue the desired action. 3 Click Next and follow the remaining on-screen prompts. Windows Vista: 1 Click Start . 2 In the Start Search box, type System Restore and press . In the event that System Restore did not resolve... all open files and exit any open programs. Do not alter, open, or delete any files or programs until the system restoration is complete. Windows XP: 1 Click Start→ All Programs→ Accessories→ System Tools→ System Restore. 2 Click Undo my last restoration and click ...
...my last restoration and click Next. otherwise, contact your administrator to continue the desired action. 3 Click Next and follow the remaining on-screen prompts. Windows Vista: 1 Click Start . 2 In the Start Search box, type System Restore and press . In the event that System Restore did not resolve... all open files and exit any open programs. Do not alter, open, or delete any files or programs until the system restoration is complete. Windows XP: 1 Click Start→ All Programs→ Accessories→ System Tools→ System Restore. 2 Click Undo my last restoration and click ...
Setup and Quick Reference Guide
Page 56
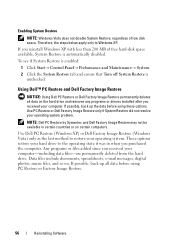
... System Restore is automatically disabled. Any programs or files added since you received your computer. Use Dell PC Restore (Windows XP) or Dell Factory Image Restore (Windows Vista) only as the last method to restore your computer-including data files-are permanently deleted from...computers. If you purchased the computer. Enabling System Restore NOTE: Windows Vista does not disable System Restore; Using Dell™ PC Restore and Dell Factory Image Restore NOTICE: Using Dell PC Restore or Dell Factory Image Restore permanently deletes all data before using PC Restore or...
... System Restore is automatically disabled. Any programs or files added since you received your computer. Use Dell PC Restore (Windows XP) or Dell Factory Image Restore (Windows Vista) only as the last method to restore your computer-including data files-are permanently deleted from...computers. If you purchased the computer. Enabling System Restore NOTE: Windows Vista does not disable System Restore; Using Dell™ PC Restore and Dell Factory Image Restore NOTICE: Using Dell PC Restore or Dell Factory Image Restore permanently deletes all data before using PC Restore or...
Setup and Quick Reference Guide
Page 57
Windows XP: Dell PC Restore Using PC Restore: 1 Turn on . 6 Click Next. If you do not press in time, let the computer finish starting, and then restart the ... the computer was turned on the computer. The restore process takes approximately 6 to 10 minutes to complete. 4 When prompted, click Finish to proceed with www.dell.com appears at the top of the screen. 2 Immediately upon seeing the blue bar, press . During the boot process, a blue bar with PC Restore, click...
Windows XP: Dell PC Restore Using PC Restore: 1 Turn on . 6 Click Next. If you do not press in time, let the computer finish starting, and then restart the ... the computer was turned on the computer. The restore process takes approximately 6 to 10 minutes to complete. 4 When prompted, click Finish to proceed with www.dell.com appears at the top of the screen. 2 Immediately upon seeing the blue bar, press . During the boot process, a blue bar with PC Restore, click...


