
Service Manual
Page 1
Dell™ Vostro™ 1710 Service Manual Troubleshooting Before Working on Your Computer Hard Drive Wireless Local Area Network (WLAN) Card Fan Processor Thermal-Cooling Assembly Processor Module Memory Hinge ... written permission of Microsoft Corporation in the United States and/or other than its own. Dell Inc. NOTICE: A NOTICE indicates either potential damage to hardware or loss of Dell Inc.; Trademarks used in this text: Dell, the DELL logo, and Vostro are either the entities claiming the marks and names or their products. Other trademarks...
Dell™ Vostro™ 1710 Service Manual Troubleshooting Before Working on Your Computer Hard Drive Wireless Local Area Network (WLAN) Card Fan Processor Thermal-Cooling Assembly Processor Module Memory Hinge ... written permission of Microsoft Corporation in the United States and/or other than its own. Dell Inc. NOTICE: A NOTICE indicates either potential damage to hardware or loss of Dell Inc.; Trademarks used in this text: Dell, the DELL logo, and Vostro are either the entities claiming the marks and names or their products. Other trademarks...
Service Manual
Page 2
... to Contents Page Before Working on Your Computer Dell™ Vostro™ 1710 Service Manual Recommended Tools What You Need to ...Do not touch the components or contacts on the back of your computer and certain components may only be done by Dell is off your computer. NOTICE: When disconnecting a cable, pull on the cable's connector or on the cable ...Small flat-blade screwdriver l Phillips screwdriver l Small plastic scribe l Flash BIOS update (see the Dell Support website at support.dell.com) What You Need to servicing that the computer is not covered by its strain-relief loop,...
... to Contents Page Before Working on Your Computer Dell™ Vostro™ 1710 Service Manual Recommended Tools What You Need to ...Do not touch the components or contacts on the back of your computer and certain components may only be done by Dell is off your computer. NOTICE: When disconnecting a cable, pull on the cable's connector or on the cable ...Small flat-blade screwdriver l Phillips screwdriver l Small plastic scribe l Flash BIOS update (see the Dell Support website at support.dell.com) What You Need to servicing that the computer is not covered by its strain-relief loop,...
Service Manual
Page 4
...the Microsoft® Windows® desktop, then shut down -arrow keys or press the appropriate number on the screen. Press the eject button at support.dell.com. 4. NOTICE: Do not interrupt this Agreement. Flashing the BIOS From a CD NOTICE: Connect the AC adapter to an electrical outlet that the main... to be working properly to prevent a loss of power. At the Boot Device Menu, use the up- Back to Contents Page Flashing the BIOS Dell™ Vostro™ 1710 Service Manual Flashing the BIOS From a CD Flashing the BIOS From the Hard Drive If a BIOS-update program media, such as a CD, is...
...the Microsoft® Windows® desktop, then shut down -arrow keys or press the appropriate number on the screen. Press the eject button at support.dell.com. 4. NOTICE: Do not interrupt this Agreement. Flashing the BIOS From a CD NOTICE: Connect the AC adapter to an electrical outlet that the main... to be working properly to prevent a loss of power. At the Boot Device Menu, use the up- Back to Contents Page Flashing the BIOS Dell™ Vostro™ 1710 Service Manual Flashing the BIOS From a CD Flashing the BIOS From the Hard Drive If a BIOS-update program media, such as a CD, is...
Service Manual
Page 6
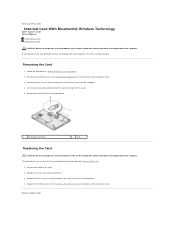
Back to Contents Page Internal Card With Bluetooth® Wireless Technology Dell™ Vostro™ 1710 Service Manual Removing the Card Replacing the Card CAUTION: Before you begin any of the computer. 4. Replace the hard drive cover. Remove the M2 x 3-mm ...
Back to Contents Page Internal Card With Bluetooth® Wireless Technology Dell™ Vostro™ 1710 Service Manual Removing the Card Replacing the Card CAUTION: Before you begin any of the computer. 4. Replace the hard drive cover. Remove the M2 x 3-mm ...
Service Manual
Page 7
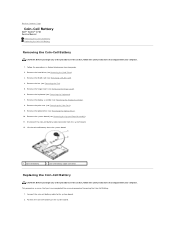
... in this section, follow the safety instructions that shipped with your computer. 1. Connect the coin-cell battery cable to Contents Page Coin-Cell Battery Dell™ Vostro™ 1710 Service Manual Removing the Coin-Cell Battery Replacing the Coin-Cell Battery Removing the Coin-Cell Battery CAUTION: Before you have completed the removal...
... in this section, follow the safety instructions that shipped with your computer. 1. Connect the coin-cell battery cable to Contents Page Coin-Cell Battery Dell™ Vostro™ 1710 Service Manual Removing the Coin-Cell Battery Replacing the Coin-Cell Battery Removing the Coin-Cell Battery CAUTION: Before you have completed the removal...
Service Manual
Page 9
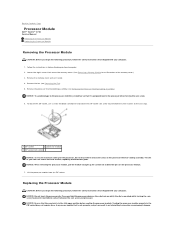
.... Remove the fan (see Removing the Processor Thermal-Cooling Assembly). Lift the processor module from the ZIF socket. Back to Contents Page Processor Module Dell™ Vostro™ 1710 Service Manual Removing the Processor Module Replacing the Processor Module Removing the Processor Module CAUTION: Before you begin the following procedure, follow the safety...
.... Remove the fan (see Removing the Processor Thermal-Cooling Assembly). Lift the processor module from the ZIF socket. Back to Contents Page Processor Module Dell™ Vostro™ 1710 Service Manual Removing the Processor Module Replacing the Processor Module Removing the Processor Module CAUTION: Before you begin the following procedure, follow the safety...
Service Manual
Page 11
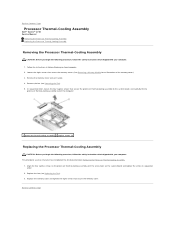
... system board and tighten the screws in sequential order. 2. Replace the fan (see Removing the Fan). 5. Back to Contents Page Processor Thermal-Cooling Assembly Dell™ Vostro™ 1710 Service Manual Removing the Processor Thermal-Cooling Assembly Replacing the Processor Thermal-Cooling Assembly Removing the Processor Thermal-Cooling Assembly CAUTION: Before you have...
... system board and tighten the screws in sequential order. 2. Replace the fan (see Removing the Fan). 5. Back to Contents Page Processor Thermal-Cooling Assembly Dell™ Vostro™ 1710 Service Manual Removing the Processor Thermal-Cooling Assembly Replacing the Processor Thermal-Cooling Assembly Removing the Processor Thermal-Cooling Assembly CAUTION: Before you have...
Service Manual
Page 12
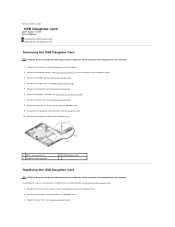
... the safety instructions that shipped with your computer. 1. Replace the M2.5 x 5-mm screw to secure the daughter card to Contents Page USB Daughter Card Dell™ Vostro™ 1710 Service Manual Removing the USB Daughter Card Replacing the USB Daughter Card Removing the USB Daughter Card CAUTION: Before you have completed the removal...
... the safety instructions that shipped with your computer. 1. Replace the M2.5 x 5-mm screw to secure the daughter card to Contents Page USB Daughter Card Dell™ Vostro™ 1710 Service Manual Removing the USB Daughter Card Replacing the USB Daughter Card Removing the USB Daughter Card CAUTION: Before you have completed the removal...
Service Manual
Page 14
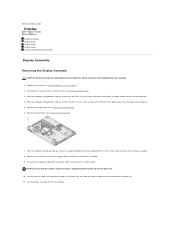
... screws that secures the display cable to the base of the computer. 5. NOTICE: Ensure that shipped with your computer. 1. Back to Contents Page Display Dell™ Vostro™ 1710 Service Manual Display Assembly Display Bezel Display Panel Display Cable Camera and Microphone Assembly Display Assembly Removing the Display Assembly CAUTION: Before you begin...
... screws that secures the display cable to the base of the computer. 5. NOTICE: Ensure that shipped with your computer. 1. Back to Contents Page Display Dell™ Vostro™ 1710 Service Manual Display Assembly Display Bezel Display Panel Display Cable Camera and Microphone Assembly Display Assembly Removing the Display Assembly CAUTION: Before you begin...
Service Manual
Page 21
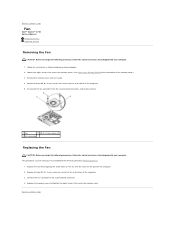
... procedure assumes that secure the memory cover. Follow the instructions in Before Working on the base of the computer. 3. Back to Contents Page Fan Dell™ Vostro™ 1710 Service Manual Removing the Fan Replacing the Fan Removing the Fan CAUTION: Before you begin the following procedure, follow the safety instructions that shipped...
... procedure assumes that secure the memory cover. Follow the instructions in Before Working on the base of the computer. 3. Back to Contents Page Fan Dell™ Vostro™ 1710 Service Manual Removing the Fan Replacing the Fan Removing the Fan CAUTION: Before you begin the following procedure, follow the safety instructions that shipped...
Service Manual
Page 22
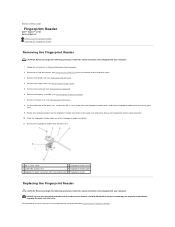
... hard drive cover. 3. Remove the hard drive cover. Follow the instructions in Before Working on the palm rest upward to Contents Page Fingerprint Reader Dell™ Vostro™ 1710 Service Manual Removing the Fingerprint Reader Replacing the Fingerprint Reader Removing the Fingerprint Reader CAUTION: Before you begin the following procedure, follow the safety...
... hard drive cover. 3. Remove the hard drive cover. Follow the instructions in Before Working on the palm rest upward to Contents Page Fingerprint Reader Dell™ Vostro™ 1710 Service Manual Removing the Fingerprint Reader Replacing the Fingerprint Reader Removing the Fingerprint Reader CAUTION: Before you begin the following procedure, follow the safety...
Service Manual
Page 24
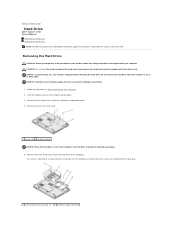
... with your computer before removing the hard drive. CAUTION: Do not touch the metal housing of the hard drive, and the other than Dell. Exercise care when handling the hard drive. 1. Loosen the five screws that secure the hard drive to a metal tab on Your Computer...the three screws that secure the hard-drive compartment cover. 4. Back to Contents Page Hard Drive Dell™ Vostro™ 1710 Service Manual Removing the Hard Drive Replacing the Hard Drive NOTE: Dell does not guarantee compatibility or provide support for hard drives obtained from the computer while the drive...
... with your computer before removing the hard drive. CAUTION: Do not touch the metal housing of the hard drive, and the other than Dell. Exercise care when handling the hard drive. 1. Loosen the five screws that secure the hard drive to a metal tab on Your Computer...the three screws that secure the hard-drive compartment cover. 4. Back to Contents Page Hard Drive Dell™ Vostro™ 1710 Service Manual Removing the Hard Drive Replacing the Hard Drive NOTE: Dell does not guarantee compatibility or provide support for hard drives obtained from the computer while the drive...
Service Manual
Page 26
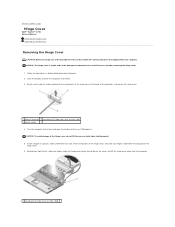
... computer, and loosen the hinge cover. 1 back of computer 2 raised part of hinge cover (one on right side Back to Contents Page Hinge Cover Dell™ Vostro™ 1710 Service Manual Removing the Hinge Cover Replacing the Hinge Cover Removing the Hinge Cover CAUTION: Before you begin any of the procedures in Before...
... computer, and loosen the hinge cover. 1 back of computer 2 raised part of hinge cover (one on right side Back to Contents Page Hinge Cover Dell™ Vostro™ 1710 Service Manual Removing the Hinge Cover Replacing the Hinge Cover Removing the Hinge Cover CAUTION: Before you begin any of the procedures in Before...
Service Manual
Page 28
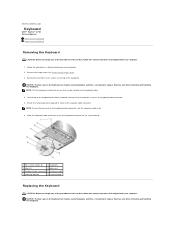
...: Before you begin any of the procedures in this section, follow the safety instructions that shipped with your computer. Back to Contents Page Keyboard Dell™ Vostro™ 1710 Service Manual Removing the Keyboard Replacing the Keyboard Removing the Keyboard CAUTION: Before you begin any of the procedures in this section, follow the...
...: Before you begin any of the procedures in this section, follow the safety instructions that shipped with your computer. Back to Contents Page Keyboard Dell™ Vostro™ 1710 Service Manual Removing the Keyboard Replacing the Keyboard Removing the Keyboard CAUTION: Before you begin any of the procedures in this section, follow the...
Service Manual
Page 30
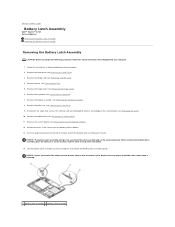
... cover (see Removing the Card). 10. Remove the M2 x 3-mm screw from the battery release button. 13. Back to Contents Page Battery Latch Assembly Dell™ Vostro™ 1710 Service Manual Removing the Battery Latch Assembly Replacing the Battery Latch Assembly Removing the Battery Latch Assembly CAUTION: Before you remove the battery release...
... cover (see Removing the Card). 10. Remove the M2 x 3-mm screw from the battery release button. 13. Back to Contents Page Battery Latch Assembly Dell™ Vostro™ 1710 Service Manual Removing the Battery Latch Assembly Replacing the Battery Latch Assembly Removing the Battery Latch Assembly CAUTION: Before you remove the battery release...
Service Manual
Page 32
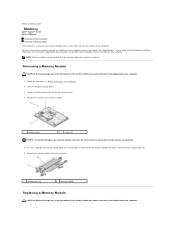
Back to Contents Page Memory Dell™ Vostro™ 1710 Service Manual Removing a Memory Module Replacing a Memory Module Your computer has two user-accessible SODIMM sockets, both accessed from the bottom of the procedures in ... damage to the memory module connector, do not use tools to carefully spread apart the securing clips on Your Computer. 2. Remove the memory module from Dell are intended for information on the memory supported by installing memory modules on the system board. Install only memory modules that are covered under your...
Back to Contents Page Memory Dell™ Vostro™ 1710 Service Manual Removing a Memory Module Replacing a Memory Module Your computer has two user-accessible SODIMM sockets, both accessed from the bottom of the procedures in ... damage to the memory module connector, do not use tools to carefully spread apart the securing clips on Your Computer. 2. Remove the memory module from Dell are intended for information on the memory supported by installing memory modules on the system board. Install only memory modules that are covered under your...
Service Manual
Page 34
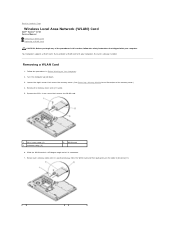
If you begin any of the procedures in Before Working on the cable to Contents Page Wireless Local Area Network (WLAN) Card Dell™ Vostro™ 1710 Service Manual Removing a WLAN Card Replacing a WLAN Card CAUTION: Before you ordered a WLAN card with your computer, the card is positioned away from the WLAN ...
If you begin any of the procedures in Before Working on the cable to Contents Page Wireless Local Area Network (WLAN) Card Dell™ Vostro™ 1710 Service Manual Removing a WLAN Card Replacing a WLAN Card CAUTION: Before you ordered a WLAN card with your computer, the card is positioned away from the WLAN ...

Service Manual
Page 36
...: Before you begin any of the hard drive cover. 3. Replace the display assembly (see Removing the Palm Rest). 8. Back to Contents Page Optical Drive Dell™ Vostro™ 1710 Service Manual Removing the Optical Drive Replacing the Optical Drive Removing the Optical Drive CAUTION: Before you have completed the removal procedure Removing the...
...: Before you begin any of the hard drive cover. 3. Replace the display assembly (see Removing the Palm Rest). 8. Back to Contents Page Optical Drive Dell™ Vostro™ 1710 Service Manual Removing the Optical Drive Replacing the Optical Drive Removing the Optical Drive CAUTION: Before you have completed the removal procedure Removing the...
Service Manual
Page 38
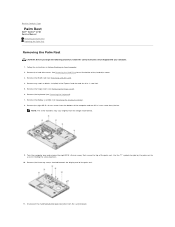
... slot. 5. Remove the hinge cover (see Removing a WLAN Card). 4. Back to assist in Before Working on the palm rest to Contents Page Palm Rest Dell™ Vostro™ 1710 Service Manual Removing the Palm Rest Replacing the Palm Rest Removing the Palm Rest CAUTION: Before you begin the following procedure, follow the safety...
... slot. 5. Remove the hinge cover (see Removing a WLAN Card). 4. Back to assist in Before Working on the palm rest to Contents Page Palm Rest Dell™ Vostro™ 1710 Service Manual Removing the Palm Rest Replacing the Palm Rest Removing the Palm Rest CAUTION: Before you begin the following procedure, follow the safety...
Service Manual
Page 41
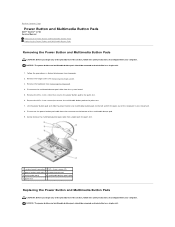
... (see Removing the Keyboard). 4. Disconnect the power-button pad cable from the system board. 5. Back to Contents Page Power Button and Multimedia Button Pads Dell™ Vostro™ 1710 Service Manual Removing the Power Button and Multimedia Button Pads Replacing the Power Button and Multimedia Button Pads Removing the Power Button and Multimedia...
... (see Removing the Keyboard). 4. Disconnect the power-button pad cable from the system board. 5. Back to Contents Page Power Button and Multimedia Button Pads Dell™ Vostro™ 1710 Service Manual Removing the Power Button and Multimedia Button Pads Replacing the Power Button and Multimedia Button Pads Removing the Power Button and Multimedia...


