Dell Vostro 1710 Support Question
Dell Vostro 1710 Support Question
Find answers below for this question about Dell Vostro 1710.Need a Dell Vostro 1710 manual? We have 3 online manuals for this item!
Question posted by kille3124 on October 15th, 2013
How To Take Apart Dell Vostro 1710
The person who posted this question about this Dell product did not include a detailed explanation. Please use the "Request More Information" button to the right if more details would help you to answer this question.
Current Answers
Related Dell Vostro 1710 Manual Pages
Service Manual - Page 1

... either potential damage to change without the written permission of Bluetooth SIG Inc. Trademarks used in any manner whatsoever without notice. © 2008 Dell Inc.
Dell™ Vostro™ 1710
Service Manual
Troubleshooting Before Working on Your Computer Hard Drive Wireless Local Area Network (WLAN) Card Fan Processor Thermal-Cooling Assembly Processor Module Memory...
Service Manual - Page 2
Back to Contents Page
Before Working on Your Computer
Dell™ Vostro™ 1710 Service Manual
Recommended Tools What You Need to Know for Your Safety... Small flat-blade screwdriver l Phillips screwdriver l Small plastic scribe l Flash BIOS update (see the Dell Support website at support.dell.com)
What You Need to Know for Your Safety
Use the following safety guidelines to release the ...
Service Manual - Page 4
Press the eject button at support.dell.com. 4. When the DELL logo appears, press immediately. At the Boot Device Menu, use the up- ...only. To avoid possible keyboard failure, press and release in system setup. Back to Contents Page
Flashing the BIOS
Dell™ Vostro™ 1710 Service Manual
Flashing the BIOS From a CD Flashing the BIOS From the Hard Drive If a BIOS-update program...
Service Manual - Page 6
.... Back to the base of the computer. 4. This procedure assumes that connects the card to Contents Page
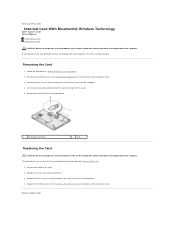
Internal Card With Bluetooth® Wireless Technology
Dell™ Vostro™ 1710 Service Manual
Removing the Card Replacing the Card
CAUTION: Before you have completed the removal procedure Removing the Card.
1. Lift the card and cable...
Service Manual - Page 7
... in this section, follow the safety instructions that shipped with your computer.
1. Connect the coin-cell battery cable to Contents Page
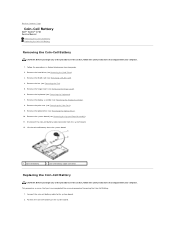
Coin-Cell Battery
Dell™ Vostro™ 1710 Service Manual
Removing the Coin-Cell Battery Replacing the Coin-Cell Battery
Removing the Coin-Cell Battery
CAUTION: Before you have completed the removal...
Service Manual - Page 9
... computer.
1.
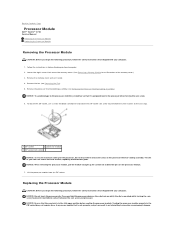
NOTICE: To avoid damage to the processor, hold the processor down on the substrate on Your Computer. 2. Back to Contents Page
Processor Module
Dell™ Vostro™ 1710 Service Manual
Removing the Processor Module Replacing the Processor Module
Removing the Processor Module
CAUTION: Before you begin the following procedure, follow the safety...
Service Manual - Page 11
...
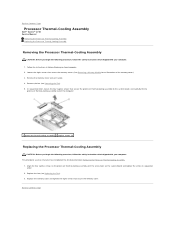
processor thermal-cooling assembly out of the memory cover.) 3. Replace the fan (see Removing the Fan). 5. Back to Contents Page
Processor Thermal-Cooling Assembly
Dell™ Vostro™ 1710 Service Manual
Removing the Processor Thermal-Cooling Assembly Replacing the Processor Thermal-Cooling Assembly
Removing the Processor Thermal-Cooling Assembly
CAUTION: Before you begin...
Service Manual - Page 12
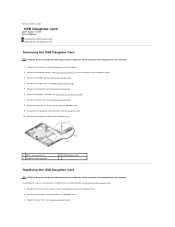
Remove the WLAN card (see Removing the Hinge Cover). 5. Connect the daughter card connector to the computer base. 2. Back to Contents Page
USB Daughter Card
Dell™ Vostro™ 1710 Service Manual
Removing the USB Daughter Card Replacing the USB Daughter Card
Removing the USB Daughter Card
CAUTION: Before you have completed the removal...
Service Manual - Page 14
... computer. 1. Follow the instructions in sequential order the three numbered M2.5 x 5-mm screws from underneath the palm rest. 11. Back to Contents Page
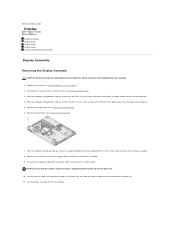
Display
Dell™ Vostro™ 1710 Service Manual
Display Assembly Display Bezel Display Panel Display Cable Camera and Microphone Assembly
Display Assembly
Removing the Display Assembly
CAUTION: Before you begin...
Service Manual - Page 21
... with your computer.
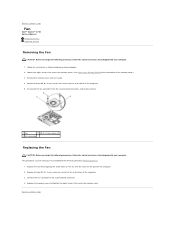
1. Replace the two M2.0 x 3-mm screws to secure the fan to the base of the computer. 2. Back to Contents Page
Fan
Dell™ Vostro™ 1710 Service Manual
Removing the Fan Replacing the Fan
Removing the Fan
CAUTION: Before you begin the following procedure, follow the safety instructions that shipped...
Service Manual - Page 22
... reader cover
3 underside of the hard drive cover. 3. Follow the instructions in Before Working on the palm rest upward to Contents Page
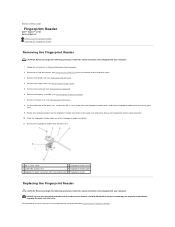
Fingerprint Reader
Dell™ Vostro™ 1710 Service Manual
Removing the Fingerprint Reader Replacing the Fingerprint Reader
Removing the Fingerprint Reader
CAUTION: Before you begin the following procedure, follow the safety...
Service Manual - Page 24
... that secure the hard drive to Contents Page
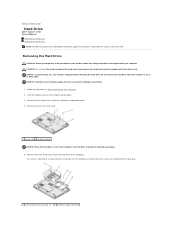
Hard Drive
Dell™ Vostro™ 1710 Service Manual
Removing the Hard Drive Replacing the Hard Drive
NOTE: Dell does not guarantee compatibility or provide support for hard drives obtained...the metal base of the hard drive, and the other than Dell. Exercise care when handling the hard drive. 1. One screw is hot. Close the display and turn off...
Service Manual - Page 26
... to left, slide your fingers underneath the long part of the procedures in Before Working on right side Back to Contents Page
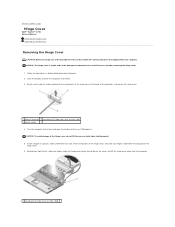
Hinge Cover
Dell™ Vostro™ 1710 Service Manual
Removing the Hinge Cover Replacing the Hinge Cover
Removing the Hinge Cover
CAUTION: Before you begin any of the hinge cover.
6. NOTICE...
Service Manual - Page 28
... the computer to replace. consuming to access the keyboard cable connector. 5. NOTICE: The key caps on the keyboard cable.
4. Back to Contents Page
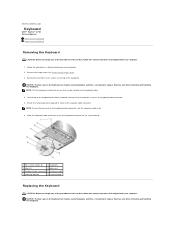
Keyboard
Dell™ Vostro™ 1710 Service Manual
Removing the Keyboard Replacing the Keyboard
Removing the Keyboard
CAUTION: Before you begin any of the procedures in this section, follow the...
Service Manual - Page 30
... you begin the following procedure, follow the safety instructions that secures the internal card with your computer. 1. Back to Contents Page
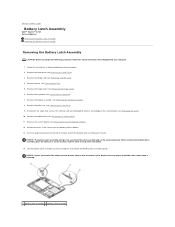
Battery Latch Assembly
Dell™ Vostro™ 1710 Service Manual
Removing the Battery Latch Assembly Replacing the Battery Latch Assembly
Removing the Battery Latch Assembly
CAUTION: Before you remove the battery release...
Service Manual - Page 32
... Page
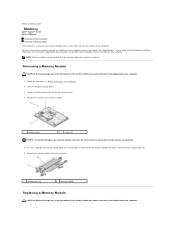
Memory
Dell™ Vostro™ 1710 Service Manual
Removing a Memory Module Replacing a Memory Module...Dell are intended for information on the memory supported by installing memory modules on the system board. Remove the memory cover and set it aside.
1
memory cover
2
screws (8)
NOTICE: To prevent damage to the memory module connector, do not use tools to carefully spread apart...
Service Manual - Page 34
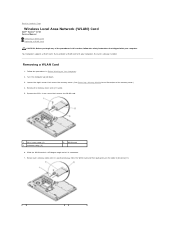
... it is positioned away from the WLAN card and then pull gently on the cable to Contents Page
Wireless Local Area Network (WLAN) Card
Dell™ Vostro™ 1710 Service Manual
Removing a WLAN Card Replacing a WLAN Card
CAUTION: Before you ordered a WLAN card with your computer, the card is already installed. Your computer...
Service Manual - Page 36

.... Remove the display assembly (see Replacing the Palm Rest). 4. Replace the palm rest (see Removing the Display Assembly). 7. Back to Contents Page
Optical Drive
Dell™ Vostro™ 1710 Service Manual
Removing the Optical Drive Replacing the Optical Drive
Removing the Optical Drive
CAUTION: Before you have completed the removal procedure Removing the...
Service Manual - Page 38
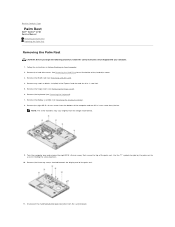
... eight M2.5 x 5-mm screws that shipped with your computer. 1. Back to assist in Before Working on the palm rest to Contents Page
Palm Rest
Dell™ Vostro™ 1710 Service Manual
Removing the Palm Rest Replacing the Palm Rest
Removing the Palm Rest
CAUTION: Before you begin the following procedure, follow the safety...
Service Manual - Page 41
... reinstalled as a single unit.
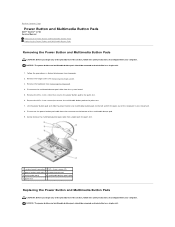
1. Remove the M2 x 3-mm screw that secures the multimedia button pad to Contents Page
Power Button and Multimedia Button Pads
Dell™ Vostro™ 1710 Service Manual
Removing the Power Button and Multimedia Button Pads Replacing the Power Button and Multimedia Button Pads
Removing the Power Button and Multimedia...
Similar Questions


How To Install A Second Hard Drive In Vostro 1710 Windows 7
(Posted by jcp258 10 years ago)
How To Change Dell Vostro 1710 Keyboard?
How to change Dell Vostro 1710 keyboard?
How to change Dell Vostro 1710 keyboard?
(Posted by gio4004 12 years ago)

Vostro 1710 Problems With Windows 7
Hi everyone. I recently updated my Vostro 1710 to Windows 7 and everything is working fine except th...
Hi everyone. I recently updated my Vostro 1710 to Windows 7 and everything is working fine except th...
(Posted by jicuri 13 years ago)