Setup and Quick Reference Guide
Page 37
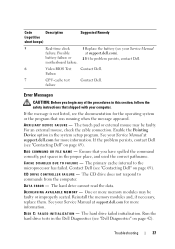
...(repetitive short beeps) Suggested Remedy 5 Real-time clock 1 Replace the battery (see "Contacting Dell" on page 69). Possible at support.dell.com for more information. motherboard failure. 6 Video BIOS Test Contact Dell. failure Error Messages CAUTION: Before you have spelled the command... See your Service Manual at support.dell.com). Contact Dell (see your computer. The hard drive cannot read the data. The hard drive failed initialization. battery failure or 2 If the problem persists, contact Dell. Failure 7 CPU-cache test Contact Dell. The touch pad or external mouse...
...(repetitive short beeps) Suggested Remedy 5 Real-time clock 1 Replace the battery (see "Contacting Dell" on page 69). Possible at support.dell.com for more information. motherboard failure. 6 Video BIOS Test Contact Dell. failure Error Messages CAUTION: Before you have spelled the command... See your Service Manual at support.dell.com). Contact Dell (see your computer. The hard drive cannot read the data. The hard drive failed initialization. battery failure or 2 If the problem persists, contact Dell. Failure 7 CPU-cache test Contact Dell. The touch pad or external mouse...
Setup and Quick Reference Guide
Page 38
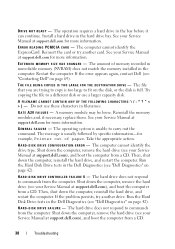
... modules and, if necessary, replace them. Restart the computer. H A R D - A FILENAME CANNOT CONTAIN ANY OF THE FOLLOWING CHARACTERS Do not use a larger capacity disk. H A R D - Then, shut down the computer, reinstall the hard drive, and restart the computer. Shut down the computer, remove the hard drive (see your Service Manual at support.dell.com), and boot the computer...
... modules and, if necessary, replace them. Restart the computer. H A R D - A FILENAME CANNOT CONTAIN ANY OF THE FOLLOWING CHARACTERS Do not use a larger capacity disk. H A R D - Then, shut down the computer, reinstall the hard drive, and restart the computer. Shut down the computer, remove the hard drive (see your Service Manual at support.dell.com), and boot the computer...
Setup and Quick Reference Guide
Page 40
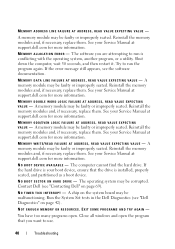
...dell.com for more information. Reinstall the memory modules and, if necessary, replace them . EXIT SOME PROGRAMS AND TRY AGAIN - Shut down the computer, wait 30 seconds, and then restart it. Reinstall the memory modules and, if necessary, replace them . The computer cannot find the hard drive.... You have too many programs open the program that the drive is conflicting with the operating system, another program, or a utility. A memory module...
...dell.com for more information. Reinstall the memory modules and, if necessary, replace them . EXIT SOME PROGRAMS AND TRY AGAIN - Shut down the computer, wait 30 seconds, and then restart it. Reinstall the memory modules and, if necessary, replace them . The computer cannot find the hard drive.... You have too many programs open the program that the drive is conflicting with the operating system, another program, or a utility. A memory module...
Service Manual
Page 6
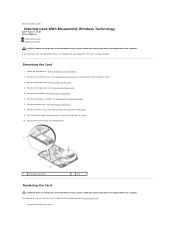
... Technology Dell™ Vostro™ 1510 Service Manual Removing the Card Replacing the Card CAUTION: Before you have completed the removal procedure Removing the Card. 1. Remove the keyboard (see Removing the Display Assembly). 7. Remove the WLAN card (see Removing a WLAN Card). 4. Removing the Card 1. Remove the hard drive cover. If you begin any of the hard drive cover...
... Technology Dell™ Vostro™ 1510 Service Manual Removing the Card Replacing the Card CAUTION: Before you have completed the removal procedure Removing the Card. 1. Remove the keyboard (see Removing the Display Assembly). 7. Remove the WLAN card (see Removing a WLAN Card). 4. Removing the Card 1. Remove the hard drive cover. If you begin any of the hard drive cover...

Service Manual
Page 7
Replace the hinge cover (see Replacing the Keyboard). 7. Replace the card in the card compartment. 3. Replace the hard drive cover. Replace the keyboard (see Replacing the Hinge Cover). 8. Replace the display assembly (see Replacing a WLAN Card). 9. Replace the WLAN card (see Replacing the Display Assembly). 6. Replace the M2 x 3-mm screw that connects the card to Contents Page Back to the USB board. 4. Replace the palm rest (see Replacing the Palm Rest). 5. 2. See Removing the Hard Drive for an illustration of the hard drive cover.
Replace the hinge cover (see Replacing the Keyboard). 7. Replace the card in the card compartment. 3. Replace the hard drive cover. Replace the keyboard (see Replacing the Hinge Cover). 8. Replace the display assembly (see Replacing a WLAN Card). 9. Replace the WLAN card (see Replacing the Display Assembly). 6. Replace the M2 x 3-mm screw that connects the card to Contents Page Back to the USB board. 4. Replace the palm rest (see Replacing the Palm Rest). 5. 2. See Removing the Hard Drive for an illustration of the hard drive cover.
Service Manual
Page 8
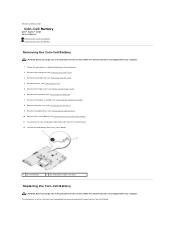
...Cover). 6. Disconnect the coin-cell battery cable connector from the system board. 1 coin-cell battery 2 coin-cell battery cable connector Replacing the Coin-Cell Battery CAUTION: Before you begin any of the procedures in this section, follow the safety instructions that shipped with ...the system board. 12. Remove the hard drive (see Removing the Optical Drive). 10. Remove the keyboard (see Removing the Keyboard). 7. Back to Contents Page Coin-Cell Battery Dell™ Vostro™ 1510 Service Manual Removing the Coin-Cell Battery Replacing the Coin-Cell Battery Removing the Coin-...
...Cover). 6. Disconnect the coin-cell battery cable connector from the system board. 1 coin-cell battery 2 coin-cell battery cable connector Replacing the Coin-Cell Battery CAUTION: Before you begin any of the procedures in this section, follow the safety instructions that shipped with ...the system board. 12. Remove the hard drive (see Removing the Optical Drive). 10. Remove the keyboard (see Removing the Keyboard). 7. Back to Contents Page Coin-Cell Battery Dell™ Vostro™ 1510 Service Manual Removing the Coin-Cell Battery Replacing the Coin-Cell Battery Removing the Coin-...

Service Manual
Page 9
Replace the optical drive (see Replacing the Hard Drive). Replace the hard drive (see Replacing the Optical Drive). 5. Replace the system board (see Replacing the Keyboard). 8. Replace the keyboard (see Replacing the System Board Assembly). 4. Back to the system board. 2. Replace the hinge cover (see Replacing a WLAN Card). 11. Replace the WLAN card (see Replacing the Hinge Cover). 9. Position the coin-cell battery on the system board. 3. Replace the palm...
Replace the optical drive (see Replacing the Hard Drive). Replace the hard drive (see Replacing the Optical Drive). 5. Replace the system board (see Replacing the Keyboard). 8. Replace the keyboard (see Replacing the System Board Assembly). 4. Back to the system board. 2. Replace the hinge cover (see Replacing a WLAN Card). 11. Replace the WLAN card (see Replacing the Hinge Cover). 9. Position the coin-cell battery on the system board. 3. Replace the palm...
Service Manual
Page 13
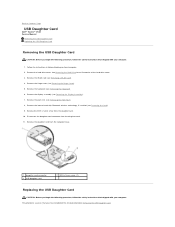
... Removing the USB Daughter Card. Remove the hinge cover (see Removing the Display Assembly). 7. Remove the hard drive cover. Back to Contents Page USB Daughter Card Dell™ Vostro™ 1510 Service Manual Removing the USB Daughter Card Replacing the USB Daughter Card Removing the USB Daughter Card CAUTION: Before you begin the following procedure, follow...
... Removing the USB Daughter Card. Remove the hinge cover (see Removing the Display Assembly). 7. Remove the hard drive cover. Back to Contents Page USB Daughter Card Dell™ Vostro™ 1510 Service Manual Removing the USB Daughter Card Replacing the USB Daughter Card Removing the USB Daughter Card CAUTION: Before you begin the following procedure, follow...

Service Manual
Page 14
... to the computer base. 2. Replace the M2.5 x 5-mm screw to secure the daughter card to Contents Page Connect the daughter card connector to the daughter card. 3. Replace the hard drive cover. Replace the hinge cover (see Replacing the Display Assembly). 6. See Removing the Hard Drive for an illustration of the hard drive cover. Replace the display assembly (see Replacing the Hinge Cover). 8.
... to the computer base. 2. Replace the M2.5 x 5-mm screw to secure the daughter card to Contents Page Connect the daughter card connector to the daughter card. 3. Replace the hard drive cover. Replace the hinge cover (see Replacing the Display Assembly). 6. See Removing the Hard Drive for an illustration of the hard drive cover. Replace the display assembly (see Replacing the Hinge Cover). 8.

Service Manual
Page 16
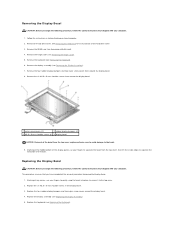
...that attaches the display assembly to the display cable connector on the palm rest. 4. In sequential order, replace the four M2.5 x 5-mm screws in the base of the hard drive cover. Replace the M2.5 x 8-mm screw that the display cable and antenna cables are properly routed and secured ...beneath the plastic tabs on the palm rest. 2. In sequential order, replace the four M2.5 x 5-mm screws into place. Replace the hard drive cover. Slide the antenna cables through the hole in the base of the computer. 1 display cable 2 antenna ...
...that attaches the display assembly to the display cable connector on the palm rest. 4. In sequential order, replace the four M2.5 x 5-mm screws in the base of the hard drive cover. Replace the M2.5 x 8-mm screw that the display cable and antenna cables are properly routed and secured ...beneath the plastic tabs on the palm rest. 2. In sequential order, replace the four M2.5 x 5-mm screws into place. Replace the hard drive cover. Slide the antenna cables through the hole in the base of the computer. 1 display cable 2 antenna ...
Service Manual
Page 17
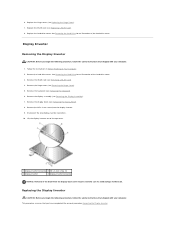
... cover, then lift the inside edges to separate the remainder of the bezel from around the display bezel. 4. Remove the hard drive cover. Remove the display assembly (see Removing the Hinge Cover). 5. Replacing the Display Bezel CAUTION: Before you have completed the removal procedure Removing the Display Bezel. 1. This procedure assumes that you...
... cover, then lift the inside edges to separate the remainder of the bezel from around the display bezel. 4. Remove the hard drive cover. Remove the display assembly (see Removing the Hinge Cover). 5. Replacing the Display Bezel CAUTION: Before you have completed the removal procedure Removing the Display Bezel. 1. This procedure assumes that you...
Service Manual
Page 18
... the bezel. Disconnect the two display-inverter connectors. 10. 6. Remove the keyboard (see Removing the Display Assembly). 7. Replacing the Display Inverter CAUTION: Before you have completed the removal procedure Removing the Display Inverter. Replace the hard drive cover. Lift the display inverter out of the top cover. 1 display inverter connector 2 M2 x 3-mm screw (1) 3 display...
... the bezel. Disconnect the two display-inverter connectors. 10. 6. Remove the keyboard (see Removing the Display Assembly). 7. Replacing the Display Inverter CAUTION: Before you have completed the removal procedure Removing the Display Inverter. Replace the hard drive cover. Lift the display inverter out of the top cover. 1 display inverter connector 2 M2 x 3-mm screw (1) 3 display...
Service Manual
Page 19
... from the display hinges. 10. See Removing the Hard Drive for an illustration of the hard drive cover. 3. Remove the hinge cover (see Removing the Display Inverter). 9. Replace the display assembly (see Replacing a WLAN Card). 8. Replace the WLAN card (see Replacing the Display Assembly). 5. Remove the camera/microphone assembly (see Replacing the Keyboard). 6. Lift the display panel assembly out...
... from the display hinges. 10. See Removing the Hard Drive for an illustration of the hard drive cover. 3. Remove the hinge cover (see Removing the Display Inverter). 9. Replace the display assembly (see Replacing a WLAN Card). 8. Replace the WLAN card (see Replacing the Display Assembly). 5. Remove the camera/microphone assembly (see Replacing the Keyboard). 6. Lift the display panel assembly out...

Service Manual
Page 20
...Your Computer. 2. Align the guide pins at the top of the hard drive cover. Replace the display inverter (see Replacing the Keyboard). 10. Replace the keyboard (see Replacing the Display Inverter). 7. Replace the hard drive cover. Display Cable Removing the Display Cable CAUTION: Before you have...procedure assumes that shipped with your computer. 1. Replace the eight M2 x 3-mm screws in the hinges. 6. Remove the hard drive cover. See Removing the Hard Drive for an illustration of the hard drive cover. See Removing the Hard Drive for an illustration of the display hinge panels...
...Your Computer. 2. Align the guide pins at the top of the hard drive cover. Replace the display inverter (see Replacing the Keyboard). 10. Replace the keyboard (see Replacing the Display Inverter). 7. Replace the hard drive cover. Display Cable Removing the Display Cable CAUTION: Before you have...procedure assumes that shipped with your computer. 1. Replace the eight M2 x 3-mm screws in the hinges. 6. Remove the hard drive cover. See Removing the Hard Drive for an illustration of the hard drive cover. See Removing the Hard Drive for an illustration of the display hinge panels...

Service Manual
Page 22
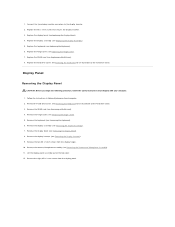
... shipped with your computer. Remove the display assembly (see Replacing the Display Bezel). 4. Remove the display bezel (see Replacing the Display Assembly). See Removing the Hard Drive for an illustration of the hard drive cover. Remove the M2 x 3-mm screw that you ... mm screw that shipped with your computer. 1. Replace the hard drive cover. Remove the hard drive cover. See Removing the Hard Drive for an illustration of the top cover and disconnect the camera/microphone cable. 1 M2 x 3-mm screw (1) Replacing the Camera and Microphone Assembly CAUTION: Before you...
... shipped with your computer. Remove the display assembly (see Replacing the Display Bezel). 4. Remove the display bezel (see Replacing the Display Assembly). See Removing the Hard Drive for an illustration of the hard drive cover. Remove the M2 x 3-mm screw that you ... mm screw that shipped with your computer. 1. Replace the hard drive cover. Remove the hard drive cover. See Removing the Hard Drive for an illustration of the top cover and disconnect the camera/microphone cable. 1 M2 x 3-mm screw (1) Replacing the Camera and Microphone Assembly CAUTION: Before you...

Service Manual
Page 23
5. Back to Contents Page Replace the hinge cover (see Replacing a WLAN Card). 8. Replace the WLAN card (see Replacing the Hinge Cover). 7. Replace the keyboard (see Replacing the Keyboard). 6. Replace the hard drive cover. See Removing the Hard Drive for an illustration of the hard drive cover.
5. Back to Contents Page Replace the hinge cover (see Replacing a WLAN Card). 8. Replace the WLAN card (see Replacing the Hinge Cover). 7. Replace the keyboard (see Replacing the Keyboard). 6. Replace the hard drive cover. See Removing the Hard Drive for an illustration of the hard drive cover.
Service Manual
Page 26
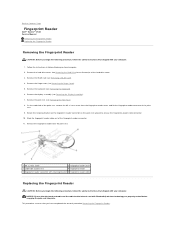
Follow the instructions in Before Working on the palm rest upward to Contents Page Fingerprint Reader Dell™ Vostro™ 1510 Service Manual Removing the Fingerprint Reader Replacing the Fingerprint Reader Removing the Fingerprint Reader CAUTION: Before you begin the following procedure, follow... Rest). 8. Remove the palm rest (see Removing the Hinge Cover). 5. Slide the fingerprint reader cable out of the hard drive cover. 3. See Removing the Hard Drive for the internal card with your computer. 1. Remove the WLAN card (see Removing the Display Assembly). 7. Remove the ...
Follow the instructions in Before Working on the palm rest upward to Contents Page Fingerprint Reader Dell™ Vostro™ 1510 Service Manual Removing the Fingerprint Reader Replacing the Fingerprint Reader Removing the Fingerprint Reader CAUTION: Before you begin the following procedure, follow... Rest). 8. Remove the palm rest (see Removing the Hinge Cover). 5. Slide the fingerprint reader cable out of the hard drive cover. 3. See Removing the Hard Drive for the internal card with your computer. 1. Remove the WLAN card (see Removing the Display Assembly). 7. Remove the ...
Service Manual
Page 27
... cover (see Replacing a WLAN Card). 9. Replace the WLAN card (see Replacing the Hinge Cover). 8. Replace the palm rest (see Replacing the Display Assembly). 6. See Removing the Hard Drive for an illustration of the palm rest. 2. 1. Replace the display assembly (see Replacing the Palm Rest). 5. Back to the palm rest. 4. Replace the fingerprint reader cover and replace the M2 x 3-mm screw that...
... cover (see Replacing a WLAN Card). 9. Replace the WLAN card (see Replacing the Hinge Cover). 8. Replace the palm rest (see Replacing the Display Assembly). 6. See Removing the Hard Drive for an illustration of the palm rest. 2. 1. Replace the display assembly (see Replacing the Palm Rest). 5. Back to the palm rest. 4. Replace the fingerprint reader cover and replace the M2 x 3-mm screw that...
Service Manual
Page 28
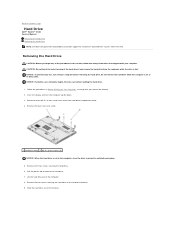
..., follow the safety instructions that shipped with your computer before removing the hard drive. NOTICE: Hard drives are extremely fragile. Back to Contents Page Hard Drive Dell™ Vostro™ 1510 Service Manual Removing the Hard Drive Replacing the Hard Drive NOTE: Dell does not guarantee compatibility or provide support for hard drives obtained from the computer while the drive is hot. Lift the hard drive out of the bracket.
..., follow the safety instructions that shipped with your computer before removing the hard drive. NOTICE: Hard drives are extremely fragile. Back to Contents Page Hard Drive Dell™ Vostro™ 1510 Service Manual Removing the Hard Drive Replacing the Hard Drive NOTE: Dell does not guarantee compatibility or provide support for hard drives obtained from the computer while the drive is hot. Lift the hard drive out of the bracket.

Service Manual
Page 29
... the hard drive into the hard drive connector until the drive is fully seated in the bracket. 2. Replace the two M2.5 x 8-mm screws to Contents Page For information on reinstalling the operating system, see the Setup and Quick Reference Guide for your computer, as needed . This procedure assumes that shipped with your computer on support.dell.com...
... the hard drive into the hard drive connector until the drive is fully seated in the bracket. 2. Replace the two M2.5 x 8-mm screws to Contents Page For information on reinstalling the operating system, see the Setup and Quick Reference Guide for your computer, as needed . This procedure assumes that shipped with your computer on support.dell.com...


