Owner's Manual
Page 4
... as Your Primary Display 44 Microsoft Windows XP 44 Windows Vista 45 Using Catalyst® Control Center 45 Launching Catalyst Control Center 46 5 Using the Keyboard and Touch Pad . . . . 47 Numeric Keypad 47 Key Combinations 48 System Functions 48 Battery 48 CD or DVD Tray 48 Display Functions 48 4 Contents
... as Your Primary Display 44 Microsoft Windows XP 44 Windows Vista 45 Using Catalyst® Control Center 45 Launching Catalyst Control Center 46 5 Using the Keyboard and Touch Pad . . . . 47 Numeric Keypad 47 Key Combinations 48 System Functions 48 Battery 48 CD or DVD Tray 48 Display Functions 48 4 Contents
Owner's Manual
Page 5
Power Management 48 Speaker Functions 49 Microsoft® Windows® Logo Key Functions . . . . 49 Adjusting Keyboard Settings 49 Touch Pad 50 Customizing the Touch Pad 51 6 Using a Battery 53 Battery Performance 53 Checking the Battery Charge 54 Dell™ QuickSet Battery Meter 54 Microsoft® Windows® Power Meter 55 Charge Gauge 55...
Power Management 48 Speaker Functions 49 Microsoft® Windows® Logo Key Functions . . . . 49 Adjusting Keyboard Settings 49 Touch Pad 50 Customizing the Touch Pad 51 6 Using a Battery 53 Battery Performance 53 Checking the Battery Charge 54 Dell™ QuickSet Battery Meter 54 Microsoft® Windows® Power Meter 55 Charge Gauge 55...
Owner's Manual
Page 8
Memory 95 Modem 98 Hinge Cover 100 Keyboard 101 Wireless Mini-Card 103 Coin-Cell Battery 106 Display 107 12 Troubleshooting 111 Dell Technical Update Service 111 Dell Diagnostics 111 Dell Support Center 116 Dell Support 116 Dell PC TuneUp 117 Dell PC Checkup 118 Dell Network Assistant 118 DellConnect 118 Drive Problems 119 Optical drive problems 119 Hard drive problems 120 E-Mail, Modem, and Internet Problems 121 Error Messages 123 ExpressCard Problems 128 IEEE 1394 Device Problems 128 8 Contents
Memory 95 Modem 98 Hinge Cover 100 Keyboard 101 Wireless Mini-Card 103 Coin-Cell Battery 106 Display 107 12 Troubleshooting 111 Dell Technical Update Service 111 Dell Diagnostics 111 Dell Support Center 116 Dell Support 116 Dell PC TuneUp 117 Dell PC Checkup 118 Dell Network Assistant 118 DellConnect 118 Drive Problems 119 Optical drive problems 119 Hard drive problems 120 E-Mail, Modem, and Internet Problems 121 Error Messages 123 ExpressCard Problems 128 IEEE 1394 Device Problems 128 8 Contents
Owner's Manual
Page 9
Keyboard Problems 129 External Keyboard problems 129 Unexpected characters 130 Lockups and Software Problems 130 The computer does not start 130 The computer stops responding 131 A program stops responding or crashes repeatedly 131 A program is designed for an earlier Microsoft® Windows® operating system . . . . . 131 A solid blue screen appears 132 Dell MediaDirect problems...
Keyboard Problems 129 External Keyboard problems 129 Unexpected characters 130 Lockups and Software Problems 130 The computer does not start 130 The computer stops responding 131 A program stops responding or crashes repeatedly 131 A program is designed for an earlier Microsoft® Windows® operating system . . . . . 131 A solid blue screen appears 132 Dell MediaDirect problems...

Owner's Manual
Page 11
Only 182 FCC Class B 182 Macrovision Product Notice 183 Glossary 185 Index 203 Contents 11 Travel Tips 162 Traveling by Air 163 15 Contacting Dell 165 16 Specifications 167 17 Appendix 175 Using the System Setup Program 175 Viewing the System Setup Screens 176 Commonly Used Options 177 Cleaning Your Computer 179 Computer, Keyboard, and Display 179 Touch Pad 180 Mouse 180 Floppy Drive 181 CDs and DVDs 181 FCC Notice (U.S.
Only 182 FCC Class B 182 Macrovision Product Notice 183 Glossary 185 Index 203 Contents 11 Travel Tips 162 Traveling by Air 163 15 Contacting Dell 165 16 Specifications 167 17 Appendix 175 Using the System Setup Program 175 Viewing the System Setup Screens 176 Commonly Used Options 177 Cleaning Your Computer 179 Computer, Keyboard, and Display 179 Touch Pad 180 Mouse 180 Floppy Drive 181 CDs and DVDs 181 FCC Notice (U.S.

Owner's Manual
Page 20
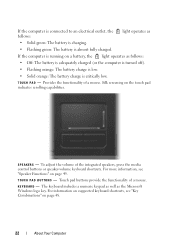
Front View 10 9 8 1 2 3 4 5 6 7 1 display latch release 2 display latches (2) 4 power button 5 device status lights 7 speakers (2) 8 touch pad buttons 10 keyboard and wireless status lights 3 display 6 touch pad 9 keyboard 20 About Your Computer
Front View 10 9 8 1 2 3 4 5 6 7 1 display latch release 2 display latches (2) 4 power button 5 device status lights 7 speakers (2) 8 touch pad buttons 10 keyboard and wireless status lights 3 display 6 touch pad 9 keyboard 20 About Your Computer
Owner's Manual
Page 22
... computer is running on the touch pad indicates scrolling capabilities. Provides the functionality of the integrated speakers, press the media control buttons or speaker-volume keyboard shortcuts. To adjust the volume of a mouse. K E Y B O A R D - For more information, see "Key Combinations" on page 49. T O U C H...off). • Flashing orange: The battery charge is low. • Solid orange: The battery charge is critically low. The keyboard includes a numeric keypad as well as the Microsoft Windows logo key. Touch pad buttons provide the functionality of a mouse. Silk ...
... computer is running on the touch pad indicates scrolling capabilities. Provides the functionality of the integrated speakers, press the media control buttons or speaker-volume keyboard shortcuts. To adjust the volume of a mouse. K E Y B O A R D - For more information, see "Key Combinations" on page 49. T O U C H...off). • Flashing orange: The battery charge is low. • Solid orange: The battery charge is critically low. The keyboard includes a numeric keypad as well as the Microsoft Windows logo key. Touch pad buttons provide the functionality of a mouse. Silk ...

Owner's Manual
Page 23
Turns on when wireless networking is enabled. To enable or disable wireless networking, press . About Your Computer 23 Turns on when the scroll lock function is enabled. A Turns on when the numeric keypad is enabled. KEYBOARD AND WIRELESS STATUS LIGHTS The green lights located above the keyboard indicate the following: 9 Turns on when the uppercase letter function is enabled.
Turns on when wireless networking is enabled. To enable or disable wireless networking, press . About Your Computer 23 Turns on when the scroll lock function is enabled. A Turns on when the numeric keypad is enabled. KEYBOARD AND WIRELESS STATUS LIGHTS The green lights located above the keyboard indicate the following: 9 Turns on when the uppercase letter function is enabled.
Owner's Manual
Page 26
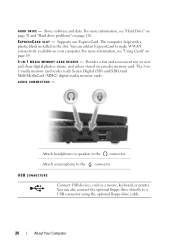
... Secure Digital (SD) card/SDIO and MultiMediaCard (MMC) digital media memory cards. Attach a microphone to the connector. USB CONNECTORS Connect USB devices, such as a mouse, keyboard, or printer. Attach headphones or speakers to the connector. H A R D D R I A M E M O R Y C A R D R E A D E R - You can add an ExpressCard to make WWAN connectivity available on page 120...
... Secure Digital (SD) card/SDIO and MultiMediaCard (MMC) digital media memory cards. Attach a microphone to the connector. USB CONNECTORS Connect USB devices, such as a mouse, keyboard, or printer. Attach headphones or speakers to the connector. H A R D D R I A M E M O R Y C A R D R E A D E R - You can add an ExpressCard to make WWAN connectivity available on page 120...

Owner's Manual
Page 28
.... For additional information on using the network adapter, see the online modem documentation supplied with your computer. USB CONNECTORS Connect USB devices, such as a mouse, keyboard, or printer. The green and yellow lights next to the modem connector. NOTICE: The network connector is slightly larger than the modem connector. You can...
.... For additional information on using the network adapter, see the online modem documentation supplied with your computer. USB CONNECTORS Connect USB devices, such as a mouse, keyboard, or printer. The green and yellow lights next to the modem connector. NOTICE: The network connector is slightly larger than the modem connector. You can...
Owner's Manual
Page 41
... make a note of the current settings so you can change back to the previous settings if you attach to your computer is running on the keyboard. You can press the following keys to adjust display brightness: • Press and the up - Making Images and Text Look Bigger or Sharper...read if you try to change the brightness level, the Brightness Meter may appear on an external monitor). Using the Display Adjusting Brightness When a Dell™ computer is connected to an external monitor and you change . or down -arrow key to decrease brightness on the integrated display only ...
... make a note of the current settings so you can change back to the previous settings if you attach to your computer is running on the keyboard. You can press the following keys to adjust display brightness: • Press and the up - Making Images and Text Look Bigger or Sharper...read if you try to change the brightness level, the Brightness Meter may appear on an external monitor). Using the Display Adjusting Brightness When a Dell™ computer is connected to an external monitor and you change . or down -arrow key to decrease brightness on the integrated display only ...
Owner's Manual
Page 47
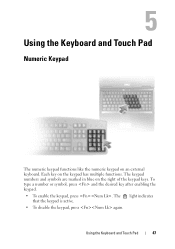
Using the Keyboard and Touch Pad Numeric Keypad The numeric keypad functions like the numeric keypad on the right of the keypad keys. To type a number or symbol, press and the desired key after enabling the keypad. • To enable the keypad, press . Using the Keyboard and Touch Pad 47 The 9 light indicates that the keypad is active. • To disable the keypad, press again. The keypad numbers and symbols are marked in blue on an external keyboard. Each key on the keypad has multiple functions.
Using the Keyboard and Touch Pad Numeric Keypad The numeric keypad functions like the numeric keypad on the right of the keypad keys. To type a number or symbol, press and the desired key after enabling the keypad. • To enable the keypad, press . Using the Keyboard and Touch Pad 47 The 9 light indicates that the keypad is active. • To disable the keypad, press again. The keypad numbers and symbols are marked in blue on an external keyboard. Each key on the keypad has multiple functions.
Owner's Manual
Page 48
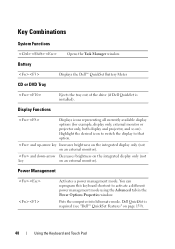
...; QuickSet Battery Meter Display Functions Ejects the tray out of the drive (if Dell QuickSet is required (see "Dell™ QuickSet Features" on an external monitor). Power Management Activates a power management mode. You can reprogram this keyboard shortcut to that option. and up-arrow key Increases brightness on the integrated display only (not...
...; QuickSet Battery Meter Display Functions Ejects the tray out of the drive (if Dell QuickSet is required (see "Dell™ QuickSet Features" on an external monitor). Power Management Activates a power management mode. You can reprogram this keyboard shortcut to that option. and up-arrow key Increases brightness on the integrated display only (not...

Owner's Manual
Page 49
...174; Logo Key Functions Windows logo key and Minimizes all open the Control Panel and click Keyboard. Windows logo key and Opens the System Properties dialog box. Using the Keyboard and Touch Pad 49 Windows logo key and Restores all windows previously minimized with the use of... attached. Windows logo key and Opens the Run dialog box. This command functions as the character repeat rate, open windows. Adjusting Keyboard Settings To adjust keyboard operation, such as a toggle to a network). To access the Help and Support Center, see the Windows Help and Support Center...
...174; Logo Key Functions Windows logo key and Minimizes all open the Control Panel and click Keyboard. Windows logo key and Opens the System Properties dialog box. Using the Keyboard and Touch Pad 49 Windows logo key and Restores all windows previously minimized with the use of... attached. Windows logo key and Opens the Run dialog box. This command functions as the character repeat rate, open windows. Adjusting Keyboard Settings To adjust keyboard operation, such as a toggle to a network). To access the Help and Support Center, see the Windows Help and Support Center...

Owner's Manual
Page 50
Use the touch pad and touch pad buttons as you to press the left touch-pad button twice. 50 Using the Keyboard and Touch Pad On the second tap, leave your finger on the touch pad and move (or drag) an object, position the cursor on the ...
Use the touch pad and touch pad buttons as you to press the left touch-pad button twice. 50 Using the Keyboard and Touch Pad On the second tap, leave your finger on the touch pad and move (or drag) an object, position the cursor on the ...

Owner's Manual
Page 51
... sides to disable the touch pad or adjust its settings. 1 Open the Control Panel, click Printers and Other Hardware, and then click Mouse. Using the Keyboard and Touch Pad 51 To access the Help and Support Center, see the Windows Help and Support Center. Customizing the Touch Pad You can use...
... sides to disable the touch pad or adjust its settings. 1 Open the Control Panel, click Printers and Other Hardware, and then click Mouse. Using the Keyboard and Touch Pad 51 To access the Help and Support Center, see the Windows Help and Support Center. Customizing the Touch Pad You can use...

Owner's Manual
Page 52
52 Using the Keyboard and Touch Pad
52 Using the Keyboard and Touch Pad

Owner's Manual
Page 101
1 2 1 hinge cover 2 scribe Keyboard CAUTION: Before you begin any of the computer). See "Hinge Cover" on page 89. 2 Open the display. 3 Remove the hinge cover. Adding and Replacing Parts ...
1 2 1 hinge cover 2 scribe Keyboard CAUTION: Before you begin any of the computer). See "Hinge Cover" on page 89. 2 Open the display. 3 Remove the hinge cover. Adding and Replacing Parts ...

Owner's Manual
Page 102
... replacing the two screws. 102 Adding and Replacing Parts c To release the keyboard cable from the keyboard connector on the system board, rotate the plastic bar on the keyboard connector to the front of the computer. 1 2 3 4 5 1 keyboard screws (2) 2 keyboard 3 tabs 4 keyboard cable 5 plastic bar on keyboard connector NOTICE: To avoid scratching the palm rest when replacing the...
... replacing the two screws. 102 Adding and Replacing Parts c To release the keyboard cable from the keyboard connector on the system board, rotate the plastic bar on the keyboard connector to the front of the computer. 1 2 3 4 5 1 keyboard screws (2) 2 keyboard 3 tabs 4 keyboard cable 5 plastic bar on keyboard connector NOTICE: To avoid scratching the palm rest when replacing the...

Owner's Manual
Page 103
... two antenna cables from the battery bay before you begin working inside the computer. 1 Follow the procedures in the Product Information Guide. See "Keyboard" on page 100. 3 Remove the keyboard. If you ordered a Mini-Card with your computer, the card is not already installed, go to the system board, you must remove...
... two antenna cables from the battery bay before you begin working inside the computer. 1 Follow the procedures in the Product Information Guide. See "Keyboard" on page 100. 3 Remove the keyboard. If you ordered a Mini-Card with your computer, the card is not already installed, go to the system board, you must remove...


