
Owner's Manual
Page 7
...Network Card 81 Mobile Broadband/Wireless Wide Area Network (WWAN 82 What You Need to Establish a Mobile Broadband Network Connection 82 Checking Your Dell Mobile Broadband Card . . . . 83 Microsoft® Windows® Firewall 83 10 Securing Your Computer 85 Security Cable Lock 85 Passwords... 85 Computer Tracking Software 86 If Your Computer Is Lost or Stolen 86 11 Adding and Replacing Parts 89 Before You Begin 89 Recommended Tools 89 Turning Off Your Computer 89 Before Working Inside Your Computer 90 Optical Drive 92 Hard Drive 92 Returning a Hard Drive to Dell 94 Contents 7
...Network Card 81 Mobile Broadband/Wireless Wide Area Network (WWAN 82 What You Need to Establish a Mobile Broadband Network Connection 82 Checking Your Dell Mobile Broadband Card . . . . 83 Microsoft® Windows® Firewall 83 10 Securing Your Computer 85 Security Cable Lock 85 Passwords... 85 Computer Tracking Software 86 If Your Computer Is Lost or Stolen 86 11 Adding and Replacing Parts 89 Before You Begin 89 Recommended Tools 89 Turning Off Your Computer 89 Before Working Inside Your Computer 90 Optical Drive 92 Hard Drive 92 Returning a Hard Drive to Dell 94 Contents 7
Owner's Manual
Page 29
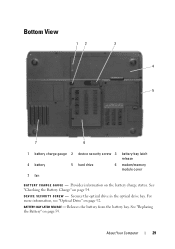
... gauge 2 device security screw 3 battery-bay latch release 4 battery 5 hard drive 6 modem/memory module cover 7 fan B A T T E R Y C H A R G E G A U G E - D E V I C E S E C U R I T Y S C R E W - For more information, see "Optical Drive" on the battery charge status. About Your Computer 29 Provides information on page 92. Releases the battery from the battery bay. See "Replacing the Battery" on page 54. See "Checking the Battery...
... gauge 2 device security screw 3 battery-bay latch release 4 battery 5 hard drive 6 modem/memory module cover 7 fan B A T T E R Y C H A R G E G A U G E - D E V I C E S E C U R I T Y S C R E W - For more information, see "Optical Drive" on the battery charge status. About Your Computer 29 Provides information on page 92. Releases the battery from the battery bay. See "Replacing the Battery" on page 54. See "Checking the Battery...
Owner's Manual
Page 91
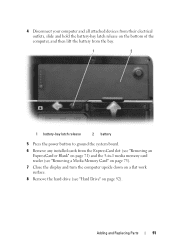
Adding and Replacing Parts 91 4 Disconnect your computer and all attached devices from their electrical outlets, slide and hold the battery-bay latch release on the bottom of ... card reader (see "Removing a Media Memory Card" on page 73). 7 Close the display and turn the computer upside down on a flat work surface. 8 Remove the hard drive (see "Hard Drive" on page 92).
Adding and Replacing Parts 91 4 Disconnect your computer and all attached devices from their electrical outlets, slide and hold the battery-bay latch release on the bottom of ... card reader (see "Removing a Media Memory Card" on page 73). 7 Close the display and turn the computer upside down on a flat work surface. 8 Remove the hard drive (see "Hard Drive" on page 92).
Owner's Manual
Page 92
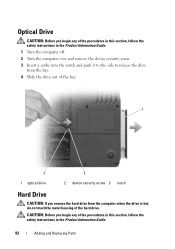
...hard drive from the bay. 4 Slide the drive out of the bay. 1 3 2 1 optical drive 2 device security screw 3 notch Hard Drive CAUTION: If you begin any of the hard drive. Optical Drive... CAUTION: Before you begin any of the procedures in this section, follow the safety instructions in the Product Information Guide. 1 Turn the computer off. 2 Turn the computer over and remove the device security screw. 3 Insert a scribe into the notch and push it to the side to release the drive... from the computer when the drive is hot, do not touch...
...hard drive from the bay. 4 Slide the drive out of the bay. 1 3 2 1 optical drive 2 device security screw 3 notch Hard Drive CAUTION: If you begin any of the hard drive. Optical Drive... CAUTION: Before you begin any of the procedures in this section, follow the safety instructions in the Product Information Guide. 1 Turn the computer off. 2 Turn the computer over and remove the device security screw. 3 Insert a scribe into the notch and push it to the side to release the drive... from the computer when the drive is hot, do not touch...

Owner's Manual
Page 93
..." on the new hard drive. To replace the hard drive in the hard drive bay: 1 Follow the procedures in hibernate mode. NOTICE: Hard drives are installing a hard drive from sources other than Dell. NOTE: If you need to install an operating system, drivers, and utilities on page 89. 2 Turn the computer over, and remove the hard drive screws. 1 2 1 hard drive screws (2) 2 hard drive Adding and Replacing Parts 93 See...
..." on the new hard drive. To replace the hard drive in the hard drive bay: 1 Follow the procedures in hibernate mode. NOTICE: Hard drives are installing a hard drive from sources other than Dell. NOTE: If you need to install an operating system, drivers, and utilities on page 89. 2 Turn the computer over, and remove the hard drive screws. 1 2 1 hard drive screws (2) 2 hard drive Adding and Replacing Parts 93 See...

Owner's Manual
Page 94
... it in the Product Information Guide. 3 Slide the hard drive out of the computer. 4 Remove the new drive from its original or comparable foam packaging. NOTICE: Use firm and even pressure to Dell in transit. 2 1 1 foam packaging 2 hard drive 94 Adding and Replacing Parts See "Restoring Your Microsoft® Windows Vista®...drivers and utilities for your computer. If you use excessive force, you may be damaged in its packaging. NOTICE: When the hard drive is fully seated. 6 Replace and tighten the hard drive screws. 7 Install the operating system for your computer. Otherwise, the...
... it in the Product Information Guide. 3 Slide the hard drive out of the computer. 4 Remove the new drive from its original or comparable foam packaging. NOTICE: Use firm and even pressure to Dell in transit. 2 1 1 foam packaging 2 hard drive 94 Adding and Replacing Parts See "Restoring Your Microsoft® Windows Vista®...drivers and utilities for your computer. If you use excessive force, you may be damaged in its packaging. NOTICE: When the hard drive is fully seated. 6 Replace and tighten the hard drive screws. 7 Install the operating system for your computer. Otherwise, the...
Owner's Manual
Page 97
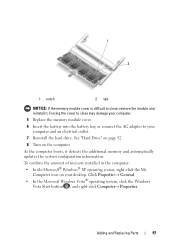
... and right-click Computer→ Properties. 1 2 1 notch 2 tab NOTICE: If the memory module cover is difficult to close may damage your computer. 5 Replace the memory module cover. 6 Insert the battery into the battery bay, or connect the AC adapter to close , remove the module and reinstall it detects...: • In the Microsoft® Windows® XP operating system, right-click the My Computer icon on the computer. Adding and Replacing Parts 97 Forcing the cover to your desktop. See "Hard Drive" on page 92. 8 Turn on your computer and an electrical outlet. 7 Reinstall the...
... and right-click Computer→ Properties. 1 2 1 notch 2 tab NOTICE: If the memory module cover is difficult to close may damage your computer. 5 Replace the memory module cover. 6 Insert the battery into the battery bay, or connect the AC adapter to close , remove the module and reinstall it detects...: • In the Microsoft® Windows® XP operating system, right-click the My Computer icon on the computer. Adding and Replacing Parts 97 Forcing the cover to your desktop. See "Hard Drive" on page 92. 8 Turn on your computer and an electrical outlet. 7 Reinstall the...
Owner's Manual
Page 123
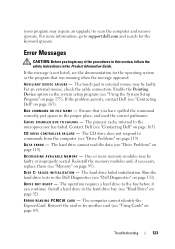
... can continue. Contact Dell (see "Using the System Setup Program" on page 69). The hard drive cannot read the data (see "Using Cards" on page 175). Reinsert the card or try another card (see "Drive Problems" on page 92). Troubleshooting 123 The hard drive failed initialization. AU X I L I L U R E - Reinstall the memory modules and, if necessary, replace them (see...
... can continue. Contact Dell (see "Using the System Setup Program" on page 69). The hard drive cannot read the data (see "Using Cards" on page 175). Reinsert the card or try another card (see "Drive Problems" on page 92). Troubleshooting 123 The hard drive failed initialization. AU X I L I L U R E - Reinstall the memory modules and, if necessary, replace them (see...

Owner's Manual
Page 124
... installed in the Dell Diagnostics (see "Hard Drive" on page 92), and boot the computer from a CD. The hard drive does not respond to carry out the command. Then, shut down the computer, reinstall the hard drive, and restart the computer. The hard drive may be defective. Reinstall the memory modules and, if necessary, replace them (see "Hard Drive" on page 92...
... installed in the Dell Diagnostics (see "Hard Drive" on page 92), and boot the computer from a CD. The hard drive does not respond to carry out the command. Then, shut down the computer, reinstall the hard drive, and restart the computer. The hard drive may be defective. Reinstall the memory modules and, if necessary, replace them (see "Hard Drive" on page 92...
Owner's Manual
Page 126
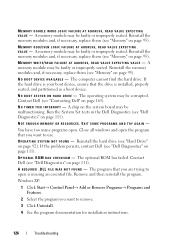
... RESOURCES. EXIT SOME PROGRAMS AND TRY AGAIN - Reinstall the memory modules and, if necessary, replace them (see "Dell Diagnostics" on the system board may be faulty or improperly seated. Contact Dell (see "Hard Drive" on page 165). Reinstall the hard drive (see "Contacting Dell" on page 92). OPTIONAL ROM B A D CHECKSUM - Remove and then reinstall the program. Windows XP...
... RESOURCES. EXIT SOME PROGRAMS AND TRY AGAIN - Reinstall the memory modules and, if necessary, replace them (see "Dell Diagnostics" on the system board may be faulty or improperly seated. Contact Dell (see "Hard Drive" on page 165). Reinstall the hard drive (see "Contacting Dell" on page 92). OPTIONAL ROM B A D CHECKSUM - Remove and then reinstall the program. Windows XP...

Owner's Manual
Page 205
..., 69, 71 CardBus technology, 69 extended, 69 installing, 70 Mobile Broadband, 69 removing, 71 slots, 69 types, 69 WWAN, 69 H hard drive description, 26, 30 problems, 120 replacing, 92 returning to Dell, 94 hardware Dell Diagnostics, 111 Hardware Troubleshooter, 147 Help and Support Center, 17 help file Windows Help and Support Center, 17 hibernate mode...
..., 69, 71 CardBus technology, 69 extended, 69 installing, 70 Mobile Broadband, 69 removing, 71 slots, 69 types, 69 WWAN, 69 H hard drive description, 26, 30 problems, 120 replacing, 92 returning to Dell, 94 hardware Dell Diagnostics, 111 Hardware Troubleshooter, 147 Help and Support Center, 17 help file Windows Help and Support Center, 17 hibernate mode...
Service Manual
Page 2
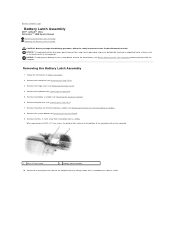
...base by lifting it away with a screwdriver or a plastic scribe. Remove the hard drive (see Removing the Processor Thermal-Cooling Assembly). 8. Remove the processor thermal-cooling assembly (see Removing the Hard Drive). 3. Back to the system board, remove the main battery (see Before Working...Before You Begin. 2. NOTICE: To help prevent damage to Contents Page Battery Latch Assembly Dell™ Latitude™ 131L/ Dell Vostro™ 1000 Service Manual Removing the Battery Latch Assembly Replacing the Battery Latch Assembly CAUTION: Before you remove the M2 x 2.7-mm screw, the ...
...base by lifting it away with a screwdriver or a plastic scribe. Remove the hard drive (see Removing the Processor Thermal-Cooling Assembly). 8. Remove the processor thermal-cooling assembly (see Removing the Hard Drive). 3. Back to the system board, remove the main battery (see Before Working...Before You Begin. 2. NOTICE: To help prevent damage to Contents Page Battery Latch Assembly Dell™ Latitude™ 131L/ Dell Vostro™ 1000 Service Manual Removing the Battery Latch Assembly Replacing the Battery Latch Assembly CAUTION: Before you remove the M2 x 2.7-mm screw, the ...

Service Manual
Page 3
... Processor Thermal-Cooling Assembly). 6. Ensure that the newly installed latch moves smoothly and freely when pushed and released. 4. Replace the processor thermal-cooling assembly (see Replacing the Palm Rest). 7. Replace the hard drive (see Replacing the System Board). 5. Replace the system board (see Replacing the Hard Drive). 1 hook 2 spring 11. Back to Contents Page Insert the latch assembly into place...
... Processor Thermal-Cooling Assembly). 6. Ensure that the newly installed latch moves smoothly and freely when pushed and released. 4. Replace the processor thermal-cooling assembly (see Replacing the Palm Rest). 7. Replace the hard drive (see Replacing the System Board). 5. Replace the system board (see Replacing the Hard Drive). 1 hook 2 spring 11. Back to Contents Page Insert the latch assembly into place...
Service Manual
Page 8
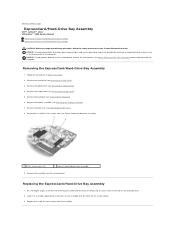
... Inside Your Computer) before working inside the computer. NOTICE: To help prevent damage to Contents Page ExpressCard/Hard-Drive Bay Assembly Dell™ Latitude™ 131L/ Dell Vostro™ 1000 Service Manual Removing the ExpressCard/Hard-Drive Bay Assembly Replacing the ExpressCard/Hard-Drive Bay Assembly CAUTION: Before you begin the following procedure, follow the safety instructions in Before You Begin...
... Inside Your Computer) before working inside the computer. NOTICE: To help prevent damage to Contents Page ExpressCard/Hard-Drive Bay Assembly Dell™ Latitude™ 131L/ Dell Vostro™ 1000 Service Manual Removing the ExpressCard/Hard-Drive Bay Assembly Replacing the ExpressCard/Hard-Drive Bay Assembly CAUTION: Before you begin the following procedure, follow the safety instructions in Before You Begin...
Service Manual
Page 25
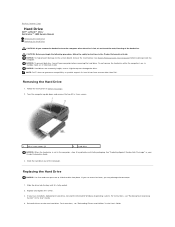
... the two M3 x 3-mm screws. 1 M3 x 3-mm screws (2) 2 hard drive NOTICE: When the hard drive is fully seated. 2. Slide the hard drive out of the hard drive. Back to Contents Page Hard Drive Dell™ Latitude™ 131L/ Dell Vostro™ 1000 Service Manual Removing the Hard Drive Replacing the Hard Drive CAUTION: If you remove the hard drive from sources other than Dell. NOTICE: To prevent data loss, turn off your...
... the two M3 x 3-mm screws. 1 M3 x 3-mm screws (2) 2 hard drive NOTICE: When the hard drive is fully seated. 2. Slide the hard drive out of the hard drive. Back to Contents Page Hard Drive Dell™ Latitude™ 131L/ Dell Vostro™ 1000 Service Manual Removing the Hard Drive Replacing the Hard Drive CAUTION: If you remove the hard drive from sources other than Dell. NOTICE: To prevent data loss, turn off your...
Service Manual
Page 42
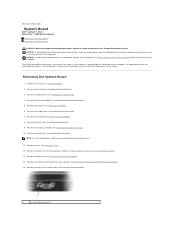
... (see Removing the ExpressCard/Hard-Drive Bay Assembly). 15. Remove the two hex-nut video screws from the back of the computer. Remove the fan (see Removing the Hinge Cover). 7. Back to Contents Page System Board Dell™ Latitude™ 131L/ Dell Vostro™ 1000 Service Manual Removing the System Board Replacing the System Board CAUTION: Before...
... (see Removing the ExpressCard/Hard-Drive Bay Assembly). 15. Remove the two hex-nut video screws from the back of the computer. Remove the fan (see Removing the Hinge Cover). 7. Back to Contents Page System Board Dell™ Latitude™ 131L/ Dell Vostro™ 1000 Service Manual Removing the System Board Replacing the System Board CAUTION: Before...
Service Manual
Page 43
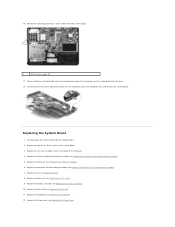
... slowly ease the connectors out of the computer. 4. Replacing the System Board 1. Replace the Mini-Card (see Replacing the Processor Module). 6. Replace the two hex-nut video screws in the system board. 3. Replace the processor (see Replacing a Mini-Card). 11. Replace the keyboard (see Replacing the ExpressCard/Hard-Drive Bay Assembly). 5. 16. Replace the two M2.5 x 5-mm screws in the back...
... slowly ease the connectors out of the computer. 4. Replacing the System Board 1. Replace the Mini-Card (see Replacing the Processor Module). 6. Replace the two hex-nut video screws in the system board. 3. Replace the processor (see Replacing a Mini-Card). 11. Replace the keyboard (see Replacing the ExpressCard/Hard-Drive Bay Assembly). 5. 16. Replace the two M2.5 x 5-mm screws in the back...
Service Manual
Page 44
... up the computer to boot from a CD this one time only. Replace the optical drive (see Replacing the Modem). 14. NOTICE: Before turning on . Back to update the BIOS on the screen. Replace the hard drive (see Replacing the Memory Module(s)). 15. Insert the flash BIOS update program CD that... a BIOS update program CD to flash the BIOS, press before inserting the CD so that accompanied the replacement system board into the optical drive. Replace the memory module(s) (see Replacing the Hard Drive). 17. Replace the main battery (see Before Working Inside Your Computer). 13.
... up the computer to boot from a CD this one time only. Replace the optical drive (see Replacing the Modem). 14. NOTICE: Before turning on . Back to update the BIOS on the screen. Replace the hard drive (see Replacing the Memory Module(s)). 15. Insert the flash BIOS update program CD that... a BIOS update program CD to flash the BIOS, press before inserting the CD so that accompanied the replacement system board into the optical drive. Replace the memory module(s) (see Replacing the Hard Drive). 17. Replace the main battery (see Before Working Inside Your Computer). 13.


