Service Manual
Page 1
NOTE: The color of your computer. is shown in this text: Dell, the DELL logo, Vostro, and Latitude are registered trademarks of Dell Inc.; Information in this document to Microsoft® Windows® operating systems are not applicable. Trademarks used... If you make better use of your computer may be used in this document. Dell Inc. disclaims any manner whatsoever without notice. © 2007 Dell Inc. Dell™ Latitude™ 131L/Dell Vostro™ 1000 Service Manual Before You Begin Optical Drive Hard Drive Memory Module(s) Modem Mini-Card Keyboard Hinge...
NOTE: The color of your computer. is shown in this text: Dell, the DELL logo, Vostro, and Latitude are registered trademarks of Dell Inc.; Information in this document to Microsoft® Windows® operating systems are not applicable. Trademarks used... If you make better use of your computer may be used in this document. Dell Inc. disclaims any manner whatsoever without notice. © 2007 Dell Inc. Dell™ Latitude™ 131L/Dell Vostro™ 1000 Service Manual Before You Begin Optical Drive Hard Drive Memory Module(s) Modem Mini-Card Keyboard Hinge...
Service Manual
Page 2
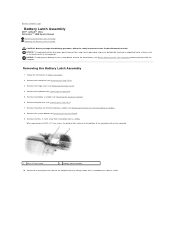
NOTICE: To help prevent damage to Contents Page Battery Latch Assembly Dell™ Latitude™ 131L/ Dell Vostro™ 1000 Service Manual Removing the Battery Latch Assembly Replacing the Battery Latch Assembly CAUTION: Before you remove the M2 x 2.7-mm screw, the battery latch release on the computer. ...
NOTICE: To help prevent damage to Contents Page Battery Latch Assembly Dell™ Latitude™ 131L/ Dell Vostro™ 1000 Service Manual Removing the Battery Latch Assembly Replacing the Battery Latch Assembly CAUTION: Before you remove the M2 x 2.7-mm screw, the battery latch release on the computer. ...
Service Manual
Page 4
...its edges, not by your computer (see Turning Off Your Computer). Unless otherwise noted, each procedure assumes that is not authorized by Dell is flat and clean to the computer, perform the following tools: l Small flat-blade screwdriver l Phillips screwdriver l Small plastic ...open programs before you pull connectors apart, keep them evenly aligned to Contents Page Before You Begin Dell™ Latitude™ 131L/ Dell Vostro™ 1000 Service Manual Recommended Tools Turning Off Your Computer Before Working Inside Your Computer This section provides procedures for removing and...
...its edges, not by your computer (see Turning Off Your Computer). Unless otherwise noted, each procedure assumes that is not authorized by Dell is flat and clean to the computer, perform the following tools: l Small flat-blade screwdriver l Phillips screwdriver l Small plastic ...open programs before you pull connectors apart, keep them evenly aligned to Contents Page Before You Begin Dell™ Latitude™ 131L/ Dell Vostro™ 1000 Service Manual Recommended Tools Turning Off Your Computer Before Working Inside Your Computer This section provides procedures for removing and...

Service Manual
Page 6
.... 2. NOTE: If you use a BIOS update program CD to flash the BIOS, set up the computer to Contents Page Flashing the BIOS Dell™ Latitude™ 131L/ Dell Vostro™ 1000 Service Manual 1. Back to boot and updates the new BIOS. The BIOS update program CD may not be available in and that appear on the...
.... 2. NOTE: If you use a BIOS update program CD to flash the BIOS, set up the computer to Contents Page Flashing the BIOS Dell™ Latitude™ 131L/ Dell Vostro™ 1000 Service Manual 1. Back to boot and updates the new BIOS. The BIOS update program CD may not be available in and that appear on the...
Service Manual
Page 7
..., you must remove the battery from the battery bay before you begin working inside the computer. Back to Contents Page Bluetooth® Card Dell™ Latitude™ 131L/ Dell Vostro™ 1000 Service Manual Removing a Bluetooth Card Replacing a Bluetooth Card CAUTION: Before you begin any of the procedures in this section, follow the safety instructions in...
..., you must remove the battery from the battery bay before you begin working inside the computer. Back to Contents Page Bluetooth® Card Dell™ Latitude™ 131L/ Dell Vostro™ 1000 Service Manual Removing a Bluetooth Card Replacing a Bluetooth Card CAUTION: Before you begin any of the procedures in this section, follow the safety instructions in...
Service Manual
Page 8
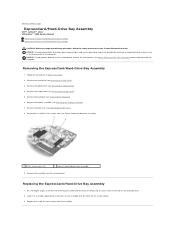
... Information Guide. Removing the ExpressCard/Hard-Drive Bay Assembly 1. NOTICE: To help prevent damage to Contents Page ExpressCard/Hard-Drive Bay Assembly Dell™ Latitude™ 131L/ Dell Vostro™ 1000 Service Manual Removing the ExpressCard/Hard-Drive Bay Assembly Replacing the ExpressCard/Hard-Drive Bay Assembly CAUTION: Before you begin the following procedure, follow the...
... Information Guide. Removing the ExpressCard/Hard-Drive Bay Assembly 1. NOTICE: To help prevent damage to Contents Page ExpressCard/Hard-Drive Bay Assembly Dell™ Latitude™ 131L/ Dell Vostro™ 1000 Service Manual Removing the ExpressCard/Hard-Drive Bay Assembly Replacing the ExpressCard/Hard-Drive Bay Assembly CAUTION: Before you begin the following procedure, follow the...
Service Manual
Page 10
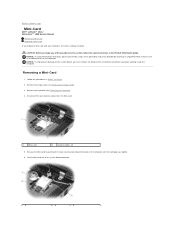
... before you ordered a Mini-Card with your computer, the card is already installed. NOTICE: To help prevent damage to Contents Page Mini-Card Dell™ Latitude™ 131L/ Dell Vostro™ 1000 Service Manual Removing a Mini-Card Replacing a Mini-Card If you begin any of its system board connector. CAUTION: Before you begin working inside the...
... before you ordered a Mini-Card with your computer, the card is already installed. NOTICE: To help prevent damage to Contents Page Mini-Card Dell™ Latitude™ 131L/ Dell Vostro™ 1000 Service Manual Removing a Mini-Card Replacing a Mini-Card If you begin any of its system board connector. CAUTION: Before you begin working inside the...
Service Manual
Page 12
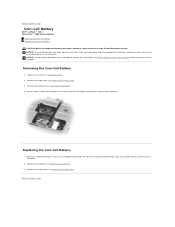
... it into the guide on the computer. Remove the hinge cover (see Removing the Keyboard). 4. Back to Contents Page Coin-Cell Battery Dell™ Latitude™ 131L/ Dell Vostro™ 1000 Service Manual Removing the Coin-Cell Battery Replacing the Coin-Cell Battery CAUTION: Before you replace the battery, insert it at a 30-degree angle under...
... it into the guide on the computer. Remove the hinge cover (see Removing the Keyboard). 4. Back to Contents Page Coin-Cell Battery Dell™ Latitude™ 131L/ Dell Vostro™ 1000 Service Manual Removing the Coin-Cell Battery Replacing the Coin-Cell Battery CAUTION: Before you replace the battery, insert it at a 30-degree angle under...
Service Manual
Page 13
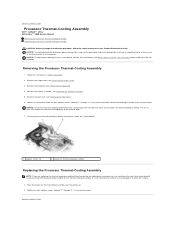
... unpainted metal surface (such as the back panel) on the processor thermal-cooling assembly. Back to Contents Page Processor Thermal-Cooling Assembly Dell™ Latitude™ 131L/ Dell Vostro™ 1000 Service Manual Removing the Processor Thermal-Cooling Assembly Replacing the Processor Thermal-Cooling Assembly CAUTION: Before you can place the new thermal pad directly on...
... unpainted metal surface (such as the back panel) on the processor thermal-cooling assembly. Back to Contents Page Processor Thermal-Cooling Assembly Dell™ Latitude™ 131L/ Dell Vostro™ 1000 Service Manual Removing the Processor Thermal-Cooling Assembly Replacing the Processor Thermal-Cooling Assembly CAUTION: Before you can place the new thermal pad directly on...
Service Manual
Page 15
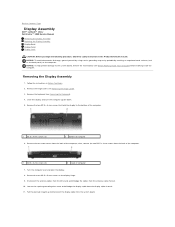
... the back of the computer. 1 M2.5 x 8-mm screws (2) 2 back of computer 6. Pull the pull-tab straight up to Contents Page Display Assembly Dell™ Latitude™ 131L/ Dell Vostro™ 1000 Service Manual Removing the Display Assembly Replacing the Display Assembly Display Bezel Display Panel Display Latch CAUTION: Before you begin the following procedure, follow the...
... the back of the computer. 1 M2.5 x 8-mm screws (2) 2 back of computer 6. Pull the pull-tab straight up to Contents Page Display Assembly Dell™ Latitude™ 131L/ Dell Vostro™ 1000 Service Manual Removing the Display Assembly Replacing the Display Assembly Display Bezel Display Panel Display Latch CAUTION: Before you begin the following procedure, follow the...

Service Manual
Page 21
... the system board, remove the main battery (see Before Working Inside Your Computer) before working inside the computer. Back to Contents Page Fan Dell™ Latitude™ 131L/ Dell Vostro™ 1000 Service Manual Removing a Fan Replacing a Fan CAUTION: Before you begin the following procedure, follow the safety instructions in the Product Information Guide. Remove the...
... the system board, remove the main battery (see Before Working Inside Your Computer) before working inside the computer. Back to Contents Page Fan Dell™ Latitude™ 131L/ Dell Vostro™ 1000 Service Manual Removing a Fan Replacing a Fan CAUTION: Before you begin the following procedure, follow the safety instructions in the Product Information Guide. Remove the...

Service Manual
Page 24
... tested in X one word (that file and folder names comply with a 3-character extension (.htm or .gif). X 14. X 8. Manually check all file names including the extensions are Web posted only, such as ®. Ensure that each of the directory, and is in ...Internet Explorer. Verify that are lowercase. 8.3 naming conventions do not contain spaces, slashes, colons, questions X marks, or extended characters such as Service Manuals). Links to one browser may not exceed 8 X characters with 8.3 naming conventions. There are relative and not hard-coded X 9. If ...
... tested in X one word (that file and folder names comply with a 3-character extension (.htm or .gif). X 14. X 8. Manually check all file names including the extensions are Web posted only, such as ®. Ensure that each of the directory, and is in ...Internet Explorer. Verify that are lowercase. 8.3 naming conventions do not contain spaces, slashes, colons, questions X marks, or extended characters such as Service Manuals). Links to one browser may not exceed 8 X characters with 8.3 naming conventions. There are relative and not hard-coded X 9. If ...
Service Manual
Page 25
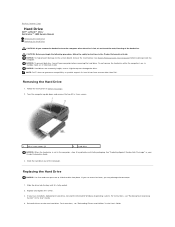
Back to Contents Page Hard Drive Dell™ Latitude™ 131L/ Dell Vostro™ 1000 Service Manual Removing the Hard Drive Replacing the Hard Drive CAUTION: If you remove the hard drive from sources other than Dell. Slide the hard drive out of the hard drive. For instructions, see "Reinstalling Drivers ...drive. Replace and tighten the screws. 3. For instructions, see Before Working Inside Your Computer) before removing the hard drive. NOTE: Dell™ does not guarantee compatibility or provide support for hard drives from the computer when the drive is hot, do not touch ...
Back to Contents Page Hard Drive Dell™ Latitude™ 131L/ Dell Vostro™ 1000 Service Manual Removing the Hard Drive Replacing the Hard Drive CAUTION: If you remove the hard drive from sources other than Dell. Slide the hard drive out of the hard drive. For instructions, see "Reinstalling Drivers ...drive. Replace and tighten the screws. 3. For instructions, see Before Working Inside Your Computer) before removing the hard drive. NOTE: Dell™ does not guarantee compatibility or provide support for hard drives from the computer when the drive is hot, do not touch ...
Service Manual
Page 27
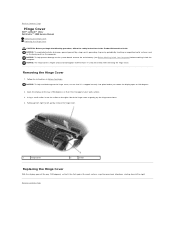
... following procedure, follow the safety instructions in Before You Begin. Be careful when removing the hinge cover. Back to Contents Page Hinge Cover Dell™ Latitude™ 131L/ Dell Vostro™ 1000 Service Manual Removing the Hinge Cover Replacing the Hinge Cover CAUTION: Before you rotate the display open all the way (180 degrees) so that...
... following procedure, follow the safety instructions in Before You Begin. Be careful when removing the hinge cover. Back to Contents Page Hinge Cover Dell™ Latitude™ 131L/ Dell Vostro™ 1000 Service Manual Removing the Hinge Cover Replacing the Hinge Cover CAUTION: Before you rotate the display open all the way (180 degrees) so that...

Service Manual
Page 28
... latch Replacing the Keyboard 1. Follow the procedures in the Product Information Guide. Slide the tabs on the computer. Back to Contents Page Keyboard Dell™ Latitude™ 131L/ Dell Vostro™ 1000 Service Manual Removing the Keyboard Replacing the Keyboard CAUTION: Before you begin the following procedure, follow the safety instructions in Before You Begin. 2. NOTICE...
... latch Replacing the Keyboard 1. Follow the procedures in the Product Information Guide. Slide the tabs on the computer. Back to Contents Page Keyboard Dell™ Latitude™ 131L/ Dell Vostro™ 1000 Service Manual Removing the Keyboard Replacing the Keyboard CAUTION: Before you begin the following procedure, follow the safety instructions in Before You Begin. 2. NOTICE...
Service Manual
Page 30
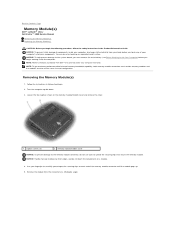
...: To prevent static damage to the system board, you must be of your computer's electronic components. Back to Contents Page Memory Module(s) Dell™ Latitude™ 131L/ Dell Vostro™ 1000 Service Manual Removing the Memory Module(s) Replacing the Memory Module(s) CAUTION: Before you begin working inside your computer, discharge static electricity from your body before...
...: To prevent static damage to the system board, you must be of your computer's electronic components. Back to Contents Page Memory Module(s) Dell™ Latitude™ 131L/ Dell Vostro™ 1000 Service Manual Removing the Memory Module(s) Replacing the Memory Module(s) CAUTION: Before you begin working inside your computer, discharge static electricity from your body before...
Service Manual
Page 32
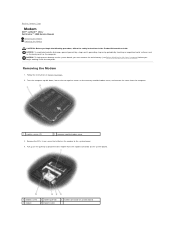
... on the system board. 1 modem screw 4 modem 2 modem pull-tab 5 modem cable 3 modem connector on the computer. Back to Contents Page Modem Dell™ Latitude™ 131L/ Dell Vostro™ 1000 Service Manual Removing the Modem Replacing the Modem CAUTION: Before you begin the following procedure, follow the safety instructions in Before You Begin. 2. NOTICE: To...
... on the system board. 1 modem screw 4 modem 2 modem pull-tab 5 modem cable 3 modem connector on the computer. Back to Contents Page Modem Dell™ Latitude™ 131L/ Dell Vostro™ 1000 Service Manual Removing the Modem Replacing the Modem CAUTION: Before you begin the following procedure, follow the safety instructions in Before You Begin. 2. NOTICE: To...
Service Manual
Page 34
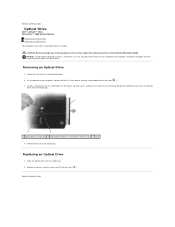
... Begin. 2. Replacing an Optical Drive 1. Insert a screwdriver into the media bay. 2. Replace the device security screw next to Contents Page Optical Drive Dell™ Latitude™ 131L/ Dell Vostro™ 1000 Service Manual Removing an Optical Drive Replacing an Optical Drive Your computer ships with a lock icon ( ). 3. Back to release the optical drive from the media...
... Begin. 2. Replacing an Optical Drive 1. Insert a screwdriver into the media bay. 2. Replace the device security screw next to Contents Page Optical Drive Dell™ Latitude™ 131L/ Dell Vostro™ 1000 Service Manual Removing an Optical Drive Replacing an Optical Drive Your computer ships with a lock icon ( ). 3. Back to release the optical drive from the media...
Service Manual
Page 35
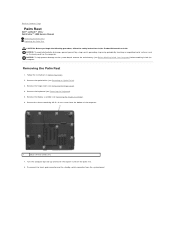
...) on the palm rest. 8. Remove the optical drive (see Removing the Keyboard). 5. NOTICE: To help prevent damage to Contents Page Palm Rest Dell™ Latitude™ 131L/ Dell Vostro™ 1000 Service Manual Removing the Palm Rest Replacing the Palm Rest CAUTION: Before you begin the following procedure, follow the safety instructions in Before You Begin...
...) on the palm rest. 8. Remove the optical drive (see Removing the Keyboard). 5. NOTICE: To help prevent damage to Contents Page Palm Rest Dell™ Latitude™ 131L/ Dell Vostro™ 1000 Service Manual Removing the Palm Rest Replacing the Palm Rest CAUTION: Before you begin the following procedure, follow the safety instructions in Before You Begin...
Service Manual
Page 38
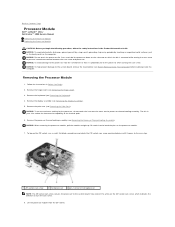
... screwdriver and rotate the ZIF-socket cam screw counterclockwise until it is mounted while turning the cam screw to Contents Page Processor Module Dell™ Latitude™ 131L/ Dell Vostro™ 1000 Service Manual Removing the Processor Module Replacing the Processor Module CAUTION: Before you begin the following procedure, follow the safety instructions in the Product...
... screwdriver and rotate the ZIF-socket cam screw counterclockwise until it is mounted while turning the cam screw to Contents Page Processor Module Dell™ Latitude™ 131L/ Dell Vostro™ 1000 Service Manual Removing the Processor Module Replacing the Processor Module CAUTION: Before you begin the following procedure, follow the safety instructions in the Product...


