User Guide
Page 4
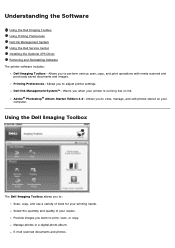
... documents and images. E-mail scanned documents and photos. Understanding the Software Using the Dell Imaging Toolbox Using Printing Preferences Dell Ink Management System Using the Dell Service Center Installing the Optional XPS Driver Removing and Reinstalling Software The printer software includes: Dell Imaging Toolbox- Allows you want to : Scan, copy, and use a variety of your copies. Allows...
... documents and images. E-mail scanned documents and photos. Understanding the Software Using the Dell Imaging Toolbox Using Printing Preferences Dell Ink Management System Using the Dell Service Center Installing the Optional XPS Driver Removing and Reinstalling Software The printer software includes: Dell Imaging Toolbox- Allows you want to : Scan, copy, and use a variety of your copies. Allows...
User Guide
Page 5
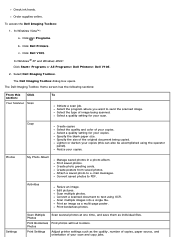
...box opens. Resize your scan. Scan multiple photos. Settings Scan Multiple Photos Scan several photos at one time, and save them as a multi-page poster. To access the Dell Imaging Toolbox: 1. Select the program where you want to e-mail messages. Create photo greeting cards. c.... and Windows 2000: Click Start® Programs or All Programs® Dell Printers® Dell V105. 2. Copy Create copies Select the quality and color of the original document being scanned. The Dell Imaging Toolbox Home screen has the following sections: From this can also be accomplished ...
...box opens. Resize your scan. Scan multiple photos. Settings Scan Multiple Photos Scan several photos at one time, and save them as a multi-page poster. To access the Dell Imaging Toolbox: 1. Select the program where you want to e-mail messages. Create photo greeting cards. c.... and Windows 2000: Click Start® Programs or All Programs® Dell Printers® Dell V105. 2. Copy Create copies Select the quality and color of the original document being scanned. The Dell Imaging Toolbox Home screen has the following sections: From this can also be accomplished ...
User Guide
Page 6
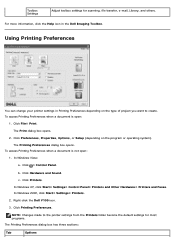
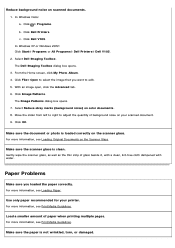
... a document is not open : 1. Click File® Print. Click Hardware and Sound. Using Printing Preferences You can change your printer settings in the Dell Imaging Toolbox. The Print dialog box opens. 2. Right-click the Dell V105 icon. 3. Click ® Control Panel. The Printing Preferences dialog box opens. Click Printing Preferences. In Windows Vista: a. NOTE: Changes...
... a document is not open : 1. Click File® Print. Click Hardware and Sound. Using Printing Preferences You can change your printer settings in the Dell Imaging Toolbox. The Print dialog box opens. 2. Right-click the Dell V105 icon. 3. Click ® Control Panel. The Printing Preferences dialog box opens. Click Printing Preferences. In Windows Vista: a. NOTE: Changes...
User Guide
Page 27
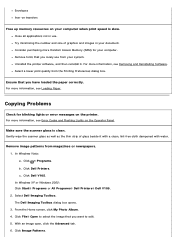
...Lights on your system. c. Consider purchasing more information, see Removing and Reinstalling Software. In Windows Vista: a. Click Dell V105. The Dell Imaging Toolbox dialog box opens. 3. Copying Problems Check for your document. Click File® Open to select the image that you... (RAM) for blinking lights or error messages on the printer. Select Dell Imaging Toolbox. Remove fonts that you want to edit. 5. Click Image Patterns. Click ® Programs. b. In Windows XP or Windows 2000: Click Start® Programs or All Programs® Dell Printers® Dell V105. 2.
...Lights on your system. c. Consider purchasing more information, see Removing and Reinstalling Software. In Windows Vista: a. Click Dell V105. The Dell Imaging Toolbox dialog box opens. 3. Copying Problems Check for your document. Click File® Open to select the image that you... (RAM) for blinking lights or error messages on the printer. Select Dell Imaging Toolbox. Remove fonts that you want to edit. 5. Click Image Patterns. Click ® Programs. b. In Windows XP or Windows 2000: Click Start® Programs or All Programs® Dell Printers® Dell V105. 2.
User Guide
Page 28
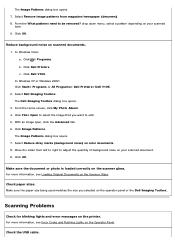
Click OK. In Windows Vista: a. The Dell Imaging Toolbox dialog box opens. 3. From the What patterns need to adjust the quantity of background noise on your scanned document. 9. In Windows XP or Windows 2000: Click Start® Programs or All Programs® Dell Printers® Dell V105. 2. Click Image Patterns. The Image Patterns dialog box opens. 7. Move...
Click OK. In Windows Vista: a. The Dell Imaging Toolbox dialog box opens. 3. From the What patterns need to adjust the quantity of background noise on your scanned document. 9. In Windows XP or Windows 2000: Click Start® Programs or All Programs® Dell Printers® Dell V105. 2. Click Image Patterns. The Image Patterns dialog box opens. 7. Move...
User Guide
Page 29
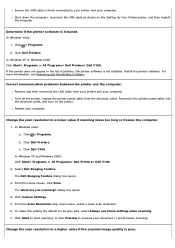
... list of printers, the printer software is installed. Unplug the printer power cable from your printer and your computer. Determine if the printer software is not installed. Click Dell Printers. In Windows XP or Windows 2000: Click Start® Programs or All Programs® Dell Printers® Dell V105. For more information, see Removing and Reinstalling Software. Select Dell Imaging Toolbox. From the...
... list of printers, the printer software is installed. Unplug the printer power cable from your printer and your computer. Determine if the printer software is not installed. Click Dell Printers. In Windows XP or Windows 2000: Click Start® Programs or All Programs® Dell Printers® Dell V105. For more information, see Removing and Reinstalling Software. Select Dell Imaging Toolbox. From the...
User Guide
Page 30
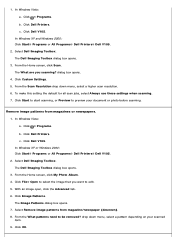
... select the image that you scanning? In Windows XP and Windows 2000: Click Start® Programs or All Programs® Dell Printers® Dell V105. 2. From the Home screen, click Scan. Click Custom Settings. 5. Select Dell Imaging Toolbox. To make this setting the default for all scan jobs, select Always use these settings when scanning. 7. Click...
... select the image that you scanning? In Windows XP and Windows 2000: Click Start® Programs or All Programs® Dell Printers® Dell V105. 2. From the Home screen, click Scan. Click Custom Settings. 5. Select Dell Imaging Toolbox. To make this setting the default for all scan jobs, select Always use these settings when scanning. 7. Click...
User Guide
Page 31
... Start® Programs or All Programs® Dell Printers® Dell V105. 2. Make sure the document or photo is not wrinkled, torn, or damaged. Make sure the paper is loaded correctly on your printer. Select Dell Imaging Toolbox. From the Home screen, click My Photo Album.... 4. With an image open, click the Advanced tab. 6. Move the slider from left to right to edit. 5. Click Dell Printers. Click Dell V105. Select Reduce stray marks (...
... Start® Programs or All Programs® Dell Printers® Dell V105. 2. Make sure the document or photo is not wrinkled, torn, or damaged. Make sure the paper is loaded correctly on your printer. Select Dell Imaging Toolbox. From the Home screen, click My Photo Album.... 4. With an image open, click the Advanced tab. 6. Move the slider from left to right to edit. 5. Click Dell Printers. Click Dell V105. Select Reduce stray marks (...
User Guide
Page 34
...sides. 6. In Windows® XP and Windows 2000: Click Start® Programs or All Programs® Dell Printers® Dell V105. 4. From the Folders pane, open the folder that they are using photo/glossy paper. To select ...Dell Imaging Toolbox. Click Photo Prints. 9. Borderless printing is only performed if you want in a nonadhesive photo album or frame, allow sufficient time for the photo from sticking together or smudging. The Printing Preferences dialog box closes. 8. NOTE: Before placing your photos. 7. Click ® Programs. b. Click Dell Printers. Click Dell V105...
...sides. 6. In Windows® XP and Windows 2000: Click Start® Programs or All Programs® Dell Printers® Dell V105. 4. From the Folders pane, open the folder that they are using photo/glossy paper. To select ...Dell Imaging Toolbox. Click Photo Prints. 9. Borderless printing is only performed if you want in a nonadhesive photo album or frame, allow sufficient time for the photo from sticking together or smudging. The Printing Preferences dialog box closes. 8. NOTE: Before placing your photos. 7. Click ® Programs. b. Click Dell Printers. Click Dell V105...
User Guide
Page 35
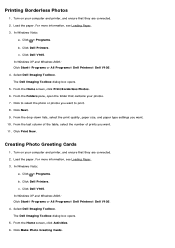
... ® Programs. b. In Windows XP and Windows 2000: Click Start® Programs or All Programs® Dell Printers® Dell V105. 4. In Windows Vista: a. c. c. From the Home screen, click Print Borderless Photos. 6. Load the paper. Select Dell Imaging Toolbox. The Dell Imaging Toolbox dialog box opens. 5. Click Print Now. For more information, see Loading Paper. 3. From the last...
... ® Programs. b. In Windows XP and Windows 2000: Click Start® Programs or All Programs® Dell Printers® Dell V105. 4. In Windows Vista: a. c. c. From the Home screen, click Print Borderless Photos. 6. Load the paper. Select Dell Imaging Toolbox. The Dell Imaging Toolbox dialog box opens. 5. Click Print Now. For more information, see Loading Paper. 3. From the last...
User Guide
Page 47
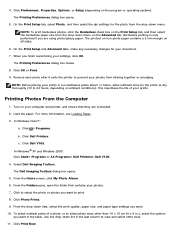
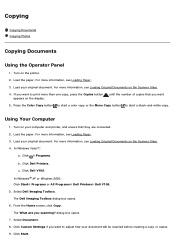
...one copy, press the Copies button appears on your document will be scanned before creating a copy or copies. 9. Using Your Computer 1. Load the paper. In Windows Vista™: a. Select Dell Imaging Toolbox. For more information, see Loading Original Documents on the printer...Click ® Programs. b. From the Home screen, click Copy. Click Dell Printers. c. The Dell Imaging Toolbox dialog box opens. 6. Turn on the Scanner Glass. 4. dialog box opens. 7. Click Dell V105. Select Document. 8. Copying Copying Documents Copying Photos Copying Documents Using the ...
...one copy, press the Copies button appears on your document will be scanned before creating a copy or copies. 9. Using Your Computer 1. Load the paper. In Windows Vista™: a. Select Dell Imaging Toolbox. For more information, see Loading Original Documents on the printer...Click ® Programs. b. From the Home screen, click Copy. Click Dell Printers. c. The Dell Imaging Toolbox dialog box opens. 6. Turn on the Scanner Glass. 4. dialog box opens. 7. Click Dell V105. Select Document. 8. Copying Copying Documents Copying Photos Copying Documents Using the ...
User Guide
Page 48
...cm) photo card with the print side facing up . For more than one copy, press the Copies button appears on the Scanner Glass. 4. Turn on the printer. 2. Click Copy Now. Select Dell Imaging Toolbox. From the Home screen, click Copy. To copy photos with other sizes,... press the Color Copy button to start a color copy or the Mono Copy button to start a black-and-white copy. In Windows XP or Windows 2000: Click Start® Programs or All Programs® Dell Printers® Dell V105...
...cm) photo card with the print side facing up . For more than one copy, press the Copies button appears on the Scanner Glass. 4. Turn on the printer. 2. Click Copy Now. Select Dell Imaging Toolbox. From the Home screen, click Copy. To copy photos with other sizes,... press the Color Copy button to start a color copy or the Mono Copy button to start a black-and-white copy. In Windows XP or Windows 2000: Click Start® Programs or All Programs® Dell Printers® Dell V105...
User Guide
Page 52
... the Scanner Glass. 3. In Windows Vista™: a. Select Dell Imaging Toolbox. From the Home screen, click Scan. For more information, see Loading Original Documents on the scanner glass. In Windows® XP or Windows 2000: Click Start® Programs or All Programs® Dell Printers® Dell V105. 4. Press the Scan button . c. For more information, see...
... the Scanner Glass. 3. In Windows Vista™: a. Select Dell Imaging Toolbox. From the Home screen, click Scan. For more information, see Loading Original Documents on the scanner glass. In Windows® XP or Windows 2000: Click Start® Programs or All Programs® Dell Printers® Dell V105. 4. Press the Scan button . c. For more information, see...
User Guide
Page 53
Scanning Multiple Photos Into a Single File NOTE: Some programs do not support multiple-page scanning. 1. In Windows Vista: a. c. Select Dell Imaging Toolbox. Click Dell V105. Load your original photos on your computer and printer, and ensure that you can edit with your original document facedown on the Scanner Glass. 3. Click ® Programs. b. Turn on the scanner...
Scanning Multiple Photos Into a Single File NOTE: Some programs do not support multiple-page scanning. 1. In Windows Vista: a. c. Select Dell Imaging Toolbox. Click Dell V105. Load your original photos on your computer and printer, and ensure that you can edit with your original document facedown on the Scanner Glass. 3. Click ® Programs. b. Turn on the scanner...
User Guide
Page 54
... the edges of the scan area. 3. Click Start® Programs or All Programs® Dell Printers® Dell V105. 4. Select Dell Imaging Toolbox. Load your original photo facedown on your computer and printer, and ensure that they are connected. 2. c. The Dell Imaging Toolbox opens. 5. The Dell Imaging Toolbox opens. 5. Click Edit Picture. 7. Turn on the Scanner Glass. 3. Click Convert Scanned Document...
... the edges of the scan area. 3. Click Start® Programs or All Programs® Dell Printers® Dell V105. 4. Select Dell Imaging Toolbox. Load your original photo facedown on your computer and printer, and ensure that they are connected. 2. c. The Dell Imaging Toolbox opens. 5. The Dell Imaging Toolbox opens. 5. Click Edit Picture. 7. Turn on the Scanner Glass. 3. Click Convert Scanned Document...
User Guide
Page 55
... image is saved: a. Click ® Programs. b. If you are connected. 2. Click Dell V105. b. Turn on your computer and printer, and ensure that they are scanning a new image: From the Home screen, click Activities. 5. Click ® Programs. b. Select Dell Imaging Toolbox. The Dell Imaging Toolbox opens. 5. Select one or more of the Save or Edit dialog box, click Save...
... image is saved: a. Click ® Programs. b. If you are connected. 2. Click Dell V105. b. Turn on your computer and printer, and ensure that they are scanning a new image: From the Home screen, click Activities. 5. Click ® Programs. b. Select Dell Imaging Toolbox. The Dell Imaging Toolbox opens. 5. Select one or more of the Save or Edit dialog box, click Save...
User Guide
Page 56
... or All Programs® Dell Printers® Dell V105. 4. Select from the Photo option. If you are connected. 2. E-Mailing Documents or Photos Scanning Documents or Photos for e-mailing, choose Photo or Several Photos. Turn on your default word-processing application instead of the Library dialog box. Click ® Programs. b. The Dell Imaging Toolbox opens. 5. The Image...
... or All Programs® Dell Printers® Dell V105. 4. Select from the Photo option. If you are connected. 2. E-Mailing Documents or Photos Scanning Documents or Photos for e-mailing, choose Photo or Several Photos. Turn on your default word-processing application instead of the Library dialog box. Click ® Programs. b. The Dell Imaging Toolbox opens. 5. The Image...
User Guide
Page 57
... With your document or photo to send. Adding a File to create an e-mail message with your file attached. Select Dell Imaging Toolbox. Click to select each photo or document that contains the files you want to attach your scanned item selected, click E-...Programs or All Programs® Dell Printers® Dell V105. 2. From the Folders pane, open the folder that you are sending one or more photos, select a photo size. 7. Adjust your scanned image. 10. Click Dell Printers. Click Dell V105. In Windows Vista: a. Click Dell V105. Save your scanned image using...
... With your document or photo to send. Adding a File to create an e-mail message with your file attached. Select Dell Imaging Toolbox. Click to select each photo or document that contains the files you want to attach your scanned item selected, click E-...Programs or All Programs® Dell Printers® Dell V105. 2. From the Folders pane, open the folder that you are sending one or more photos, select a photo size. 7. Adjust your scanned image. 10. Click Dell Printers. Click Dell V105. In Windows Vista: a. Click Dell V105. Save your scanned image using...
User Guide
Page 58
... PDF. Click ® Programs. b. In Windows XP and Windows 2000: Click Start® Programs or All Programs® Dell Printers® Dell V105. 2. The Dell Imaging Toolbox dialog box opens. 3. With your selections. 11. Click Add Another to scan additional images or to PDF. 9. The software...Windows 2000: Click Start® Programs or All Programs® Dell Printers® Dell V105. 3. The Dell Imaging Toolbox dialog box opens. 4. Select Photo, Several Photos, or Document. 7. Do one PDF file or Save each image as one of the following: Select Add New Scan, and then select Photo...
... PDF. Click ® Programs. b. In Windows XP and Windows 2000: Click Start® Programs or All Programs® Dell Printers® Dell V105. 2. The Dell Imaging Toolbox dialog box opens. 3. With your selections. 11. Click Add Another to scan additional images or to PDF. 9. The software...Windows 2000: Click Start® Programs or All Programs® Dell Printers® Dell V105. 3. The Dell Imaging Toolbox dialog box opens. 4. Select Photo, Several Photos, or Document. 7. Do one PDF file or Save each image as one of the following: Select Add New Scan, and then select Photo...
User Guide
Page 59
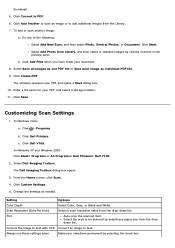
...and then select or deselect images by selecting a paper size from the dropdown list. Customizing Scan Settings 1. The Dell Imaging Toolbox dialog box opens. 3. Scan Resolution (Dots Per Inch) Select a scan resolution value from the Library. 7. ...one PDF file or Save each image as needed. Size Auto-crop the scanned item. Enter a file name for your PDF and opens a Save dialog box. 10. Click ® Programs. b. In Windows XP and Windows 2000: Click Start® Programs or All Programs® Dell Printers® Dell V105. 2. Click Dell Printers. Click Dell V105...
...and then select or deselect images by selecting a paper size from the dropdown list. Customizing Scan Settings 1. The Dell Imaging Toolbox dialog box opens. 3. Scan Resolution (Dots Per Inch) Select a scan resolution value from the Library. 7. ...one PDF file or Save each image as needed. Size Auto-crop the scanned item. Enter a file name for your PDF and opens a Save dialog box. 10. Click ® Programs. b. In Windows XP and Windows 2000: Click Start® Programs or All Programs® Dell Printers® Dell V105. 2. Click Dell Printers. Click Dell V105...