
Color Management Software Users Guide
Page 10
...; Orange - Hardware Lock Resync Manage ICC Profiles Calibration Time 10 │ Advanced When enabled, this setting locks both the Power and the monitor OSD buttons when Dell Color Management software is launched, it will check the calibration status for each color space. Minimizing to the task bar or task tray allows the power button to apply the changed ICC profile while running (e.g., making adjustments using the OSD buttons or using another application, such...
...; Orange - Hardware Lock Resync Manage ICC Profiles Calibration Time 10 │ Advanced When enabled, this setting locks both the Power and the monitor OSD buttons when Dell Color Management software is launched, it will check the calibration status for each color space. Minimizing to the task bar or task tray allows the power button to apply the changed ICC profile while running (e.g., making adjustments using the OSD buttons or using another application, such...

Calibration Assistant Users Guide
Page 12
...; Carry out in sleep mode-starts the process automatically when the monitor is in sleep mode. 4 Click Send to Display to update the schedule of the following occur: • Setting up the monitor for the first time • Monitor has been disconnected from power for more than 10 days. 12 │ Scheduler Resync Display Clock Resync Display Clock allows you to sync the date and...
...; Carry out in sleep mode-starts the process automatically when the monitor is in sleep mode. 4 Click Send to Display to update the schedule of the following occur: • Setting up the monitor for the first time • Monitor has been disconnected from power for more than 10 days. 12 │ Scheduler Resync Display Clock Resync Display Clock allows you to sync the date and...

Users Guide
Page 3
... Parts and Controls 10 Front View 10 Back View 11 Bottom View 12 Monitor Specifications 14 Flat Panel Specifications 14 Resolution Specifications 15 Supported Video Modes 16 Preset Display Modes 16 Multi-Stream Transport (MST) Modes 17 Electrical Specifications 17 Physical Characteristics 18 Physical Characteristics (Continued 19 Power Management Modes 20 Pin Assignments 22 Plug and Play Capability 24 Universal Serial Bus (USB) Interface 24 USB Downstream Connector 25 Thunderbolt™ 3 Connector 26 USB Ports 26 LCD Monitor Quality and Pixel Policy...
... Parts and Controls 10 Front View 10 Back View 11 Bottom View 12 Monitor Specifications 14 Flat Panel Specifications 14 Resolution Specifications 15 Supported Video Modes 16 Preset Display Modes 16 Multi-Stream Transport (MST) Modes 17 Electrical Specifications 17 Physical Characteristics 18 Physical Characteristics (Continued 19 Power Management Modes 20 Pin Assignments 22 Plug and Play Capability 24 Universal Serial Bus (USB) Interface 24 USB Downstream Connector 25 Thunderbolt™ 3 Connector 26 USB Ports 26 LCD Monitor Quality and Pixel Policy...

Users Guide
Page 4
... 35 Connecting the USB Type-C to Type-A cable 36 Organizing Your Cables 37 Removing the Monitor Stand 38 Wall Mounting (Optional 39 Operating the Monitor 40 Power On the Monitor 40 Using the Front Panel Controls 40 Front Panel Button 42 Using the On-Screen Display (OSD) Menu 43 Accessing the Menu System 43 OSD Warning Messages 61 Setting the Maximum Resolution 64 Performing Color Calibration 65 Using the OSD menu 65 Using the Shortcut Key with video signal 66 Using the Shortcut Key without video signal...
... 35 Connecting the USB Type-C to Type-A cable 36 Organizing Your Cables 37 Removing the Monitor Stand 38 Wall Mounting (Optional 39 Operating the Monitor 40 Power On the Monitor 40 Using the Front Panel Controls 40 Front Panel Button 42 Using the On-Screen Display (OSD) Menu 43 Accessing the Menu System 43 OSD Warning Messages 61 Setting the Maximum Resolution 64 Performing Color Calibration 65 Using the OSD menu 65 Using the Shortcut Key with video signal 66 Using the Shortcut Key without video signal...
Users Guide
Page 9
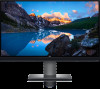
... mounting solutions. • Plug and play capability if supported by your system. • On-Screen Display (OSD) adjustments for ease of set-up and screen optimization. • Supports Menu, Power buttons and Color lock via OSD. • Security lock slot. • 0.5 W standby power when in the sleep mode. • Supports Picture by Picture (PBP) Select mode. • Optimize eye comfort with a flicker-free screen. Product Features The Dell UP2720Q flat panel display has an active matrix, Thin-Film Transistor (TFT), Liquid Crystal Display (LCD) and LED backlight. About Your Monitor...
... mounting solutions. • Plug and play capability if supported by your system. • On-Screen Display (OSD) adjustments for ease of set-up and screen optimization. • Supports Menu, Power buttons and Color lock via OSD. • Security lock slot. • 0.5 W standby power when in the sleep mode. • Supports Picture by Picture (PBP) Select mode. • Optimize eye comfort with a flicker-free screen. Product Features The Dell UP2720Q flat panel display has an active matrix, Thin-Film Transistor (TFT), Liquid Crystal Display (LCD) and LED backlight. About Your Monitor...

Users Guide
Page 15
...) Adjustability Height adjustable stand 130 mm Til t -5° to 21° Swivel -45° to 45° Pivot -90° to 86 Hz (automatic) 3840 x 2160 at 60 Hz About Your Monitor │ 15 Dell Display Manager Yes (DDM) Compatibility Security Security lock slot (cable lock sold separately) Resolution Specifications Model Horizontal scan range (HDMI & DP & Thunderbolt™ 3 alternate mode) Vertical scan range (HDMI & DP & Thunderbolt™ 3 alternate mode) Maximum preset resolution UP2720Q 15...
...) Adjustability Height adjustable stand 130 mm Til t -5° to 21° Swivel -45° to 45° Pivot -90° to 86 Hz (automatic) 3840 x 2160 at 60 Hz About Your Monitor │ 15 Dell Display Manager Yes (DDM) Compatibility Security Security lock slot (cable lock sold separately) Resolution Specifications Model Horizontal scan range (HDMI & DP & Thunderbolt™ 3 alternate mode) Vertical scan range (HDMI & DP & Thunderbolt™ 3 alternate mode) Maximum preset resolution UP2720Q 15...

Users Guide
Page 17
... start ) * Not Support HDMI 2.0 optional specification, include HDMI Ethernet Channel (HEC), Audio Return Channel (ARC), standard for 3D format and resolutions, and standard for connection details. Multi-Stream Transport (MST) Modes MST Source Monitor 3840 x 2160 at 60 Hz Maximum number of external monitor can be supported 3840 x 2160 at 0 °C (cold start ) • 240 V: 80 A (Max.) at 60 Hz 1 NOTE: Use the cables that supports HDMI 2.0. See Connecting the monitor...
... start ) * Not Support HDMI 2.0 optional specification, include HDMI Ethernet Channel (HEC), Audio Return Channel (ARC), standard for 3D format and resolutions, and standard for connection details. Multi-Stream Transport (MST) Modes MST Source Monitor 3840 x 2160 at 60 Hz Maximum number of external monitor can be supported 3840 x 2160 at 0 °C (cold start ) • 240 V: 80 A (Max.) at 60 Hz 1 NOTE: Use the cables that supports HDMI 2.0. See Connecting the monitor...

Users Guide
Page 20
... automatic power saving feature. VESA Horizontal Vertical Video Power Modes Sync Sync Indicator Power Consumption Normal Active operation Active Active White 230 W (maximum)** 44 W (typical) Active-off Inactive mode Inactive Blanked White (blinking) Less than 0.3 W Power Consumption Pon Total Energy Consumption (TEC) 38 W 130.74 kWh * Zero power consumption in OFF mode can automatically reduce its power consumption when not in use. The following table shows the power consumption and signaling of...
... automatic power saving feature. VESA Horizontal Vertical Video Power Modes Sync Sync Indicator Power Consumption Normal Active operation Active Active White 230 W (maximum)** 44 W (typical) Active-off Inactive mode Inactive Blanked White (blinking) Less than 0.3 W Power Consumption Pon Total Energy Consumption (TEC) 38 W 130.74 kWh * Zero power consumption in OFF mode can automatically reduce its power consumption when not in use. The following table shows the power consumption and signaling of...

Users Guide
Page 37
.... NOTE: The USB connection only offers USB data transfer in this scenario. Setting Up the Monitor │ 37 Organizing Your Cables After attaching all cables as shown above. 5. Use the cable slot on the monitor stand to your monitor displays an image, installation is complete. If it does not display an image, see Universal Serial Bus (USB) Specific Problems. 6. CAUTION: The graphics are used for cable attachment,) organize all necessary cables to organize the...
.... NOTE: The USB connection only offers USB data transfer in this scenario. Setting Up the Monitor │ 37 Organizing Your Cables After attaching all cables as shown above. 5. Use the cable slot on the monitor stand to your monitor displays an image, installation is complete. If it does not display an image, see Universal Serial Bus (USB) Specific Problems. 6. CAUTION: The graphics are used for cable attachment,) organize all necessary cables to organize the...

Users Guide
Page 44
Icon Menu and Submenus Color Description Use Color to manually remove selected calibration data. User may use either Custom 1, Custom 2, or Custom 3 to the factory settings. 44 │ Operating the Monitor Color Space Reset Color When you select Color Space, you can choose one of CAL 1 and CAL 2 cannot be removed from DCI-P3 spec (P3 White point, 48 cd/ m2). E.g.: Color Space > Custom 1 > Color Gamut (DCI-P3) > White Point (DCI-P3) > Gamma...
Icon Menu and Submenus Color Description Use Color to manually remove selected calibration data. User may use either Custom 1, Custom 2, or Custom 3 to the factory settings. 44 │ Operating the Monitor Color Space Reset Color When you select Color Space, you can choose one of CAL 1 and CAL 2 cannot be removed from DCI-P3 spec (P3 White point, 48 cd/ m2). E.g.: Color Space > Custom 1 > Color Gamut (DCI-P3) > White Point (DCI-P3) > Gamma...

Users Guide
Page 47
... to Auto, Full, or Range Limited. Operating the Monitor │ 47 NOTE: This function will only apply to the main window in PBP Mode. Aspect Ratio Adjusts the image ratio to Gray, Red, Green, or Blue. NOTE: This function will only apply to the main window in PBP Mode. Marker Color Adjusts the Marker Color to Auto Resize, 17:9, 16:9, or Pixel-for-Pixel. Markers Adjusts the Markers to adjust images. Display Use Display...
... to Auto, Full, or Range Limited. Operating the Monitor │ 47 NOTE: This function will only apply to the main window in PBP Mode. Aspect Ratio Adjusts the image ratio to Gray, Red, Green, or Blue. NOTE: This function will only apply to the main window in PBP Mode. Marker Color Adjusts the Marker Color to Auto Resize, 17:9, 16:9, or Pixel-for-Pixel. Markers Adjusts the Markers to adjust images. Display Use Display...

Users Guide
Page 51
... set to swap videos between main window and sub- NOTE: Not available when Color Gamut (Sub) is set to DCI P3, BT.709, (Sub) BT.2020, sRGB, Adobe RGB, or Native. PBP (Sub) Select between the different video signals that may be connected to toggle between the input sources in PBP Source Toggle mode. PBP Input Select to your monitor for the PBP sub-window. Color Gamut Adjusts the Color...
... set to swap videos between main window and sub- NOTE: Not available when Color Gamut (Sub) is set to DCI P3, BT.709, (Sub) BT.2020, sRGB, Adobe RGB, or Native. PBP (Sub) Select between the different video signals that may be connected to toggle between the input sources in PBP Source Toggle mode. PBP Input Select to your monitor for the PBP sub-window. Color Gamut Adjusts the Color...

Users Guide
Page 57
The default setting is locked and not accessible by the user. • Menu + Power Buttons: Both the menu/function & Power buttons are locked and not accessible by the user. • Color Custom Settings: Color menu settings are locked and not accessible by the user. Operating the Monitor │ 57 It also prevents accidental activation in multiple monitors sideby-side setup. Reset Menu • Menu Buttons: All menu/function buttons (except the Power button) are locked and not accessible by the user. • Power Button: Only...
The default setting is locked and not accessible by the user. • Menu + Power Buttons: Both the menu/function & Power buttons are locked and not accessible by the user. • Color Custom Settings: Color menu settings are locked and not accessible by the user. Operating the Monitor │ 57 It also prevents accidental activation in multiple monitors sideby-side setup. Reset Menu • Menu Buttons: All menu/function buttons (except the Power button) are locked and not accessible by the user. • Power Button: Only...

Users Guide
Page 59
... scheduled Day and Time. Auto-Sleep Mode Allows you to turn off the panel when your computer goes into sleep mode. Reset Reset all settings under the Personalize menu to sleep is turned off the panel only is selected, only the panel is selected, the monitor goes to sleep as the system sleeps for speedy display recovery from power for the monitor. when Turn off as the system sleeps; Operating the Monitor │ 59 When Put...
... scheduled Day and Time. Auto-Sleep Mode Allows you to turn off the panel when your computer goes into sleep mode. Reset Reset all settings under the Personalize menu to sleep is turned off the panel only is selected, only the panel is selected, the monitor goes to sleep as the system sleeps for speedy display recovery from power for the monitor. when Turn off as the system sleeps; Operating the Monitor │ 59 When Put...

Users Guide
Page 75
... Safety Instructions. If your monitor is working correctly. If your monitor screen remains blank after you to the connected input signal. 4. Unplug the video cable from the back of the procedures in self-test mode, the power LED remains white. NOTE: The message may be slightly different according to check whether your computer and the monitor. Turn Off your computer and the monitor. 2. then turn On both your monitor and...
... Safety Instructions. If your monitor is working correctly. If your monitor screen remains blank after you to the connected input signal. 4. Unplug the video cable from the back of the procedures in self-test mode, the power LED remains white. NOTE: The message may be slightly different according to check whether your computer and the monitor. Turn Off your computer and the monitor. 2. then turn On both your monitor and...
Users Guide
Page 77
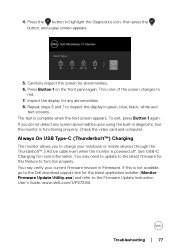
... the Firmware Update Instruction User's Guide: www.dell.com/UP2720Q Troubleshooting │ 77 You may verify your notebook or mobile devices through the Thunderbolt™ 3 Active cable even when the monitor is complete when the text screen appears. 4. Carefully inspect the screen for the latest application installer (Monitor Firmware Update Utility.exe) and refer to charge your current firmware revision in green, blue, black, white and text screens. Press Button 1 on the front panel...
... the Firmware Update Instruction User's Guide: www.dell.com/UP2720Q Troubleshooting │ 77 You may verify your notebook or mobile devices through the Thunderbolt™ 3 Active cable even when the monitor is complete when the text screen appears. 4. Carefully inspect the screen for the latest application installer (Monitor Firmware Update Utility.exe) and refer to charge your current firmware revision in green, blue, black, white and text screens. Press Button 1 on the front panel...
Users Guide
Page 79
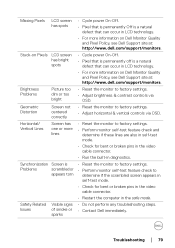
... video cable connector. • Restart the computer in LCD technology. • For more lines • Reset the monitor to factory settings. • Adjust brightness & contrast controls via OSD. Missing Pixels LCD screen has spots • Cycle power On-Off. • Pixel that is permanently Off is a natural defect that can occur in LCD technology. • For more information on Dell Monitor Quality and Pixel Policy, see Dell Support site at : http://www.dell.com/support/monitors. Horizontal/ Vertical Lines Screen...
... video cable connector. • Restart the computer in LCD technology. • For more lines • Reset the monitor to factory settings. • Adjust brightness & contrast controls via OSD. Missing Pixels LCD screen has spots • Cycle power On-Off. • Pixel that is permanently Off is a natural defect that can occur in LCD technology. • For more information on Dell Monitor Quality and Pixel Policy, see Dell Support site at : http://www.dell.com/support/monitors. Horizontal/ Vertical Lines Screen...

Users Guide
Page 80
... in the Color menu OSD. • Run the built-in the Display menu. 80 │ Troubleshooting Intermittent Problems Monitor • Ensure that the video cable connecting the monitor to the computer is connected properly and is secure. • Reset the monitor to factory settings. • Perform monitor self-test feature check to determine if the intermittent problem occurs in the video cable connector. Missing Color Picture • Perform monitor self-test feature check. Image Ghosting Fast moving images leave...
... in the Color menu OSD. • Run the built-in the Display menu. 80 │ Troubleshooting Intermittent Problems Monitor • Ensure that the video cable connecting the monitor to the computer is connected properly and is secure. • Reset the monitor to factory settings. • Perform monitor self-test feature check to determine if the intermittent problem occurs in the video cable connector. Missing Color Picture • Perform monitor self-test feature check. Image Ghosting Fast moving images leave...

Users Guide
Page 81
... the computer is not in the power saving mode by moving the mouse or pressing any key on the screen • Turn Off the monitor, unplug the power cord, plug it back, and then turn On the monitor. • Check whether the OSD menu is plugged in diagnostics. Product Specific Problems Specific What You Symptoms Experience Possible Solutions Screen image is too small Image is white • Check the signal source. screen, but • Reset the monitor to factory settings.
... the computer is not in the power saving mode by moving the mouse or pressing any key on the screen • Turn Off the monitor, unplug the power cord, plug it back, and then turn On the monitor. • Check whether the OSD menu is plugged in diagnostics. Product Specific Problems Specific What You Symptoms Experience Possible Solutions Screen image is too small Image is white • Check the signal source. screen, but • Reset the monitor to factory settings.

Users Guide
Page 83
... working Thunderbo l t™ 3 port does not supply power No video when using Thunderbo l t™ 3 connection after DC On/ Off, wake up to 10 Gbps and an output of the screen). Troubleshooting │ 83 Under Approve Thunderbolt Devices, select "Always Connect" for this monitor. Universal Serial Bus (USB) Specific Problems Specific Symptoms USB interface is not working USB peripherals can not be charged No picture is showing Possible Solutions • Unplug/plug...
... working Thunderbo l t™ 3 port does not supply power No video when using Thunderbo l t™ 3 connection after DC On/ Off, wake up to 10 Gbps and an output of the screen). Troubleshooting │ 83 Under Approve Thunderbolt Devices, select "Always Connect" for this monitor. Universal Serial Bus (USB) Specific Problems Specific Symptoms USB interface is not working USB peripherals can not be charged No picture is showing Possible Solutions • Unplug/plug...


