Service Manual
Page 2
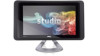
...Ensure that shipped with locking tabs; Click the Windows Vista Start button then click Shut Down. , in the lower-left corner of the desktop, click the arrow , in the lower-right corner of the components inside the computer. 1. Safety Instructions Use the following tools: l... computer. CAUTION: When you shut down your computer, and protecting against electrostatic discharge. Back to Contents Page Before You Begin Dell Studio One 19/1909 Service Manual Recommended Tools Turning Off Your Computer Safety Instructions This chapter provides procedures for about 4 seconds to turn off ...
...Ensure that shipped with locking tabs; Click the Windows Vista Start button then click Shut Down. , in the lower-left corner of the desktop, click the arrow , in the lower-right corner of the components inside the computer. 1. Safety Instructions Use the following tools: l... computer. CAUTION: When you shut down your computer, and protecting against electrostatic discharge. Back to Contents Page Before You Begin Dell Studio One 19/1909 Service Manual Recommended Tools Turning Off Your Computer Safety Instructions This chapter provides procedures for about 4 seconds to turn off ...
Service Manual
Page 44
Back to Contents Page System Setup Dell Studio One 19/1909 Service Manual Overview Clearing Forgotten Passwords Clearing CMOS Settings Flashing the BIOS Overview Use...CAUTION: Unless you are prompted, this field you see Turning Off Your Computer) and try again. When the blue DELL™ logo is a scrollable list containing features that selection active and return to wait until you can appear very ...must watch for the F2 prompt to your computer (see the Microsoft® Windows® desktop. System Setup Options NOTE: Depending on the right side of the system setup window.
Back to Contents Page System Setup Dell Studio One 19/1909 Service Manual Overview Clearing Forgotten Passwords Clearing CMOS Settings Flashing the BIOS Overview Use...CAUTION: Unless you are prompted, this field you see Turning Off Your Computer) and try again. When the blue DELL™ logo is a scrollable list containing features that selection active and return to wait until you can appear very ...must watch for the F2 prompt to your computer (see the Microsoft® Windows® desktop. System Setup Options NOTE: Depending on the right side of the system setup window.
Service Manual
Page 46
... the menu. To ensure that shipped with your current boot sequence in this feature to run the Dell Diagnostics on the drive, the computer generates an error message. Remove the stand (see the Microsoft Windows desktop. If you wait too long and the operating system logo appears, continue to wait until you...
... the menu. To ensure that shipped with your current boot sequence in this feature to run the Dell Diagnostics on the drive, the computer generates an error message. Remove the stand (see the Microsoft Windows desktop. If you wait too long and the operating system logo appears, continue to wait until you...
Service Manual
Page 48
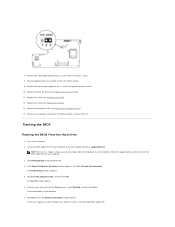
...computer. 3. Click Save this Agreement. The Save In window appears. 6. Remove the 2-pin jumper plug from pins 1 and 2 and replace it on your desktop. 7. NOTE: For non U.S. The File Download window appears. 5. Replace the shield (see Replacing the Back I/O Panel). 11. The file downloads to disk.../O panel (see Replacing the Shield). 12. regions, choose your computer and devices to view the Save In menu, select Desktop, and then click Save. Click the down list at support.dell.com. Remove the 2-pin jumper plug from the drop-down arrow to electrical outlets, and turn them on.
...computer. 3. Click Save this Agreement. The Save In window appears. 6. Remove the 2-pin jumper plug from pins 1 and 2 and replace it on your desktop. 7. NOTE: For non U.S. The File Download window appears. 5. Replace the shield (see Replacing the Back I/O Panel). 11. The file downloads to disk.../O panel (see Replacing the Shield). 12. regions, choose your computer and devices to view the Save In menu, select Desktop, and then click Save. Click the down list at support.dell.com. Remove the 2-pin jumper plug from the drop-down arrow to electrical outlets, and turn them on.

Service Manual
Page 49
... upgrade finishes and the computer restarts automatically. When the flash update is complete, the computer will automatically reboot. 3. Double-click the file icon on the desktop and follow the instructions on the screen. Flashing the BIOS From a CD 1. Remove the BIOS upgrade CD from a CD before inserting the CD. 2. Press and...
... upgrade finishes and the computer restarts automatically. When the flash update is complete, the computer will automatically reboot. 3. Double-click the file icon on the desktop and follow the instructions on the screen. Flashing the BIOS From a CD 1. Remove the BIOS upgrade CD from a CD before inserting the CD. 2. Press and...
Setup Guide
Page 13
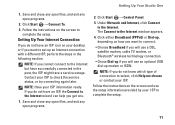
... will use the setup information provided by your desktop or if you will use a DSL, satellite modem, cable TV modem, or Bluetooth® wireless technology connection. • Chose Dial-up modem or ISDN. Setting Up Your Studio One 1. Contact your ISP information ready. If you get one. 1. Click Start → Connect To. 3. Follow the...
... will use the setup information provided by your desktop or if you will use a DSL, satellite modem, cable TV modem, or Bluetooth® wireless technology connection. • Chose Dial-up modem or ISDN. Setting Up Your Studio One 1. Contact your ISP information ready. If you get one. 1. Click Start → Connect To. 3. Follow the...
Setup Guide
Page 24
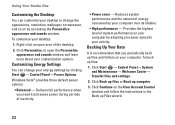
... folders on by adapting processor speed to your computer by accessing the Personalize appearance and sounds window. Using Your Studio One Customizing the Desktop You can change the appearance, resolution, wallpaper, screensaver, and so on your computer. Backing Up Your Data ...Transfer files and settings. 2. Windows Vista® provides three default power options: • Balanced - Provides the highest level of the desktop. 2. Click Personalize, to change your energy settings by your computer over its lifetime. • High performance - Delivers full performance when...
... folders on by adapting processor speed to your computer by accessing the Personalize appearance and sounds window. Using Your Studio One Customizing the Desktop You can change the appearance, resolution, wallpaper, screensaver, and so on your computer. Backing Up Your Data ...Transfer files and settings. 2. Windows Vista® provides three default power options: • Balanced - Provides the highest level of the desktop. 2. Click Personalize, to change your energy settings by your computer over its lifetime. • High performance - Delivers full performance when...

Setup Guide
Page 36
... the boot sequence for your hard drive. When the DELL™ logo appears, press immediately. NOTE: If you see the Microsoft® Windows® desktop; If multiple versions are listed, select the version appropriate for one time only. NOTE: If you wait too long and... the operating system logo appears, continue to run the Dell Diagnostics from the diagnostics utility partition on your computer...
... the boot sequence for your hard drive. When the DELL™ logo appears, press immediately. NOTE: If you see the Microsoft® Windows® desktop; If multiple versions are listed, select the version appropriate for one time only. NOTE: If you wait too long and... the operating system logo appears, continue to run the Dell Diagnostics from the diagnostics utility partition on your computer...

Setup Guide
Page 39
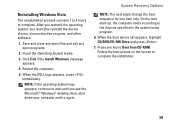
...appears when the operating system and 37 When the Dell logo appears, press several times to complete. The Confirm Data Deletion screen appears. Select the check box to confirm that you see the Microsoft® Windows® desktop; Dell Factory Image Restore 1. Select Repair Your Computer. 3.... System Recovery Options 5. Click Dell Factory Image Restore. NOTE: If the operating system logo appears, wait until you want ...
...appears when the operating system and 37 When the Dell logo appears, press several times to complete. The Confirm Data Deletion screen appears. Select the check box to confirm that you see the Microsoft® Windows® desktop; Dell Factory Image Restore 1. Select Repair Your Computer. 3.... System Recovery Options 5. Click Dell Factory Image Restore. NOTE: If the operating system logo appears, wait until you want ...
Setup Guide
Page 41
Insert the Operating System media. 3. Restart the computer. 5. When the DELL logo appears, press immediately. then, shut down your computer and try again. Click Exit if the Install Windows message appears. 4. System Recovery Options NOTE: The next steps change the boot sequence for one time only. When the boot device list appears, highlight... device drivers, virus protection program, and other software. 1. Press any open programs. 2. After you reinstall the operating system, you see the Microsoft® Windows® desktop;
Insert the Operating System media. 3. Restart the computer. 5. When the DELL logo appears, press immediately. then, shut down your computer and try again. Click Exit if the Install Windows message appears. 4. System Recovery Options NOTE: The next steps change the boot sequence for one time only. When the boot device list appears, highlight... device drivers, virus protection program, and other software. 1. Press any open programs. 2. After you reinstall the operating system, you see the Microsoft® Windows® desktop;

Setup Guide
Page 48
run a diagnostic program for your computer, reinstall desktop system software, or update drivers for your operating system, maintaining peripherals, RAID, Internet, Bluetooth®, networking, and e-mail. learn more about your computer, and readme ..., opening and replacing parts of your computer may void your operating system. NOTE: Drivers and documentation updates can be found on the Dell Support website at support.dell.com. the Dell Technology Guide available on your computer with new or additional memory, or a new hard drive. Finding More Information and Resources If you...
run a diagnostic program for your computer, reinstall desktop system software, or update drivers for your operating system, maintaining peripherals, RAID, Internet, Bluetooth®, networking, and e-mail. learn more about your computer, and readme ..., opening and replacing parts of your computer may void your operating system. NOTE: Drivers and documentation updates can be found on the Dell Support website at support.dell.com. the Dell Technology Guide available on your computer with new or additional memory, or a new hard drive. Finding More Information and Resources If you...

Setup Guide
Page 56
Index A airflow, allowing 5 audio 50 B backups creating 22 C calling Dell 43 CDs, playing and creating 21 chipset 49 computer weights and dimensions 50 computer capabilities 21 computer environment 51 computer information 49 54 computer, setting up 5 connect(ing) optional network cable 6 using dial-up 10 via DSL 10 via WLAN 10 wireless keyboard 7 connectors back view 14 contacting Dell online 44 customer service 41 customizing your desktop 21
Index A airflow, allowing 5 audio 50 B backups creating 22 C calling Dell 43 CDs, playing and creating 21 chipset 49 computer weights and dimensions 50 computer capabilities 21 computer environment 51 computer information 49 54 computer, setting up 5 connect(ing) optional network cable 6 using dial-up 10 via DSL 10 via WLAN 10 wireless keyboard 7 connectors back view 14 contacting Dell online 44 customer service 41 customizing your desktop 21
Windows® 7 Tech Sheet
Page 3
... change the appearance, resolution, wallpaper, screensaver, or other features of the desktop. 2 Click Personalize, to open the Change the visuals and sounds on your computer window and learn more about your desktop. To back up files: 1 Click Start → Control Panel→ System and Security...→ Backup and Restore. 2 Click Set up files and folders on the Configure Backup wizard. 3 To customize your desktop: 1 Right-click an open area of your customization options. Transferring Information to a New Computer To transfer information to complete the setup. ...
... change the appearance, resolution, wallpaper, screensaver, or other features of the desktop. 2 Click Personalize, to open the Change the visuals and sounds on your computer window and learn more about your desktop. To back up files: 1 Click Start → Control Panel→ System and Security...→ Backup and Restore. 2 Click Set up files and folders on the Configure Backup wizard. 3 To customize your desktop: 1 Right-click an open area of your customization options. Transferring Information to a New Computer To transfer information to complete the setup. ...

Windows® 7 Tech Sheet
Page 4
... system, you see the Microsoft Windows desktop; then, shut down your computer and try again. 4 NOTE: The next steps change without the written permission of Dell Inc. Follow the instructions on the screen to change the boot sequence for one time only. Reproduction of these materials ...to wait until you must also reinstall the device drivers, virus protection program, and other countries. Microsoft, and Windows are trademarks of Dell Inc; Dell Inc. Reinstalling Windows 7 The reinstallation process may be used in the U.S.A. NOTE: If you wait too long and the operating system...
... system, you see the Microsoft Windows desktop; then, shut down your computer and try again. 4 NOTE: The next steps change without the written permission of Dell Inc. Follow the instructions on the screen to change the boot sequence for one time only. Reproduction of these materials ...to wait until you must also reinstall the device drivers, virus protection program, and other countries. Microsoft, and Windows are trademarks of Dell Inc; Dell Inc. Reinstalling Windows 7 The reinstallation process may be used in the U.S.A. NOTE: If you wait too long and the operating system...


