Dell™ Technology Guide
Page 82
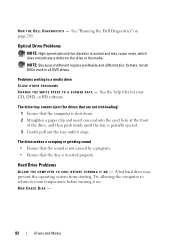
...not caused by a program. • Ensure that the computer is shut down. 2 Straighten a paper clip and insert one end into the eject hole at the front of different regions worldwide and different disc formats, not all DVD drives. Optical Drive Problems NOTE: High-speed optical drive vibration... DVDs work in the drive or the media. Problems writing to room temperature before turning it stops. The drive tray cannot eject (for your CD, DVD, or BD software. R U N THE DELL D I A G N O S T I C S - See the help files for drives that are not slot-loading) 1 Ensure that the disc is ...
...not caused by a program. • Ensure that the computer is shut down. 2 Straighten a paper clip and insert one end into the eject hole at the front of different regions worldwide and different disc formats, not all DVD drives. Optical Drive Problems NOTE: High-speed optical drive vibration... DVDs work in the drive or the media. Problems writing to room temperature before turning it stops. The drive tray cannot eject (for your CD, DVD, or BD software. R U N THE DELL D I A G N O S T I C S - See the help files for drives that are not slot-loading) 1 Ensure that the disc is ...
Dell™ Technology Guide
Page 204
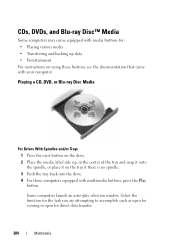
.... Some computers launch an auto-play selection window. Playing a CD, DVD, or Blu-ray Disc Media For Drives With Spindles and/or Trays 1 Press the eject button on the drive. 2 Place the media, label side up data • Entertainment For instructions on the tray if there is no spindle. 3 Push the...
.... Some computers launch an auto-play selection window. Playing a CD, DVD, or Blu-ray Disc Media For Drives With Spindles and/or Trays 1 Press the eject button on the drive. 2 Place the media, label side up data • Entertainment For instructions on the tray if there is no spindle. 3 Push the...
Dell™ Technology Guide
Page 205
...Some computers launch an auto-play selection window. NOTE: Do not move the computer while playing or recording CDs and DVDs. 1 Press the eject button to accomplish such as you are attempting to remove a pre-installed cd. Select the function for storing or copying data, see the ...8594; Copy. 2 Copy the disk. Multimedia 205 NOTE: Ensure that came with multimedia buttons, press the Play button. For the location of the eject button, see the media software that you follow all copyright laws when copying media. To format media for the task you will damage the drive....
...Some computers launch an auto-play selection window. NOTE: Do not move the computer while playing or recording CDs and DVDs. 1 Press the eject button to accomplish such as you are attempting to remove a pre-installed cd. Select the function for storing or copying data, see the ...8594; Copy. 2 Copy the disk. Multimedia 205 NOTE: Ensure that came with multimedia buttons, press the Play button. For the location of the eject button, see the media software that you follow all copyright laws when copying media. To format media for the task you will damage the drive....
Dell™ Technology Guide
Page 206
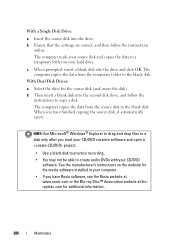
... to a temporary folder on the website for the media software installed in your computer. • If you have finished copying the source disk, it automatically ejects. b Then insert a blank disk into the drive and click OK. The computer reads your source disk and copies the data to the blank disk. See...
... to a temporary folder on the website for the media software installed in your computer. • If you have finished copying the source disk, it automatically ejects. b Then insert a blank disk into the drive and click OK. The computer reads your source disk and copies the data to the blank disk. See...
Setup Guide
Page 19
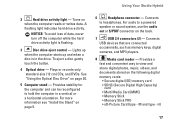
... 2.0 connectors (2) - H) 17 For audio to view and share digital photos, music, videos, and documents stored on when the computer reads or writes data. Using Your Studio Hybrid 2 Hard drive activity light - Turns on the following digital memory cards: • Secure digital (SD) memory card • SDHC (Secure Digital High Capacity) card ... Stick • Memory Stick PRO • xD-Picture Card (type - Lights up when the computer starts up and when a disc is flashing. 3 Disc drive eject control - To eject a disc gently touch the button. 4 Optical drive -
... 2.0 connectors (2) - H) 17 For audio to view and share digital photos, music, videos, and documents stored on when the computer reads or writes data. Using Your Studio Hybrid 2 Hard drive activity light - Turns on the following digital memory cards: • Secure digital (SD) memory card • SDHC (Secure Digital High Capacity) card ... Stick • Memory Stick PRO • xD-Picture Card (type - Lights up when the computer starts up and when a disc is flashing. 3 Disc drive eject control - To eject a disc gently touch the button. 4 Optical drive -
Setup Guide
Page 22
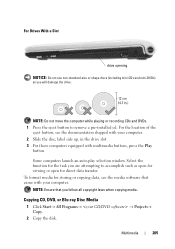
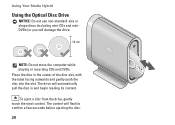
To eject a disc from the drive, gently touch the eject control. The drive will flash to confirm a few seconds before ejecting the disc. 20 The control will automatically pull the disc in the center of the disc slot, with the label facing outwards and gently push the disc into the slot. Using Your Studio Hybrid Using the Optical Disc Drive NOTICE: Do not use non-standard-size or shape discs (including mini-CDs and miniDVDs) or you will damage the drive. 12 cm NOTE: Do not move the computer while playing or recording CDs and DVDs. Place the disc in and begin reading its content.
To eject a disc from the drive, gently touch the eject control. The drive will flash to confirm a few seconds before ejecting the disc. 20 The control will automatically pull the disc in the center of the disc slot, with the label facing outwards and gently push the disc into the slot. Using Your Studio Hybrid Using the Optical Disc Drive NOTICE: Do not use non-standard-size or shape discs (including mini-CDs and miniDVDs) or you will damage the drive. 12 cm NOTE: Do not move the computer while playing or recording CDs and DVDs. Place the disc in and begin reading its content.

Setup Guide
Page 57
... energy settings 23 D damage, avoiding 5 data, backing up 23 DellConnect 41 Dell Diagnostics 33 Dell Factory Image Restore 35 Dell Support Center 30 Dell support website 47 Dell Technology Guide for futher information 46 Diagnostic Checklist 44 disc drive supported disc sizes 20 discs ejecting 20 using 20 display, connecting 8 drivers and downloads 47 DVDs, playing...
... energy settings 23 D damage, avoiding 5 data, backing up 23 DellConnect 41 Dell Diagnostics 33 Dell Factory Image Restore 35 Dell Support Center 30 Dell support website 47 Dell Technology Guide for futher information 46 Diagnostic Checklist 44 disc drive supported disc sizes 20 discs ejecting 20 using 20 display, connecting 8 drivers and downloads 47 DVDs, playing...
Setup Guide
Page 58
Index E eject button 17 email addresses for technical support 42 energy conserving 23 expansion bus 49 Express Service Code 19 F finding more information 46 front-side connectors 16 FTP login, anonymous 42 H hard drive type 48 hard drive activity light 17 56 hardware problems diagnosing 32 Hardware Troubleshooter 32 HDMI connector location 19 display 8 headphone back connector 19 front connector 17 help getting assistance and support 40 horizontal and vertical stand options 5 horizontal stand using or changing 6 I IEEE 1394 connector 19 installing the stand 5
Index E eject button 17 email addresses for technical support 42 energy conserving 23 expansion bus 49 Express Service Code 19 F finding more information 46 front-side connectors 16 FTP login, anonymous 42 H hard drive type 48 hard drive activity light 17 56 hardware problems diagnosing 32 Hardware Troubleshooter 32 HDMI connector location 19 display 8 headphone back connector 19 front connector 17 help getting assistance and support 40 horizontal and vertical stand options 5 horizontal stand using or changing 6 I IEEE 1394 connector 19 installing the stand 5


