
Service Manual
Page 1
Dell Studio™ 1555 Service Manual Before You Begin Base Cover Hard Drive Memory Communication Cards Coin-Cell Battery Center Control Cover Keyboard Display Power Button Board Camera (Optional) Palm Rest Speaker Assembly Optical Drive ExpressCard Board AC Adapter Connector USB ...in any manner whatsoever without notice. © 2008 Dell Inc. All rights reserved. Bluetooth is subject to either trademarks or registered trademarks of Dell Inc.; Microsoft, Windows, Windows Vista, and Windows Vista start button logo are trademarks of Microsoft Corporation in the United States...
Dell Studio™ 1555 Service Manual Before You Begin Base Cover Hard Drive Memory Communication Cards Coin-Cell Battery Center Control Cover Keyboard Display Power Button Board Camera (Optional) Palm Rest Speaker Assembly Optical Drive ExpressCard Board AC Adapter Connector USB ...in any manner whatsoever without notice. © 2008 Dell Inc. All rights reserved. Bluetooth is subject to either trademarks or registered trademarks of Dell Inc.; Microsoft, Windows, Windows Vista, and Windows Vista start button logo are trademarks of Microsoft Corporation in the United States...
Service Manual
Page 3
...all open programs before you turn off when you have performed the steps in your operating system, press and hold the power button for removing and installing the components in Before Working Inside Your Computer. Ensure that the connectors are turned off. Before Working ... avoid electrostatic discharge, ground yourself by using a wrist grounding strap or by your computer. Back to Contents Page Before You Begin Dell Studio™ 1555 Service Manual Recommended Tools Turning Off Your Computer Before Working Inside Your Computer This document provides procedures for at least 8 to 10 ...
...all open programs before you turn off when you have performed the steps in your operating system, press and hold the power button for removing and installing the components in Before Working Inside Your Computer. Ensure that the connectors are turned off. Before Working ... avoid electrostatic discharge, ground yourself by using a wrist grounding strap or by your computer. Back to Contents Page Before You Begin Dell Studio™ 1555 Service Manual Recommended Tools Turning Off Your Computer Before Working Inside Your Computer This document provides procedures for at least 8 to 10 ...
Service Manual
Page 36
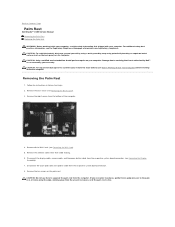
...the base cover (see the Regulatory Compliance Homepage at www.dell.com/regulatory_compliance. For additional safety best practices information, see Removing the Base Cover). 3. Disconnect the display cable, camera cable, and the power button cable from their cable routing. 6. Removing the Palm Rest... not use force to separate the palm rest from the respective system board connectors. 8. Back to Contents Page Palm Rest Dell Studio™ 1555 Service Manual Removing the Palm Rest Replacing the Palm Rest WARNING: Before working inside the computer. CAUTION: Only a certified ...
...the base cover (see the Regulatory Compliance Homepage at www.dell.com/regulatory_compliance. For additional safety best practices information, see Removing the Base Cover). 3. Disconnect the display cable, camera cable, and the power button cable from their cable routing. 6. Removing the Palm Rest... not use force to separate the palm rest from the respective system board connectors. 8. Back to Contents Page Palm Rest Dell Studio™ 1555 Service Manual Removing the Palm Rest Replacing the Palm Rest WARNING: Before working inside the computer. CAUTION: Only a certified ...
Service Manual
Page 38
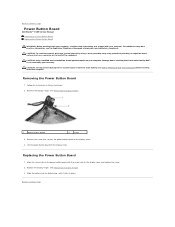
...Button Board Dell Studio™ 1555 Service Manual Removing the Power Button Board Replacing the Power Button Board WARNING: Before working inside your computer, read the safety information that secures the power button board to the display cover. 4. Damage due to servicing that is not authorized by Dell... the display hinges (see Removing the Display Hinges). 1 power button board 2 screw 3. Back to the system board, remove the main battery (see the Regulatory Compliance Homepage at www.dell.com/regulatory_compliance. CAUTION: To avoid electrostatic discharge, ground yourself by...
...Button Board Dell Studio™ 1555 Service Manual Removing the Power Button Board Replacing the Power Button Board WARNING: Before working inside your computer, read the safety information that secures the power button board to the display cover. 4. Damage due to servicing that is not authorized by Dell... the display hinges (see Removing the Display Hinges). 1 power button board 2 screw 3. Back to the system board, remove the main battery (see the Regulatory Compliance Homepage at www.dell.com/regulatory_compliance. CAUTION: To avoid electrostatic discharge, ground yourself by...
Service Manual
Page 47
..., Windows, Windows Vista, and Windows Vista start button logo are either the entities claiming the marks and names or their products. disclaims any proprietary interest in any manner whatsoever without notice. © 2008 Dell Inc. Trademarks used in this document to refer...in this document is a registered trademark owned by Dell under license; CAUTION: A CAUTION indicates potential damage to hardware or loss of your computer. December 2008 Rev. All rights reserved. Back to Contents Page Dell Studio™ 1555 Service Manual NOTE: A NOTE indicates important information that...
..., Windows, Windows Vista, and Windows Vista start button logo are either the entities claiming the marks and names or their products. disclaims any proprietary interest in any manner whatsoever without notice. © 2008 Dell Inc. Trademarks used in this document to refer...in this document is a registered trademark owned by Dell under license; CAUTION: A CAUTION indicates potential damage to hardware or loss of your computer. December 2008 Rev. All rights reserved. Back to Contents Page Dell Studio™ 1555 Service Manual NOTE: A NOTE indicates important information that...
Setup Guide
Page 14
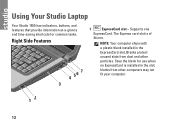
Save the blank for common tasks. NOTE: Your computer ships with a plastic blank installed in the slot; Blanks protect unused slots from other particles. Supports one ExpressCard. The Express card slot is installed in the ExpressCard slot. Right Side Features 4 56 7 3 1 ExpressCard slot - Using Your Studio Laptop Your Studio 1555 has indicators, buttons, and features that provide information at-a-glance and time-saving shortcuts for use when no ExpressCard is of 34 mm. blanks from dust and other computers may not fit your computer. 12 12
Save the blank for common tasks. NOTE: Your computer ships with a plastic blank installed in the slot; Blanks protect unused slots from other particles. Supports one ExpressCard. The Express card slot is installed in the ExpressCard slot. Right Side Features 4 56 7 3 1 ExpressCard slot - Using Your Studio Laptop Your Studio 1555 has indicators, buttons, and features that provide information at-a-glance and time-saving shortcuts for use when no ExpressCard is of 34 mm. blanks from dust and other computers may not fit your computer. 12 12


