User Guide
Page 4
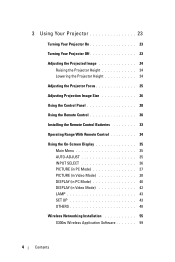
... Height 24 Lowering the Projector Height 24 Adjusting the Projector Focus 25 Adjusting Projection Image Size 26 Using the Control Panel 28 Using the Remote Control 30 Installing the Remote Control Batteries 33 Operating Range With Remote Control 34 Using the On-Screen Display 35 Main Menu 35 AUTO-ADJUST 35 INPUT SELECT 36 PICTURE (in PC...
... Height 24 Lowering the Projector Height 24 Adjusting the Projector Focus 25 Adjusting Projection Image Size 26 Using the Control Panel 28 Using the Remote Control 30 Installing the Remote Control Batteries 33 Operating Range With Remote Control 34 Using the On-Screen Display 35 Main Menu 35 AUTO-ADJUST 35 INPUT SELECT 36 PICTURE (in PC...
User Guide
Page 6
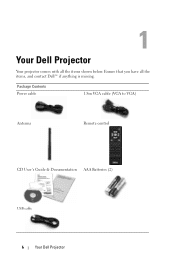
1 Your Dell Projector Your projector comes with all the items, and contact Dell™ if anything is missing. Package Contents Power cable 1.8m VGA cable (VGA to VGA) Antenna Remote control CD User's Guide & Documentation AAA Batteries (2) USB cable 6 Your Dell Projector Ensure that you have all the items shown below.
1 Your Dell Projector Your projector comes with all the items, and contact Dell™ if anything is missing. Package Contents Power cable 1.8m VGA cable (VGA to VGA) Antenna Remote control CD User's Guide & Documentation AAA Batteries (2) USB cable 6 Your Dell Projector Ensure that you have all the items shown below.
User Guide
Page 11
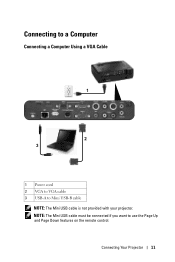
NOTE: The Mini USB cable must be connected if you want to Mini USB-B cable NOTE: The Mini USB cable is not provided with your projector. Connecting Your Projector 11 Connecting to a Computer Connecting a Computer Using a VGA Cable 1 2 3 1 Power cord 2 VGA to VGA cable 3 USB-A to use the Page Up and Page Down features on the remote control.
NOTE: The Mini USB cable must be connected if you want to Mini USB-B cable NOTE: The Mini USB cable is not provided with your projector. Connecting Your Projector 11 Connecting to a Computer Connecting a Computer Using a VGA Cable 1 2 3 1 Power cord 2 VGA to VGA cable 3 USB-A to use the Page Up and Page Down features on the remote control.
User Guide
Page 13
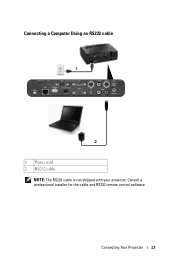
Connecting Your Projector 13 Consult a professional installer for the cable and RS232 remote control software. Connecting a Computer Using an RS232 cable 1 2 1 Power cord 2 RS232 cable NOTE: The RS232 cable is not shipped with your projector.
Connecting Your Projector 13 Consult a professional installer for the cable and RS232 remote control software. Connecting a Computer Using an RS232 cable 1 2 1 Power cord 2 RS232 cable NOTE: The RS232 cable is not shipped with your projector.
User Guide
Page 23
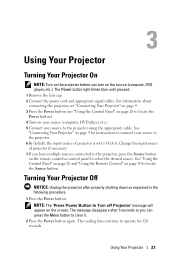
... Off NOTICE: Unplug the projector after 5 seconds or you turn on the source (computer, DVD player, etc.). See "Using the Control Panel" on page 28 and "Using the Remote Control" on the remote control or control panel to locate the Source button. The message disappears after properly shutting down as explained in the following procedure. 1 Press...
... Off NOTICE: Unplug the projector after 5 seconds or you turn on the source (computer, DVD player, etc.). See "Using the Control Panel" on page 28 and "Using the Remote Control" on the remote control or control panel to locate the Source button. The message disappears after properly shutting down as explained in the following procedure. 1 Press...
User Guide
Page 29
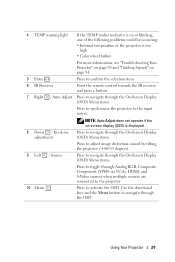
... activate the OSD. NOTE: Auto Adjust does not operate if the on page 94. 5 Enter Press to confirm the selection item. 6 IR Receiver Point the remote control towards the IR receiver and press a button. 7 Right / Auto Adjust Press to navigate through the OSD. Using Your Projector 29
... activate the OSD. NOTE: Auto Adjust does not operate if the on page 94. 5 Enter Press to confirm the selection item. 6 IR Receiver Point the remote control towards the IR receiver and press a button. 7 Right / Auto Adjust Press to navigate through the OSD. Using Your Projector 29

User Guide
Page 30
For more information, see "Turning Your Projector On" on page 23 and "Turning Your Projector Off" on or off. Using the Remote Control 1 15 2 16 3 4 17 5 18 6 19 7 21 8 20 9 22 10 23 11 24 12 14 25 13 26 1 Power 2 Enter 3 Right 4 Down Turns the projector on page 23. Press to navigate through the On-Screen Display (OSD) Menu items. Press to confirm the selection. Press to navigate through the On-Screen Display (OSD) Menu items. 30 Using Your Projector
For more information, see "Turning Your Projector On" on page 23 and "Turning Your Projector Off" on or off. Using the Remote Control 1 15 2 16 3 4 17 5 18 6 19 7 21 8 20 9 22 10 23 11 24 12 14 25 13 26 1 Power 2 Enter 3 Right 4 Down Turns the projector on page 23. Press to navigate through the On-Screen Display (OSD) Menu items. Press to confirm the selection. Press to navigate through the On-Screen Display (OSD) Menu items. 30 Using Your Projector
User Guide
Page 31
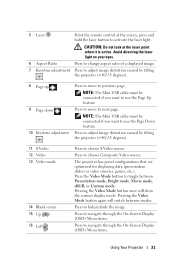
5 Laser Point the remote control at the laser point when it is active. CAUTION: Do not look at the screen, press and hold the laser button to use the Page ...
5 Laser Point the remote control at the laser point when it is active. CAUTION: Do not look at the screen, press and hold the laser button to use the Page ...
User Guide
Page 33
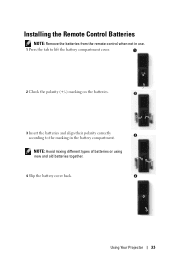
NOTE: Avoid mixing different types of batteries or using new and old batteries together. 4 Slip the battery cover back. 4 Using Your Projector 33 Installing the Remote Control Batteries NOTE: Remove the batteries from the remote control when not in use. 1 Press the tab to lift the battery compartment cover. 1 2 Check the polarity (+/-) marking on the batteries. 2 3 Insert the batteries and align their polarity correctly 3 according to the marking in the battery compartment.
NOTE: Avoid mixing different types of batteries or using new and old batteries together. 4 Slip the battery cover back. 4 Using Your Projector 33 Installing the Remote Control Batteries NOTE: Remove the batteries from the remote control when not in use. 1 Press the tab to lift the battery compartment cover. 1 2 Check the polarity (+/-) marking on the batteries. 2 3 Insert the batteries and align their polarity correctly 3 according to the marking in the battery compartment.
User Guide
Page 34
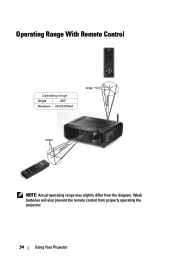
Weak batteries will also prevent the remote control from the diagram. Operating Range With Remote Control Distance Operating range Angle ±20° Distance 7m/22.97feet Angle Angle Distance NOTE: Actual operating range may slightly differ from properly operating the projector. 34 Using Your Projector
Weak batteries will also prevent the remote control from the diagram. Operating Range With Remote Control Distance Operating range Angle ±20° Distance 7m/22.97feet Angle Angle Distance NOTE: Actual operating range may slightly differ from properly operating the projector. 34 Using Your Projector
User Guide
Page 35
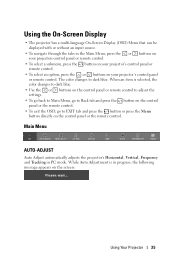
...source. • To navigate through the tabs in the Main Menu, press the or buttons on your projectors control panel or remote control. • To select a submenu, press the button on your projector's control panel or remote control. While Auto Adjustment is selected, the color changes to dark blue. • Use the or buttons on the... adjust the settings. • To go back to Main Menu, go to Back tab and press the button on the control panel or the remote control. • To exit the OSD, go to dark blue. The color changes to EXIT tab and press the button or press the Menu button ...
...source. • To navigate through the tabs in the Main Menu, press the or buttons on your projectors control panel or remote control. • To select a submenu, press the button on your projector's control panel or remote control. While Auto Adjustment is selected, the color changes to dark blue. • Use the or buttons on the... adjust the settings. • To go back to Main Menu, go to Back tab and press the button on the control panel or the remote control. • To exit the OSD, go to dark blue. The color changes to EXIT tab and press the button or press the Menu button ...
User Guide
Page 48
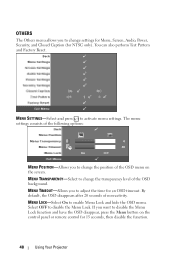
...-Select and press to change the position of non-activity. By default, the OSD disappears after 20 seconds of the OSD menu on the control panel or remote control for an OSD timeout. OTHERS The Others menu allows you to change the transparency level of the OSD background. If you to adjust the...
...-Select and press to change the position of non-activity. By default, the OSD disappears after 20 seconds of the OSD menu on the control panel or remote control for an OSD timeout. OTHERS The Others menu allows you to change the transparency level of the OSD background. If you to adjust the...

User Guide
Page 67
... Back No function No function NOTE: If you enter OSD menu while using PtG, PtG navigation by up , down and left buttons to navigate and control panel or remote control to select.
... Back No function No function NOTE: If you enter OSD menu while using PtG, PtG navigation by up , down and left buttons to navigate and control panel or remote control to select.
User Guide
Page 85
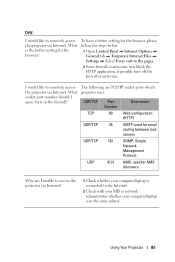
... with your MIS or network administrator whether your computer/laptop is the better setting for the browser, please follow the steps below: 1 Open Control Panel Internet Options General tab Temporary Internet Files Settings Select Every visit to the pages. 2 Some firewall or anti-virus may block the HTTP... UDP/TCP 161 SNMP: Simple Network Management Protocol UDP 9131 AMX: used for it in the same subnet. TIPS: I would like to remotely access The following are TCP/IP socket ports which the projector via Internet. Using Your Projector 85 To have a better setting for the browser...
... with your MIS or network administrator whether your computer/laptop is the better setting for the browser, please follow the steps below: 1 Open Control Panel Internet Options General tab Temporary Internet Files Settings Select Every visit to the pages. 2 Some firewall or anti-virus may block the HTTP... UDP/TCP 161 SNMP: Simple Network Management Protocol UDP 9131 AMX: used for it in the same subnet. TIPS: I would like to remotely access The following are TCP/IP socket ports which the projector via Internet. Using Your Projector 85 To have a better setting for the browser...
User Guide
Page 91
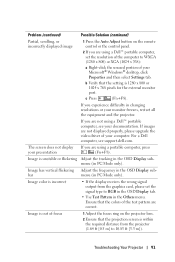
...only). If images are not displayed properly, please upgrade the video driver of focus 1 Adjust the focus ring on the remote control or the control panel. 2 If you are not using a Dell™ portable computer, set the signal type to RGB in the OSD Display tab. • Use Test Pattern in...Image color is within the required distance from the graphics card, please set the resolution of the computer to 10.83 ft [3.3 m]). For a Dell computer, see your monitor freezes, restart all the equipment and the projector. bar menu (in the OSD Display sub- Ensure that the projection screen ...
...only). If images are not displayed properly, please upgrade the video driver of focus 1 Adjust the focus ring on the remote control or the control panel. 2 If you are not using a Dell™ portable computer, set the signal type to RGB in the OSD Display tab. • Use Test Pattern in...Image color is within the required distance from the graphics card, please set the resolution of the computer to 10.83 ft [3.3 m]). For a Dell computer, see your monitor freezes, restart all the equipment and the projector. bar menu (in the OSD Display sub- Ensure that the projection screen ...
User Guide
Page 93
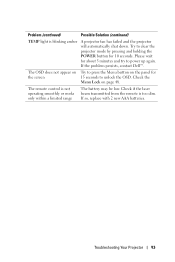
... about 5 minutes and try to power up again. The remote control is too dim. Check if the laser beam transmitted from the remote is not operating smoothly or works only within a limited range The battery may be low. If the problem persists, contact Dell™. Please wait for 10 seconds. The OSD does not...
... about 5 minutes and try to power up again. The remote control is too dim. Check if the laser beam transmitted from the remote is not operating smoothly or works only within a limited range The battery may be low. If the problem persists, contact Dell™. Please wait for 10 seconds. The OSD does not...
User Guide
Page 100
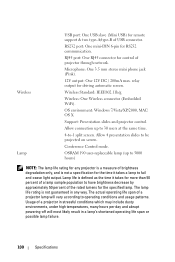
... operating life span or possible lamp failure. 100 Specifications RS232 port: One mini-DIN 6-pin for remote support & two type-A/type-B of projector through network. Conference Control mode. Wireless Lamp USB port: One USB slave (Mini USB) for RS232 communication. RJ45 port:... connector for driving automatic screen. OS environment: Windows 7/Vista/XP/2000, MAC OS X Support: Presentation slides and projector control. relay output for control of USB connector. Allow 4 presentation slides to operating conditions and usage patterns. Lamp life is not a specification for the...
... operating life span or possible lamp failure. 100 Specifications RS232 port: One mini-DIN 6-pin for remote support & two type-A/type-B of projector through network. Conference Control mode. Wireless Lamp USB port: One USB slave (Mini USB) for RS232 communication. RJ45 port:... connector for driving automatic screen. OS environment: Windows 7/Vista/XP/2000, MAC OS X Support: Presentation slides and projector control. relay output for control of USB connector. Allow 4 presentation slides to operating conditions and usage patterns. Lamp life is not a specification for the...
User Guide
Page 108
... A Viewer connector 9 USB Type B Display connector 9 VGA-A input (D-sub) connector 9 VGA-A output (monitor loop-through) 9 VGA-B input (D-sub) connector 9 Contact Dell 6, 92, 96 Control Panel 28 D Dell contacting 103 M Main Unit 7 Antenna 7 Control panel 7 Focus tab 7 IR receivers 7 Lens 7 Lens cap 7 Menu Position 48 Menu Settings 48 Menu Timeout 48 Menu Transparency 48 Mute... 103 Power Saving 50 Power Settings 50 Powering On/Off the Projector Powering Off the Projector 23 Powering On the Projector 23 Q Quick Shutdown 50 R Remote Control 30 IR receiver 29 Reset 49 Reset, Factory 54 108 Index
... A Viewer connector 9 USB Type B Display connector 9 VGA-A input (D-sub) connector 9 VGA-A output (monitor loop-through) 9 VGA-B input (D-sub) connector 9 Contact Dell 6, 92, 96 Control Panel 28 D Dell contacting 103 M Main Unit 7 Antenna 7 Control panel 7 Focus tab 7 IR receivers 7 Lens 7 Lens cap 7 Menu Position 48 Menu Settings 48 Menu Timeout 48 Menu Transparency 48 Mute... 103 Power Saving 50 Power Settings 50 Powering On/Off the Projector Powering Off the Projector 23 Powering On the Projector 23 Q Quick Shutdown 50 R Remote Control 30 IR receiver 29 Reset 49 Reset, Factory 54 108 Index


