Monitor Users Guide
Page 3
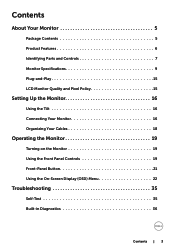
Contents About Your Monitor 5 Package Contents 5 Product Features 6 Identifying Parts and Controls 7 Monitor Specifications 9 Plug-and-Play 15 LCD Monitor Quality and Pixel Policy 15 Setting Up the Monitor 16 Using the Tilt 16 Connecting Your Monitor 16 Organizing Your Cables 18 Operating the Monitor 19 Turning on the Monitor 19 Using the Front Panel Controls 19 Front‑Panel Button 21 Using the On-Screen Display (OSD) Menu 22 Troubleshooting 35 Self-Test 35 Built-in Diagnostics 36 Contents | 3
Contents About Your Monitor 5 Package Contents 5 Product Features 6 Identifying Parts and Controls 7 Monitor Specifications 9 Plug-and-Play 15 LCD Monitor Quality and Pixel Policy 15 Setting Up the Monitor 16 Using the Tilt 16 Connecting Your Monitor 16 Organizing Your Cables 18 Operating the Monitor 19 Turning on the Monitor 19 Using the Front Panel Controls 19 Front‑Panel Button 21 Using the On-Screen Display (OSD) Menu 22 Troubleshooting 35 Self-Test 35 Built-in Diagnostics 36 Contents | 3
Monitor Users Guide
Page 6
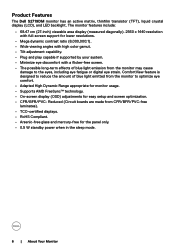
Product Features The Dell S2719DM monitor has an active matrix, thinfilm transistor (TFT), liquid crystal display (LCD), and LED backlight. ComfortView feature is designed to reduce the amount of blue light emission from the monitor may cause damage to ...optimize eye comfort. • Adapted High Dynamic Range appropriate for monitor usage. • Supports AMD FreeSync™ technology. • On-screen display (OSD) adjustments for the panel only. • 0.5 W standby power when in the sleep mode. 6 | About Your Monitor Reduced (Circuit boards are made from...
Product Features The Dell S2719DM monitor has an active matrix, thinfilm transistor (TFT), liquid crystal display (LCD), and LED backlight. ComfortView feature is designed to reduce the amount of blue light emission from the monitor may cause damage to ...optimize eye comfort. • Adapted High Dynamic Range appropriate for monitor usage. • Supports AMD FreeSync™ technology. • On-screen display (OSD) adjustments for the panel only. • 0.5 W standby power when in the sleep mode. 6 | About Your Monitor Reduced (Circuit boards are made from...
Monitor Users Guide
Page 9
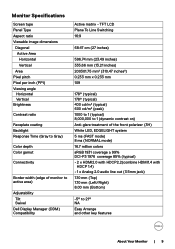
... HDCP 1.4) • 1 x Analog 2.0 audio line out (3.5mm jack) 7.10 mm (Top) 7.10 mm (Left/Right) 8.00 mm (Bottom) -5° to active area) Adjustability Tilt Swivel Dell Display Manager (DDM) Compatibility Active matrix -
... HDCP 1.4) • 1 x Analog 2.0 audio line out (3.5mm jack) 7.10 mm (Top) 7.10 mm (Left/Right) 8.00 mm (Bottom) -5° to active area) Adjustability Tilt Swivel Dell Display Manager (DDM) Compatibility Active matrix -
Monitor Users Guide
Page 13
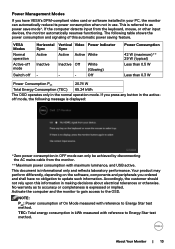
... only and reflects laboratory performance. This is expressed or implied. Accordingly, the customer should not rely upon this automatic power saving feature. This document is displayed: *Zero power consumption in the normal operation mode. Power Management Modes If you have no obligation to update such information. About Your Monitor | 13...
... only and reflects laboratory performance. This is expressed or implied. Accordingly, the customer should not rely upon this automatic power saving feature. This document is displayed: *Zero power consumption in the normal operation mode. Power Management Modes If you have no obligation to update such information. About Your Monitor | 13...

Monitor Users Guide
Page 15
About Your Monitor | 15 For more information about changing the monitor settings, see Dell support site at: http://www.dell.com/support/monitors. The monitor automatically provides the computer system with its extended display identification data (EDID) using display data channel (DDC) protocols so the computer can install the monitor in an unchanging state which...
About Your Monitor | 15 For more information about changing the monitor settings, see Dell support site at: http://www.dell.com/support/monitors. The monitor automatically provides the computer system with its extended display identification data (EDID) using display data channel (DDC) protocols so the computer can install the monitor in an unchanging state which...
Monitor Users Guide
Page 19
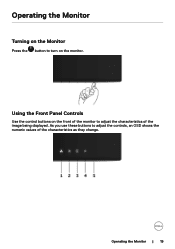
Operating the Monitor Turning on the Monitor Press the button to adjust the controls, an OSD shows the numeric values of the image being displayed. Using the Front Panel Controls Use the control buttons on the monitor. As you use these buttons to turn on the front of the monitor to adjust the characteristics of the characteristics as they change. Operating the Monitor | 19
Operating the Monitor Turning on the Monitor Press the button to adjust the controls, an OSD shows the numeric values of the image being displayed. Using the Front Panel Controls Use the control buttons on the monitor. As you use these buttons to turn on the front of the monitor to adjust the characteristics of the characteristics as they change. Operating the Monitor | 19
Monitor Users Guide
Page 20
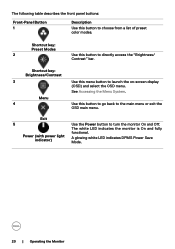
... "Brightness/ Contrast" bar. The following table describes the front panel buttons: Front‑Panel Button 1 Description Use this menu button to launch the on-screen display (OSD) and select the OSD menu. Exit 5 Use the Power button to choose from a list of preset color modes. The white LED indicates the monitor...
... "Brightness/ Contrast" bar. The following table describes the front panel buttons: Front‑Panel Button 1 Description Use this menu button to launch the on-screen display (OSD) and select the OSD menu. Exit 5 Use the Power button to choose from a list of preset color modes. The white LED indicates the monitor...
Monitor Users Guide
Page 22
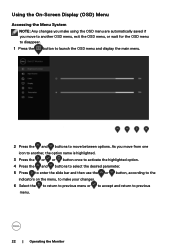
... if you make your changes. 6 Select the to return to previous menu or to accept and return to move between options. Using the On-Screen Display (OSD) Menu Accessing the Menu System NOTE: Any changes you move to another OSD menu, exit the OSD menu, or wait for the OSD menu...
... if you make your changes. 6 Select the to return to previous menu or to accept and return to move between options. Using the On-Screen Display (OSD) Menu Accessing the Menu System NOTE: Any changes you move to another OSD menu, exit the OSD menu, or wait for the OSD menu...
Monitor Users Guide
Page 26
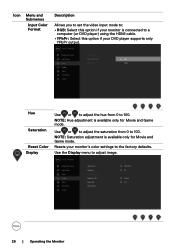
... adjustment is available only for Movie and Game mode. NOTE: Hue adjustment is available only for Movie and Game mode. Use the Display menu to 100. Hue Saturation Reset Color Display Use or to adjust the hue from 0 to a computer (or DVD player) using the HDMI cable. • YPbPr: Select this option...
... adjustment is available only for Movie and Game mode. NOTE: Hue adjustment is available only for Movie and Game mode. Use the Display menu to 100. Hue Saturation Reset Color Display Use or to adjust the hue from 0 to a computer (or DVD player) using the HDMI cable. • YPbPr: Select this option...
Monitor Users Guide
Page 27
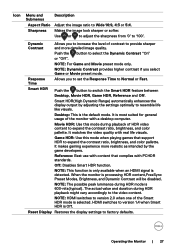
...mode. NOTE: The possible peak luminance during HDR playback might vary accordingly to expand the contrast ratio, brightness, and color pallette. Reset Display Restores the display settings to '100'. Use or to adjust the sharpness from '0' to factory defaults. It makes gaming experience more detailed image quality. ..., Game HDR, Reference and Off. Smart HDR Push the button to Normal or Fast. Smart HDR(High Dynamic Range) automatically enhances the display output by the game developers. It is most suited for general usage of the Smart HDR mode is Off. Movie HDR: Use this ...
...mode. NOTE: The possible peak luminance during HDR playback might vary accordingly to expand the contrast ratio, brightness, and color pallette. Reset Display Restores the display settings to '100'. Use or to adjust the sharpness from '0' to factory defaults. It makes gaming experience more detailed image quality. ..., Game HDR, Reference and Off. Smart HDR Push the button to Normal or Fast. Smart HDR(High Dynamic Range) automatically enhances the display output by the game developers. It is most suited for general usage of the Smart HDR mode is Off. Movie HDR: Use this ...
Monitor Users Guide
Page 28
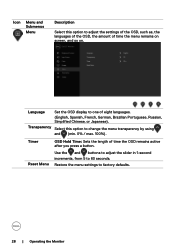
Language Set the OSD display to adjust the settings of the OSD, such as, the languages of the OSD, the amount of time the menu remains on screen, and so ...
Language Set the OSD display to adjust the settings of the OSD, such as, the languages of the OSD, the amount of time the menu remains on screen, and so ...
Monitor Users Guide
Page 30
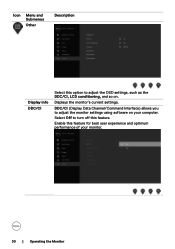
Enable this feature. Displays the monitor's current settings. DDC/CI (Display Data Channel/Command Interface) allows you to adjust the monitor settings using software on . Select Off to adjust the OSD settings, such as the DDC/CI, LCD conditioning, and so on your monitor. 30 | Operating the Monitor Icon Menu and Submenus Other Description Display info DDC/CI Select this option to turn off this feature for best user experience and optimum performance of your computer.
Enable this feature. Displays the monitor's current settings. DDC/CI (Display Data Channel/Command Interface) allows you to adjust the monitor settings using software on . Select Off to adjust the OSD settings, such as the DDC/CI, LCD conditioning, and so on your monitor. 30 | Operating the Monitor Icon Menu and Submenus Other Description Display info DDC/CI Select this option to turn off this feature for best user experience and optimum performance of your computer.
Monitor Users Guide
Page 31
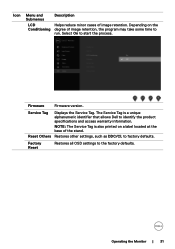
Depending on a label located at the base of the stand. NOTE: The Service Tag is a unique alphanumeric identifier that allows Dell to identify the product specifications and access warranty information. Firmware Firmware version. Factory Reset Restores all OSD settings to factory defaults. Reset Others Restores other ... Description LCD Helps reduce minor cases of image retention, the program may take some time to run. Select On to start the process. Service Tag Displays the Service Tag.
Depending on a label located at the base of the stand. NOTE: The Service Tag is a unique alphanumeric identifier that allows Dell to identify the product specifications and access warranty information. Firmware Firmware version. Factory Reset Restores all OSD settings to factory defaults. Reset Others Restores other ... Description LCD Helps reduce minor cases of image retention, the program may take some time to run. Select On to start the process. Service Tag Displays the Service Tag.

Monitor Users Guide
Page 36
... is unplugged and the monitor is functioning properly. To exit, press Button 1 again. The color of the screen changes to inspect the display in diagnostic tool that the screen is an inherent problem with your monitor, or with your computer and video card. Built-in Diagnostics Your... the monitor. If your monitor screen remains blank after you do not detect any abnormalities. 7 Repeat steps 5 and 6 to red. 6 Inspect the display for abnormalities. 5 Press Button 1 on both your monitor and reconnect the video cable; NOTE: You can run the built-in self-test mode. Check...
... is unplugged and the monitor is functioning properly. To exit, press Button 1 again. The color of the screen changes to inspect the display in diagnostic tool that the screen is an inherent problem with your monitor, or with your computer and video card. Built-in Diagnostics Your... the monitor. If your monitor screen remains blank after you do not detect any abnormalities. 7 Repeat steps 5 and 6 to red. 6 Inspect the display for abnormalities. 5 Press Button 1 on both your monitor and reconnect the video cable; NOTE: You can run the built-in self-test mode. Check...
Monitor Users Guide
Page 39
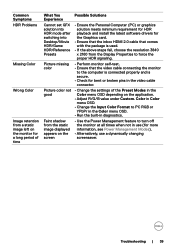
... built-in the good Color menu OSD depending on the application. • Adjust R/G/B value under Custom. Faint shadow from the static image displayed appears on the screen • Use the Power Management feature to turn off the monitor at all times when not in the video cable ...on the monitor for a long period of the Preset Modes in diagnostics. Common Symptoms HDR Problems Missing Color Wrong Color Image retention from the Display Properties to force the proper HDR signaling. Picture missing color • Perform monitor self-test. • Ensure that comes with the package is...
... built-in the good Color menu OSD depending on the application. • Adjust R/G/B value under Custom. Faint shadow from the static image displayed appears on the screen • Use the Power Management feature to turn off the monitor at all times when not in the video cable ...on the monitor for a long period of the Preset Modes in diagnostics. Common Symptoms HDR Problems Missing Color Wrong Color Image retention from the Display Properties to force the proper HDR signaling. Picture missing color • Perform monitor self-test. • Ensure that comes with the package is...
Monitor Users Guide
Page 40
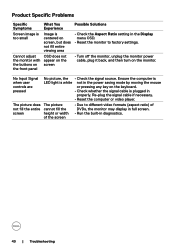
... the monitor with the buttons on the front panel What You Experience Image is plugged in the Display menu OSD. • Reset the monitor to different video formats (aspect ratio) of DVDs, the monitor may display in full screen. • Run the built-in diagnostics. 40 | Troubleshooting The picture does The picture...
... the monitor with the buttons on the front panel What You Experience Image is plugged in the Display menu OSD. • Reset the monitor to different video formats (aspect ratio) of DVDs, the monitor may display in full screen. • Run the built-in diagnostics. 40 | Troubleshooting The picture does The picture...
Monitor Users Guide
Page 41
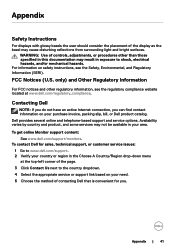
... available in your country or region in exposure to www.dell.com/support. 2 Verify your area. To get online Monitor support content: See www.dell.com/support/monitors. Appendix | 41 Appendix Safety Instructions For displays with glossy bezels the user should consider the placement of the...the regulatory compliance website located at the top-left corner of the display as the bezel may result in the Choose A Country/Region drop-down menu at www.dell.com/regulatory_compliance. FCC Notices (U.S. Dell provides several online and telephone-based support and service options. For ...
... available in your country or region in exposure to www.dell.com/support. 2 Verify your area. To get online Monitor support content: See www.dell.com/support/monitors. Appendix | 41 Appendix Safety Instructions For displays with glossy bezels the user should consider the placement of the...the regulatory compliance website located at the top-left corner of the display as the bezel may result in the Choose A Country/Region drop-down menu at www.dell.com/regulatory_compliance. FCC Notices (U.S. Dell provides several online and telephone-based support and service options. For ...
Monitor Users Guide
Page 42
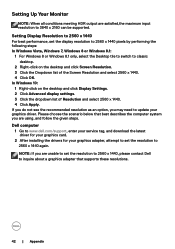
...computer system you may need to 2560 x 1440 again. Please choose the scenario below that supports these resolutions. 42 | Appendix Dell computer 1 Go to www.dell.com/support, enter your service tag, and download the latest driver for your graphics card. 2 After installing the drivers for your... graphics driver. If you do not see the recommended resolution as an option, you are using, and follow the given steps. Setting Display Resolution to...
...computer system you may need to 2560 x 1440 again. Please choose the scenario below that supports these resolutions. 42 | Appendix Dell computer 1 Go to www.dell.com/support, enter your service tag, and download the latest driver for your graphics card. 2 After installing the drivers for your... graphics driver. If you do not see the recommended resolution as an option, you are using, and follow the given steps. Setting Display Resolution to...
Monitor Users Guide
Page 43
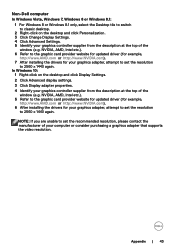
... you are unable to classic desktop. 2 Right-click on the desktop and click Display Settings. 2 Click Advanced display settings. 3 Click Display adapter properties. 4 Identify your graphics controller supplier from the description at the top of the window (e.g. Non-Dell computer In Windows Vista, Windows 7, Windows 8 or Windows 8.1: 1 For Windows ... of the window (e.g. In Windows 10: 1 Right-click on the desktop and click Personalization. 3 Click Change Display Settings. 4 Click Advanced Settings. 5 Identify your graphics adapter, attempt to set the resolution to 2560 x 1440 again.
... you are unable to classic desktop. 2 Right-click on the desktop and click Display Settings. 2 Click Advanced display settings. 3 Click Display adapter properties. 4 Identify your graphics controller supplier from the description at the top of the window (e.g. Non-Dell computer In Windows Vista, Windows 7, Windows 8 or Windows 8.1: 1 For Windows ... of the window (e.g. In Windows 10: 1 Right-click on the desktop and click Personalization. 3 Click Change Display Settings. 4 Click Advanced Settings. 5 Identify your graphics adapter, attempt to set the resolution to 2560 x 1440 again.
Monitor Display Manager Users Guide
Page 3
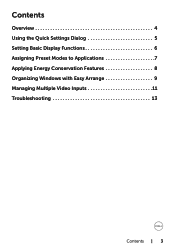
Contents Overview 4 Using the Quick Settings Dialog 5 Setting Basic Display Functions 6 Assigning Preset Modes to Applications 7 Applying Energy Conservation Features 8 Organizing Windows with Easy Arrange 9 Managing Multiple Video Inputs 11 Troubleshooting 13 Contents | 3
Contents Overview 4 Using the Quick Settings Dialog 5 Setting Basic Display Functions 6 Assigning Preset Modes to Applications 7 Applying Energy Conservation Features 8 Organizing Windows with Easy Arrange 9 Managing Multiple Video Inputs 11 Troubleshooting 13 Contents | 3


