Monitor Users Guide
Page 3
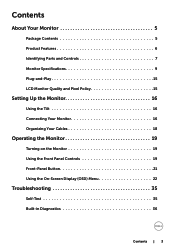
Contents About Your Monitor 5 Package Contents 5 Product Features 6 Identifying Parts and Controls 7 Monitor Specifications 9 Plug-and-Play 15 LCD Monitor Quality and Pixel Policy 15 Setting Up the Monitor 16 Using the Tilt 16 Connecting Your Monitor 16 Organizing Your Cables 18 Operating the Monitor 19 Turning on the Monitor 19 Using the Front Panel Controls 19 Front‑Panel Button 21 Using the On-Screen Display (OSD) Menu 22 Troubleshooting 35 Self-Test 35 Built-in Diagnostics 36 Contents | 3
Contents About Your Monitor 5 Package Contents 5 Product Features 6 Identifying Parts and Controls 7 Monitor Specifications 9 Plug-and-Play 15 LCD Monitor Quality and Pixel Policy 15 Setting Up the Monitor 16 Using the Tilt 16 Connecting Your Monitor 16 Organizing Your Cables 18 Operating the Monitor 19 Turning on the Monitor 19 Using the Front Panel Controls 19 Front‑Panel Button 21 Using the On-Screen Display (OSD) Menu 22 Troubleshooting 35 Self-Test 35 Built-in Diagnostics 36 Contents | 3
Monitor Users Guide
Page 6
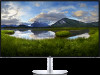
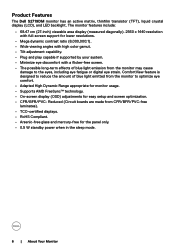
... to optimize eye comfort. • Adapted High Dynamic Range appropriate for monitor usage. • Supports AMD FreeSync™ technology. • On-screen display (OSD) adjustments for the panel only. • 0.5 W standby power when in the sleep mode. 6 | About Your Monitor ComfortView feature is designed to reduce the amount of blue light emission from the monitor to the eyes, including eye fatigue or digital eye strain. Reduced (Circuit boards are...
... to optimize eye comfort. • Adapted High Dynamic Range appropriate for monitor usage. • Supports AMD FreeSync™ technology. • On-screen display (OSD) adjustments for the panel only. • 0.5 W standby power when in the sleep mode. 6 | About Your Monitor ComfortView feature is designed to reduce the amount of blue light emission from the monitor to the eyes, including eye fatigue or digital eye strain. Reduced (Circuit boards are...
Monitor Users Guide
Page 8
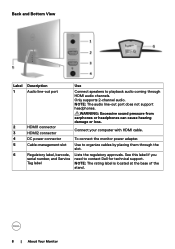
... you need to contact Dell for technical support. To connect the monitor power adapter. Use to organize cables by placing them through HDMI audio channels. NOTE: The audio line-out port does not support headphones. Back and Bottom View Label 1 2 3 4 5 6 Description Audio line-out port HDMI1 connector HDMI2 connector DC power connector Cable-management slot Regulatory label, barcode, serial number, and Service Tag label Use Connect speakers to playback audio coming through the slot. Only supports 2-channel audio. WARNING: Excessive sound pressure...
... you need to contact Dell for technical support. To connect the monitor power adapter. Use to organize cables by placing them through HDMI audio channels. NOTE: The audio line-out port does not support headphones. Back and Bottom View Label 1 2 3 4 5 6 Description Audio line-out port HDMI1 connector HDMI2 connector DC power connector Cable-management slot Regulatory label, barcode, serial number, and Service Tag label Use Connect speakers to playback audio coming through the slot. Only supports 2-channel audio. WARNING: Excessive sound pressure...
Monitor Users Guide
Page 9
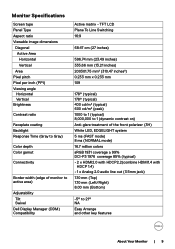
Monitor Specifications Screen type Panel Type Aspect ratio Viewable image dimensions Diagonal Active Area Horizontal Vertical Area Pixel pitch Pixel per inch (PPI) Viewing angle Horizontal Vertical Brightness Contrast ratio Faceplate coating Backlight Response Time (Gray to Gray) Color depth Color gamut Connectivity Border width (edge of the front polarizer (3H) White LED, EDGELIGHT system 5 ms (FAST mode) 8 ms (NORMAL mode) 16.7 million colors sRGB 1931 coverage ≥ 99% DCI-P3 1976 coverage 85% (typical...
Monitor Specifications Screen type Panel Type Aspect ratio Viewable image dimensions Diagonal Active Area Horizontal Vertical Area Pixel pitch Pixel per inch (PPI) Viewing angle Horizontal Vertical Brightness Contrast ratio Faceplate coating Backlight Response Time (Gray to Gray) Color depth Color gamut Connectivity Border width (edge of the front polarizer (3H) White LED, EDGELIGHT system 5 ms (FAST mode) 8 ms (NORMAL mode) 16.7 million colors sRGB 1931 coverage ≥ 99% DCI-P3 1976 coverage 85% (typical...
Monitor Users Guide
Page 13
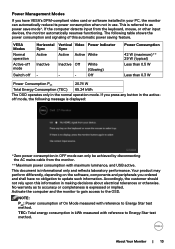
... software installed in making decisions about electrical tolerances or otherwise. Your product may perform differently, depending on the software, components and peripherals you press any button in use. VESA Modes Normal operation Active-off mode Switch off Horizontal Vertical Video Power Indicator Sync Sync Active Active Active White Inactive - This document is referred to the OSD. About Your Monitor | 13 Accordingly, the customer should not rely upon this automatic power saving...
... software installed in making decisions about electrical tolerances or otherwise. Your product may perform differently, depending on the software, components and peripherals you press any button in use. VESA Modes Normal operation Active-off mode Switch off Horizontal Vertical Video Power Indicator Sync Sync Active Active Active White Inactive - This document is referred to the OSD. About Your Monitor | 13 Accordingly, the customer should not rely upon this automatic power saving...
Monitor Users Guide
Page 20
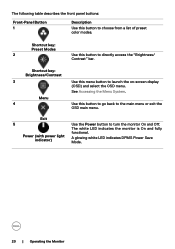
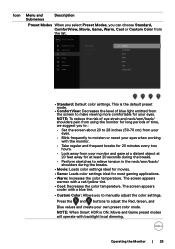
... the OSD main menu. A glowing white LED indicates DPMS Power Save Mode. 20 | Operating the Monitor See Accessing the Menu System. Menu 4 Use this button to go back to turn the monitor On and Off. The following table describes the front panel buttons: Front‑Panel Button 1 Description Use this button to directly access the "Brightness/ Contrast" bar. Shortcut key: Preset Modes 2 Use this menu button to launch the on-screen display (OSD) and select the OSD menu. Shortcut key: Brightness/Contrast 3 Use this button...
... the OSD main menu. A glowing white LED indicates DPMS Power Save Mode. 20 | Operating the Monitor See Accessing the Menu System. Menu 4 Use this button to go back to turn the monitor On and Off. The following table describes the front panel buttons: Front‑Panel Button 1 Description Use this button to directly access the "Brightness/ Contrast" bar. Shortcut key: Preset Modes 2 Use this menu button to launch the on-screen display (OSD) and select the OSD menu. Shortcut key: Brightness/Contrast 3 Use this button...

Monitor Users Guide
Page 24
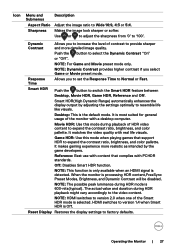
... Color menu to select the HDMI2 input source. Use to your monitor's Input Source settings to select Auto Select, the monitor scans for available input sources. Select the HDMI2 input when you are using the HDMI2 connector. Icon Menu and Submenus Input Source Description Use the Input Source menu to select between different video inputs that are be connected to select the HDMI1 input source. HDMI1 HDMI2 Select the HDMI1 input when you are using the HDMI1 connector. Auto Select Reset Input Source Color Use to the factory defaults. Resets...
... Color menu to select the HDMI2 input source. Use to your monitor's Input Source settings to select Auto Select, the monitor scans for available input sources. Select the HDMI2 input when you are using the HDMI2 connector. Icon Menu and Submenus Input Source Description Use the Input Source menu to select between different video inputs that are be connected to select the HDMI1 input source. HDMI1 HDMI2 Select the HDMI1 input when you are using the HDMI1 connector. Auto Select Reset Input Source Color Use to the factory defaults. Resets...
Monitor Users Guide
Page 25
... HDR is the default preset mode. • ComfortView: Decreases the level of time, we suggest you to adjust the Red, Green, and Blue values and create your own preset color mode. NOTE: To reduce the risk of eye strain and neck/arm/back/ shoulders pain from using the monitor for long periods of blue light emitted from the screen to make viewing more comfortable for...
... HDR is the default preset mode. • ComfortView: Decreases the level of time, we suggest you to adjust the Red, Green, and Blue values and create your own preset color mode. NOTE: To reduce the risk of eye strain and neck/arm/back/ shoulders pain from using the monitor for long periods of blue light emitted from the screen to make viewing more comfortable for...
Monitor Users Guide
Page 27
...: Use this mode during HDR mode is 600-nits(typical). HDMI switches to version 1.4 when Smart HDR is the default mode. Smart HDR Push the button to select the Dynamic Contrast "On" or "Off". Reference: Best use with PCHDR standards. When the monitor is selected. Reset Display Restores the display settings to Wide 16:9, 4:3 or 5:4. Icon Menu and Submenus Description Aspect Ratio Adjust the image ratio to factory defaults. Sharpness Makes the image look...
...: Use this mode during HDR mode is 600-nits(typical). HDMI switches to version 1.4 when Smart HDR is the default mode. Smart HDR Push the button to select the Dynamic Contrast "On" or "Off". Reference: Best use with PCHDR standards. When the monitor is selected. Reset Display Restores the display settings to Wide 16:9, 4:3 or 5:4. Icon Menu and Submenus Description Aspect Ratio Adjust the image ratio to factory defaults. Sharpness Makes the image look...

Monitor Users Guide
Page 29
Operating the Monitor | 29 Power Button Allows you to set the state of the power light to factory defaults. LED Reset Personalization Restores Shortcut Keys and Power Button LED to save energy. Icon Menu and Submenus Personalize Description Shortcut key 1 Select from Preset Modes, Brightness/Contrast, Input Source, Aspect Ratio, Smart HDR set as shortcut key 2. Shortcut key 2 Select from Preset Modes, Brightness/Contrast, Input Source, Aspect Ratio, Smart HDR set as shortcut key 1.
Operating the Monitor | 29 Power Button Allows you to set the state of the power light to factory defaults. LED Reset Personalization Restores Shortcut Keys and Power Button LED to save energy. Icon Menu and Submenus Personalize Description Shortcut key 1 Select from Preset Modes, Brightness/Contrast, Input Source, Aspect Ratio, Smart HDR set as shortcut key 2. Shortcut key 2 Select from Preset Modes, Brightness/Contrast, Input Source, Aspect Ratio, Smart HDR set as shortcut key 1.
Monitor Users Guide
Page 30
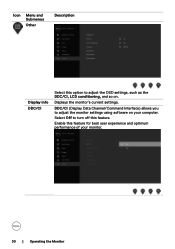
Icon Menu and Submenus Other Description Display info DDC/CI Select this feature. Select Off to turn off this option to adjust the monitor settings using software on . Enable this feature for best user experience and optimum performance of your computer. Displays the monitor's current settings. DDC/CI (Display Data Channel/Command Interface) allows you to adjust the OSD settings, such as the DDC/CI, LCD conditioning, and so on your monitor. 30 | Operating the Monitor
Icon Menu and Submenus Other Description Display info DDC/CI Select this feature. Select Off to turn off this option to adjust the monitor settings using software on . Enable this feature for best user experience and optimum performance of your computer. Displays the monitor's current settings. DDC/CI (Display Data Channel/Command Interface) allows you to adjust the OSD settings, such as the DDC/CI, LCD conditioning, and so on your monitor. 30 | Operating the Monitor

Monitor Users Guide
Page 35
... in this section, follow the Safety Instructions. Also, depending upon the selected input, one of the procedures in self-test mode, the power LED remains white. or Troubleshooting | 35 Troubleshooting WARNING: Before you to check whether your computer and the monitor. 2 Unplug the video cable from the back of computer. 3 Turn on -screen (against a black background), if the monitor cannot sense a video signal and is functioning properly. Self...
... in this section, follow the Safety Instructions. Also, depending upon the selected input, one of the procedures in self-test mode, the power LED remains white. or Troubleshooting | 35 Troubleshooting WARNING: Before you to check whether your computer and the monitor. 2 Unplug the video cable from the back of computer. 3 Turn on -screen (against a black background), if the monitor cannot sense a video signal and is functioning properly. Self...

Monitor Users Guide
Page 36
... screen changes to red. 6 Inspect the display for 5 seconds. To exit, press Button 1 again. Check the video card and computer. 36 | Troubleshooting then turn on the front panel again. To run the built-in diagnostic tool, the monitor is an inherent problem with your monitor, or with your computer and video card. If you do not detect any abnormalities. 7 Repeat steps 5 and 6 to inspect the display in green, blue, black, white...
... screen changes to red. 6 Inspect the display for 5 seconds. To exit, press Button 1 again. Check the video card and computer. 36 | Troubleshooting then turn on the front panel again. To run the built-in diagnostic tool, the monitor is an inherent problem with your monitor, or with your computer and video card. If you do not detect any abnormalities. 7 Repeat steps 5 and 6 to inspect the display in green, blue, black, white...
Monitor Users Guide
Page 38
..., see Dell Support site at: http://www.dell.com/support/monitors. • Reset the monitor to factory settings. • Adjust brightness & contrast controls via OSD. • Do not perform any troubleshooting steps. • Contact Dell immediately. • Ensure that the video cable connecting the monitor to the computer is connected properly and is secure. • Reset the monitor to factory settings. • Perform monitor self-test feature check to determine if the intermittent problem occurs in selftest mode. 38 | Troubleshooting
..., see Dell Support site at: http://www.dell.com/support/monitors. • Reset the monitor to factory settings. • Adjust brightness & contrast controls via OSD. • Do not perform any troubleshooting steps. • Contact Dell immediately. • Ensure that the video cable connecting the monitor to the computer is connected properly and is secure. • Reset the monitor to factory settings. • Perform monitor self-test feature check to determine if the intermittent problem occurs in selftest mode. 38 | Troubleshooting
Monitor Users Guide
Page 39
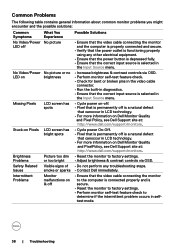
... Problems Missing Color Wrong Color Image retention from a static image left on the monitor for a long period of the Preset Modes in the good Color menu OSD depending on the screen • Use the Power Management feature to turn off the monitor at all times when not in use a dynamically changing screensaver. Faint shadow from the Display Properties to force the proper HDR signaling. Color in the video cable connector. Picture missing color • Perform monitor...
... Problems Missing Color Wrong Color Image retention from a static image left on the monitor for a long period of the Preset Modes in the good Color menu OSD depending on the screen • Use the Power Management feature to turn off the monitor at all times when not in use a dynamically changing screensaver. Faint shadow from the Display Properties to force the proper HDR signaling. Color in the video cable connector. Picture missing color • Perform monitor...
Monitor Users Guide
Page 40
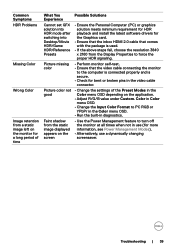
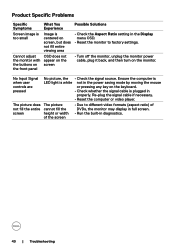
...; Check whether the signal cable is plugged in diagnostics. 40 | Troubleshooting Ensure the computer is LED light is white not in the power saving mode by moving the mouse or pressing any key on the monitor. No Input Signal when user controls are pressed No picture, the • Check the signal source. Re-plug the signal cable if necessary. • Reset the computer or video player. Product Specific Problems Specific Symptoms Screen image is too small Cannot adjust the monitor with the buttons...
...; Check whether the signal cable is plugged in diagnostics. 40 | Troubleshooting Ensure the computer is LED light is white not in the power saving mode by moving the mouse or pressing any key on the monitor. No Input Signal when user controls are pressed No picture, the • Check the signal source. Re-plug the signal cable if necessary. • Reset the computer or video player. Product Specific Problems Specific Symptoms Screen image is too small Cannot adjust the monitor with the buttons...
Monitor Users Guide
Page 42
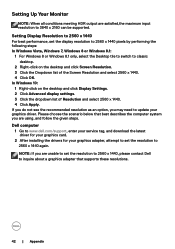
... www.dell.com/support, enter your service tag, and download the latest driver for your graphics card. 2 After installing the drivers for your graphics adapter, attempt to set the resolution to update your graphics driver. If you do not see the recommended resolution as an option, you may need to 2560 x 1440 again. NOTE: If you are using, and follow the given steps. Setting Up Your Monitor NOTE...
... www.dell.com/support, enter your service tag, and download the latest driver for your graphics card. 2 After installing the drivers for your graphics adapter, attempt to set the resolution to update your graphics driver. If you do not see the recommended resolution as an option, you may need to 2560 x 1440 again. NOTE: If you are using, and follow the given steps. Setting Up Your Monitor NOTE...
Monitor Users Guide
Page 43
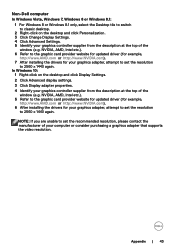
.... 3 Click Change Display Settings. 4 Click Advanced Settings. 5 Identify your graphics controller supplier from the description at the top of the window (e.g. Appendix | 43 NVIDIA, AMD, Intel etc.). 6 Refer to the graphic card provider website for updated driver (for example, http://www.AMD.com or http://www.NVIDIA.com). 7 After installing the drivers for your computer or consider purchasing a graphics adapter that supports the video resolution.
.... 3 Click Change Display Settings. 4 Click Advanced Settings. 5 Identify your graphics controller supplier from the description at the top of the window (e.g. Appendix | 43 NVIDIA, AMD, Intel etc.). 6 Refer to the graphic card provider website for updated driver (for example, http://www.AMD.com or http://www.NVIDIA.com). 7 After installing the drivers for your computer or consider purchasing a graphics adapter that supports the video resolution.
Monitor Display Manager Users Guide
Page 4
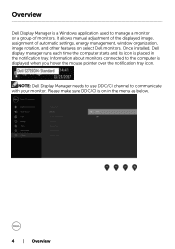
... monitor. Once installed, Dell display manager runs each time the computer starts and its icon is on select Dell monitors. NOTE: Dell Display Manager needs to use DDC/CI channel to manage a monitor or a group of automatic settings, energy management, window organization, image rotation, and other features on in the notification tray. Please make sure DDC/CI is placed in the menu as below. 4 | Overview It allows manual adjustment...
... monitor. Once installed, Dell display manager runs each time the computer starts and its icon is on select Dell monitors. NOTE: Dell Display Manager needs to use DDC/CI channel to manage a monitor or a group of automatic settings, energy management, window organization, image rotation, and other features on in the notification tray. Please make sure DDC/CI is placed in the menu as below. 4 | Overview It allows manual adjustment...

Monitor Display Manager Users Guide
Page 7
... packed files, are not supported and will be the same on each connected monitor, or it automatically. To override this behavior for many popular applications. Dell Display Manager is run in the assignment list take priority over the general Direct3D setting. When Auto Mode is activated. In addition an option can vary from the desktop, Windows Start Menu, or elsewhere, and...
... packed files, are not supported and will be the same on each connected monitor, or it automatically. To override this behavior for many popular applications. Dell Display Manager is run in the assignment list take priority over the general Direct3D setting. When Auto Mode is activated. In addition an option can vary from the desktop, Windows Start Menu, or elsewhere, and...


