S2418H/S2418HX Users Guide
Page 3
... Parts and Controls 7 Monitor Specifications 9 Plug-and-Play 16 LCD Monitor Quality and Pixel Policy 16 Setting Up the Monitor 17 Attaching the Stand 17 Connecting Your Monitor 17 Setting Up Your Speaker 18 Organizing Your Cables 21 Computer Playback Default Setting (HDMI Cable Connected 21 Speaker Volume Controls Setting 22 Computer Volume Controls Setting 23 The Speaker of monitor are ready to play music 26 Removing the Monitor Stand 27 Operating the Monitor 28 Turning on the Monitor 28 Using the Front Panel Controls 28 Using the On-Screen Display (OSD) Menu 31...
... Parts and Controls 7 Monitor Specifications 9 Plug-and-Play 16 LCD Monitor Quality and Pixel Policy 16 Setting Up the Monitor 17 Attaching the Stand 17 Connecting Your Monitor 17 Setting Up Your Speaker 18 Organizing Your Cables 21 Computer Playback Default Setting (HDMI Cable Connected 21 Speaker Volume Controls Setting 22 Computer Volume Controls Setting 23 The Speaker of monitor are ready to play music 26 Removing the Monitor Stand 27 Operating the Monitor 28 Turning on the Monitor 28 Using the Front Panel Controls 28 Using the On-Screen Display (OSD) Menu 31...
S2418H/S2418HX Users Guide
Page 6
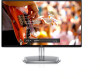
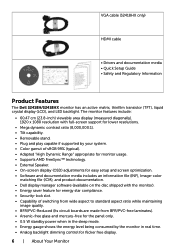
...; Drivers and documentation media • Quick Setup Guide • Safety and Regulatory Information Product Features The Dell S2418H/S2418HX monitor has an active matrix, thinfilm transistor (TFT), liquid crystal display (LCD), and LED backlight. The monitor features include: • 60.47 cm (23.8-inch) viewable area display (measured diagonally). 1920 x 1080 resolution with full-screen support for lower resolutions. • Mega dynamic contrast ratio (8,000,000:1). • Tilt capability. • Removable stand. • Plug...
...; Drivers and documentation media • Quick Setup Guide • Safety and Regulatory Information Product Features The Dell S2418H/S2418HX monitor has an active matrix, thinfilm transistor (TFT), liquid crystal display (LCD), and LED backlight. The monitor features include: • 60.47 cm (23.8-inch) viewable area display (measured diagonally). 1920 x 1080 resolution with full-screen support for lower resolutions. • Mega dynamic contrast ratio (8,000,000:1). • Tilt capability. • Removable stand. • Plug...
S2418H/S2418HX Users Guide
Page 8
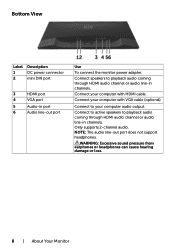
... HDMI cable. Connect speakers to playback audio coming through HDMI audio channel or audio line-in port 6 Audio line-out port Use To connect the monitor power adapter. Connect to active speakers to your computer audio output. WARNING: Excessive sound pressure from earphones or headphones can cause hearing damage or loss. 8 | About Your Monitor Connect your computer with VGA cable (optional). NOTE: The audio line-out port does not support headphones. Bottom View Label 1 2 Description DC power connector mini DIN port 3 HDMI port 4 VGA port 5 Audio...
... HDMI cable. Connect speakers to playback audio coming through HDMI audio channel or audio line-in port 6 Audio line-out port Use To connect the monitor power adapter. Connect to active speakers to your computer audio output. WARNING: Excessive sound pressure from earphones or headphones can cause hearing damage or loss. 8 | About Your Monitor Connect your computer with VGA cable (optional). NOTE: The audio line-out port does not support headphones. Bottom View Label 1 2 Description DC power connector mini DIN port 3 HDMI port 4 VGA port 5 Audio...
S2418H/S2418HX Users Guide
Page 11
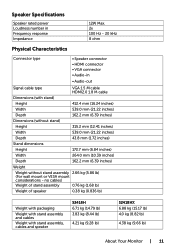
... inches) Stand dimensions Height 173.7 mm (6.84 inches) Width 264.0 mm (10.39 inches) Depth 162.2 mm (6.39 inches) Weight Weight without stand assembly 2.66 kg (5.86 lb) (For wall mount or VESA mount considerations - Speaker Specifications Speaker rated power Loudness number in Frequency response Impedance 12W Max. 2x 100 Hz - 20 kHz 8 ohm Physical Characteristics Connector type • Speaker connector • HDMI connector • VGA connector • Audio-in • Audio-out Signal cable type VGA 1.5 M cable HDMI2.0 1.8 M cable Dimensions (with stand assembly, cables...
... inches) Stand dimensions Height 173.7 mm (6.84 inches) Width 264.0 mm (10.39 inches) Depth 162.2 mm (6.39 inches) Weight Weight without stand assembly 2.66 kg (5.86 lb) (For wall mount or VESA mount considerations - Speaker Specifications Speaker rated power Loudness number in Frequency response Impedance 12W Max. 2x 100 Hz - 20 kHz 8 ohm Physical Characteristics Connector type • Speaker connector • HDMI connector • VGA connector • Audio-in • Audio-out Signal cable type VGA 1.5 M cable HDMI2.0 1.8 M cable Dimensions (with stand assembly, cables...
S2418H/S2418HX Users Guide
Page 13
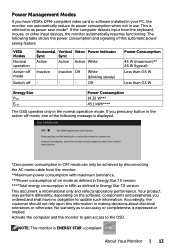
... have VESA's DPM-compliant video card or software installed in your PC, the monitor can only be achieved by disconnecting the AC mains cable from the keyboard, mouse, or other input devices, the monitor automatically resumes functioning. If you press any button in the active-off Horizontal Vertical Video Power Indicator Sync Sync Active Active Active White Inactive - Accordingly, the customer should not rely upon this automatic power saving...
... have VESA's DPM-compliant video card or software installed in your PC, the monitor can only be achieved by disconnecting the AC mains cable from the keyboard, mouse, or other input devices, the monitor automatically resumes functioning. If you press any button in the active-off Horizontal Vertical Video Power Indicator Sync Sync Active Active Active White Inactive - Accordingly, the customer should not rely upon this automatic power saving...
S2418H/S2418HX Users Guide
Page 17
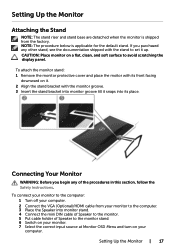
... stand base are detached when the monitor is applicable for the default stand. Setting Up the Monitor | 17 Connecting Your Monitor WARNING: Before you purchased any of Speaker to avoid scratching the display panel. NOTE: The procedure below is shipped from your monitor. 7 Select the correct input source at Monitor OSD Menu and turn on it. 2 Align the stand bracket with the stand to set it snaps into monitor stand. 4 Connect the mini DIN cable of Speaker...
... stand base are detached when the monitor is applicable for the default stand. Setting Up the Monitor | 17 Connecting Your Monitor WARNING: Before you purchased any of Speaker to avoid scratching the display panel. NOTE: The procedure below is shipped from your monitor. 7 Select the correct input source at Monitor OSD Menu and turn on it. 2 Align the stand bracket with the stand to set it snaps into monitor stand. 4 Connect the mini DIN cable of Speaker...

S2418H/S2418HX Users Guide
Page 27
... screwdriver to push the release latch. 4 While pushing the release latch, pull the stand in the arrow direction to set it up. Setting Up the Monitor | 27 Removing the Monitor Stand CAUTION: To prevent scratches on the LCD screen while removing the stand, make sure that the monitor is applicable for the default stand. If you purchased any other stand, see the documentation shipped with the...
... screwdriver to push the release latch. 4 While pushing the release latch, pull the stand in the arrow direction to set it up. Setting Up the Monitor | 27 Removing the Monitor Stand CAUTION: To prevent scratches on the LCD screen while removing the stand, make sure that the monitor is applicable for the default stand. If you purchased any other stand, see the documentation shipped with the...

S2418H/S2418HX Users Guide
Page 34
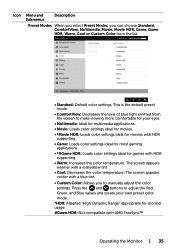
... the Monitor Use the Color menu to select the HDMI input source. Use to select the VGA input source. Resets your monitor. Use to select Auto Select, the monitor scans for available input sources. Icon Menu and Submenus Input Source Description Use the Input Source menu to select between different video inputs that are using the HDMI connector. VGA HDMI Auto Select Reset Input Source Color Select the VGA input when you are using the analog (VGA) connector. Select the HDMI input when you are be connected to your monitor's Input Source settings to the factory defaults.
... the Monitor Use the Color menu to select the HDMI input source. Use to select the VGA input source. Resets your monitor. Use to select Auto Select, the monitor scans for available input sources. Icon Menu and Submenus Input Source Description Use the Input Source menu to select between different video inputs that are using the HDMI connector. VGA HDMI Auto Select Reset Input Source Color Select the VGA input when you are using the analog (VGA) connector. Select the HDMI input when you are be connected to your monitor's Input Source settings to the factory defaults.
S2418H/S2418HX Users Guide
Page 35
... a red/yellow tint. • Cool: Decreases the color temperature. Operating the Monitor | 35 Icon Menu and Submenus Description Preset Modes When you select Preset Modes, you to manually adjust the color settings. Press the and buttons to make viewing more comfortable for your own preset color mode. *HDR: Adapted "High Dynamic Range" appropriate for games with HDR supporting. • Warm: Increases the color temperature. This is the default preset mode. •...
... a red/yellow tint. • Cool: Decreases the color temperature. Operating the Monitor | 35 Icon Menu and Submenus Description Preset Modes When you select Preset Modes, you to manually adjust the color settings. Press the and buttons to make viewing more comfortable for your own preset color mode. *HDR: Adapted "High Dynamic Range" appropriate for games with HDR supporting. • Warm: Increases the color temperature. This is the default preset mode. •...

S2418H/S2418HX Users Guide
Page 37
... select the Dynamic Contrast "On" or "Off". Icon Menu and Submenus Vertical Position Sharpness Pixel Clock Description Use or to factory defaults. NOTE: Horizontal Position and Vertical Position adjustments are not obtained using the VGA cable. Reset Display Restores the display settings to adjust the image up or down. Phase If satisfactory results are only available for best image quality. Operating the Monitor | 37 NOTE: For Game and Movie preset mode only. Use the or buttons to Normal...
... select the Dynamic Contrast "On" or "Off". Icon Menu and Submenus Vertical Position Sharpness Pixel Clock Description Use or to factory defaults. NOTE: Horizontal Position and Vertical Position adjustments are not obtained using the VGA cable. Reset Display Restores the display settings to adjust the image up or down. Phase If satisfactory results are only available for best image quality. Operating the Monitor | 37 NOTE: For Game and Movie preset mode only. Use the or buttons to Normal...

S2418H/S2418HX Users Guide
Page 39
... active after you press a button. Timer Lock Reset Menu OSD Hold Time: Sets the length of time the menu remains on screen, and so on. Operating the Monitor | 39 Controls user access to 60 seconds. Language Set the OSD display to factory defaults. Only hard unlock (Press and hold the exit button 6 sec) Unlock function - Icon Menu and Submenus Menu Description Select this option to change the menu transparency by using and (min. 0 / max. 100...
... active after you press a button. Timer Lock Reset Menu OSD Hold Time: Sets the length of time the menu remains on screen, and so on. Operating the Monitor | 39 Controls user access to 60 seconds. Language Set the OSD display to factory defaults. Only hard unlock (Press and hold the exit button 6 sec) Unlock function - Icon Menu and Submenus Menu Description Select this option to change the menu transparency by using and (min. 0 / max. 100...

S2418H/S2418HX Users Guide
Page 41
Icon Menu and Submenus Other Description DDC/CI Select this option to adjust the OSD settings, such as the DDC/CI, LCD conditioning, and so on your monitor. Select Disable to adjust the monitor settings using software on . Enable this feature. DDC/CI (Display Data Channel/Command Interface) allows you to turn off this feature for best user experience and optimum performance of your computer. Operating the Monitor | 41
Icon Menu and Submenus Other Description DDC/CI Select this option to adjust the OSD settings, such as the DDC/CI, LCD conditioning, and so on your monitor. Select Disable to adjust the monitor settings using software on . Enable this feature. DDC/CI (Display Data Channel/Command Interface) allows you to turn off this feature for best user experience and optimum performance of your computer. Operating the Monitor | 41

S2418H/S2418HX Users Guide
Page 45
... video cable becomes disconnected or damaged. 5 Turn off both your monitor is working correctly. then turn on -screen (against a black background), if the monitor cannot sense a video signal and is functioning properly. The floating dialog box should appear on both your monitor and reconnect the video cable; Troubleshooting | 45 While in this section, follow the Safety Instructions. Troubleshooting WARNING: Before you to check whether your computer and the monitor...
... video cable becomes disconnected or damaged. 5 Turn off both your monitor is working correctly. then turn on -screen (against a black background), if the monitor cannot sense a video signal and is functioning properly. The floating dialog box should appear on both your monitor and reconnect the video cable; Troubleshooting | 45 While in this section, follow the Safety Instructions. Troubleshooting WARNING: Before you to check whether your computer and the monitor...

S2418H/S2418HX Users Guide
Page 46
... front panel again. The monitor then goes into the self-test mode. 3 Press and hold Button 1 for any screen abnormalities upon using the built-in green, blue, black, white, and text screens. To exit, press Button 1 again. If you do not detect any abnormalities. 7 Repeat steps 5 and 6 to inspect the display in diagnostic tool, the monitor is functioning properly. Check the video card and computer. 46 | Troubleshooting If your monitor screen...
... front panel again. The monitor then goes into the self-test mode. 3 Press and hold Button 1 for any screen abnormalities upon using the built-in green, blue, black, white, and text screens. To exit, press Button 1 again. If you do not detect any abnormalities. 7 Repeat steps 5 and 6 to inspect the display in diagnostic tool, the monitor is functioning properly. Check the video card and computer. 46 | Troubleshooting If your monitor screen...
S2418H/S2418HX Users Guide
Page 49
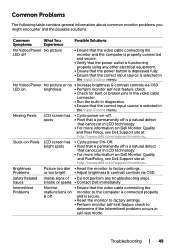
...; Reset the monitor to factory settings. • Perform monitor self-test feature check to factory settings. Intermittent Problems Monitor • Ensure that canoccur in self-test mode. or too bright • Adjust brightness & contrast controls via OSD. Troubleshooting | 49 Missing Pixels LCD screen has spots • Cycle power on-off. • Pixel that is permanently off is a natural defect that the video cable connecting the malfunctions on Dell Monitor Quality and PixelPolicy, see Dell Support site at : http://www.dell.com/support/monitors. LED...
...; Reset the monitor to factory settings. • Perform monitor self-test feature check to factory settings. Intermittent Problems Monitor • Ensure that canoccur in self-test mode. or too bright • Adjust brightness & contrast controls via OSD. Troubleshooting | 49 Missing Pixels LCD screen has spots • Cycle power on-off. • Pixel that is permanently off is a natural defect that the video cable connecting the malfunctions on Dell Monitor Quality and PixelPolicy, see Dell Support site at : http://www.dell.com/support/monitors. LED...

S2418H/S2418HX Users Guide
Page 50
... in the Color menu OSD depending on menu OSD. Re-plug the signal cable if necessary. • Reset the computer or video player. Product Specific Problems Specific Symptoms What You Experience Possible Solutions Screen image is too small Image is • Check the Aspect Ratio setting in properly. No Input Signal when user controls are pressed No picture, the LED light is white • Check the signal source. Common Symptoms Missing Color Wrong Color Image retention from a static image left on the monitor for...
... in the Color menu OSD depending on menu OSD. Re-plug the signal cable if necessary. • Reset the computer or video player. Product Specific Problems Specific Symptoms What You Experience Possible Solutions Screen image is too small Image is • Check the Aspect Ratio setting in properly. No Input Signal when user controls are pressed No picture, the LED light is white • Check the signal source. Common Symptoms Missing Color Wrong Color Image retention from a static image left on the monitor for...
S2418H/S2418HX Users Guide
Page 52
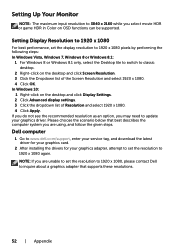
... OSD functions can be supported. NOTE: If you are using, and follow the given steps. Setting Up Your Monitor NOTE: The maximum input resolution to inquire about a graphics adapter that best describes the computer system you are unable to set the resolution to 1920 x 1080 again. Dell computer 1 Go to www.dell.com/support, enter your service tag, and download the latest driver for your graphics card. 2 After installing...
... OSD functions can be supported. NOTE: If you are using, and follow the given steps. Setting Up Your Monitor NOTE: The maximum input resolution to inquire about a graphics adapter that best describes the computer system you are unable to set the resolution to 1920 x 1080 again. Dell computer 1 Go to www.dell.com/support, enter your service tag, and download the latest driver for your graphics card. 2 After installing...

S2418H/S2418HX Users Guide
Page 53
... for updated driver (for example, http://www.ATI.com or http://www.NVIDIA.com). 7 After installing the drivers for your computer or consider purchasing a graphics adapter that supports the video resolution. Non-Dell computer In Windows Vista, Windows 7, Windows 8 or Windows 8.1: 1 For Windows 8 or Windows 8.1 only, select the Desktop tile to switch to classic desktop. 2 Right-click on the desktop and click Display Settings. 2 Click Advanced display settings. 3 Click Display adapter properties...
... for updated driver (for example, http://www.ATI.com or http://www.NVIDIA.com). 7 After installing the drivers for your computer or consider purchasing a graphics adapter that supports the video resolution. Non-Dell computer In Windows Vista, Windows 7, Windows 8 or Windows 8.1: 1 For Windows 8 or Windows 8.1 only, select the Desktop tile to switch to classic desktop. 2 Right-click on the desktop and click Display Settings. 2 Click Advanced display settings. 3 Click Display adapter properties...
S2418H/S2418HX Display Manager Users Guide
Page 4
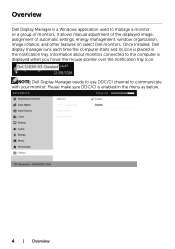
... select Dell monitors. Information about monitors connected to the computer is enabled in the notification tray. Please make sure DDC/CI is displayed when you hover the mouse pointer over the notification tray icon. It allows manual adjustment of the displayed image, assignment of monitors. Overview Dell Display Manager is placed in the menu as below. 4 | Overview Once installed, Dell display manager runs each time the computer starts...
... select Dell monitors. Information about monitors connected to the computer is enabled in the notification tray. Please make sure DDC/CI is displayed when you hover the mouse pointer over the notification tray icon. It allows manual adjustment of the displayed image, assignment of monitors. Overview Dell Display Manager is placed in the menu as below. 4 | Overview Once installed, Dell display manager runs each time the computer starts...

S2418H/S2418HX Display Manager Users Guide
Page 7
... monitor to the next. Dell Display Manager is activated. In addition an option can vary from the desktop, Windows Start Menu, or elsewhere, and drop it onto the current list. Applications present in full-screen mode. To override this behavior for many popular applications. The preset mode assigned to a particular application may be ineffective. When Auto Mode is enabled, Dell Display Manager automatically switches...
... monitor to the next. Dell Display Manager is activated. In addition an option can vary from the desktop, Windows Start Menu, or elsewhere, and drop it onto the current list. Applications present in full-screen mode. To override this behavior for many popular applications. The preset mode assigned to a particular application may be ineffective. When Auto Mode is enabled, Dell Display Manager automatically switches...


