User's Guide
Page 152
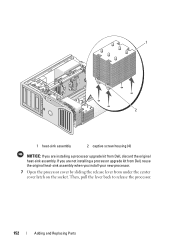
If you install your new processor. 7 Open the processor cover by sliding the release lever from Dell, discard the original heat-sink assembly. Then, pull the lever back to release the processor. 152 Adding and Replacing Parts 1 2 1 heat-sink assembly 2 captive screw housing (4) NOTICE: If you are not installing a processor upgrade kit from Dell, reuse the original heat-sink assembly when you are installing a processor upgrade kit from under the center cover latch on the socket.
If you install your new processor. 7 Open the processor cover by sliding the release lever from Dell, discard the original heat-sink assembly. Then, pull the lever back to release the processor. 152 Adding and Replacing Parts 1 2 1 heat-sink assembly 2 captive screw housing (4) NOTICE: If you are not installing a processor upgrade kit from Dell, reuse the original heat-sink assembly when you are installing a processor upgrade kit from under the center cover latch on the socket.

User's Guide
Page 159
... damage. 15 Replace the memory shroud and memory fan. Adding and Replacing Parts 159 its thumbscrews must be sufficiently tight in place; 1 2 1 heat-sink assembly 2 captive screw housing (4) NOTICE: The memory shroud holds the (optional) memory risers in order to secure the risers and to electrical outlets, and turn them on page...
... damage. 15 Replace the memory shroud and memory fan. Adding and Replacing Parts 159 its thumbscrews must be sufficiently tight in place; 1 2 1 heat-sink assembly 2 captive screw housing (4) NOTICE: The memory shroud holds the (optional) memory risers in order to secure the risers and to electrical outlets, and turn them on page...


