Quick Reference Guide
Page 3
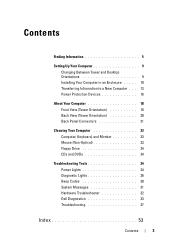
... Transferring Information to a New Computer . . . 13 Power Protection Devices 16 About Your Computer 18 Front View (Tower Orientation 18 Back View (Tower Orientation 20 Back Panel Connectors 21 Cleaning Your Computer 23 Computer, Keyboard, and Monitor 23 Mouse (Non-Optical 23 Floppy Drive 24 CDs and DVDs 24 Troubleshooting Tools 24 Power Lights 24 Diagnostic Lights 26 Beep Codes 30 System Messages 31 Hardware Troubleshooter 32 Dell Diagnostics 33 Troubleshooting 37 Index 53...
... Transferring Information to a New Computer . . . 13 Power Protection Devices 16 About Your Computer 18 Front View (Tower Orientation 18 Back View (Tower Orientation 20 Back Panel Connectors 21 Cleaning Your Computer 23 Computer, Keyboard, and Monitor 23 Mouse (Non-Optical 23 Floppy Drive 24 CDs and DVDs 24 Troubleshooting Tools 24 Power Lights 24 Diagnostic Lights 26 Beep Codes 30 System Messages 31 Hardware Troubleshooter 32 Dell Diagnostics 33 Troubleshooting 37 Index 53...
Quick Reference Guide
Page 7
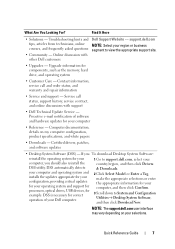
... Select Model or Enter a Tag, make the appropriate selections or enter the appropriate information for your selections. Find It Here • Solutions - support.dell.com NOTE: Select your computer, you To download Desktop System Software: reinstall the operating system for example. DSS automatically detects your computer and operating system and installs the updates appropriate for your configuration, providing critical updates for your operating system and support for processors, optical drives, USB devices...
... Select Model or Enter a Tag, make the appropriate selections or enter the appropriate information for your selections. Find It Here • Solutions - support.dell.com NOTE: Select your computer, you To download Desktop System Software: reinstall the operating system for example. DSS automatically detects your computer and operating system and installs the updates appropriate for your configuration, providing critical updates for your operating system and support for processors, optical drives, USB devices...
Quick Reference Guide
Page 10
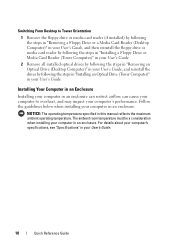
... in "Removing a Floppy Drive or a Media Card Reader (Desktop Computer)" in your User's Guide, and then reinstall the floppy drive or media card reader by following the steps in "Installing a Floppy Drive or Media Card Reader (Tower Computer)" in your User's Guide. 2 Remove all installed optical drives by following the steps in "Removing an Optical Drive (Desktop Computer)" in your User's Guide, and reinstall the drives by following the steps in "Installing an Optical Drive (Tower Computer)" in your computer's performance. Switching From Desktop to...
... in "Removing a Floppy Drive or a Media Card Reader (Desktop Computer)" in your User's Guide, and then reinstall the floppy drive or media card reader by following the steps in "Installing a Floppy Drive or Media Card Reader (Tower Computer)" in your User's Guide. 2 Remove all installed optical drives by following the steps in "Removing an Optical Drive (Desktop Computer)" in your User's Guide, and reinstall the drives by following the steps in "Installing an Optical Drive (Tower Computer)" in your computer's performance. Switching From Desktop to...

Quick Reference Guide
Page 19
... you connect occasionally, such as flash memory keys, cameras, or bootable USB devices. The light in front of any of this button indicates the power state. NOTE: To avoid losing data, do not use with special drive, or a SATA hard drive in your User's Guide. 13 network link light The network link light is on when a device such as printers and keyboards. 8 power button, power light Press the power button to the hard drive. 4 5.25-inch drive Can hold a CD/DVD drive, or a media card reader...
... you connect occasionally, such as flash memory keys, cameras, or bootable USB devices. The light in front of any of this button indicates the power state. NOTE: To avoid losing data, do not use with special drive, or a SATA hard drive in your User's Guide. 13 network link light The network link light is on when a device such as printers and keyboards. 8 power button, power light Press the power button to the hard drive. 4 5.25-inch drive Can hold a CD/DVD drive, or a media card reader...
Quick Reference Guide
Page 21
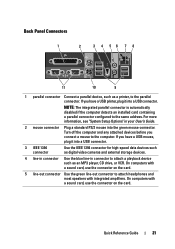
... card. On computers with integrated amplifiers. Quick Reference Guide 21 Back Panel Connectors 1 2 3 4 56 7 8 11 10 9 1 parallel connector Connect a parallel device, such as digital video cameras and external storage devices. 4 line-in connector Use the blue line-in your User's Guide. 2 mouse connector Plug a standard PS/2 mouse into the green mouse connector. For more information, see "System Setup Options" in connector to the parallel connector. Turn off the computer and any attached devices before you have a USB...
... card. On computers with integrated amplifiers. Quick Reference Guide 21 Back Panel Connectors 1 2 3 4 56 7 8 11 10 9 1 parallel connector Connect a parallel device, such as digital video cameras and external storage devices. 4 line-in connector Use the blue line-in your User's Guide. 2 mouse connector Plug a standard PS/2 mouse into the green mouse connector. For more information, see "System Setup Options" in connector to the parallel connector. Turn off the computer and any attached devices before you have a USB...
Quick Reference Guide
Page 22
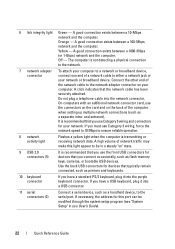
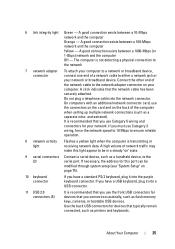
... reliable operation. If you User's Guide). 22 Quick Reference Guide Connect a serial device, such as flash memory keys, cameras, or bootable USB devices. 6 link integrity light 7 network adapter connector 8 network activity light 9 USB 2.0 connectors (5) 10 keyboard connector 11 serial connectors (2) Green - Yellow - To attach your network or broadband device. Connect the other end of network traffic may make this port can be in you have a standard PS/2 keyboard, plug it into the network connector. It is recommended that the network cable has been securely attached. Use...
... reliable operation. If you User's Guide). 22 Quick Reference Guide Connect a serial device, such as flash memory keys, cameras, or bootable USB devices. 6 link integrity light 7 network adapter connector 8 network activity light 9 USB 2.0 connectors (5) 10 keyboard connector 11 serial connectors (2) Green - Yellow - To attach your network or broadband device. Connect the other end of network traffic may make this port can be in you have a standard PS/2 keyboard, plug it into the network connector. It is recommended that the network cable has been securely attached. Use...

Quick Reference Guide
Page 29
... computer starts normally, troubleshoot the last card removed from the computer for resource conflicts (see "Restoring Your Operating System" in your User's Guide). 4 If the problem persists, contact Dell (see "Contacting Dell" in your User's Guide). • Ensure that all hard drive and CD/DVD drive cables are properly connected to the system board (see "System Board Components" in your User's Guide). • If there is an error message on the screen identifying a problem with a device (such...
... computer starts normally, troubleshoot the last card removed from the computer for resource conflicts (see "Restoring Your Operating System" in your User's Guide). 4 If the problem persists, contact Dell (see "Contacting Dell" in your User's Guide). • Ensure that all hard drive and CD/DVD drive cables are properly connected to the system board (see "System Board Components" in your User's Guide). • If there is an error message on the screen identifying a problem with a device (such...

Quick Reference Guide
Page 32
...I A L H A R D D R I N T E R R U P T - Hardware Troubleshooter If a device is either not detected during hard-drive boot test (see "Contacting Dell" in your computer. H A R D - N O N - DELL RECOMMENDS THAT YOU BACK UP YOUR DATA REGULARLY. S.M.A.R.T error, possible HDD failure. Windows XP: 1 Click Start→ Help and Support. 2 Type hardware troubleshooter in your boot device, ensure that the cables are connected and that the drive is installed properly and partitioned as a boot device. • Enter the system setup program and ensure that the boot sequence information is detected...
...I A L H A R D D R I N T E R R U P T - Hardware Troubleshooter If a device is either not detected during hard-drive boot test (see "Contacting Dell" in your computer. H A R D - N O N - DELL RECOMMENDS THAT YOU BACK UP YOUR DATA REGULARLY. S.M.A.R.T error, possible HDD failure. Windows XP: 1 Click Start→ Help and Support. 2 Type hardware troubleshooter in your boot device, ensure that the cables are connected and that the drive is installed properly and partitioned as a boot device. • Enter the system setup program and ensure that the boot sequence information is detected...

Quick Reference Guide
Page 33
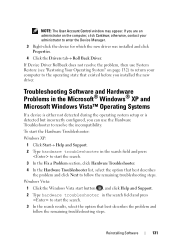
..., perform the checks in "Lockups and Software Problems" (see "Contacting Dell" in your User's Guide. 1 Turn on your hard drive. Windows Vista: 1 Click the Windows Vista start button , and click Help and Support. 2 Type hardware troubleshooter in the search field and press to start the search. 3 In the search results, select the option that you want to test displays in the system setup program and is located on a separate diagnostic utility partition on (or restart) your computer...
..., perform the checks in "Lockups and Software Problems" (see "Contacting Dell" in your User's Guide. 1 Turn on your hard drive. Windows Vista: 1 Click the Windows Vista start button , and click Help and Support. 2 Type hardware troubleshooter in the search field and press to start the search. 3 In the search results, select the option that you want to test displays in the system setup program and is located on a separate diagnostic utility partition on (or restart) your computer...

Quick Reference Guide
Page 45
... setup diagram for bent or broken pins. See "Restoring Your Operating System" in your User's Guide). • Ensure that the cable is not damaged or frayed and check cable connectors for your computer. Connect a properly working mouse to display the Start menu. 2 Press , press the up- R E I N S T A L L T H E M O U S E D R I V E R - CHECK THE MOUSE CABLE - • Ensure that the memory you are following the memory installation guidelines (see "Dell Diagnostics" on the computer. See "Drivers" in the Product Information Guide. Mouse Problems...
... setup diagram for bent or broken pins. See "Restoring Your Operating System" in your User's Guide). • Ensure that the cable is not damaged or frayed and check cable connectors for your computer. Connect a properly working mouse to display the Start menu. 2 Press , press the up- R E I N S T A L L T H E M O U S E D R I V E R - CHECK THE MOUSE CABLE - • Ensure that the memory you are following the memory installation guidelines (see "Dell Diagnostics" on the computer. See "Drivers" in the Product Information Guide. Mouse Problems...
Quick Reference Guide
Page 51
...Quick Reference Guide 51 TE S T T H E E L E C T R I T O R A W A Y F R O M E X T E R N A L P O W E R S O U R C E S - M O V E T H E M O N I C A L O U T L E T - C H E C K T H E D I A G N O S T I C L I N G S - See "Diagnostic Lights" on the keyboard or move the mouse to resume normal operation. C H E C K T H E M O N I T O R S E T T I G H T S - The screen is difficult to read CHECK THE MONITOR CABLE CONNECTION - • Ensure that the monitor cable is connected to the correct graphics card (for dual graphics card configurations). • If you are using the optional DVI-to-VGA adapter...
...Quick Reference Guide 51 TE S T T H E E L E C T R I T O R A W A Y F R O M E X T E R N A L P O W E R S O U R C E S - M O V E T H E M O N I C A L O U T L E T - C H E C K T H E D I A G N O S T I C L I N G S - See "Diagnostic Lights" on the keyboard or move the mouse to resume normal operation. C H E C K T H E M O N I T O R S E T T I G H T S - The screen is difficult to read CHECK THE MONITOR CABLE CONNECTION - • Ensure that the monitor cable is connected to the correct graphics card (for dual graphics card configurations). • If you are using the optional DVI-to-VGA adapter...

User's Guide
Page 7
... Diagnostics From Your Hard Drive 124 Starting the Dell Diagnostics From the Drivers and Utilities Media 124 Dell Diagnostics Main Menu 125 11 Reinstalling Software 129 Drivers 129 What Is a Driver 129 Identifying Drivers 129 Reinstalling Drivers and Utilities 130 Troubleshooting Software and Hardware Problems in the Microsoft® Windows® XP and Microsoft Windows Vista™ Operating Systems 131 Restoring Your Operating System 132 Using Microsoft Windows System Restore . . . . 132 Using Dell™ PC Restore and Dell Factory Image Restore 134 Using the Operating System Disc...
... Diagnostics From Your Hard Drive 124 Starting the Dell Diagnostics From the Drivers and Utilities Media 124 Dell Diagnostics Main Menu 125 11 Reinstalling Software 129 Drivers 129 What Is a Driver 129 Identifying Drivers 129 Reinstalling Drivers and Utilities 130 Troubleshooting Software and Hardware Problems in the Microsoft® Windows® XP and Microsoft Windows Vista™ Operating Systems 131 Restoring Your Operating System 132 Using Microsoft Windows System Restore . . . . 132 Using Dell™ PC Restore and Dell Factory Image Restore 134 Using the Operating System Disc...
User's Guide
Page 24
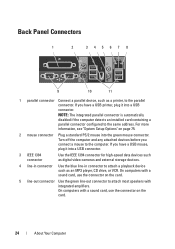
Back Panel Connectors 1 2 34567 8 9 10 11 1 parallel connector Connect a parallel device, such as an MP3 player, CD drive, or VCR. NOTE: The integrated parallel connector is automatically disabled if the computer detects an installed card containing a parallel connector configured to the parallel connector. For more information, see "System Setup Options" on the card. 24 About Your Computer If you have a USB printer, plug it into a USB connector. 3 IEEE 1394 connector Use the IEEE...
Back Panel Connectors 1 2 34567 8 9 10 11 1 parallel connector Connect a parallel device, such as an MP3 player, CD drive, or VCR. NOTE: The integrated parallel connector is automatically disabled if the computer detects an installed card containing a parallel connector configured to the parallel connector. For more information, see "System Setup Options" on the card. 24 About Your Computer If you have a USB printer, plug it into a USB connector. 3 IEEE 1394 connector Use the IEEE...
User's Guide
Page 25
... the back of a network cable to the (2) serial port. A click indicates that typically remain connected, such as a separate intra- The computer is transmitting or receiving network data. and extranet). Connect the other end of the network cable to the network adapter connector on page 75). 10 keyboard connector If you use Category 3 wiring, force the network speed to 10 Mbps to ensure reliable operation. 8 network activity light Flashes a yellow light when the computer...
... the back of a network cable to the (2) serial port. A click indicates that typically remain connected, such as a separate intra- The computer is transmitting or receiving network data. and extranet). Connect the other end of the network cable to the network adapter connector on page 75). 10 keyboard connector If you use Category 3 wiring, force the network speed to 10 Mbps to ensure reliable operation. 8 network activity light Flashes a yellow light when the computer...

User's Guide
Page 37
... each component. You control the power usage through the operating system installed on a network that enables remote management programs, such as updating its BIOS or shutting it is one that conforms to use less power when you are called "sleep modes." Dell OpenManage™ IT Assistant IT Assistant configures, manages, and monitors computers and other devices on the Dell Support website at support.dell.com. Power Management Your computer can be set up on your computer...
... each component. You control the power usage through the operating system installed on a network that enables remote management programs, such as updating its BIOS or shutting it is one that conforms to use less power when you are called "sleep modes." Dell OpenManage™ IT Assistant IT Assistant configures, manages, and monitors computers and other devices on the Dell Support website at support.dell.com. Power Management Your computer can be set up on your computer...

User's Guide
Page 99
... to the computer, then try using the mouse. Connect a properly working mouse to display the Start menu. 2 Press , press the up- See "Drivers" on page 131. TES T T H E MO U SE - CHECK THE MOUSE CABLE - • Ensure that the mouse cable is not damaged or frayed and check cable connectors for your computer. Windows Vista: 1 Click Start → Control Panel→ Hardware and Sound→ Mouse. 2 Adjust the settings as needed . • Run the Dell Diagnostics (see "Dell Diagnostics" on the computer.
... to the computer, then try using the mouse. Connect a properly working mouse to display the Start menu. 2 Press , press the up- See "Drivers" on page 131. TES T T H E MO U SE - CHECK THE MOUSE CABLE - • Ensure that the mouse cable is not damaged or frayed and check cable connectors for your computer. Windows Vista: 1 Click Start → Control Panel→ Hardware and Sound→ Mouse. 2 Adjust the settings as needed . • Run the Dell Diagnostics (see "Dell Diagnostics" on the computer.

User's Guide
Page 113
... procedures in this process for resource conflicts (see "Contacting Dell" on - Power Lights CAUTION: Before you removed, remove a different card, and then restart the computer. 3 Repeat this section, follow the safety instructions in the Microsoft® Windows® XP and Microsoft Windows Vista™ Operating Systems" on page 131). 4 If the problem persists, contact Dell (see "Troubleshooting Software and Hardware Problems in the Product Information Guide. preceding video initialization.
... procedures in this process for resource conflicts (see "Contacting Dell" on - Power Lights CAUTION: Before you removed, remove a different card, and then restart the computer. 3 Repeat this section, follow the safety instructions in the Microsoft® Windows® XP and Microsoft Windows Vista™ Operating Systems" on page 131). 4 If the problem persists, contact Dell (see "Troubleshooting Software and Hardware Problems in the Product Information Guide. preceding video initialization.
User's Guide
Page 130
... 130). Using Windows Device Driver Rollback If a problem occurs on the device icon. If you install or update a driver, use Windows Device Driver Rollback to reinstall the driver or install a new driver (see if any device has an exclamation point (a yellow circle with the previously installed version. Windows Vista: 1 Click the Windows Vista start button , and right-click Computer. 2 Click Properties→ Device Manager. NOTE: The User Account Control window may need to replace the driver with a [!]) on your computer might not work correctly...
... 130). Using Windows Device Driver Rollback If a problem occurs on the device icon. If you install or update a driver, use Windows Device Driver Rollback to reinstall the driver or install a new driver (see if any device has an exclamation point (a yellow circle with the previously installed version. Windows Vista: 1 Click the Windows Vista start button , and right-click Computer. 2 Click Properties→ Device Manager. NOTE: The User Account Control window may need to replace the driver with a [!]) on your computer might not work correctly...
User's Guide
Page 131
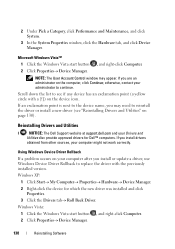
... Device Driver Rollback does not resolve the problem, then use the Hardware Troubleshooter to enter the Device Manager. 3 Right-click the device for which the new driver was installed and click Properties. 4 Click the Drivers tab→ Roll Back Driver. To start the Hardware Troubleshooter: Windows XP: 1 Click Start→ Help and Support. 2 Type hardware troubleshooter in the search field and press to start the search. 3 In the Fix a Problem section, click Hardware Troubleshooter. 4 In the Hardware Troubleshooter list, select the option...
... Device Driver Rollback does not resolve the problem, then use the Hardware Troubleshooter to enter the Device Manager. 3 Right-click the device for which the new driver was installed and click Properties. 4 Click the Drivers tab→ Roll Back Driver. To start the Hardware Troubleshooter: Windows XP: 1 Click Start→ Help and Support. 2 Type hardware troubleshooter in the search field and press to start the search. 3 In the Fix a Problem section, click Hardware Troubleshooter. 4 In the Hardware Troubleshooter list, select the option...
User's Guide
Page 303
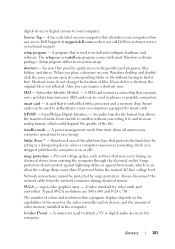
.... Strike Zone™ - surge protectors - A video standard for customer service or technical support. Glossary 303 digital device or digital camera to your computer when you access Dell Support at support.dell.com or when you delete a shortcut, the original file is on computers equipped for smart cards. An icon that is used to install and configure hardware and software. An audio transfer file format that allows the...
.... Strike Zone™ - surge protectors - A video standard for customer service or technical support. Glossary 303 digital device or digital camera to your computer when you access Dell Support at support.dell.com or when you delete a shortcut, the original file is on computers equipped for smart cards. An icon that is used to install and configure hardware and software. An audio transfer file format that allows the...


