Information Update - Intel Xeon 5600 Series Processors
Page 2
...standard and low voltage memory modules For information on the memory configuration guidelines, see your system's Hardware Owner's Manual at a lower voltage may cause restrictions to PowerEdge R410, R510, R610, R710, R910, T410, T610, and T710 systems only. DDR3L memory is not supported at standard voltage (1.5 V) without any of the... (1.35 V) that ensures memory power savings up to control frequency and voltage configuration within allowable limits. Operating the system memory at support.dell.com/manuals. NOTE: Applies to additional frequency and memory population capabilities.
...standard and low voltage memory modules For information on the memory configuration guidelines, see your system's Hardware Owner's Manual at a lower voltage may cause restrictions to PowerEdge R410, R510, R610, R710, R910, T410, T610, and T710 systems only. DDR3L memory is not supported at standard voltage (1.5 V) without any of the... (1.35 V) that ensures memory power savings up to control frequency and voltage configuration within allowable limits. Operating the system memory at support.dell.com/manuals. NOTE: Applies to additional frequency and memory population capabilities.
Information Update - Processor Installation
Page 3
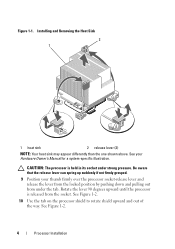
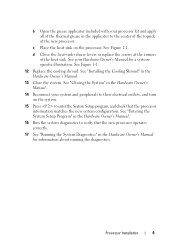
... them. Before you begin this procedure, review the safety instructions that you intend to remove the processor. See your Hardware Owner's Manual for 3 seconds to fully drain the system of stored power prior to maintain proper thermal conditions. 5 Release one of the heat...the system. 1 Prior to install the update on components in the Hardware Owner's Manual. 4 Remove the cooling shroud. When disconnected from support.dell.com and follow the instructions included in the Hardware Owner's Manual. Allow the heat sink and processor to loosen from a processor unless you always...
... them. Before you begin this procedure, review the safety instructions that you intend to remove the processor. See your Hardware Owner's Manual for 3 seconds to fully drain the system of stored power prior to maintain proper thermal conditions. 5 Release one of the heat...the system. 1 Prior to install the update on components in the Hardware Owner's Manual. 4 Remove the cooling shroud. When disconnected from support.dell.com and follow the instructions included in the Hardware Owner's Manual. Allow the heat sink and processor to loosen from a processor unless you always...
Information Update - Processor Installation
Page 4
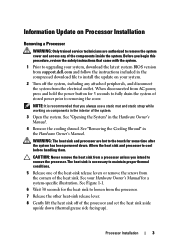
... appear differently than the one shown above. Be aware that the release lever can spring up suddenly if not firmly grasped. 9 Position your Hardware Owner's Manual for a system-specific illustration. See Figure 1-2. 4 Processor Installation CAUTION: The processor is released from under strong pressure. See Figure 1-2. 10 Use the tab on the...
... appear differently than the one shown above. Be aware that the release lever can spring up suddenly if not firmly grasped. 9 Position your Hardware Owner's Manual for a system-specific illustration. See Figure 1-2. 4 Processor Installation CAUTION: The processor is released from under strong pressure. See Figure 1-2. 10 Use the tab on the...
Information Update - Processor Installation
Page 9
... heat sink. Processor Installation 9 See Figure 1-1. 12 Replace the cooling shroud. See "Entering the System Setup Program" in the Hardware Owner's Manual. 16 Run the system diagnostics to enter the System Setup program, and check that the new processor operates correctly. 17 See "Running the System... Diagnostics" in the Hardware Owner's Manual. 13 Close the system. d Close the heat-sink release levers or replace the screws at the corners of the new processor. See ...
... heat sink. Processor Installation 9 See Figure 1-1. 12 Replace the cooling shroud. See "Entering the System Setup Program" in the Hardware Owner's Manual. 16 Run the system diagnostics to enter the System Setup program, and check that the new processor operates correctly. 17 See "Running the System... Diagnostics" in the Hardware Owner's Manual. 13 Close the system. d Close the heat-sink release levers or replace the screws at the corners of the new processor. See ...
Dell PowerEdge Deployment Guide
Page 3
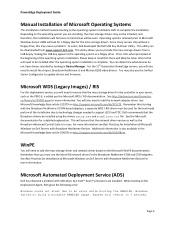
PowerEdge Deployment Guide Table of Contents Introduction ...2 Unified Server Configurator (USC) Deployment ...2 Dell Systems Build and Update Utility (SBUU) ...3 Dell OpenManage™ Deployment Toolkit (DTK)...3 Manual Installation of Microsoft Operating Systems 4 Microsoft WDS (Legacy Images) / RIS ...4 WinPE ...4 Microsoft Automated Deployment Service (ADS) ...4 Page 1
PowerEdge Deployment Guide Table of Contents Introduction ...2 Unified Server Configurator (USC) Deployment ...2 Dell Systems Build and Update Utility (SBUU) ...3 Dell OpenManage™ Deployment Toolkit (DTK)...3 Manual Installation of Microsoft Operating Systems 4 Microsoft WDS (Legacy Images) / RIS ...4 WinPE ...4 Microsoft Automated Deployment Service (ADS) ...4 Page 1
Dell PowerEdge Deployment Guide
Page 6
... network driver based on http://support.microsoft.com/kb/254078/en. PowerEdge Deployment Guide Manual Installation of Microsoft Operating Systems This installation method involves booting to the operating system installation DVD to an error while booting the RAMDISK. To assist, Dell developed the Dell USB Key F6 Driver Utility. Windows failed to Microsoft Windows...
... network driver based on http://support.microsoft.com/kb/254078/en. PowerEdge Deployment Guide Manual Installation of Microsoft Operating Systems This installation method involves booting to the operating system installation DVD to an error while booting the RAMDISK. To assist, Dell developed the Dell USB Key F6 Driver Utility. Windows failed to Microsoft Windows...
Deploying UEFI-Aware Operating Systems on Dell PowerEdge Servers
Page 3
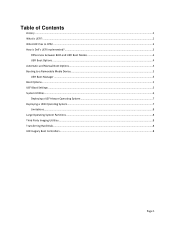
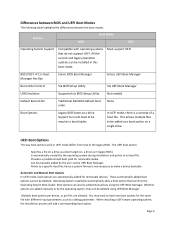
Table of Contents History ...2 What is UEFI?...2 What UEFI has to Offer...3 How is Dell's UEFI implemented? ...3 Differences between BIOS and UEFI Boot Modes 4 UEFI Boot Options ...4 Automatic and Manual Boot Options ...4 Booting to a Removable Media Device...5 UEFI Boot Manager ...5 Boot Options...5 UEFI Boot Settings ...5 System Utilities ...6 Deploying a UEFI‐Aware Operating System ...7 Deploying a UEFI Operating System ...7 Limitations ...8 Large Operating System Partitions ...8 Third Party Imaging Utilities ...8 Transferring Hard Disks ...8 UEFI Legacy Boot Controllers...8 Page 1
Table of Contents History ...2 What is UEFI?...2 What UEFI has to Offer...3 How is Dell's UEFI implemented? ...3 Differences between BIOS and UEFI Boot Modes 4 UEFI Boot Options ...4 Automatic and Manual Boot Options ...4 Booting to a Removable Media Device...5 UEFI Boot Manager ...5 Boot Options...5 UEFI Boot Settings ...5 System Utilities ...6 Deploying a UEFI‐Aware Operating System ...7 Deploying a UEFI Operating System ...7 Limitations ...8 Large Operating System Partitions ...8 Third Party Imaging Utilities ...8 Transferring Hard Disks ...8 UEFI Legacy Boot Controllers...8 Page 1
Deploying UEFI-Aware Operating Systems on Dell PowerEdge Servers
Page 6
... option on a drive as in legacy BIOS). Operating System installation automatically adds a boot option that of a boot file. Whether options are added manually or by using UEFI Boot Manager. You may want to have two boot options for removable media. Page 4 hence a system format is a ... the operating system, they can be manually added by the operating system during installation and points to a drive. Is automatically created by the user via BIOS Setup Utility Not needed Default Boot Order Traditional Dell BIOS default boot order None Boot Options Legacy BIOS boots to...
... option on a drive as in legacy BIOS). Operating System installation automatically adds a boot option that of a boot file. Whether options are added manually or by using UEFI Boot Manager. You may want to have two boot options for removable media. Page 4 hence a system format is a ... the operating system, they can be manually added by the operating system during installation and points to a drive. Is automatically created by the user via BIOS Setup Utility Not needed Default Boot Order Traditional Dell BIOS default boot order None Boot Options Legacy BIOS boots to...
Deploying UEFI-Aware Operating Systems on Dell PowerEdge Servers
Page 7
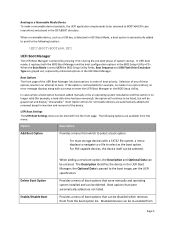
...with a prompt to the following options are not listed. For PXE‐capable devices, the device itself can be entered. Boot options that were manually and operating system installed and can be entered from Page 5 In UEFI boot mode, it replaces both the BIOS Boot Manager and the boot ... re‐enabled from the front page. When a removable device, such as the boot option. In cases where a boot option has been added manually or by pressing during the pre‐boot phase of boot options that option is not bootable (for example, no longer valid (for removable devices...
...with a prompt to the following options are not listed. For PXE‐capable devices, the device itself can be entered. Boot options that were manually and operating system installed and can be entered from Page 5 In UEFI boot mode, it replaces both the BIOS Boot Manager and the boot ... re‐enabled from the front page. When a removable device, such as the boot option. In cases where a boot option has been added manually or by pressing during the pre‐boot phase of boot options that option is not bootable (for example, no longer valid (for removable devices...
Getting Started Guide
Page 9
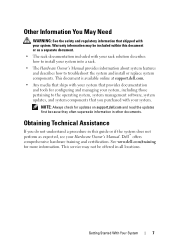
... with your system. Obtaining Technical Assistance If you purchased with your system into a rack. • The Hardware Owner's Manual provides information about system features and describes how to troubleshoot the system and install or replace system components. Getting Started With Your...because they often supersede information in this document or as expected, see your Hardware Owner's Manual. Dell™ offers comprehensive hardware training and certification. See www.dell.com/training for configuring and managing your system, including those pertaining to install your system...
... with your system. Obtaining Technical Assistance If you purchased with your system into a rack. • The Hardware Owner's Manual provides information about system features and describes how to troubleshoot the system and install or replace system components. Getting Started With Your...because they often supersede information in this document or as expected, see your Hardware Owner's Manual. Dell™ offers comprehensive hardware training and certification. See www.dell.com/training for configuring and managing your system, including those pertaining to install your system...
Hardware Owner's Manual
Page 63
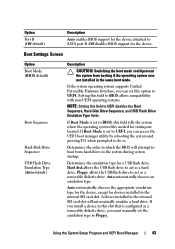
... emulate a hard drive. Auto automatically chooses the appropriate emulation type for the device, except for devices installed in the same boot mode. If you must manually set this slot that is set to SATA port B. Off disables BIOS support for a USB flash drive. A device installed in the internal SD card slot...
... emulate a hard drive. Auto automatically chooses the appropriate emulation type for the device, except for devices installed in the same boot mode. If you must manually set this slot that is set to SATA port B. Off disables BIOS support for a USB flash drive. A device installed in the internal SD card slot...
Hardware Owner's Manual
Page 65
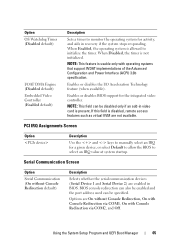
...: This feature is allowed to initialize the timer. If this field is not initialized. PCI IRQ Assignments Screen Option Description Use the and keys to manually select an IRQ for the integrated video controller. Enables or disables the I /OAT DMA Engine (Disabled default) Embedded Video Controller (Enabled default) Description Sets a timer...
...: This feature is allowed to initialize the timer. If this field is not initialized. PCI IRQ Assignments Screen Option Description Use the and keys to manually select an IRQ for the integrated video controller. Enables or disables the I /OAT DMA Engine (Disabled default) Embedded Video Controller (Enabled default) Description Sets a timer...
Hardware Owner's Manual
Page 74
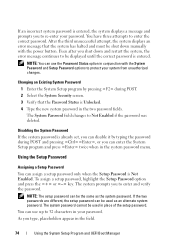
Using the Setup Password Assigning a Setup Password You can assign a setup password only when the Setup Password is already set, you shut down manually with the System Password and Setup Password options to 32 characters in your password. Even after you can disable it by pressing during POST and ...
Using the Setup Password Assigning a Setup Password You can assign a setup password only when the Setup Password is already set, you shut down manually with the System Password and Setup Password options to 32 characters in your password. Even after you can disable it by pressing during POST and ...

