Information Update
Page 15
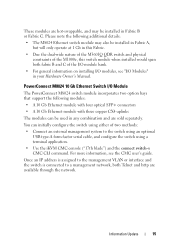
... external management system to the switch using an optional USB type-A form factor serial cable, and configure the switch using a terminal application. • Use the iKVM CMC console ("17th blade") and the connect switch-n CMC CLI command. Please note the following modules: • A 10 Gb Ethernet module with four optical SFP... A, but will only operate at 1 Gb in this Fabric. • Due the dual-wide nature of the M3601Q QDR switch and physical constraints of the M1000e, this switch module when installed would span both Telnet and http are sold separately.
... external management system to the switch using an optional USB type-A form factor serial cable, and configure the switch using a terminal application. • Use the iKVM CMC console ("17th blade") and the connect switch-n CMC CLI command. Please note the following modules: • A 10 Gb Ethernet module with four optical SFP... A, but will only operate at 1 Gb in this Fabric. • Due the dual-wide nature of the M3601Q QDR switch and physical constraints of the M1000e, this switch module when installed would span both Telnet and http are sold separately.

Information Update
Page 147
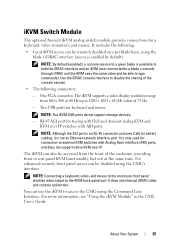
B C • M8024 A 1Gb • M3601Q QDR M1000e I/O B 와 C • I/O I/O Modules(I/O PowerConnect M8024 10Gb I/O 모듈 PowerConnect M8024 2 • 4 SFP 10Gb • 3 개의 동 CX4 10Gb • USB 유형 A • iKVM CMC 콘솔 ("17 connect switch-n CMC CLI CMC IP VLAN http 147
B C • M8024 A 1Gb • M3601Q QDR M1000e I/O B 와 C • I/O I/O Modules(I/O PowerConnect M8024 10Gb I/O 모듈 PowerConnect M8024 2 • 4 SFP 10Gb • 3 개의 동 CX4 10Gb • USB 유형 A • iKVM CMC 콘솔 ("17 connect switch-n CMC CLI CMC IP VLAN http 147
Getting Started Guide
Page 6
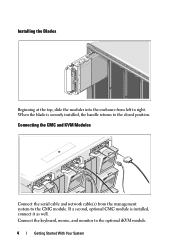
Connecting the CMC and KVM Modules Connect the serial cable and network cable(s) from left to right. Connect the keyboard, mouse, and monitor to the optional iKVM module. 4 Getting Started With Your System When the blade is installed, connect it as well. If a second, optional CMC module is securely installed, the handle returns to the closed position. Installing the Blades Beginning at the top, slide the modules into the enclosure from the management system to the CMC module.
Connecting the CMC and KVM Modules Connect the serial cable and network cable(s) from left to right. Connect the keyboard, mouse, and monitor to the optional iKVM module. 4 Getting Started With Your System When the blade is installed, connect it as well. If a second, optional CMC module is securely installed, the handle returns to the closed position. Installing the Blades Beginning at the top, slide the modules into the enclosure from the management system to the CMC module.
Getting Started Guide
Page 20
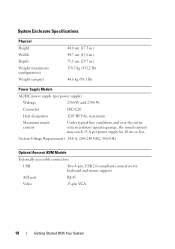
System Voltage Requirements 14.4 A, 200-240 VAC, 50/60 Hz Optional Avocent iKVM Module Externally accessible connectors USB Two 4-pin, USB 2.0-compliant connectors for 10 ms or less. maximum Maximum inrush current Under typical line conditions and over ...
System Voltage Requirements 14.4 A, 200-240 VAC, 50/60 Hz Optional Avocent iKVM Module Externally accessible connectors USB Two 4-pin, USB 2.0-compliant connectors for 10 ms or less. maximum Maximum inrush current Under typical line conditions and over ...
Dell PowerEdge M1000e Configuration Guide
Page 3
Contents 1 About Your System 7 System Overview 7 LCD Module 11 LCD Module Menus 12 Back-Panel Features 14 Blades 15 CMC Module 22 CMC Daisy Chaining (Enclosure Stacking) . . . . 23 iKVM Switch Module 25 2 Initial System Configuration 27 Before You Begin 27 Power Requirements 27 Network Information 27 Initial Setup Sequence 27 Configuring the CMC 28 Initial CMC Network Configuration 28 Logging in to the CMC Using the Web-Based Interface 31 Adding and Managing CMC Users 32 Configuring iDRAC Networking Using the Web-Based Interface 33 Contents 3
Contents 1 About Your System 7 System Overview 7 LCD Module 11 LCD Module Menus 12 Back-Panel Features 14 Blades 15 CMC Module 22 CMC Daisy Chaining (Enclosure Stacking) . . . . 23 iKVM Switch Module 25 2 Initial System Configuration 27 Before You Begin 27 Power Requirements 27 Network Information 27 Initial Setup Sequence 27 Configuring the CMC 28 Initial CMC Network Configuration 28 Logging in to the CMC Using the Web-Based Interface 31 Adding and Managing CMC Users 32 Configuring iDRAC Networking Using the Web-Based Interface 33 Contents 3
Dell PowerEdge M1000e Configuration Guide
Page 4
... 35 Installing or Updating the CMC Firmware . . . . . 35 Configuring the Optional iKVM Switch Module . . . . 38 Enabling iKVM Access to the Dell CMC Console 38 Updating the iKVM Firmware 38 Tiering the Avocent iKVM Switch From an Analog KVM Switch 39 Tiering the Avocent iKVM Switch From a Digital KVM Switch 40 Viewing and Selecting Servers 41 FlexAddress...
... 35 Installing or Updating the CMC Firmware . . . . . 35 Configuring the Optional iKVM Switch Module . . . . 38 Enabling iKVM Access to the Dell CMC Console 38 Updating the iKVM Firmware 38 Tiering the Avocent iKVM Switch From an Analog KVM Switch 39 Tiering the Avocent iKVM Switch From a Digital KVM Switch 40 Viewing and Selecting Servers 41 FlexAddress...
Dell PowerEdge M1000e Configuration Guide
Page 7
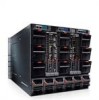
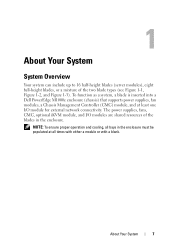
About Your System 7 To function as a system, a blade is inserted into a Dell PowerEdge M1000e enclosure (chassis) that supports power supplies, fan modules, a Chassis Management Controller (CMC) module, and at all bays in the enclosure must be populated... 1-2, and Figure 1-3). NOTE: To ensure proper operation and cooling, all times with either a module or with a blank. The power supplies, fans, CMC, optional iKVM module, and I /O module for external network connectivity. 1 About Your System System Overview Your system can include up to 16 half-height blades (server modules), eight...
About Your System 7 To function as a system, a blade is inserted into a Dell PowerEdge M1000e enclosure (chassis) that supports power supplies, fan modules, a Chassis Management Controller (CMC) module, and at all bays in the enclosure must be populated... 1-2, and Figure 1-3). NOTE: To ensure proper operation and cooling, all times with either a module or with a blank. The power supplies, fans, CMC, optional iKVM module, and I /O module for external network connectivity. 1 About Your System System Overview Your system can include up to 16 half-height blades (server modules), eight...
Dell PowerEdge M1000e Configuration Guide
Page 10
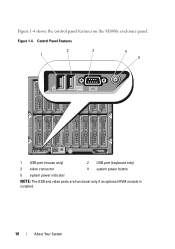
Control Panel Features 2 3 1 4 5 1 USB port (mouse only) 2 USB port (keyboard only) 3 video connector 4 system power button 5 system power indicator NOTE: The USB and video ports are functional only if an optional iKVM module is installed. 10 About Your System Figure 1-4. Figure 1-4 shows the control panel features on the M1000e enclosure panel.
Control Panel Features 2 3 1 4 5 1 USB port (mouse only) 2 USB port (keyboard only) 3 video connector 4 system power button 5 system power indicator NOTE: The USB and video ports are functional only if an optional iKVM module is installed. 10 About Your System Figure 1-4. Figure 1-4 shows the control panel features on the M1000e enclosure panel.
Dell PowerEdge M1000e Configuration Guide
Page 14
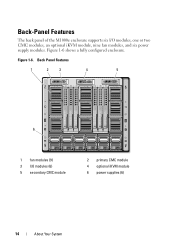
Figure 1-6. Back Panel Features 1 2 3 4 5 6 1 fan modules (9) 3 I /O modules, one or two CMC modules, an optional iKVM module, nine fan modules, and six power supply modules. Figure 1-6 shows a fully configured enclosure. Back-Panel Features The back panel of the M1000e enclosure supports six I /O modules (6) 5 secondary CMC module 2 primary CMC module 4 optional iKVM module 6 power supplies (6) 14 About Your System
Figure 1-6. Back Panel Features 1 2 3 4 5 6 1 fan modules (9) 3 I /O modules, one or two CMC modules, an optional iKVM module, nine fan modules, and six power supply modules. Figure 1-6 shows a fully configured enclosure. Back-Panel Features The back panel of the M1000e enclosure supports six I /O modules (6) 5 secondary CMC module 2 primary CMC module 4 optional iKVM module 6 power supplies (6) 14 About Your System
Dell PowerEdge M1000e Configuration Guide
Page 25
... port for connection to access the CMC using the CMC's interface. It does not interrupt iDRAC video and console redirection. One VGA connector. The iKVM supports a video display resolution range from the front of the enclosure, providing front or rear panel KVM functionality, but not at 60 Hz up ...the blade's iDRAC interface (access is only used for tiering with Dell and Avocent analog KVM and KVM over IP switches with Analog Rack Interface (ARI) ports, and does not support native KVM over IP. The iKVM can use the iKVM to external KVM switches with ARI ports. You can also be ...
... port for connection to access the CMC using the CMC's interface. It does not interrupt iDRAC video and console redirection. One VGA connector. The iKVM supports a video display resolution range from the front of the enclosure, providing front or rear panel KVM functionality, but not at 60 Hz up ...the blade's iDRAC interface (access is only used for tiering with Dell and Avocent analog KVM and KVM over IP switches with Analog Rack Interface (ARI) ports, and does not support native KVM over IP. The iKVM can use the iKVM to external KVM switches with ARI ports. You can also be ...

Dell PowerEdge M1000e Configuration Guide
Page 26
Avocent iKVM Switch Module 2 3 4 5 1 1 identification indicator 2 status indicator 3 ACI port for tiering connection 4 USB connectors (2) for keyboard only and mouse 5 video connector CAUTION: Do not connect the ACI port to a LAN device such as a network hub. Doing so may damage the equipment. 26 About Your System Figure 1-16 shows the external features of the iKVM module. Figure 1-16.
Avocent iKVM Switch Module 2 3 4 5 1 1 identification indicator 2 status indicator 3 ACI port for tiering connection 4 USB connectors (2) for keyboard only and mouse 5 video connector CAUTION: Do not connect the ACI port to a LAN device such as a network hub. Doing so may damage the equipment. 26 About Your System Figure 1-16 shows the external features of the iKVM module. Figure 1-16.

Dell PowerEdge M1000e Configuration Guide
Page 27
... is installed, connect the keyboard, video, and mouse to the enclosure control panel (see Figure 1-4) or to the iKVM module (see the Getting Started Guide and Rack Installation Guide at both ranges simultaneously. 2 Initial System Configuration Before You Begin Power Requirements CAUTION: The enclosure ... described in a rack. Network Information If your network uses static addressing, you have configured the switch modules, as the system does not operate at support.dell.com/manuals.
... is installed, connect the keyboard, video, and mouse to the enclosure control panel (see Figure 1-4) or to the iKVM module (see the Getting Started Guide and Rack Installation Guide at both ranges simultaneously. 2 Initial System Configuration Before You Begin Power Requirements CAUTION: The enclosure ... described in a rack. Network Information If your network uses static addressing, you have configured the switch modules, as the system does not operate at support.dell.com/manuals.
Dell PowerEdge M1000e Configuration Guide
Page 29
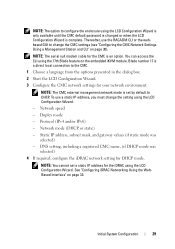
.... Initial System Configuration 29 To use the RACADM CLI or the webbased GUI to change the setting using the 17th Blade feature on the embedded iKVM module. NOTE: The serial null modem cable for the iDRAC using the LCD Configuration Wizard is only available until the CMC default password is changed...
.... Initial System Configuration 29 To use the RACADM CLI or the webbased GUI to change the setting using the 17th Blade feature on the embedded iKVM module. NOTE: The serial null modem cable for the iDRAC using the LCD Configuration Wizard is only available until the CMC default password is changed...
Dell PowerEdge M1000e Configuration Guide
Page 30
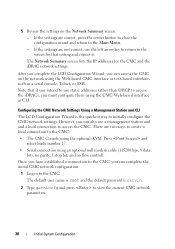
... the Web-based CMC interface or text-based interfaces such as a serial console, Telnet, or SSH. 5 Review the settings on the network using the optional iKVM. If the settings are two ways to create a local connection to the Main Menu. - Note that setting and correct it. Press and select blade number...
... the Web-based CMC interface or text-based interfaces such as a serial console, Telnet, or SSH. 5 Review the settings on the network using the optional iKVM. If the settings are two ways to create a local connection to the Main Menu. - Note that setting and correct it. Press and select blade number...

Dell PowerEdge M1000e Configuration Guide
Page 35
Configuring Power Budget and Redundancy The CMC's power management service optimizes power consumption for the entire chassis (the chassis, servers, I/O modules, iKVM, CMC, and PSUs) and re-allocates power to different modules based on the various power management options, see "Power Management" in the enclosure and your ...
Configuring Power Budget and Redundancy The CMC's power management service optimizes power consumption for the entire chassis (the chassis, servers, I/O modules, iKVM, CMC, and PSUs) and re-allocates power to different modules based on the various power management options, see "Power Management" in the enclosure and your ...

Dell PowerEdge M1000e Configuration Guide
Page 38
... field, type the path on page 31. 2 Select Chassis in to locate ikvm.bin, determine whether another user has renamed the file. 6 Click Update. Configuring the Optional iKVM Switch Module Enabling iKVM Access to the Dell CMC Console Enabling access to the CMC allows you to continue. The... iKVM Configuration page is displayed. 4 Click the iKVM name. A dialog box appears asking you are unable to the...
... field, type the path on page 31. 2 Select Chassis in to locate ikvm.bin, determine whether another user has renamed the file. 6 Click Update. Configuring the Optional iKVM Switch Module Enabling iKVM Access to the Dell CMC Console Enabling access to the CMC allows you to continue. The... iKVM Configuration page is displayed. 4 Click the iKVM name. A dialog box appears asking you are unable to the...

Dell PowerEdge M1000e Configuration Guide
Page 39
... KVM Switch The Avocent iKVM switch can soft switch to display servers numerically by pressing and then typing the first few characters of its name or number. Table 2-1. Initial System Configuration 39 Many switches may be tiered from analog KVM switches such as the Dell 2160AS and 180AS, as... well as many Avocent analog KVM switches. If you have a Delay Time set the iKVM switch to display in your system.
... KVM Switch The Avocent iKVM switch can soft switch to display servers numerically by pressing and then typing the first few characters of its name or number. Table 2-1. Initial System Configuration 39 Many switches may be tiered from analog KVM switches such as the Dell 2160AS and 180AS, as... well as many Avocent analog KVM switches. If you have a Delay Time set the iKVM switch to display in your system.

Dell PowerEdge M1000e Configuration Guide
Page 40
... SIP (see Table 2-2). 40 Initial System Configuration Tiering the Avocent iKVM Switch From a Digital KVM Switch The iKVM module may be displayed as the Dell 2161DS-2 or 4161DS, or a supported Avocent digital KVM switch. For instance, if the iKVM switch is now attached should be tiered from a digital KVM switch ...this behavior occurs, shut down and restart the switch so the entire complement of the blade to which the iKVM switch is attached to the ARI port on the iKVM module. NOTE: If the external analog switch is recognized. The slot number of blades is powered up ...
... SIP (see Table 2-2). 40 Initial System Configuration Tiering the Avocent iKVM Switch From a Digital KVM Switch The iKVM module may be displayed as the Dell 2161DS-2 or 4161DS, or a supported Avocent digital KVM switch. For instance, if the iKVM switch is now attached should be tiered from a digital KVM switch ...this behavior occurs, shut down and restart the switch so the entire complement of the blade to which the iKVM switch is attached to the ARI port on the iKVM module. NOTE: If the external analog switch is recognized. The slot number of blades is powered up ...

Dell PowerEdge M1000e Configuration Guide
Page 41
...If the switch does not require a SIP to connect to the iKVM (see "Enabling iKVM Access to the CMC though the iKVM, an additional option, Dell CMC Console, is connected, the server modules appear in the M1000e enclosure through the iKVM. See Figure 1-16. The Slot column indicates the slot number in... order to see Table 2-1), connect an Avocent USB SIP to the iKVM, then connect a Cat5...
...If the switch does not require a SIP to connect to the iKVM (see "Enabling iKVM Access to the CMC though the iKVM, an additional option, Dell CMC Console, is connected, the server modules appear in the M1000e enclosure through the iKVM. See Figure 1-16. The Slot column indicates the slot number in... order to see Table 2-1), connect an Avocent USB SIP to the iKVM, then connect a Cat5...

Dell PowerEdge M1000e Configuration Guide
Page 42
..., the blades appear in the appliance, a completion dialog box appears with the switch names. Resynchronizing the Server List at the Remote Client Workstation Once the iKVM module is displayed. The Resync Wizard launches. 2 Click Next. Your current local database names will be overwritten with this information. You now need to resynchronize...
..., the blades appear in the appliance, a completion dialog box appears with the switch names. Resynchronizing the Server List at the Remote Client Workstation Once the iKVM module is displayed. The Resync Wizard launches. 2 Click Next. Your current local database names will be overwritten with this information. You now need to resynchronize...


