Getting Started Guide
Page 5
... drive controllers. - Up to two internal, 1-inch high, SATA hard drives with an optional SAS controller card. • Optional remote access controller for static rails and sliding rails. System Features The major hardware and software features of your Hardware Owner's Manual. • One of the following processors: - One Intel® Core™...
... drive controllers. - Up to two internal, 1-inch high, SATA hard drives with an optional SAS controller card. • Optional remote access controller for static rails and sliding rails. System Features The major hardware and software features of your Hardware Owner's Manual. • One of the following processors: - One Intel® Core™...

Getting Started Guide
Page 8
Unpacking the System Unpack your system in the rack. Installing the Rails and System in a Rack Once you need them later. See your rack installation documentation for your system, install the rails and the system in a rack. 6 Getting Started With Your System Keep all shipping materials in case you have read the "Safety Instructions" located in the rack installation documentation for instructions on installing your system and identify each item.
Unpacking the System Unpack your system in the rack. Installing the Rails and System in a Rack Once you need them later. See your rack installation documentation for your system, install the rails and the system in a rack. 6 Getting Started With Your System Keep all shipping materials in case you have read the "Safety Instructions" located in the rack installation documentation for instructions on installing your system and identify each item.

Hardware Owner's Manual (PDF)
Page 46
... complete information about 1.3 cm (0.5 inch), and grasp the cover on both sides. 5 Carefully lift the cover away from the rack and place it on static rails, remove the system from the system. See Figure 3-3. 4 Slide the cover backward about safety precautions, working inside the system.
... complete information about 1.3 cm (0.5 inch), and grasp the cover on both sides. 5 Carefully lift the cover away from the rack and place it on static rails, remove the system from the system. See Figure 3-3. 4 Slide the cover backward about safety precautions, working inside the system.

Rack Installation Guide
Page 5
...Kit Contents 8 VersaRails Rack Kit Contents 8 Installation Tasks 9 Removing the Rack Doors 10 Marking the Rack 10 Installing the Mounting Rails in the Rack 12 Installing and Removing Chassis Static Rail Modules 14 Installing the System in the Rack 15 Installing the Releasable Tie Wraps 17 Removing the System From the Rack... Two-Post Rack Installation 18 Recommended Tools and Supplies 19 Rack Kit Contents 19 Installation Tasks 20 Marking the Rack 20 Installing the Mounting Rails 22 Installing the System in the Rack 26 Installing the Releasable Tie Wraps 26 Index 27 Contents 3
...Kit Contents 8 VersaRails Rack Kit Contents 8 Installation Tasks 9 Removing the Rack Doors 10 Marking the Rack 10 Installing the Mounting Rails in the Rack 12 Installing and Removing Chassis Static Rail Modules 14 Installing the System in the Rack 15 Installing the Releasable Tie Wraps 17 Removing the System From the Rack... Two-Post Rack Installation 18 Recommended Tools and Supplies 19 Rack Kit Contents 19 Installation Tasks 20 Marking the Rack 20 Installing the Mounting Rails 22 Installing the System in the Rack 26 Installing the Releasable Tie Wraps 26 Index 27 Contents 3

Rack Installation Guide
Page 6
...Rack Kit Contents 8 VersaRails Rack Kit Contents 9 One Rack Unit 10 Marking the Vertical Rails 11 Installing the RapidRails Mounting Rails 13 Installing the VersaRails Mounting Rails 14 Installing and Removing Static Rail Modules . . . . 15 Installing the System in the Rack 16 Installing the ...Two-Post, Open-Frame Relay Rack Wide-Hole Spacing 21 Installing the Mounting Rails for Center-Mount Configuration 23 Configuring the Adjustable Mounting Bracket for Flush-Mount Installation 24 Installing the Mounting Rails for Flush-Mount Configuration 25 4 Contents Figure 1-11. Figure 1-14....
...Rack Kit Contents 8 VersaRails Rack Kit Contents 9 One Rack Unit 10 Marking the Vertical Rails 11 Installing the RapidRails Mounting Rails 13 Installing the VersaRails Mounting Rails 14 Installing and Removing Static Rail Modules . . . . 15 Installing the System in the Rack 16 Installing the ...Two-Post, Open-Frame Relay Rack Wide-Hole Spacing 21 Installing the Mounting Rails for Center-Mount Configuration 23 Configuring the Adjustable Mounting Bracket for Flush-Mount Installation 24 Installing the Mounting Rails for Flush-Mount Configuration 25 4 Contents Figure 1-11. Figure 1-14....

Rack Installation Guide
Page 10
... per inch. RapidRails Rack Kit Contents • One pair of RapidRails mounting rails • Releasable tie wraps (2) (not shown in procedural steps are identified by size and number of VersaRails mounting rails • 10-32 x 0.5-inch flange-head Phillips screws (8) • ...wraps (2) (not shown in Figure 1-2) NOTE: The nonmetric screws described in illustrations and in Figure 1-1) Figure 1-1. RapidRails Rack Kit Contents mounting rails (2) releasable tie wrap attachment points (2) VersaRails Rack Kit Contents • One pair of threads per inch is identified as a 10-32 screw...
... per inch. RapidRails Rack Kit Contents • One pair of RapidRails mounting rails • Releasable tie wraps (2) (not shown in procedural steps are identified by size and number of VersaRails mounting rails • 10-32 x 0.5-inch flange-head Phillips screws (8) • ...wraps (2) (not shown in Figure 1-2) NOTE: The nonmetric screws described in illustrations and in Figure 1-1) Figure 1-1. RapidRails Rack Kit Contents mounting rails (2) releasable tie wrap attachment points (2) VersaRails Rack Kit Contents • One pair of threads per inch is identified as a 10-32 screw...

Rack Installation Guide
Page 11
... in detail in subsequent sections) in their numbered order: 1 Removing the rack doors 2 Marking the rack 3 Installing the mounting rails in the rack • RapidRails installation • VersaRails installation • Static Rails Installation 4 Installing the system in the rack 5 Routing cables and securing with releasable tie wraps 6 Replacing the rack doors NOTE...
... in detail in subsequent sections) in their numbered order: 1 Removing the rack doors 2 Marking the rack 3 Installing the mounting rails in the rack • RapidRails installation • VersaRails installation • Static Rails Installation 4 Installing the system in the rack 5 Routing cables and securing with releasable tie wraps 6 Replacing the rack doors NOTE...

Rack Installation Guide
Page 12
... the Rack For a 1-U system, you must allow 1 U (44 mm, or 1.75 inches) of the number marking on the rack. NOTE: The vertical rails may have an alternating pattern of three holes per rack unit with your rack cabinet. Figure 1-3. Rack cabinets that the first system is not necessary... to mark or place tape on the rack's vertical rail. Removing the Rack Doors See the procedures for removing doors in the documentation provided with center-to-center hole spacing (beginning at the top...
... the Rack For a 1-U system, you must allow 1 U (44 mm, or 1.75 inches) of the number marking on the rack. NOTE: The vertical rails may have an alternating pattern of three holes per rack unit with your rack cabinet. Figure 1-3. Rack cabinets that the first system is not necessary... to mark or place tape on the rack's vertical rail. Removing the Rack Doors See the procedures for removing doors in the documentation provided with center-to-center hole spacing (beginning at the top...

Rack Installation Guide
Page 13
... locate the bottom of the system you are installing in a rack that meets EIA-310 standards) and mark the rack's front vertical rails with a horizontal line on the vertical rails (see Figure 1-4). 2 Place a mark 44 mm (1.75 inches) above the original mark you counted holes, place a mark just above the... top hole). To mark the rack, perform the following steps: 1 Place a mark (or tape) on vertical rail Rack Installation Guide 11 The bottom of each 1-U space is at the middle of tape indicates where the system's upper edge will be located on...
... locate the bottom of the system you are installing in a rack that meets EIA-310 standards) and mark the rack's front vertical rails with a horizontal line on the vertical rails (see Figure 1-4). 2 Place a mark 44 mm (1.75 inches) above the original mark you counted holes, place a mark just above the... top hole). To mark the rack, perform the following steps: 1 Place a mark (or tape) on vertical rail Rack Installation Guide 11 The bottom of each 1-U space is at the middle of tape indicates where the system's upper edge will be located on...

Rack Installation Guide
Page 14
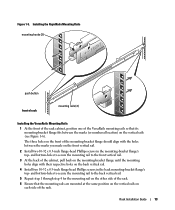
...The top mounting hook on the front mounting-bracket flange should enter the top hole between the marks or tape you made on the vertical rails. 2 Push the mounting rail forward until the mounting hooks enter their square holes, and then push down on the mounting-bracket flange until the mounting hooks seat... down on the flange until the mounting hooks seat and the push button pops out and clicks. 4 Repeat step 1 through step 3 for the mounting rail on the other side of the rack. 5 Ensure that its mounting-bracket flange fits between the marks you placed (or numbered location) on both sides...
...The top mounting hook on the front mounting-bracket flange should enter the top hole between the marks or tape you made on the vertical rails. 2 Push the mounting rail forward until the mounting hooks enter their square holes, and then push down on the mounting-bracket flange until the mounting hooks seat... down on the flange until the mounting hooks seat and the push button pops out and clicks. 4 Repeat step 1 through step 3 for the mounting rail on the other side of the rack. 5 Ensure that its mounting-bracket flange fits between the marks you placed (or numbered location) on both sides...
Rack Installation Guide
Page 15
... mounting-bracket flange until the mounting holes align with the holes between the marks (or numbered location) on the back vertical rail. 4 Install two 10-32 x 0.5-inch flange-head Phillips screws in the mounting-bracket flange's top- Figure 1-5. and bottom-holes ...holes on the vertical rails (see Figure 1-6). Installing the RapidRails Mounting Rails mounting hooks (2) push button front of rack mounting rails (2) Installing the VersaRails Mounting Rails 1 At the front of the rack cabinet, position one of the VersaRails mounting rails so that the mounting rails are mounted at ...
... mounting-bracket flange until the mounting holes align with the holes between the marks (or numbered location) on the back vertical rail. 4 Install two 10-32 x 0.5-inch flange-head Phillips screws in the mounting-bracket flange's top- Figure 1-5. and bottom-holes ...holes on the vertical rails (see Figure 1-6). Installing the RapidRails Mounting Rails mounting hooks (2) push button front of rack mounting rails (2) Installing the VersaRails Mounting Rails 1 At the front of the rack cabinet, position one of the VersaRails mounting rails so that the mounting rails are mounted at ...

Rack Installation Guide
Page 16
... two corresponding shoulder screws (see Figure 1-7). 2 To attach the rails to release each rail. 5 Unseat the rails from the J slots and remove the rails from the chassis. 1 To install the rails, locate the J slots on the front latches attached to install or remove the chassis static rail modules from the chassis. 14 Rack Installation Guide Locate...
... two corresponding shoulder screws (see Figure 1-7). 2 To attach the rails to release each rail. 5 Unseat the rails from the J slots and remove the rails from the chassis. 1 To install the rails, locate the J slots on the front latches attached to install or remove the chassis static rail modules from the chassis. 14 Rack Installation Guide Locate...
Rack Installation Guide
Page 17
... Installation Guide 15 CAUTION: Because of the size and weight of the system, lift the chassis into position so that the side rails are installing more than one system, install the first system in the lowest available position in the Rack CAUTION: If you are aligned... with the mounting rails on the rack, perform the following procedure: 1 From the front of the system, never attempt to install the system in the mounting rails by yourself. Figure 1-7. Installing and Removing Static Rail Modules rail modules (2) J slots (4) front release latch shoulder ...
... Installation Guide 15 CAUTION: Because of the size and weight of the system, lift the chassis into position so that the side rails are installing more than one system, install the first system in the lowest available position in the Rack CAUTION: If you are aligned... with the mounting rails on the rack, perform the following procedure: 1 From the front of the system, never attempt to install the system in the mounting rails by yourself. Figure 1-7. Installing and Removing Static Rail Modules rail modules (2) J slots (4) front release latch shoulder ...

Rack Installation Guide
Page 18
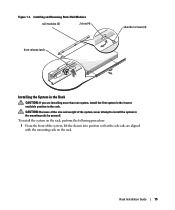
Figure 1-8. Installing the System in the Rack system rails (2) mounting rails (2) back release latches (2) thumbscrews (2) 2 Working from right to the RapidRails, VersaRails, and two-post rack kits. 16 Rack Installation Guide NOTE: Figure 1-8 applies to left, position the chassis on the mounting rails and slide back (see Figure 1-8). 3 Push the chassis back into the mounting rails until the system stops (see Figure 1-8). 4 Secure both thumbscrews on the front panel of the chassis.
Figure 1-8. Installing the System in the Rack system rails (2) mounting rails (2) back release latches (2) thumbscrews (2) 2 Working from right to the RapidRails, VersaRails, and two-post rack kits. 16 Rack Installation Guide NOTE: Figure 1-8 applies to left, position the chassis on the mounting rails and slide back (see Figure 1-8). 3 Push the chassis back into the mounting rails until the system stops (see Figure 1-8). 4 Secure both thumbscrews on the front panel of the chassis.

Rack Installation Guide
Page 19
... the releasable tie wrap attachment points located on the two back mounting-bracket flanges (see Figure 1-9). Figure 1-9. Installing the Releasable Tie Wraps mounting rails (2) releasable tie wraps (2) 2 Push the tie wrap's fastener through the attachment point. 3 Push the tie wrap's plunger until it snaps to secure the tie wrap ...
... the releasable tie wrap attachment points located on the two back mounting-bracket flanges (see Figure 1-9). Figure 1-9. Installing the Releasable Tie Wraps mounting rails (2) releasable tie wraps (2) 2 Push the tie wrap's fastener through the attachment point. 3 Push the tie wrap's plunger until it snaps to secure the tie wrap ...

Rack Installation Guide
Page 20
... back release latches. 4 Pull the system out of the rack until it stops, and then push down on both release levers to actuate the side-rail safety catches (see Figure 1-8). 5 Pull the system completely out of your rack. This completes the rack installation of the rack. Both 7.62-cm or 15...
... back release latches. 4 Pull the system out of the rack until it stops, and then push down on both release levers to actuate the side-rail safety catches (see Figure 1-8). 5 Pull the system completely out of your rack. This completes the rack installation of the rack. Both 7.62-cm or 15...

Rack Installation Guide
Page 21
...felt-tip pen to mark the mounting holes Rack Kit Contents The two-post rack kit includes (see Figure 1-10): • One pair of mounting rails • 12-24 x 0.5-inch pan-head Phillips screws (8) • Releasable tie wraps (2) (not shown in Figure 1-10) Figure 1-10. ...Two-Post Rack Kit Components 12-24 x 0.5-inch pan-head Phillips screws (8) mounting rails (2) 15.24-cm (6-inch) wide, center-mount, threaded studs 7.62-cm (3-inch) wide, centermount, threaded studs adjustable mounting flange center-mount mounting flange 15...
...felt-tip pen to mark the mounting holes Rack Kit Contents The two-post rack kit includes (see Figure 1-10): • One pair of mounting rails • 12-24 x 0.5-inch pan-head Phillips screws (8) • Releasable tie wraps (2) (not shown in Figure 1-10) Figure 1-10. ...Two-Post Rack Kit Components 12-24 x 0.5-inch pan-head Phillips screws (8) mounting rails (2) 15.24-cm (6-inch) wide, center-mount, threaded studs 7.62-cm (3-inch) wide, centermount, threaded studs adjustable mounting flange center-mount mounting flange 15...

Rack Installation Guide
Page 22
... rack kit includes performing the following tasks in order: 1 Marking the rack • Universal-hole spacing rack • Wide-hole spacing rack 2 Installing the mounting rails in the rack • Center-mount installation • Flush-mount installation 3 Installing the system in the two-post rack. Universal-Hole Spacing Racks Racks with...
... rack kit includes performing the following tasks in order: 1 Marking the rack • Universal-hole spacing rack • Wide-hole spacing rack 2 Installing the mounting rails in the rack • Center-mount installation • Flush-mount installation 3 Installing the system in the two-post rack. Universal-Hole Spacing Racks Racks with...

Rack Installation Guide
Page 23
... the front and back vertical columns of holes (see Figure 1-12). Each 1 U (44 mm, or 1.75 inches) of vertical space on the rack's front vertical rails where you have an alternating pattern of two holes per rack unit with center-to -center spacing between holes (beginning at the top of a 1-U space...
... the front and back vertical columns of holes (see Figure 1-12). Each 1 U (44 mm, or 1.75 inches) of vertical space on the rack's front vertical rails where you have an alternating pattern of two holes per rack unit with center-to -center spacing between holes (beginning at the top of a 1-U space...

Rack Installation Guide
Page 24
...screws (see Figure 1-13). 3 Repeat step 1 and step 2 to others. Use only the rack kit intended for mounting rail components. Installing the Mounting Rails You can install the mounting rails in a two-post, open-frame rack having either a flush-mount or center-mount configuration. CAUTION: Do not install another... system may result in damage to the system and personal injury to yourself and to install the left mounting rail in the two-post rack at the location you marked, push the center-mount adjustable mounting bracket forward against the vertical two-post ...
...screws (see Figure 1-13). 3 Repeat step 1 and step 2 to others. Use only the rack kit intended for mounting rail components. Installing the Mounting Rails You can install the mounting rails in a two-post, open-frame rack having either a flush-mount or center-mount configuration. CAUTION: Do not install another... system may result in damage to the system and personal injury to yourself and to install the left mounting rail in the two-post rack at the location you marked, push the center-mount adjustable mounting bracket forward against the vertical two-post ...


