
Rack-to-Tower Conversion Guide
Page 3
... Trim Panel 1-10 Installing the Front Panel 1-11 Installing the Cover, Metal Feet, and Bezel 1-12 Removing the Slide Assemblies 1-14 Replacing the Rack Doors 1-16 Figures Figure 1-1. Contents Safety Instructions 1-1 Rack-to -Tower Kit Contents 1-3 Removing the Cable-Management Arm . . . . . 1-5 Removing the System From the Slide Assemblies 1-7 Removing the Front Bezel 1-8 Contents 3 Figure...
... Trim Panel 1-10 Installing the Front Panel 1-11 Installing the Cover, Metal Feet, and Bezel 1-12 Removing the Slide Assemblies 1-14 Replacing the Rack Doors 1-16 Figures Figure 1-1. Contents Safety Instructions 1-1 Rack-to -Tower Kit Contents 1-3 Removing the Cable-Management Arm . . . . . 1-5 Removing the System From the Slide Assemblies 1-7 Removing the Front Bezel 1-8 Contents 3 Figure...
Rack-to-Tower Conversion Guide
Page 4
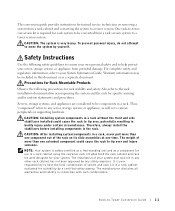
... someone. It is safety-certified as a free-standing unit and as to a tower version. Therefore, always install the stabilizers before installing components in a rack cabinet using the customer rack kit when both the rack cabinet and rack kit were designed for use in the rack. NOTE: Your system is your System Information Guide. To prevent personal injury, do...
... someone. It is safety-certified as a free-standing unit and as to a tower version. Therefore, always install the stabilizers before installing components in a rack cabinet using the customer rack kit when both the rack cabinet and rack kit were designed for use in the rack. NOTE: Your system is your System Information Guide. To prevent personal injury, do...
Rack-to-Tower Conversion Guide
Page 5
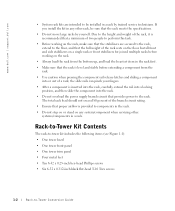
... any system/component when servicing other rack, be installed in a rack by yourself. Rack-to-Tower Kit Contents The rack-to-tower kit includes the following items (see Figure 1-1): • One tower bezel • One tower front panel • One tower trim panel • Four metal feet • Ten 6-32 x 0....rack. • Always load the rack from the bottom up, and load the heaviest item in the rack first. • Make sure that the rack is recommended that provides power to the rack. www.dell.com | support.dell.com • System rack kits are secured to the rack, extend to -Tower...
... any system/component when servicing other rack, be installed in a rack by yourself. Rack-to-Tower Kit Contents The rack-to-tower kit includes the following items (see Figure 1-1): • One tower bezel • One tower front panel • One tower trim panel • Four metal feet • Ten 6-32 x 0....rack. • Always load the rack from the bottom up, and load the heaviest item in the rack first. • Make sure that the rack is recommended that provides power to the rack. www.dell.com | support.dell.com • System rack kits are secured to the rack, extend to -Tower...

Rack-to-Tower Conversion Guide
Page 6
...reuse the following parts: • The fourteen 6-32 x 0.312-inch black flat-head T-10 Torx screws that you remove from the rack version system's front panel • The bezel attaching bracket and the four 6-32 x 0.312-inch black flat-head T-10 Torx screws...32 x 0.25-inch hex-head Phillips screw that you begin removing your system from the control panel Rack-to a tower version system, carefully read "Safety Instructions." Rack-to-Tower Kit Contents tower bezel metal feet (4) tower front panel tower trim panel 6-32 x 0.25-inch hexhead Phillips screws (10) 6-32 x 0.312-inch black ...
...reuse the following parts: • The fourteen 6-32 x 0.312-inch black flat-head T-10 Torx screws that you remove from the rack version system's front panel • The bezel attaching bracket and the four 6-32 x 0.312-inch black flat-head T-10 Torx screws...32 x 0.25-inch hex-head Phillips screw that you begin removing your system from the control panel Rack-to a tower version system, carefully read "Safety Instructions." Rack-to-Tower Kit Contents tower bezel metal feet (4) tower front panel tower trim panel 6-32 x 0.25-inch hexhead Phillips screws (10) 6-32 x 0.312-inch black ...
Rack-to-Tower Conversion Guide
Page 14
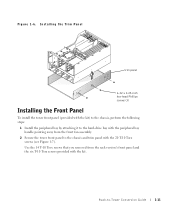
... 1-6. Installing the Trim Panel trim panel 6-32 x 0.25-inch hex-head Phillips screws (3) Installing the Front Panel To install the tower front panel (provided with the kit) to the chassis, perform the following steps: 1 Install the peripheral bay by attaching it to the hard-drive bay with the peripheral... bay handle pointing away from the rack version's front panel and the six T-10 Torx screws provided with the 20 T-10 Torx screws (see Figure 1-7). Rack-...
... 1-6. Installing the Trim Panel trim panel 6-32 x 0.25-inch hex-head Phillips screws (3) Installing the Front Panel To install the tower front panel (provided with the kit) to the chassis, perform the following steps: 1 Install the peripheral bay by attaching it to the hard-drive bay with the peripheral... bay handle pointing away from the rack version's front panel and the six T-10 Torx screws provided with the 20 T-10 Torx screws (see Figure 1-7). Rack-...
Rack-to-Tower Conversion Guide
Page 19
Label the box as a rack installation kit for the system you removed from the rack. Replacing the Rack Doors Refer to the procedures for replacing the rack doors in a box. www.dell.com | support.dell.com 3 Repeat step 2 at the back of the rack. 6 Place the cable-management arm, slide assemblies, and all fastener hardware in the documentation provided... for this slide assembly. 4 If the slide assemblies are secured with screws, remove the screws that secure the front and back mounting-bracket flanges to -Tower Conversion Guide
Label the box as a rack installation kit for the system you removed from the rack. Replacing the Rack Doors Refer to the procedures for replacing the rack doors in a box. www.dell.com | support.dell.com 3 Repeat step 2 at the back of the rack. 6 Place the cable-management arm, slide assemblies, and all fastener hardware in the documentation provided... for this slide assembly. 4 If the slide assemblies are secured with screws, remove the screws that secure the front and back mounting-bracket flanges to -Tower Conversion Guide


