
Rack-to-Tower Conversion Guide
Page 5
...component from the bottom up, and load the heaviest item in any system/component when servicing other systems/components in a rack by yourself. www.dell.com | support.dell.com • System rack kits are secured to the rack, extend to the floor, and that provides power to the rack. The total ...80 percent of the rack rests on the rack. • Always load the rack from the rack. • Use caution when pressing the component rail release latches and sliding a component into the rack. • Do not overload the power supply branch circuit that the full weight of the branch ...
...component from the bottom up, and load the heaviest item in any system/component when servicing other systems/components in a rack by yourself. www.dell.com | support.dell.com • System rack kits are secured to the rack, extend to the floor, and that provides power to the rack. The total ...80 percent of the rack rests on the rack. • Always load the rack from the rack. • Use caution when pressing the component rail release latches and sliding a component into the rack. • Do not overload the power supply branch circuit that the full weight of the branch ...
Rack-to-Tower Conversion Guide
Page 9
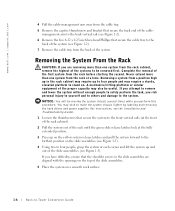
... drives and power supplies (for instructions, see the Installation and Troubleshooting Guide). 1 Loosen the thumbscrews that secure the system to the front vertical rails (at the front of the rack cabinet). 2 Pull the system out of the rack until the green slide release latches lock at the fully... | support.dell.com 4 Pull the cable-management arm away from the cable tray. 5 Remove the captive thumbscrew and bracket that secure the back end of the cablemanagement arm to the back vertical rail (see Figure 1-2). 6 Remove the five 6-32 x 0.25-inch hex-head Phillips that the shoulder screws in ...
... drives and power supplies (for instructions, see the Installation and Troubleshooting Guide). 1 Loosen the thumbscrews that secure the system to the front vertical rails (at the front of the rack cabinet). 2 Pull the system out of the rack until the green slide release latches lock at the fully... | support.dell.com 4 Pull the cable-management arm away from the cable tray. 5 Remove the captive thumbscrew and bracket that secure the back end of the cablemanagement arm to the back vertical rail (see Figure 1-2). 6 Remove the five 6-32 x 0.25-inch hex-head Phillips that the shoulder screws in ...
Rack-to-Tower Conversion Guide
Page 17
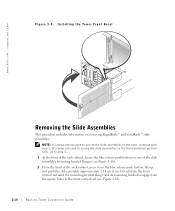
... Conversion Guide www.dell.com | support.dell.com Figure 1-9. Installing the Tower Front Bezel Removing the Slide Assemblies This procedure includes information on the blue release push button, lift up, and push the slide assembly approximately 2.54 cm (1 inch) back from the front vertical rail until the mounting-...removing RapidRails™ and VersaRails™ slide assemblies. If screws are not used to secure the slide assemblies to the front and back vertical rails, go to step 4. 1 At the front of the rack cabinet, locate the blue release push button on one of the slide assembly...
... Conversion Guide www.dell.com | support.dell.com Figure 1-9. Installing the Tower Front Bezel Removing the Slide Assemblies This procedure includes information on the blue release push button, lift up, and push the slide assembly approximately 2.54 cm (1 inch) back from the front vertical rail until the mounting-...removing RapidRails™ and VersaRails™ slide assemblies. If screws are not used to secure the slide assemblies to the front and back vertical rails, go to step 4. 1 At the front of the rack cabinet, locate the blue release push button on one of the slide assembly...
Rack-to-Tower Conversion Guide
Page 19
... for replacing the rack doors in a box. Label the box as a rack installation kit for the system you removed from the rack. www.dell.com | support.dell.com 3 Repeat step 2 at the back of the cabinet for this slide assembly. 4 If the slide assemblies are secured with your rack cabinets.... 1-16 Rack-to the vertical rails. 5 Repeat steps 1 through 3 (or step 4 if screws secure the slide assemblies) for the remaining slide assembly on the ...
... for replacing the rack doors in a box. Label the box as a rack installation kit for the system you removed from the rack. www.dell.com | support.dell.com 3 Repeat step 2 at the back of the cabinet for this slide assembly. 4 If the slide assemblies are secured with your rack cabinets.... 1-16 Rack-to the vertical rails. 5 Repeat steps 1 through 3 (or step 4 if screws secure the slide assemblies) for the remaining slide assembly on the ...


