
Rack Installation Guide
Page 9
... from the rack. • Use caution when pressing the component rail release latches and sliding a com- Due to the height and weight of the rack, Dell recommends a minimum of two people to tip over and injure someone. ponent into the rack. Servers, storage systems, and appliances are ...component out of rack cabinet has not been approved by trained service tech- The weight of a Dell rack. • Do not move large racks by yourself. If you install the kit in Dell's rack cabinet using the Dell customer rack kit. Preliminary 9/8/00 xiii Thus, "component" refers to be installed ...
... from the rack. • Use caution when pressing the component rail release latches and sliding a com- Due to the height and weight of the rack, Dell recommends a minimum of two people to tip over and injure someone. ponent into the rack. Servers, storage systems, and appliances are ...component out of rack cabinet has not been approved by trained service tech- The weight of a Dell rack. • Do not move large racks by yourself. If you install the kit in Dell's rack cabinet using the Dell customer rack kit. Preliminary 9/8/00 xiii Thus, "component" refers to be installed ...

Rack Installation Guide
Page 12
...chair's height or use a footrest, if necessary, to do not have to rest your feet and not on your hands while you work activities. DELL CONFIDENTIAL - When you set up and use your computer system: • Position your system so that the monitor and keyboard are available (from your eyes... back support. • Keep your forearms horizontal with your feet resting on the floor and your thighs level. • When sitting, make sure the weight of your legs is on the front of the monitor, its contrast and brightness settings, and the lighting around you (such as you use the...
...chair's height or use a footrest, if necessary, to do not have to rest your feet and not on your hands while you work activities. DELL CONFIDENTIAL - When you set up and use your computer system: • Position your system so that the monitor and keyboard are available (from your eyes... back support. • Keep your forearms horizontal with your feet resting on the floor and your thighs level. • When sitting, make sure the weight of your legs is on the front of the monitor, its contrast and brightness settings, and the lighting around you (such as you use the...

Rack Installation Guide
Page 18
Figure 2. Opening the 42-U Rack Door push-button cover push button handle DELL CONFIDENTIAL - (Rev. 9/8/00) FILE LOCATION: S:\SYSTEMS\MARCONI\Rackingd\7U\05KCEa00\05KCEeb0.fm Removing the Doors From the Rack You must remove the doors from the ..., rotate the handle clockwise until the latch releases, and then pull the door open. Removing the Doors From the Dell 42-U Rack CAUTION: To prevent personal injury due to the size and weight of the rack and to prevent damage to remove the doors by yourself. 1. Open the latch on the front...
Figure 2. Opening the 42-U Rack Door push-button cover push button handle DELL CONFIDENTIAL - (Rev. 9/8/00) FILE LOCATION: S:\SYSTEMS\MARCONI\Rackingd\7U\05KCEa00\05KCEeb0.fm Removing the Doors From the Rack You must remove the doors from the ..., rotate the handle clockwise until the latch releases, and then pull the door open. Removing the Doors From the Dell 42-U Rack CAUTION: To prevent personal injury due to the size and weight of the rack and to prevent damage to remove the doors by yourself. 1. Open the latch on the front...

Rack Installation Guide
Page 20
Opening the 24-U Rack Door 2. Remove the front door from the rack. DELL CONFIDENTIAL - With the door open, lift out and fully retract all the hinge pins have been lifted out and retracted, lift the door out 3. Once ... clockwise (see Figure 4). a. (Rev. 9/8/00) FILE LOCATION: S:\SYSTEMS\MARCONI\Rackingd\7U\05KCEa00\05KCEeb0.fm Removing the Doors From the Dell 24-U Rack CAUTION: To prevent personal injury due to the size and weight of the doors, never attempt to remove the back door from the rack as shown in Figure 5. Repeat steps...
Opening the 24-U Rack Door 2. Remove the front door from the rack. DELL CONFIDENTIAL - With the door open, lift out and fully retract all the hinge pins have been lifted out and retracted, lift the door out 3. Once ... clockwise (see Figure 4). a. (Rev. 9/8/00) FILE LOCATION: S:\SYSTEMS\MARCONI\Rackingd\7U\05KCEa00\05KCEeb0.fm Removing the Doors From the Dell 24-U Rack CAUTION: To prevent personal injury due to the size and weight of the doors, never attempt to remove the back door from the rack as shown in Figure 5. Repeat steps...

Rack Installation Guide
Page 26
...the two rack adapters on the computer (see Figure 9). Preliminary 9/8/00 12 Rack Installation Guide CAUTION: Because of the size and weight of the rack until they lock in the slide assemblies by yourself. Pull the two interior slide assemblies out of the computer, ... the computer. Install the shoulder screws in the three holes that are installing more than one component out of the computer (see Figure 9). DELL CONFIDENTIAL - Installing the Rack Adapter and Shoulder Screws 4. Installing the System in the rack. Install three shoulder screws on the opposite side of...
...the two rack adapters on the computer (see Figure 9). Preliminary 9/8/00 12 Rack Installation Guide CAUTION: Because of the size and weight of the rack until they lock in the slide assemblies by yourself. Pull the two interior slide assemblies out of the computer, ... the computer. Install the shoulder screws in the three holes that are installing more than one component out of the computer (see Figure 9). DELL CONFIDENTIAL - Installing the Rack Adapter and Shoulder Screws 4. Installing the System in the rack. Install three shoulder screws on the opposite side of...

Rack Installation Guide
Page 28
... slides into the square mounting holes on either side of the cable tray. DELL CONFIDENTIAL - You should lift the system only by the chassis edges. See...and its mounting are not sturdy enough to support the weight of the cable- Facing the back of the rack cabinet, attach the right-angle bracket of the PowerEdge chassis, so do not grasp the cable tray when ... LOCATION: S:\SYSTEMS\MARCONI\Rackingd\7U\05KCEa00\05KCEeb0.fm Installing the Cable Tray Attach the cable tray to the PowerEdge computer chassis using five 6-32 x 0.25-inch hex-head Phillips screws (see Figure 12). Installing the ...
... slides into the square mounting holes on either side of the cable tray. DELL CONFIDENTIAL - You should lift the system only by the chassis edges. See...and its mounting are not sturdy enough to support the weight of the cable- Facing the back of the rack cabinet, attach the right-angle bracket of the PowerEdge chassis, so do not grasp the cable tray when ... LOCATION: S:\SYSTEMS\MARCONI\Rackingd\7U\05KCEa00\05KCEeb0.fm Installing the Cable Tray Attach the cable tray to the PowerEdge computer chassis using five 6-32 x 0.25-inch hex-head Phillips screws (see Figure 12). Installing the ...

Rack Installation Guide
Page 32
...completes the rack installation for replacing the rack doors on a 42-U Rack CAUTION: To prevent personal injury due to the size and weight of the doors, never attempt to install the back door. Repeat steps 1 through 3 to replace the doors by rotating the handle...rack (see Figure 2). 4. Close the door latch by yourself. 1. DELL CONFIDENTIAL - (Rev. 9/8/00) FILE LOCATION: S:\SYSTEMS\MARCONI\Rackingd\7U\05KCEa00\05KCEeb0.fm Replacing the Rack Doors The following subsections describe procedures for the PowerEdge system. Lift the front door into position. 3. Replacing the Rack ...
...completes the rack installation for replacing the rack doors on a 42-U Rack CAUTION: To prevent personal injury due to the size and weight of the doors, never attempt to install the back door. Repeat steps 1 through 3 to replace the doors by rotating the handle...rack (see Figure 2). 4. Close the door latch by yourself. 1. DELL CONFIDENTIAL - (Rev. 9/8/00) FILE LOCATION: S:\SYSTEMS\MARCONI\Rackingd\7U\05KCEa00\05KCEeb0.fm Replacing the Rack Doors The following subsections describe procedures for the PowerEdge system. Lift the front door into position. 3. Replacing the Rack ...
Rack Installation Guide
Page 33
See ESD ESD, xv I installing cable tray, 14 cable-management arm, 14 computer, 12 rack adapters, 11, 12 shoulder screws, 11 slide assemblies, 8 K kit contents illustrated, 2 list of rack kit illustrated, 2 listed, 1 D doors opening latch 24-U rack, 6 42-U rack, 4 removing 24-U rack, 6 42-U rack, 4, 5 replacing, 18 E electrostatic discharge. Index C cable tray installing, 14 cable-management arm, 14, 16 routing cables, 16 cables, 16 cautions, ix computer installing in rack, 12 weight, 11 contents of , 1 N notational conventions, ix notes, ix support.dell.com Rack Installation Guide 1
See ESD ESD, xv I installing cable tray, 14 cable-management arm, 14 computer, 12 rack adapters, 11, 12 shoulder screws, 11 slide assemblies, 8 K kit contents illustrated, 2 list of rack kit illustrated, 2 listed, 1 D doors opening latch 24-U rack, 6 42-U rack, 4 removing 24-U rack, 6 42-U rack, 4, 5 replacing, 18 E electrostatic discharge. Index C cable tray installing, 14 cable-management arm, 14, 16 routing cables, 16 cables, 16 cautions, ix computer installing in rack, 12 weight, 11 contents of , 1 N notational conventions, ix notes, ix support.dell.com Rack Installation Guide 1
Tower Installation Guide
Page 9
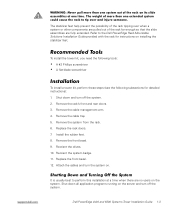
...-Mountable Solutions Installation Guide provided with the rack for detailed instructions): 1. Shut down and turn off the system. support.dell.com Dell PowerEdge 4x00 and 6300 Systems Tower Installation Guide 1-3 Replace the rack doors. 7. Replace the front bezel. 12. Shut down all application programs running.... 3. Remove the front bezel. 9. WARNING: Never pull more than one system out of the rack on installing the stabilizer feet. The weight of the rack far enough so that the slide assemblies are no users on the server and turn the system on. Refer to tip over...
...-Mountable Solutions Installation Guide provided with the rack for detailed instructions): 1. Shut down and turn off the system. support.dell.com Dell PowerEdge 4x00 and 6300 Systems Tower Installation Guide 1-3 Replace the rack doors. 7. Replace the front bezel. 12. Shut down all application programs running.... 3. Remove the front bezel. 9. WARNING: Never pull more than one system out of the rack on installing the stabilizer feet. The weight of the rack far enough so that the slide assemblies are no users on the server and turn the system on. Refer to tip over...

Tower Installation Guide
Page 10
... door of the doors, never attempt to the size and weight of the rack. Slide the latch's push-button cover up as far as it . Removing the Doors From a 24-U or 42-U Rack You must remove the doors from the rack. 1-4 Dell PowerEdge 4x00 and 6300 Systems Tower Installation Guide To remove the...
... door of the doors, never attempt to the size and weight of the rack. Slide the latch's push-button cover up as far as it . Removing the Doors From a 24-U or 42-U Rack You must remove the doors from the rack. 1-4 Dell PowerEdge 4x00 and 6300 Systems Tower Installation Guide To remove the...
Tower Installation Guide
Page 14
.... WARNING: If you are removing more than one system out of computer cable tray 6-32 x 0.25-inch screws (5) Figure 1-6. WARNING: Because of the size and weight of the rack until the slides lock in the highest position. Never pull more than one system, first remove the system in the extended position... follow include instructions for removing the system from the rack and removing the rails and other hardware associated with the rack installation of the rack. 1-8 Dell PowerEdge 4x00 and 6300 Systems Tower Installation Guide back of the rack at a time. 1.
.... WARNING: If you are removing more than one system out of computer cable tray 6-32 x 0.25-inch screws (5) Figure 1-6. WARNING: Because of the size and weight of the rack until the slides lock in the highest position. Never pull more than one system, first remove the system in the extended position... follow include instructions for removing the system from the rack and removing the rails and other hardware associated with the rack installation of the rack. 1-8 Dell PowerEdge 4x00 and 6300 Systems Tower Installation Guide back of the rack at a time. 1.

Tower Installation Guide
Page 18
... are latched. 4. Removing a Cage Nut Replacing the Rack Doors CAUTION: To prevent personal injury due to the size and weight of the doors, never attempt to install the back door. 1-12 Dell PowerEdge 4x00 and 6300 Systems Tower Installation Guide Repeat steps 1 through 4 to replace the doors by rotating the handle counterclockwise until...
... are latched. 4. Removing a Cage Nut Replacing the Rack Doors CAUTION: To prevent personal injury due to the size and weight of the doors, never attempt to install the back door. 1-12 Dell PowerEdge 4x00 and 6300 Systems Tower Installation Guide Repeat steps 1 through 4 to replace the doors by rotating the handle counterclockwise until...

Tower Installation Guide
Page 26
R rack adapters removing, 1-9 rack doors removing, 1-4 rails, removing, 1-9 removing the rack doors, 1-4 restrictions kit installation, 1-2 rubber feet installing, 1-13 S safety information, 1-2 slide assemblies removing, 1-10 stabilizer feet, 1-2 system removing rails, 1-9 weight, 1-9 system badge reorienting, 1-16 T tools recommended, 1-3 tower kit contents illustrated, 1-2 list of, 1-1 tower kit installation rack adapters, removing, 1-9 rails, removing, 1-9 W weight system, 1-9 2 Dell PowerEdge 4x00 and 6300 Systems Tower Installation Guide
R rack adapters removing, 1-9 rack doors removing, 1-4 rails, removing, 1-9 removing the rack doors, 1-4 restrictions kit installation, 1-2 rubber feet installing, 1-13 S safety information, 1-2 slide assemblies removing, 1-10 stabilizer feet, 1-2 system removing rails, 1-9 weight, 1-9 system badge reorienting, 1-16 T tools recommended, 1-3 tower kit contents illustrated, 1-2 list of, 1-1 tower kit installation rack adapters, removing, 1-9 rails, removing, 1-9 W weight system, 1-9 2 Dell PowerEdge 4x00 and 6300 Systems Tower Installation Guide


