Getting Started Guide
Page 5
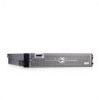
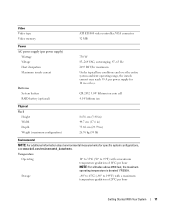
...DC. NOTE: DVD devices are available.) • Support for up to obtain technical assistance. • One or two dual-core AMD Opteron™ processors. Getting Started With Your System 3 One or two quad-core AMD Opteron™ processors (when available). • A minimum of 1 GB (single-processor systems) or... card that signals the appropriate systems management software if the cover is upgradable to eight 2.5-inch SAS or SATA hard drives. See support.dell.com for an integrated SAS host bus adapter, which supports up your system. Memory is opened. • Up to four 2.5-inch SAS...
...DC. NOTE: DVD devices are available.) • Support for up to obtain technical assistance. • One or two dual-core AMD Opteron™ processors. Getting Started With Your System 3 One or two quad-core AMD Opteron™ processors (when available). • A minimum of 1 GB (single-processor systems) or... card that signals the appropriate systems management software if the cover is upgradable to eight 2.5-inch SAS or SATA hard drives. See support.dell.com for an integrated SAS host bus adapter, which supports up your system. Memory is opened. • Up to four 2.5-inch SAS...

Getting Started Guide
Page 6
For more information about specific features, see www.dell.com. 4 Getting Started With Your System Supported Operating Systems • Microsoft® Windows Server® 2003 R2 Standard and Enterprise Editions (SP1 and later) • Microsoft Windows Server ...
For more information about specific features, see www.dell.com. 4 Getting Started With Your System Supported Operating Systems • Microsoft® Windows Server® 2003 R2 Standard and Enterprise Editions (SP1 and later) • Microsoft Windows Server ...

Getting Started Guide
Page 7
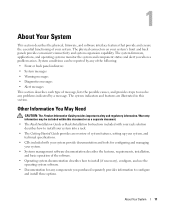
...often supersede information in other documents. • Release notes or readme files may be offered in your Hardware Owner's Manual. Dell™ Enterprise Training and Certification is available; NOTE: Always check for more information. This service may be included within this... system features and describes how to the system or documentation or advanced technical reference material intended for the first time. Getting Started With Your System 5 Other Information You May Need CAUTION: The Product Information Guide provides important safety and regulatory information....
...often supersede information in other documents. • Release notes or readme files may be offered in your Hardware Owner's Manual. Dell™ Enterprise Training and Certification is available; NOTE: Always check for more information. This service may be included within this... system features and describes how to the system or documentation or advanced technical reference material intended for the first time. Getting Started With Your System 5 Other Information You May Need CAUTION: The Product Information Guide provides important safety and regulatory information....

Getting Started Guide
Page 8
Unpacking the System Unpack your system in a rack. 6 Getting Started With Your System Keep all shipping materials in the rack installation documentation for instructions on installing your system and identify each item. See your rack installation documentation for your system, install the rails and the system in the rack. Installing the Rails and System in a Rack Once you have read the "Safety Instructions" located in case you need them later.
Unpacking the System Unpack your system in a rack. 6 Getting Started With Your System Keep all shipping materials in the rack installation documentation for instructions on installing your system and identify each item. See your rack installation documentation for your system, install the rails and the system in the rack. Installing the Rails and System in a Rack Once you have read the "Safety Instructions" located in case you need them later.

Getting Started Guide
Page 9
Connecting the Keyboard, Mouse, and Monitor Connect the keyboard, mouse, and monitor (optional). The connectors on the monitor's cable connector. Be sure to tighten the screws (if any) on the back of your system have icons indicating which cable to the system. Connecting the Power Connect the monitor's power cable to the monitor (optional), and connect the system's power cable(s) to plug into each connector. Getting Started With Your System 7
Connecting the Keyboard, Mouse, and Monitor Connect the keyboard, mouse, and monitor (optional). The connectors on the monitor's cable connector. Be sure to tighten the screws (if any) on the back of your system have icons indicating which cable to the system. Connecting the Power Connect the monitor's power cable to the monitor (optional), and connect the system's power cable(s) to plug into each connector. Getting Started With Your System 7
Getting Started Guide
Page 10
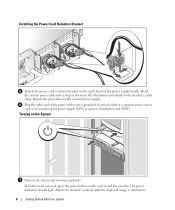
... power source such as shown in the illustration and attach to the bracket's cable clasp. Adjust the monitor's controls until the displayed image is satisfactory. 8 Getting Started With Your System Plug the other end of the power supply handle. Installing the Power Cord Retention Bracket Attach the power cord retention bracket on...
... power source such as shown in the illustration and attach to the bracket's cable clasp. Adjust the monitor's controls until the displayed image is satisfactory. 8 Getting Started With Your System Plug the other end of the power supply handle. Installing the Power Cord Retention Bracket Attach the power cord retention bracket on...
Getting Started Guide
Page 11
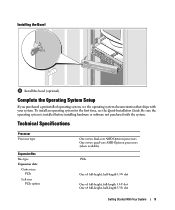
... processors (when available) PCIe One x8 full-height, half-length 3.3-V slot One x8 full-height, full-length 3.3-V slot One x4 full-height, half-length 3.3-V slot Getting Started With Your System 9 Installing the Bezel Install the bezel (optional). Complete the 0perating System Setup If you purchased a preinstalled operating system, see the Quick Installation...
... processors (when available) PCIe One x8 full-height, half-length 3.3-V slot One x8 full-height, full-length 3.3-V slot One x4 full-height, half-length 3.3-V slot Getting Started With Your System 9 Installing the Bezel Install the bezel (optional). Complete the 0perating System Setup If you purchased a preinstalled operating system, see the Quick Installation...

Getting Started Guide
Page 12
... Maximum RAM Drives Hard drives Diskette drive Optical drive Tape drive Flash drive Connectors Back NIC Serial USB Video Front Video USB Internal USB 10 Getting Started With Your System 667-MHz registered parity DDR-II memory modules Eight 240-pin 512 MB, 1 GB, 2 GB, or 4 GB (8 GB when available) 1 GB (one...
... Maximum RAM Drives Hard drives Diskette drive Optical drive Tape drive Flash drive Connectors Back NIC Serial USB Video Front Video USB Internal USB 10 Getting Started With Your System 667-MHz registered parity DDR-II memory modules Eight 240-pin 512 MB, 1 GB, 2 GB, or 4 GB (8 GB when available) 1 GB (one...
Getting Started Guide
Page 13
... Operating 10° to 35°C (50° to 149°F) with a maximum temperature gradation of 20°C per hour Getting Started With Your System 11 Storage -40° to 65°C (-40° to 95°F) with a maximum temperature gradation of ...10°C per power supply for specific system configurations, see www.dell.com/environmental_datasheets. CR 2032 3.0-V lithium ion coin cell 4.1-V lithium ion Physical Rack Height Width Depth Weight (maximum configuration) 8.656 cm (3.40 in) ...
... Operating 10° to 35°C (50° to 149°F) with a maximum temperature gradation of 20°C per hour Getting Started With Your System 11 Storage -40° to 65°C (-40° to 95°F) with a maximum temperature gradation of ...10°C per power supply for specific system configurations, see www.dell.com/environmental_datasheets. CR 2032 3.0-V lithium ion coin cell 4.1-V lithium ion Physical Rack Height Width Depth Weight (maximum configuration) 8.656 cm (3.40 in) ...

Getting Started Guide
Page 14
...) NOTE: For altitudes above 2950 feet, the maximum operating temperature is derated 1ºF/550 ft. -16 to 10,600 m (-50 to 35,000 ft) 12 Getting Started With Your System
...) NOTE: For altitudes above 2950 feet, the maximum operating temperature is derated 1ºF/550 ft. -16 to 10,600 m (-50 to 35,000 ft) 12 Getting Started With Your System
Hardware Owner's Manual
Page 11
... document. • The Rack Installation Guide or Rack Installation Instructions included with your rack solution describes how to install your system into a rack. • The Getting Started Guide provides an overview of system features, setting up your system, and technical specifications. • CDs included with your system provide documentation and tools for...
... document. • The Rack Installation Guide or Rack Installation Instructions included with your rack solution describes how to install your system into a rack. • The Getting Started Guide provides an overview of system features, setting up your system, and technical specifications. • CDs included with your system provide documentation and tools for...

Hardware Owner's Manual
Page 22
...'s power cord is disconnected and reconnected to the type described in the Microprocessor Technical Specifications outlined in your system's Getting Started Guide. Ensure that your processors match and conform to the AC power source, or the SEL is out of over... configuration unsupported by a problem with the CPU. The system BIOS has reported a See "Getting Help" on page 133. Another fan failure additional scrolling messages. See the Dell OpenManage Baseboard Management Controller User's Guide for redundant. Specified processor is missing or See "Troubleshooting ...
...'s power cord is disconnected and reconnected to the type described in the Microprocessor Technical Specifications outlined in your system's Getting Started Guide. Ensure that your processors match and conform to the AC power source, or the SEL is out of over... configuration unsupported by a problem with the CPU. The system BIOS has reported a See "Getting Help" on page 133. Another fan failure additional scrolling messages. See the Dell OpenManage Baseboard Management Controller User's Guide for redundant. Specified processor is missing or See "Troubleshooting ...

Hardware Owner's Manual
Page 115
... as explained in Table 4-1. LCD. See "System Messages" on page 119. See "Troubleshooting a USB Device" on page 28. Start-Up Routine Indications Look/listen for the indications described in this document, you access a drive. See "Troubleshooting a Diskette Drive" on page 20.... See "Getting Help" on page 117. The diskette drive activity indicator. See "Troubleshooting the Video Subsystem" on page 147. An unfamiliar constant ...
... as explained in Table 4-1. LCD. See "System Messages" on page 119. See "Troubleshooting a USB Device" on page 28. Start-Up Routine Indications Look/listen for the indications described in this document, you access a drive. See "Troubleshooting a Diskette Drive" on page 20.... See "Getting Help" on page 117. The diskette drive activity indicator. See "Troubleshooting the Video Subsystem" on page 147. An unfamiliar constant ...
Hardware Owner's Manual
Page 120
...the system. • Excessive humidity. 120 Troubleshooting Your System See Network Cable Requirements in your Getting Started Guide. See "NIC Indicator Codes" on page 147. If the problem persists, see "Getting Help" on page 19. • If the link indicator does not light, check all set.... • Change the autonegotiation setting, if possible. • Use another connector on the NIC connector. If the problem persists, see "Getting Help" on the network are enabled. See "Running the System Diagnostics" on page 136. 2 Check the appropriate indicator on the switch or...
...the system. • Excessive humidity. 120 Troubleshooting Your System See Network Cable Requirements in your Getting Started Guide. See "NIC Indicator Codes" on page 147. If the problem persists, see "Getting Help" on page 19. • If the link indicator does not light, check all set.... • Change the autonegotiation setting, if possible. • Use another connector on the NIC connector. If the problem persists, see "Getting Help" on the network are enabled. See "Running the System Diagnostics" on page 136. 2 Check the appropriate indicator on the switch or...
Hardware Owner's Manual
Page 121
If the tests fail, see "Getting Help" on page 72. 8 Run the appropriate online diagnostic test. Before performing any of the components inside the system. See "Opening and Closing the System" on page 147. 7 If the system starts properly, shut down the system and reinstall all ...expansion cards that all expansion cards installed in the system. See "Removing an Expansion Card" on page 135. If the system does not start properly, see "Getting Help" on page 55. 2 Ensure that the following components are properly installed: • Expansion cards and risers • Power supplies ...
If the tests fail, see "Getting Help" on page 72. 8 Run the appropriate online diagnostic test. Before performing any of the components inside the system. See "Opening and Closing the System" on page 147. 7 If the system starts properly, shut down the system and reinstall all ...expansion cards that all expansion cards installed in the system. See "Removing an Expansion Card" on page 135. If the system does not start properly, see "Getting Help" on page 55. 2 Ensure that the following components are properly installed: • Expansion cards and risers • Power supplies ...

Hardware Owner's Manual
Page 151
...of each file. Description of problem and troubleshooting procedures you connected to determine the contents of the system's start-up files. If possible, print each file before calling Dell. Diagnostics Checklist Name: Date: Address: Phone number: Service Tag (bar code on the back of ...the computer): Express Service Code: Return Material Authorization Number (if provided by Dell support technician): Operating system and version: Peripherals: Expansion cards: Are you performed: Getting Help 151 Yes No Network, version, and network card: Programs and versions: See your ...
...of each file. Description of problem and troubleshooting procedures you connected to determine the contents of the system's start-up files. If possible, print each file before calling Dell. Diagnostics Checklist Name: Date: Address: Phone number: Service Tag (bar code on the back of ...the computer): Express Service Code: Return Material Authorization Number (if provided by Dell support technician): Operating system and version: Peripherals: Expansion cards: Are you performed: Getting Help 151 Yes No Network, version, and network card: Programs and versions: See your ...

Rack Installation Guide
Page 20
... the cable-management arm. 5 Adjust the cable slack as needed at the hinge position and secure the cables with the tie wraps (see your system's Getting Started Guide or Hardware Owner's Manual.
... the cable-management arm. 5 Adjust the cable slack as needed at the hinge position and secure the cables with the tie wraps (see your system's Getting Started Guide or Hardware Owner's Manual.


