
USB-C Monitor Users Guide
Page 3
Contents About Your Monitor 5 Package Contents 5 Product Features 6 Identifying Parts and Controls 7 Monitor Specifications 11 Plug-and-Play 26 LCD Monitor Quality and Pixel Policy 26 Setting Up the Monitor 27 Attaching the stand 27 Using the Tilt, Swivel, and Vertical Extension 28 Connecting Your Monitor 30 Organizing Your Cables 32 Removing the Monitor Stand 33 Wall Mounting (Optional 34 Operating the Monitor 35 Turning on the Monitor 35 Using the Front Panel Controls 35 Front‑Panel Button 37 Using the On-Screen Display (OSD) Menu 38 Contents | 3
Contents About Your Monitor 5 Package Contents 5 Product Features 6 Identifying Parts and Controls 7 Monitor Specifications 11 Plug-and-Play 26 LCD Monitor Quality and Pixel Policy 26 Setting Up the Monitor 27 Attaching the stand 27 Using the Tilt, Swivel, and Vertical Extension 28 Connecting Your Monitor 30 Organizing Your Cables 32 Removing the Monitor Stand 33 Wall Mounting (Optional 34 Operating the Monitor 35 Turning on the Monitor 35 Using the Front Panel Controls 35 Front‑Panel Button 37 Using the On-Screen Display (OSD) Menu 38 Contents | 3
USB-C Monitor Users Guide
Page 6
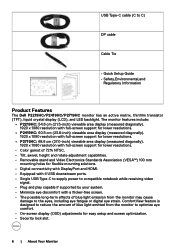
...; On-screen display (OSD) adjustments for flexible mounting solutions. • Digital connectivity with DisplayPort and HDMI. • Equipped with 4 USB downstream ports. • Single USB Type-C to supply power to compatible notebook while receiving video signal. • Plug and play capable if supported by your system. • Minimize eye discomfort with a flicker-free screen. • The possible long-term effects of 72% NTSC. • Tilt, swivel, height and rotate adjustment capabilities. • Removable stand and Video Electronics...
...; On-screen display (OSD) adjustments for flexible mounting solutions. • Digital connectivity with DisplayPort and HDMI. • Equipped with 4 USB downstream ports. • Single USB Type-C to supply power to compatible notebook while receiving video signal. • Plug and play capable if supported by your system. • Minimize eye discomfort with a flicker-free screen. • The possible long-term effects of 72% NTSC. • Tilt, swivel, height and rotate adjustment capabilities. • Removable stand and Video Electronics...

USB-C Monitor Users Guide
Page 10
...". USB downstream ports (2) Connect your computer with HDMI cable (sold separately). HDMI connector Connect your computer with DisplayPort cable. NOTE: Remove the rubber plug when using a USB Type-C cable to 1920x1080@60Hz on the monitor. 10 | About Your Monitor Display resolution up to instruction on versions of 20V/3.25A, 15V/3A, 9V/3A, 5V/3A. Power delivery of Windows prior to the monitor using a M3 x 6 mm screw (screw not included). Stand lock feature To lock the stand to Windows 10...
...". USB downstream ports (2) Connect your computer with HDMI cable (sold separately). HDMI connector Connect your computer with DisplayPort cable. NOTE: Remove the rubber plug when using a USB Type-C cable to 1920x1080@60Hz on the monitor. 10 | About Your Monitor Display resolution up to instruction on versions of 20V/3.25A, 15V/3A, 9V/3A, 5V/3A. Power delivery of Windows prior to the monitor using a M3 x 6 mm screw (screw not included). Stand lock feature To lock the stand to Windows 10...

USB-C Monitor Users Guide
Page 11
Monitor Specifications Model Screen type Panel Type Aspect ratio Viewable image dimensions Diagonal Active Area Horizontal Vertical Area Pixel pitch Pixel per inch (PPI) Viewing angle Horizontal Vertical Brightness Contrast ratio Faceplate coating Backlight Response Time (Gray to Gray) Color depth Color gamut Connectivity Border width (edge of monitor to 1 (typical) Anti-Glare with 3H hardness LED Edgelight system 8 ms (NORMAL mode) 5 ms (FAST mode) 16.7 million colors 72% (CIE1931) NOTE: Color gamut (typical) is based on CIE1976...
Monitor Specifications Model Screen type Panel Type Aspect ratio Viewable image dimensions Diagonal Active Area Horizontal Vertical Area Pixel pitch Pixel per inch (PPI) Viewing angle Horizontal Vertical Brightness Contrast ratio Faceplate coating Backlight Response Time (Gray to Gray) Color depth Color gamut Connectivity Border width (edge of monitor to 1 (typical) Anti-Glare with 3H hardness LED Edgelight system 8 ms (NORMAL mode) 5 ms (FAST mode) 16.7 million colors 72% (CIE1931) NOTE: Color gamut (typical) is based on CIE1976...

USB-C Monitor Users Guide
Page 12
...° Easy Arrange and other key features Security lock slot (cable lock sold separately) P2719HC Active matrix - Height adjustable stand Tilt Swivel Pivot Dell Display Manager (DDM) Compatibility Security Model Screen type Panel Type Aspect ratio Viewable image dimensions Diagonal Active Area Horizontal Vertical Area Pixel pitch Pixel per inch (PPI) Viewing angle Horizontal Vertical Brightness Contrast ratio Faceplate coating Backlight Response Time (Gray to Gray) Color depth Color gamut 130 mm -5° to 21° -45...
...° Easy Arrange and other key features Security lock slot (cable lock sold separately) P2719HC Active matrix - Height adjustable stand Tilt Swivel Pivot Dell Display Manager (DDM) Compatibility Security Model Screen type Panel Type Aspect ratio Viewable image dimensions Diagonal Active Area Horizontal Vertical Area Pixel pitch Pixel per inch (PPI) Viewing angle Horizontal Vertical Brightness Contrast ratio Faceplate coating Backlight Response Time (Gray to Gray) Color depth Color gamut 130 mm -5° to 21° -45...

USB-C Monitor Users Guide
Page 13
Connectivity Border width (edge of monitor to active area) Adjustability Height adjustable stand Tilt Swivel Pivot Dell Display Manager (DDM) Compatibility Security Resolution Specifications Horizontal scan range Vertical scan range Maximum preset resolution Video input capabilities (HDMI & DP playback) • 1 HDMI port • 1 DP(in) port • 1 DP(out) port • 1 USB Type-C port • 2 USB 2.0 downstream ports (rear) • 2 USB 3.0 downstream ports (side) 6.0 mm (Top/Left/Right) 20.7 mm (Bottom) 130 mm -5° to 21° -45° to 45...
Connectivity Border width (edge of monitor to active area) Adjustability Height adjustable stand Tilt Swivel Pivot Dell Display Manager (DDM) Compatibility Security Resolution Specifications Horizontal scan range Vertical scan range Maximum preset resolution Video input capabilities (HDMI & DP playback) • 1 HDMI port • 1 DP(in) port • 1 DP(out) port • 1 USB Type-C port • 2 USB 2.0 downstream ports (rear) • 2 USB 3.0 downstream ports (side) 6.0 mm (Top/Left/Right) 20.7 mm (Bottom) 130 mm -5° to 21° -45° to 45...
USB-C Monitor Users Guide
Page 14
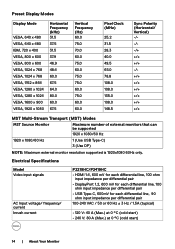
....0 75.0 75.0 60.0 75.0 60.0 60.0 Pixel Clock (MHz) 25.2 31.5 28.3 40.0 49.5 65.0 78.8 108.0 108.0 135.0 108.0 148.5 Sync Polarity (Horizontal/ Vertical MST Multi-Stream Transport (MST) Modes MST Source Monitor Maximum number of external monitors that can be supported 1920 x 1080/60 Hz 1920 x 1080/60 Hz 1 (Use USB Type-C) 3 (Use DP) NOTE: Maximum external monitor resolution supported is 1920x1080 60Hz only.
....0 75.0 75.0 60.0 75.0 60.0 60.0 Pixel Clock (MHz) 25.2 31.5 28.3 40.0 49.5 65.0 78.8 108.0 108.0 135.0 108.0 148.5 Sync Polarity (Horizontal/ Vertical MST Multi-Stream Transport (MST) Modes MST Source Monitor Maximum number of external monitors that can be supported 1920 x 1080/60 Hz 1920 x 1080/60 Hz 1 (Use USB Type-C) 3 (Use DP) NOTE: Maximum external monitor resolution supported is 1920x1080 60Hz only.

USB-C Monitor Users Guide
Page 18
... registration status by country. P2419HC VESA Modes Normal operation Active-off mode Switch off Horizontal Vertical Video Sync Sync Active Active Active Power Indicator White Inactive - TEC: Total energy consumption in use. Inactive Off - - EPEAT registration varies by country. (P2419HC/P2719HC only) TCO Certified Displays yes RoHS Compliant yes BFR/PVC free Monitor yes (excluding external cables) Power Management Modes If you have VESA's DPM-compliant video card or software installed in your PC, the...
... registration status by country. P2419HC VESA Modes Normal operation Active-off mode Switch off Horizontal Vertical Video Sync Sync Active Active Active Power Indicator White Inactive - TEC: Total energy consumption in use. Inactive Off - - EPEAT registration varies by country. (P2419HC/P2719HC only) TCO Certified Displays yes RoHS Compliant yes BFR/PVC free Monitor yes (excluding external cables) Power Management Modes If you have VESA's DPM-compliant video card or software installed in your PC, the...
USB-C Monitor Users Guide
Page 27
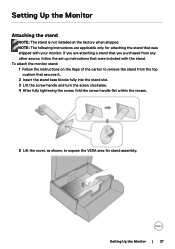
... the monitor stand: 1 Follow the instructions on the flaps of the carton to remove the stand from any other source, follow the set up instructions that secures it. 2 Insert the stand base blocks fully into the stand slot. 3 Lift the screw handle and turn the screw clockwise. 4 After fully tightening the screw, fold the screw handle flat within the recess. 5 Lift the cover, as shown, to expose the VESA...
... the monitor stand: 1 Follow the instructions on the flaps of the carton to remove the stand from any other source, follow the set up instructions that secures it. 2 Insert the stand base blocks fully into the stand slot. 3 Lift the screw handle and turn the screw clockwise. 4 After fully tightening the screw, fold the screw handle flat within the recess. 5 Lift the cover, as shown, to expose the VESA...

USB-C Monitor Users Guide
Page 30
... rotation. To connect your monitor to the computer: 1 Turn off your computer. 2 Connect the HDMI, DP or USB Type-C cable from your monitor to the computer. 3 Switch on your monitor. 4 Select the correct input source at Monitor OSD Menu and turn on your graphics card. Adjusting the Rotation Display Settings of Your System After you have rotated your monitor, you need to go to www.dell.com/support and download the latest driver for information on...
... rotation. To connect your monitor to the computer: 1 Turn off your computer. 2 Connect the HDMI, DP or USB Type-C cable from your monitor to the computer. 3 Switch on your monitor. 4 Select the correct input source at Monitor OSD Menu and turn on your graphics card. Adjusting the Rotation Display Settings of Your System After you have rotated your monitor, you need to go to www.dell.com/support and download the latest driver for information on...

USB-C Monitor Users Guide
Page 36
... menu. The following table describes the front panel buttons: Front‑Panel Button 1 Description Use this button to directly access the "Brightness/ Contrast" bar. Shortcut key: Preset Modes 2 Use this button to turn the monitor On and Off. Exit 5 Use the Power button to choose from a list of preset color modes. A glowing white LED indicates DPMS Power Save Mode. 36 | Operating the Monitor See Accessing the Menu System. The white LED indicates the monitor is On and fully Power (with power light...
... menu. The following table describes the front panel buttons: Front‑Panel Button 1 Description Use this button to directly access the "Brightness/ Contrast" bar. Shortcut key: Preset Modes 2 Use this button to turn the monitor On and Off. Exit 5 Use the Power button to choose from a list of preset color modes. A glowing white LED indicates DPMS Power Save Mode. 36 | Operating the Monitor See Accessing the Menu System. The white LED indicates the monitor is On and fully Power (with power light...
USB-C Monitor Users Guide
Page 42
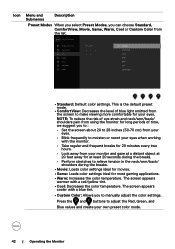
... with a blue tint. • Custom Color: Allows you to : • Set the screen about 20 to 28 inches (50-70 cm) from the list. • Standard: Default color settings. This is the default preset mode. • ComfortView: Decreases the level of time, we suggest you to adjust the Red, Green, and Blue values and create your eyes. Press the and buttons to manually adjust the color settings. Icon Menu and...
... with a blue tint. • Custom Color: Allows you to : • Set the screen about 20 to 28 inches (50-70 cm) from the list. • Standard: Default color settings. This is the default preset mode. • ComfortView: Decreases the level of time, we suggest you to adjust the Red, Green, and Blue values and create your eyes. Press the and buttons to manually adjust the color settings. Icon Menu and...

USB-C Monitor Users Guide
Page 48
Select Off to start the process. 48 | Operating the Monitor Enable this feature. LCD Helps reduce minor cases of your computer. Depending on the Conditioning degree of image retention, the program may take some time to adjust the monitor settings using software on your monitor. Icon Menu and Submenus DDC/CI Description DDC/CI (Display Data Channel/Command Interface) allows you to run. Select On to turn off this feature for best user experience and optimum performance of image retention.
Select Off to start the process. 48 | Operating the Monitor Enable this feature. LCD Helps reduce minor cases of your computer. Depending on the Conditioning degree of image retention, the program may take some time to adjust the monitor settings using software on your monitor. Icon Menu and Submenus DDC/CI Description DDC/CI (Display Data Channel/Command Interface) allows you to run. Select On to turn off this feature for best user experience and optimum performance of image retention.

USB-C Monitor Users Guide
Page 54
... Self-Test operation, remove all digital and the analog cables from the back of the computer. or 54 | Troubleshooting While in this section, follow the Safety Instructions. If your monitor and computer are properly connected but the monitor screen remains dark, run the monitor self-test by performing the following steps: 1 Turn off both your monitor is working correctly. Self-Test Your monitor provides a self...
... Self-Test operation, remove all digital and the analog cables from the back of the computer. or 54 | Troubleshooting While in this section, follow the Safety Instructions. If your monitor and computer are properly connected but the monitor screen remains dark, run the monitor self-test by performing the following steps: 1 Turn off both your monitor is working correctly. Self-Test Your monitor provides a self...

USB-C Monitor Users Guide
Page 56
The monitor then goes into the self-test mode. 3 Press and hold Button 1 for abnormalities. 5 Press Button 1 on the surface of the screen). 2 Unplug the video cable(s) from the back of the screen changes to inspect the display in green, blue, black, white, and text screens. To exit, press Button 1 again. A gray screen appears. 4 Carefully inspect the screen for 5 seconds. Check the video card and computer. 56 | Troubleshooting To run the built-in diagnostics...
The monitor then goes into the self-test mode. 3 Press and hold Button 1 for abnormalities. 5 Press Button 1 on the surface of the screen). 2 Unplug the video cable(s) from the back of the screen changes to inspect the display in green, blue, black, white, and text screens. To exit, press Button 1 again. A gray screen appears. 4 Carefully inspect the screen for 5 seconds. Check the video card and computer. 56 | Troubleshooting To run the built-in diagnostics...

USB-C Monitor Users Guide
Page 59
..., see Dell Support site at: http://www.dell.com/support/monitors. • Reset the monitor to factory settings. • Adjust brightness and contrast controls via OSD. • Do not perform any troubleshooting steps. • Contact Dell immediately. • Ensure that the video cable connecting the monitor to the computer is connected properly and is secure. • Reset the monitor to factory settings. • Perform monitor self-test feature check to determine if the intermittent problem occurs in selftest mode. Troubleshooting...
..., see Dell Support site at: http://www.dell.com/support/monitors. • Reset the monitor to factory settings. • Adjust brightness and contrast controls via OSD. • Do not perform any troubleshooting steps. • Contact Dell immediately. • Ensure that the video cable connecting the monitor to the computer is connected properly and is secure. • Reset the monitor to factory settings. • Perform monitor self-test feature check to determine if the intermittent problem occurs in selftest mode. Troubleshooting...

USB-C Monitor Users Guide
Page 61
... Aspect Ratio setting in the Display menu OSD. • Reset the monitor to factory settings. • Turn off the monitor, unplug the monitor power cable, plug it may display in full screen. • Run the built-in properly. No Input Signal when user controls are pressed No picture, the • Check the signal source. The picture does The picture not fill the entire cannot fill the screen height or width of the screen • Due to different video formats (aspect...
... Aspect Ratio setting in the Display menu OSD. • Reset the monitor to factory settings. • Turn off the monitor, unplug the monitor power cable, plug it may display in full screen. • Run the built-in properly. No Input Signal when user controls are pressed No picture, the • Check the signal source. The picture does The picture not fill the entire cannot fill the screen height or width of the screen • Due to different video formats (aspect...
USB-C Monitor Users Guide
Page 64
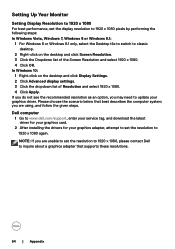
... need to update your graphics adapter, attempt to set the resolution to www.dell.com/support, enter your service tag, and download the latest driver for your graphics card. 2 After installing the drivers for your graphics driver. Setting Up Your Monitor Setting Display Resolution to 1920 x 1080 For best performance, set the display resolution to 1920 x 1080 pixels by performing the following steps: In Windows Vista, Windows 7, Windows 8 or Windows 8.1: 1 For Windows 8 or Windows 8.1 only, select the Desktop tile to switch...
... need to update your graphics adapter, attempt to set the resolution to www.dell.com/support, enter your service tag, and download the latest driver for your graphics card. 2 After installing the drivers for your graphics driver. Setting Up Your Monitor Setting Display Resolution to 1920 x 1080 For best performance, set the display resolution to 1920 x 1080 pixels by performing the following steps: In Windows Vista, Windows 7, Windows 8 or Windows 8.1: 1 For Windows 8 or Windows 8.1 only, select the Desktop tile to switch...
USB-C Monitor Users Guide
Page 65
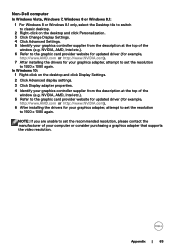
... website for updated driver (for example, http://www.AMD.com or http://www.NVIDIA.com). 6 After installing the drivers for your graphics adapter, attempt to set the recommended resolution, please contact the manufacturer of your computer or consider purchasing a graphics adapter that supports the video resolution. In Windows 10: 1 Right-click on the desktop and click Personalization. 3 Click Change Display Settings. 4 Click Advanced Settings. 5 Identify your...
... website for updated driver (for example, http://www.AMD.com or http://www.NVIDIA.com). 6 After installing the drivers for your graphics adapter, attempt to set the recommended resolution, please contact the manufacturer of your computer or consider purchasing a graphics adapter that supports the video resolution. In Windows 10: 1 Right-click on the desktop and click Personalization. 3 Click Change Display Settings. 4 Click Advanced Settings. 5 Identify your...

Display Manager Users Guide
Page 1
.... Once installed, Dell Display Manager runs each time the system starts and places its icon in the menu as below. Information about monitors connected to communicate with your monitor. NOTE: Dell Display Manager needs to use DDC/CI channel to the system is available when hovering over the notification-tray icon. Dell Display Manager User's Guide │ 1 Dell Display Manager User's Guide Overview Dell Display Manager is a Microsoft Windows application used to manage a monitor or...
.... Once installed, Dell Display Manager runs each time the system starts and places its icon in the menu as below. Information about monitors connected to communicate with your monitor. NOTE: Dell Display Manager needs to use DDC/CI channel to the system is available when hovering over the notification-tray icon. Dell Display Manager User's Guide │ 1 Dell Display Manager User's Guide Overview Dell Display Manager is a Microsoft Windows application used to manage a monitor or...


