
Reference and Installation Guide (.pdf)
Page 7
... error messages generated by both first-time and experienced computer users who want to upgrade their system to install or remove options inside the computer, such as dual in-line memory modules (DIMMs), expansion cards, or drives. • Appendix A, "Technical Specifications... C, "Regulatory Notices," is intended primarily as follows: • Everyone should read Chapter 1, "Introduction," for users who uses a Dell OptiPlex Gn or Gn+ low-profile computer system. The chapters and appendixes are intended for users who want to a network should read Chapter 4, "Using Integrated Devices."...
... error messages generated by both first-time and experienced computer users who want to upgrade their system to install or remove options inside the computer, such as dual in-line memory modules (DIMMs), expansion cards, or drives. • Appendix A, "Technical Specifications... C, "Regulatory Notices," is intended primarily as follows: • Everyone should read Chapter 1, "Introduction," for users who uses a Dell OptiPlex Gn or Gn+ low-profile computer system. The chapters and appendixes are intended for users who want to a network should read Chapter 4, "Using Integrated Devices."...
Reference and Installation Guide (.pdf)
Page 14
... 5-4 Jumpers 5-4 System Board Labels 5-8 Chapter 6 Installing System Board Options 6-1 Expansion Cards 6-2 Expansion Slots 6-2 Installing an Expansion Card 6-2 Removing an Expansion Card 6-4 Adding Memory 6-4 Performing a Memory Upgrade 6-5 Installing a DIMM 6-6 Removing a DIMM 6-6 Upgrading the Microprocessor 6-6 Replacing the System Battery 6-9 Chapter 7 Installing Drives 7-1 Removing and Replacing Front-Panel Inserts 7-1 EIDE Drive Addressing 7-2 Connecting Drives 7-3 Installing a Drive in...
... 5-4 Jumpers 5-4 System Board Labels 5-8 Chapter 6 Installing System Board Options 6-1 Expansion Cards 6-2 Expansion Slots 6-2 Installing an Expansion Card 6-2 Removing an Expansion Card 6-4 Adding Memory 6-4 Performing a Memory Upgrade 6-5 Installing a DIMM 6-6 Removing a DIMM 6-6 Upgrading the Microprocessor 6-6 Replacing the System Battery 6-9 Chapter 7 Installing Drives 7-1 Removing and Replacing Front-Panel Inserts 7-1 EIDE Drive Addressing 7-2 Connecting Drives 7-3 Installing a Drive in...
Reference and Installation Guide (.pdf)
Page 19
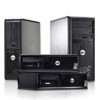
... add Dell-supported upgrades as necessary. All hard-disk drives shipped with OptiPlex Gn or Gn+ systems are high-speed, expandable personal computers designed around Intel® Pentium® microprocessors. Chapter 1 Introduction Dell® OptiPlex® Gn and Gn+ low-profile systems are SMART-compliant. • Full compliance with 512 KB of pipelined-burst static random-access memory (SRAM). System memory...
... add Dell-supported upgrades as necessary. All hard-disk drives shipped with OptiPlex Gn or Gn+ systems are high-speed, expandable personal computers designed around Intel® Pentium® microprocessors. Chapter 1 Introduction Dell® OptiPlex® Gn and Gn+ low-profile systems are SMART-compliant. • Full compliance with 512 KB of pipelined-burst static random-access memory (SRAM). System memory...
Reference and Installation Guide (.pdf)
Page 42
... monitor screen while the system is normal to run the System Setup program, press the key. 2-16 Dell OptiPlex Gn and Gn+ Low-Profile Systems Reference and Installation Guide In that case, you boot the system after a memory upgrade. To assign a new setup password, see "Assigning a System Password" found earlier in this chapter. instead, refer to... of pressing either to continue or to receive an error message the first time you do not need to refer to the instructions in "Performing a Memory Upgrade" in Chapter 6 of the message.
... monitor screen while the system is normal to run the System Setup program, press the key. 2-16 Dell OptiPlex Gn and Gn+ Low-Profile Systems Reference and Installation Guide In that case, you boot the system after a memory upgrade. To assign a new setup password, see "Assigning a System Password" found earlier in this chapter. instead, refer to... of pressing either to continue or to receive an error message the first time you do not need to refer to the instructions in "Performing a Memory Upgrade" in Chapter 6 of the message.

Reference and Installation Guide (.pdf)
Page 71
... make sure that may occur. Run the Dell Diagnostics to reach the desired memory total. Install or replace DIMMs as instructed in "Removing the Computer Cover" in consecutive sockets starting with socket A. Press to perform a memory upgrade: 1. Installing System Board Options 6-5 The... system detects that the DIMMs are seated properly in nonvolatile random-access memory (NVRAM), and generates the following message: The amount of all valid ...
... make sure that may occur. Run the Dell Diagnostics to reach the desired memory total. Install or replace DIMMs as instructed in "Removing the Computer Cover" in consecutive sockets starting with socket A. Press to perform a memory upgrade: 1. Installing System Board Options 6-5 The... system detects that the DIMMs are seated properly in nonvolatile random-access memory (NVRAM), and generates the following message: The amount of all valid ...

Reference and Installation Guide (.pdf)
Page 120
...Memory category, 2-12 W Wakeup On LAN category, 2-10 warnings, x, 5-1 warranty information, ix, D-1 Windows 95 NDIS 2 NIC driver, 4-6 reinstalling, 1-6 Windows for Workgroups NIC driver, 4-4 Windows NT 3.5x NIC driver, 4-3 Windows NT 4.0 NIC driver, 4-2 8 Dell OptiPlex Gn and Gn...+ Low-Profile Systems Reference and Installation Guide troubleshooting about , 1-2 connectors, 4-2, 6-1 V VESA and power management, 2-9 video connector, 4-2, 6-1 controller, 4-1 Video Electronics Standards Association. See USB upgrade options DIMMs, 6-4 drives, 7-1...
...Memory category, 2-12 W Wakeup On LAN category, 2-10 warnings, x, 5-1 warranty information, ix, D-1 Windows 95 NDIS 2 NIC driver, 4-6 reinstalling, 1-6 Windows for Workgroups NIC driver, 4-4 Windows NT 3.5x NIC driver, 4-3 Windows NT 4.0 NIC driver, 4-2 8 Dell OptiPlex Gn and Gn...+ Low-Profile Systems Reference and Installation Guide troubleshooting about , 1-2 connectors, 4-2, 6-1 V VESA and power management, 2-9 video connector, 4-2, 6-1 controller, 4-1 Video Electronics Standards Association. See USB upgrade options DIMMs, 6-4 drives, 7-1...

Diagnostics and Troubleshooting Guide (.pdf)
Page 70
Troubleshooting a Wet Computer Liquids can also cause damage. If an external device (such as video-memory upgrade modules, math coprocessors, and microprocessor upgrades). 6-2 Diagnostics and Troubleshooting Guide Remove the computer cover. Remove all expansion cards installed in ... the manufacturer for instructions or see if it on obtaining technical assistance. No. Also, disconnect any telephone or telecommunication lines from Dell. Turn off the system, including any telephone or telecommunication lines to troubleshoot a damaged computer: 1. See your system documentation for ...
Troubleshooting a Wet Computer Liquids can also cause damage. If an external device (such as video-memory upgrade modules, math coprocessors, and microprocessor upgrades). 6-2 Diagnostics and Troubleshooting Guide Remove the computer cover. Remove all expansion cards installed in ... the manufacturer for instructions or see if it on obtaining technical assistance. No. Also, disconnect any telephone or telecommunication lines from Dell. Turn off the system, including any telephone or telecommunication lines to troubleshoot a damaged computer: 1. See your system documentation for ...

Diagnostics and Troubleshooting Guide (.pdf)
Page 75
...power sources. Go to step 9. Reseat the video-memory upgrade module. Insert the Dell Diagnostics Diskette into drive A, reboot the system, and run the Video Test Group in the Dell Diagnostics. (See Chapter 4, "Running the Dell Diagnostics.") Most of the tests in the Video Test... to Chapter 3, "Finding Software Solutions." Insert the Dell Diagnostics Diskette into drive A, and reboot the system. It is installed. Remove the computer cover. See your system documentation for instructions. 11. Yes. Is a video-memory upgrade module installed? Is a video expansion card installed? ...
...power sources. Go to step 9. Reseat the video-memory upgrade module. Insert the Dell Diagnostics Diskette into drive A, reboot the system, and run the Video Test Group in the Dell Diagnostics. (See Chapter 4, "Running the Dell Diagnostics.") Most of the tests in the Video Test... to Chapter 3, "Finding Software Solutions." Insert the Dell Diagnostics Diskette into drive A, and reboot the system. It is installed. Remove the computer cover. See your system documentation for instructions. 11. Yes. Is a video-memory upgrade module installed? Is a video expansion card installed? ...


