
VESA Mount Manual
Page 2
... you make better use of data if instructions are not followed. Other trademarks and trade names may be used in this publication to refer to change without the written permission of these materials in trademarks and trade names other than its own. Dell Inc. March 2011 Rev. Information in this text: Dell™, the DELL logo, and OptiPlex™...
... you make better use of data if instructions are not followed. Other trademarks and trade names may be used in this publication to refer to change without the written permission of these materials in trademarks and trade names other than its own. Dell Inc. March 2011 Rev. Information in this text: Dell™, the DELL logo, and OptiPlex™...
VESA Mount Manual
Page 3
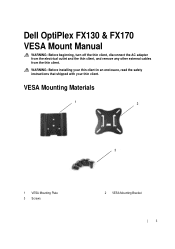
VESA Mounting Materials 1 2 1 VESA Mounting Plate 3 Screws 3 2 VESA Mounting Bracket | 3 WARNING: Before installing your thin client in an enclosure, read the safety instructions that shipped with your thin client. Dell OptiPlex FX130 & FX170 VESA Mount Manual WARNING: Before beginning, turn off the thin client, disconnect the AC adapter from the electrical outlet and the thin client, and remove any other external cables from the thin client.
VESA Mounting Materials 1 2 1 VESA Mounting Plate 3 Screws 3 2 VESA Mounting Bracket | 3 WARNING: Before installing your thin client in an enclosure, read the safety instructions that shipped with your thin client. Dell OptiPlex FX130 & FX170 VESA Mount Manual WARNING: Before beginning, turn off the thin client, disconnect the AC adapter from the electrical outlet and the thin client, and remove any other external cables from the thin client.
VESA Mount Manual
Page 4
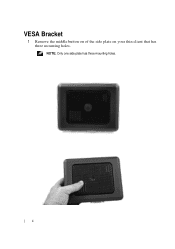
NOTE: Only one side plate has three mounting holes. | 4 VESA Bracket 1 Remove the middle button on of the side plate on your thin client that has three mounting holes.
NOTE: Only one side plate has three mounting holes. | 4 VESA Bracket 1 Remove the middle button on of the side plate on your thin client that has three mounting holes.
VESA Mount Manual
Page 6
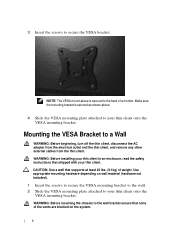
... of weight. CAUTION: Use a wall that shipped with your thin client onto the VESA mounting bracket. Use appropriate mounting hardware depending on the system. | 6 3 Insert the screws to a Wall WARNING: Before beginning, turn off the thin client, disconnect the AC adapter from the electrical outlet and the thin client, and remove any other external cables from the thin...
... of weight. CAUTION: Use a wall that shipped with your thin client onto the VESA mounting bracket. Use appropriate mounting hardware depending on the system. | 6 3 Insert the screws to a Wall WARNING: Before beginning, turn off the thin client, disconnect the AC adapter from the electrical outlet and the thin client, and remove any other external cables from the thin...
VESA Mount Manual
Page 7
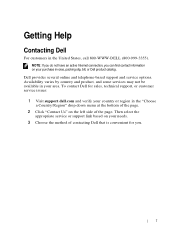
... contact Dell for sales, technical support, or customer service issues: 1 Visit support.dell.com and verify your country or region in the "Choose a Country/Region" drop down menu at the bottom of the page. 2 Click "Contact Us" on the left side of contacting Dell that is...Internet connection, you . | 7 Availability varies by country and product, and some services may not be available in the United States, call 800-WWW-DELL (800-999-3355). Dell provides several online and telephone-based support and service options. Then select the appropriate service or support link based on your needs....
... contact Dell for sales, technical support, or customer service issues: 1 Visit support.dell.com and verify your country or region in the "Choose a Country/Region" drop down menu at the bottom of the page. 2 Click "Contact Us" on the left side of contacting Dell that is...Internet connection, you . | 7 Availability varies by country and product, and some services may not be available in the United States, call 800-WWW-DELL (800-999-3355). Dell provides several online and telephone-based support and service options. Then select the appropriate service or support link based on your needs....

VESA Mount Manual
Page 8
Printed in the U.S.A. www.dell.com | support.dell.com
Printed in the U.S.A. www.dell.com | support.dell.com
User Manual
Page 2
...Information in this text: Dell™, the DELL logo, and OptiPlex™ are trademarks of these materials in this document is strictly forbidden. Reproduction of Dell Inc. Other trademarks and trade names may be used in this publication to ... 2011 Dell Inc. Dell Inc. All rights reserved. is subject to hardware or loss of Dell Inc. Power adapter models that helps you make better use of your thin client CAUTION: A CAUTION indicates potential damage to change without the written permission of data if instructions are AU1361203N (Elementech International Co....
...Information in this text: Dell™, the DELL logo, and OptiPlex™ are trademarks of these materials in this document is strictly forbidden. Reproduction of Dell Inc. Other trademarks and trade names may be used in this publication to ... 2011 Dell Inc. Dell Inc. All rights reserved. is subject to hardware or loss of Dell Inc. Power adapter models that helps you make better use of your thin client CAUTION: A CAUTION indicates potential damage to change without the written permission of data if instructions are AU1361203N (Elementech International Co....

User Manual
Page 3
Your FX170 terminal is damaged, please contact Dell immediately to report the issue. | 3 If anything is shipped with the following items: 1 Power Cord 2 Adapter 3 Terminal Stand 4 Quick Setup Guide 5 Warranty and Support Information 6 End User License Agreement 7 CD Containing Open Source Code (DeTOS Only) 8 Safety, Environmental, and Regulatory Information 9 DVI-VGA Adapter NOTE: Inspect all parts visually for best performance. Dell™ OptiPlex™ FX170 Quick Setup Guide Before Setting Up Your FX170 NOTE: Place the thin client in its vertical orientation for damage.
Your FX170 terminal is damaged, please contact Dell immediately to report the issue. | 3 If anything is shipped with the following items: 1 Power Cord 2 Adapter 3 Terminal Stand 4 Quick Setup Guide 5 Warranty and Support Information 6 End User License Agreement 7 CD Containing Open Source Code (DeTOS Only) 8 Safety, Environmental, and Regulatory Information 9 DVI-VGA Adapter NOTE: Inspect all parts visually for best performance. Dell™ OptiPlex™ FX170 Quick Setup Guide Before Setting Up Your FX170 NOTE: Place the thin client in its vertical orientation for damage.
User Manual
Page 4
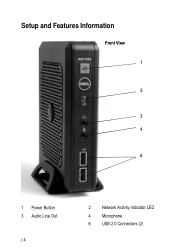
Setup and Features Information Front View 1 2 3 4 6 1 Power Button 3 Audio Line Out | 4 2 Network Activity Indicator LED 4 Microphone 6 USB 2.0 Connectors (2)
Setup and Features Information Front View 1 2 3 4 6 1 Power Button 3 Audio Line Out | 4 2 Network Activity Indicator LED 4 Microphone 6 USB 2.0 Connectors (2)

User Manual
Page 6
Quick Setup 1 Connect the monitor to the DVI Connector on the back of the unit. | 6
Quick Setup 1 Connect the monitor to the DVI Connector on the back of the unit. | 6

User Manual
Page 7
2 Connect the mouse and keyboard to the PS/2 or USB connectors, depending on what type you have. | 7
2 Connect the mouse and keyboard to the PS/2 or USB connectors, depending on what type you have. | 7

User Manual
Page 8
3 Connect the network cable to the Network Connector on the unit and the other end of the cable to your local network. | 8
3 Connect the network cable to the Network Connector on the unit and the other end of the cable to your local network. | 8
User Manual
Page 9
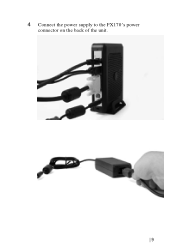
4 Connect the power supply to the FX170's power connector on the back of the unit. | 9
4 Connect the power supply to the FX170's power connector on the back of the unit. | 9
User Manual
Page 10
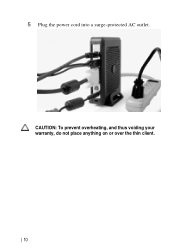
5 Plug the power cord into a surge-protected AC outlet. CAUTION: To prevent overheating, and thus voiding your warranty, do not place anything on or over the thin client. | 10
5 Plug the power cord into a surge-protected AC outlet. CAUTION: To prevent overheating, and thus voiding your warranty, do not place anything on or over the thin client. | 10
User Manual
Page 11
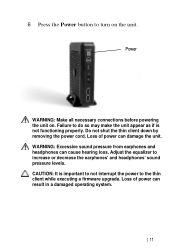
... power to turn on . WARNING: Excessive sound pressure from earphones and headphones can result in a damaged operating system. | 11 Power WARNING: Make all necessary connections before powering the unit on the unit. Failure to increase or decrease the earphones' and headphones' sound pressure levels. CAUTION: It is not functioning properly. 6 Press the Power button to the thin client while executing a firmware upgrade. Loss of power...
... power to turn on . WARNING: Excessive sound pressure from earphones and headphones can result in a damaged operating system. | 11 Power WARNING: Make all necessary connections before powering the unit on the unit. Failure to increase or decrease the earphones' and headphones' sound pressure levels. CAUTION: It is not functioning properly. 6 Press the Power button to the thin client while executing a firmware upgrade. Loss of power...
User Manual
Page 12
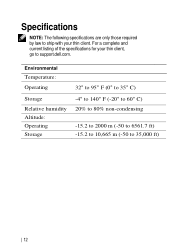
Specifications NOTE: The following specifications are only those required by law to ship with your thin client, go to 35,000 ft) | 12 Environmental Temperature: Operating Storage Relative humidity Altitude: Operating Storage 32° to 95° F (0° to 35° C) -4° to 140° F (-20° to 60° C) 20% to 80% non-condensing -15.2 to 2000 m (-50 to 6561.7 ft) -15.2 to 10,665 m (-50 to support.dell.com. For a complete and current listing of the specifications for your thin client.
Specifications NOTE: The following specifications are only those required by law to ship with your thin client, go to 35,000 ft) | 12 Environmental Temperature: Operating Storage Relative humidity Altitude: Operating Storage 32° to 95° F (0° to 35° C) -4° to 140° F (-20° to 60° C) 20% to 80% non-condensing -15.2 to 2000 m (-50 to 6561.7 ft) -15.2 to 10,665 m (-50 to support.dell.com. For a complete and current listing of the specifications for your thin client.
User Manual
Page 13
Finding More Information and Resources See the safety and regulatory documents that shipped with your thin client and the regulatory compliance website at www.dell.com/regulatory_compliance for more information on: Safety best practices Warranty Terms and Conditions Regulatory Ergonomics End User License Agreement | 13
Finding More Information and Resources See the safety and regulatory documents that shipped with your thin client and the regulatory compliance website at www.dell.com/regulatory_compliance for more information on: Safety best practices Warranty Terms and Conditions Regulatory Ergonomics End User License Agreement | 13
User Manual
Page 14
... the United States, call 800-WWW-DELL (800-999-3355). Dell provides several online and telephone-based support and service options. Then select the appropriate service or support link based on your needs. 3 Choose the method of the page. NOTE: If you do not have an active Internet connection, you . | 14 Getting Help Contacting Dell For customers in the "Choose a Country...
... the United States, call 800-WWW-DELL (800-999-3355). Dell provides several online and telephone-based support and service options. Then select the appropriate service or support link based on your needs. 3 Choose the method of the page. NOTE: If you do not have an active Internet connection, you . | 14 Getting Help Contacting Dell For customers in the "Choose a Country...


