Setup and Features Information Tech Sheet (Desktop, Mini-Tower, Small Form Factor)
Page 1
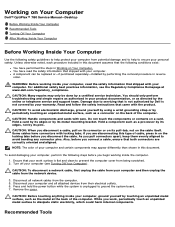
About Warnings WARNING: A WARNING indicates a potential for property damage, personal injury, or death. Dell™ OptiPlex™ 780 Setup and Features Information Tech Sheet Front and Back View - Desktop 1 2 3 4 5 10 98 76 11 12 16 1 optical drive 3 USB 2.0 connectors (2) 5 power button, power light 7 network connectivity light 9 headphone connector March 2010 15 14 13 2 optical drive eject button 4 drive activity light 6 diagnostic lights (4) 8 microphone connector 10 Media Card Reader (optional) Models: DCSM1F, DCNE1F, DCCY1F, DCSM, DCNE, and DCCY series
About Warnings WARNING: A WARNING indicates a potential for property damage, personal injury, or death. Dell™ OptiPlex™ 780 Setup and Features Information Tech Sheet Front and Back View - Desktop 1 2 3 4 5 10 98 76 11 12 16 1 optical drive 3 USB 2.0 connectors (2) 5 power button, power light 7 network connectivity light 9 headphone connector March 2010 15 14 13 2 optical drive eject button 4 drive activity light 6 diagnostic lights (4) 8 microphone connector 10 Media Card Reader (optional) Models: DCSM1F, DCNE1F, DCCY1F, DCSM, DCNE, and DCCY series

Setup and Features Information Tech Sheet (Ultra Small Form Factor)
Page 1
Dell™ OptiPlex™ 780 Ultra Small Form Factor Setup and Features Information Tech Sheet Front View 1 2 3 4 5 6 1 CD/DVD drive 3 drive activity light 5 network activity light 7 headphone connector 9 USB connectors (2) 9 8 7 2 power button 4 diagnostic lights (4) 6 WiFi activity light (optional) 8 microphone connector November 2009 Model: D01U Type: D01U001 About Warnings WARNING: A WARNING indicates a potential for property damage, personal injury, or death.
Dell™ OptiPlex™ 780 Ultra Small Form Factor Setup and Features Information Tech Sheet Front View 1 2 3 4 5 6 1 CD/DVD drive 3 drive activity light 5 network activity light 7 headphone connector 9 USB connectors (2) 9 8 7 2 power button 4 diagnostic lights (4) 6 WiFi activity light (optional) 8 microphone connector November 2009 Model: D01U Type: D01U001 About Warnings WARNING: A WARNING indicates a potential for property damage, personal injury, or death.

Dell Mounting Bracket - User's Guide (Ultra Small Form Factor)
Page 1
www.dell.com support.dell.com 1 of 14 dell.com/regulatory_compliance User's Guide Dell™ OptiPlex™ 780-USFF Mounting Bracket Wall with Wood Stud Mount Under Desk Mount The Dell OptiPlex 780-USFF Mounting Bracket supports the System in vertical or horizontal orientations.
www.dell.com support.dell.com 1 of 14 dell.com/regulatory_compliance User's Guide Dell™ OptiPlex™ 780-USFF Mounting Bracket Wall with Wood Stud Mount Under Desk Mount The Dell OptiPlex 780-USFF Mounting Bracket supports the System in vertical or horizontal orientations.

Dell Mounting Bracket - User's Guide (Ultra Small Form Factor)
Page 3
Contents 1 About your Dell OptiPlex 780-USFF Mounting Bracket 4 2 Setting up your Dell OptiPlex 780-USFF Mounting Bracket 4 3 Specifications...14 4 Finding Information...14 3 of 14
Contents 1 About your Dell OptiPlex 780-USFF Mounting Bracket 4 2 Setting up your Dell OptiPlex 780-USFF Mounting Bracket 4 3 Specifications...14 4 Finding Information...14 3 of 14

Dell Mounting Bracket - User's Guide (Ultra Small Form Factor)
Page 4
...Wall Mount 12 3 Under Desk Mount 1 1 2 3 1 System Mounting Bracket 2 System Sleeve 3 System Chassis (ordered separately) Setting up the Dell OptiPlex 780-USFF Mounting Bracket 2 Components Mounting Bracket, System Sleeve, two Lag Screws 2x M8 x 80 mm WARNING: Because surfaces vary widely and the ultimate ...mounting method is out of 14 NOTE: Refer to the System Instruction Guides, packaged separately. 4 of DELL's control, it is imperative that you consult with an appropriate engineering, architectural or construction professional to ensure that your...
...Wall Mount 12 3 Under Desk Mount 1 1 2 3 1 System Mounting Bracket 2 System Sleeve 3 System Chassis (ordered separately) Setting up the Dell OptiPlex 780-USFF Mounting Bracket 2 Components Mounting Bracket, System Sleeve, two Lag Screws 2x M8 x 80 mm WARNING: Because surfaces vary widely and the ultimate ...mounting method is out of 14 NOTE: Refer to the System Instruction Guides, packaged separately. 4 of DELL's control, it is imperative that you consult with an appropriate engineering, architectural or construction professional to ensure that your...
Service Manual
Page 1
... be used in the United States and/or other than its own. October 2012 Rev. is subject to change without the written permission of Dell Inc.; Dell™ OptiPlex™ 780 Service Manual Desktop Computer Working on Your Computer Removing and Replacing Parts Specifications Diagnostics System Setup Notes, Cautions, and Warnings NOTE: A NOTE indicates...
... be used in the United States and/or other than its own. October 2012 Rev. is subject to change without the written permission of Dell Inc.; Dell™ OptiPlex™ 780 Service Manual Desktop Computer Working on Your Computer Removing and Replacing Parts Specifications Diagnostics System Setup Notes, Cautions, and Warnings NOTE: A NOTE indicates...
Service Manual
Page 3
...by its edges, not by the online or telephone service and support team. Hold a component such as the metal at www.dell.com/regulatory_compliance. if you pull connectors apart, keep them evenly aligned to dissipate static electricity, which could harm internal components. NOTE...: The color of cable, press in Working on Your Computer Dell™ OptiPlex™ 780 Service Manual-Desktop Before Working Inside Your Computer Recommended Tools Turning Off Your Computer After Working Inside Your Computer Before Working...
...by its edges, not by the online or telephone service and support team. Hold a component such as the metal at www.dell.com/regulatory_compliance. if you pull connectors apart, keep them evenly aligned to dissipate static electricity, which could harm internal components. NOTE...: The color of cable, press in Working on Your Computer Dell™ OptiPlex™ 780 Service Manual-Desktop Before Working Inside Your Computer Recommended Tools Turning Off Your Computer After Working Inside Your Computer Before Working...
Service Manual
Page 5
Back to Contents Page Removing and Replacing Parts Dell™ OptiPlex™ 780 Service Manual-Desktop Cover Primary Hard Drive Floppy Drive (Optional) Expansion Card Memory Power Supply Fan System Board Optical Drive Secondary Hard Drive (Optional) Riser Cage Standard Back Plate Heat Sink and Processor Coin-Cell Battery IO Panel Back to Contents Page
Back to Contents Page Removing and Replacing Parts Dell™ OptiPlex™ 780 Service Manual-Desktop Cover Primary Hard Drive Floppy Drive (Optional) Expansion Card Memory Power Supply Fan System Board Optical Drive Secondary Hard Drive (Optional) Riser Cage Standard Back Plate Heat Sink and Processor Coin-Cell Battery IO Panel Back to Contents Page
Service Manual
Page 12
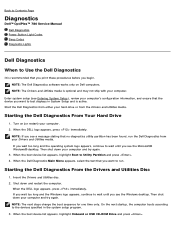
... sequence for one time only. Back to Contents Page Diagnostics Dell™ OptiPlex™ 780 Service Manual Dell Diagnostics Power Button Light Codes Beep Codes Diagnostic Lights Dell Diagnostics When to Use the Dell Diagnostics It is recommended that the device you want to run the Dell Diagnostics from your computer. 2. NOTE: The Drivers and Utilities media...
... sequence for one time only. Back to Contents Page Diagnostics Dell™ OptiPlex™ 780 Service Manual Dell Diagnostics Power Button Light Codes Beep Codes Diagnostic Lights Dell Diagnostics When to Use the Dell Diagnostics It is recommended that the device you want to run the Dell Diagnostics from your computer. 2. NOTE: The Drivers and Utilities media...
Service Manual
Page 17
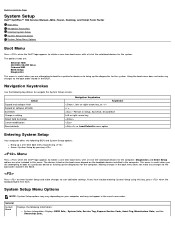
... BIOS and System Setup options: Bring up a one-time boot menu by pressing Access System Setup by pressing Menu Press when the Dell™ logo appears to initiate a one -time boot menu with a list of the valid boot devices for the system. This ...System Setup and make changes to change Cancel modification Reset defaults Navigation Keystrokes Keystroke , left- Back to Contents Page System Setup Dell™ OptiPlex™ 780 Service Manual-Mini-Tower, Desktop, and Small Form Factor Boot Menu Navigation Keystrokes Entering System Setup System Setup Simulation System Setup...
... BIOS and System Setup options: Bring up a one-time boot menu by pressing Access System Setup by pressing Menu Press when the Dell™ logo appears to initiate a one -time boot menu with a list of the valid boot devices for the system. This ...System Setup and make changes to change Cancel modification Reset defaults Navigation Keystrokes Keystroke , left- Back to Contents Page System Setup Dell™ OptiPlex™ 780 Service Manual-Mini-Tower, Desktop, and Small Form Factor Boot Menu Navigation Keystrokes Entering System Setup System Setup Simulation System Setup...
Service Manual
Page 22
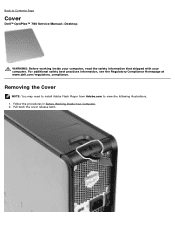
Follow the procedures in Before Working Inside Your Computer. 2. Removing the Cover NOTE: You may need to install Adobe Flash Player from Adobe.com to Contents Page Cover Dell™ OptiPlex™ 780 Service Manual-Desktop WARNING: Before working inside your computer, read the safety information that shipped with your computer. For additional safety best practices information, see the Regulatory Compliance Homepage at www.dell.com/regulatory_compliance. Pull back the cover release latch. Back to view the following illustrations. 1.
Follow the procedures in Before Working Inside Your Computer. 2. Removing the Cover NOTE: You may need to install Adobe Flash Player from Adobe.com to Contents Page Cover Dell™ OptiPlex™ 780 Service Manual-Desktop WARNING: Before working inside your computer, read the safety information that shipped with your computer. For additional safety best practices information, see the Regulatory Compliance Homepage at www.dell.com/regulatory_compliance. Pull back the cover release latch. Back to view the following illustrations. 1.
Service Manual
Page 24
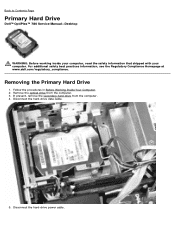
... drive from the computer. 3. Remove the optical drive from the computer. 4. Disconnect the hard-drive data cable. 5. Back to Contents Page Primary Hard Drive Dell™ OptiPlex™ 780 Service Manual-Desktop WARNING: Before working inside your computer, read the safety information that shipped with your computer. Removing the Primary Hard Drive 1. Disconnect...
... drive from the computer. 3. Remove the optical drive from the computer. 4. Disconnect the hard-drive data cable. 5. Back to Contents Page Primary Hard Drive Dell™ OptiPlex™ 780 Service Manual-Desktop WARNING: Before working inside your computer, read the safety information that shipped with your computer. Removing the Primary Hard Drive 1. Disconnect...
Service Manual
Page 28
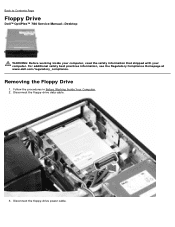
Disconnect the floppy-drive power cable. For additional safety best practices information, see the Regulatory Compliance Homepage at www.dell.com/regulatory_compliance. Removing the Floppy Drive 1. Follow the procedures in Before Working Inside Your Computer. 2. Disconnect the floppy-drive data cable. 3. Back to Contents Page Floppy Drive Dell™ OptiPlex™ 780 Service Manual-Desktop WARNING: Before working inside your computer, read the safety information that shipped with your computer.
Disconnect the floppy-drive power cable. For additional safety best practices information, see the Regulatory Compliance Homepage at www.dell.com/regulatory_compliance. Removing the Floppy Drive 1. Follow the procedures in Before Working Inside Your Computer. 2. Disconnect the floppy-drive data cable. 3. Back to Contents Page Floppy Drive Dell™ OptiPlex™ 780 Service Manual-Desktop WARNING: Before working inside your computer, read the safety information that shipped with your computer.
Service Manual
Page 32
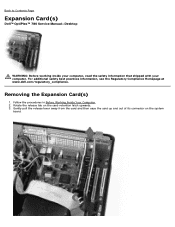
For additional safety best practices information, see the Regulatory Compliance Homepage at www.dell.com/regulatory_compliance. Gently pull the release lever away from the card and then ease the card up and out of its connector on the card-... release tab on the system board. Follow the procedures in Before Working Inside Your Computer. 2. Removing the Expansion Card(s) 1. Back to Contents Page Expansion Card(s) Dell™ OptiPlex™ 780 Service Manual-Desktop WARNING: Before working inside your computer, read the safety information that shipped with your computer.
For additional safety best practices information, see the Regulatory Compliance Homepage at www.dell.com/regulatory_compliance. Gently pull the release lever away from the card and then ease the card up and out of its connector on the card-... release tab on the system board. Follow the procedures in Before Working Inside Your Computer. 2. Removing the Expansion Card(s) 1. Back to Contents Page Expansion Card(s) Dell™ OptiPlex™ 780 Service Manual-Desktop WARNING: Before working inside your computer, read the safety information that shipped with your computer.
Service Manual
Page 34
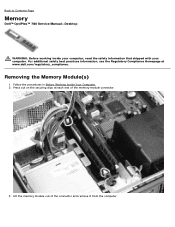
Lift the memory module out of the memory module connector. 3. Press out on the securing clips at www.dell.com/regulatory_compliance. Follow the procedures in Before Working Inside Your Computer. 2. For additional safety best practices information, see the Regulatory Compliance Homepage at each end of the connector and remove it from the computer. Removing the Memory Module(s) 1. Back to Contents Page Memory Dell™ OptiPlex™ 780 Service Manual-Desktop WARNING: Before working inside your computer, read the safety information that shipped with your computer.
Lift the memory module out of the memory module connector. 3. Press out on the securing clips at www.dell.com/regulatory_compliance. Follow the procedures in Before Working Inside Your Computer. 2. For additional safety best practices information, see the Regulatory Compliance Homepage at each end of the connector and remove it from the computer. Removing the Memory Module(s) 1. Back to Contents Page Memory Dell™ OptiPlex™ 780 Service Manual-Desktop WARNING: Before working inside your computer, read the safety information that shipped with your computer.
Service Manual
Page 36
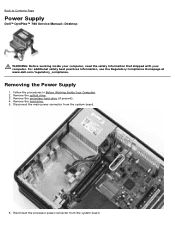
... connector from the system board. For additional safety best practices information, see the Regulatory Compliance Homepage at www.dell.com/regulatory_compliance. Removing the Power Supply 1. Back to Contents Page Power Supply Dell™ OptiPlex™ 780 Service Manual-Desktop WARNING: Before working inside your computer, read the safety information that shipped with your computer...
... connector from the system board. For additional safety best practices information, see the Regulatory Compliance Homepage at www.dell.com/regulatory_compliance. Removing the Power Supply 1. Back to Contents Page Power Supply Dell™ OptiPlex™ 780 Service Manual-Desktop WARNING: Before working inside your computer, read the safety information that shipped with your computer...
Service Manual
Page 42
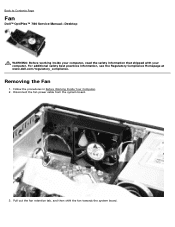
Back to Contents Page Fan Dell™ OptiPlex™ 780 Service Manual-Desktop WARNING: Before working inside your computer, read the safety information that shipped with your computer. Pull out the fan retention tab, and then shift the fan towards the system board. Disconnect the fan power cable from the system board. 3. For additional safety best practices information, see the Regulatory Compliance Homepage at www.dell.com/regulatory_compliance. Follow the procedures in Before Working Inside Your Computer. 2. Removing the Fan 1.
Back to Contents Page Fan Dell™ OptiPlex™ 780 Service Manual-Desktop WARNING: Before working inside your computer, read the safety information that shipped with your computer. Pull out the fan retention tab, and then shift the fan towards the system board. Disconnect the fan power cable from the system board. 3. For additional safety best practices information, see the Regulatory Compliance Homepage at www.dell.com/regulatory_compliance. Follow the procedures in Before Working Inside Your Computer. 2. Removing the Fan 1.
Service Manual
Page 45
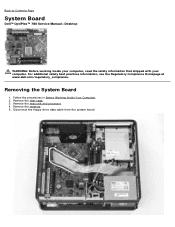
Remove the memory. 5. For additional safety best practices information, see the Regulatory Compliance Homepage at www.dell.com/regulatory_compliance. Follow the procedures in Before Working Inside Your Computer. 2. Removing the System Board 1. Disconnect the floppy-drive data cable from the system board. Back to Contents Page System Board Dell™ OptiPlex™ 780 Service Manual-Desktop WARNING: Before working inside your computer, read the safety information that shipped with your computer. Remove the riser cage. 3. Remove the heat sink and processor. 4.
Remove the memory. 5. For additional safety best practices information, see the Regulatory Compliance Homepage at www.dell.com/regulatory_compliance. Follow the procedures in Before Working Inside Your Computer. 2. Removing the System Board 1. Disconnect the floppy-drive data cable from the system board. Back to Contents Page System Board Dell™ OptiPlex™ 780 Service Manual-Desktop WARNING: Before working inside your computer, read the safety information that shipped with your computer. Remove the riser cage. 3. Remove the heat sink and processor. 4.
Service Manual
Page 55
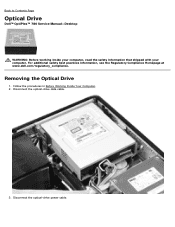
Removing the Optical Drive 1. Back to Contents Page Optical Drive Dell™ OptiPlex™ 780 Service Manual-Desktop WARNING: Before working inside your computer, read the safety information that shipped with your computer. Follow the procedures in Before Working Inside Your Computer. 2. For additional safety best practices information, see the Regulatory Compliance Homepage at www.dell.com/regulatory_compliance. Disconnect the optical-drive power cable. Disconnect the optical-drive data cable. 3.
Removing the Optical Drive 1. Back to Contents Page Optical Drive Dell™ OptiPlex™ 780 Service Manual-Desktop WARNING: Before working inside your computer, read the safety information that shipped with your computer. Follow the procedures in Before Working Inside Your Computer. 2. For additional safety best practices information, see the Regulatory Compliance Homepage at www.dell.com/regulatory_compliance. Disconnect the optical-drive power cable. Disconnect the optical-drive data cable. 3.
Service Manual
Page 59
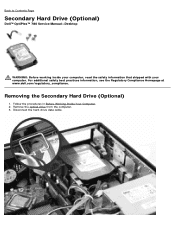
Follow the procedures in Before Working Inside Your Computer. 2. For additional safety best practices information, see the Regulatory Compliance Homepage at www.dell.com/regulatory_compliance. Disconnect the hard-drive data cable. Back to Contents Page Secondary Hard Drive (Optional) Dell™ OptiPlex™ 780 Service Manual-Desktop WARNING: Before working inside your computer, read the safety information that shipped with your computer. Removing the Secondary Hard Drive (Optional) 1. Remove the optical drive from the computer. 3.
Follow the procedures in Before Working Inside Your Computer. 2. For additional safety best practices information, see the Regulatory Compliance Homepage at www.dell.com/regulatory_compliance. Disconnect the hard-drive data cable. Back to Contents Page Secondary Hard Drive (Optional) Dell™ OptiPlex™ 780 Service Manual-Desktop WARNING: Before working inside your computer, read the safety information that shipped with your computer. Removing the Secondary Hard Drive (Optional) 1. Remove the optical drive from the computer. 3.


