
Setup and Quick Reference Guide
Page 4
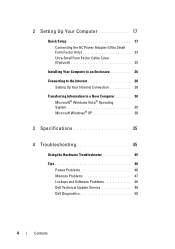
...® XP 30 3 Specifications 35 4 Troubleshooting 45 Using the Hardware Troubleshooter 45 Tips 46 Power Problems 46 Memory Problems 47 Lockups and Software Problems 48 Dell Technical Update Service 49 Dell Diagnostics 50 4 Contents
...® XP 30 3 Specifications 35 4 Troubleshooting 45 Using the Hardware Troubleshooter 45 Tips 46 Power Problems 46 Memory Problems 47 Lockups and Software Problems 48 Dell Technical Update Service 49 Dell Diagnostics 50 4 Contents

Setup and Quick Reference Guide
Page 7
Front View 1 2 3 4 5 11 10 98 76 1 optical drive 3 USB 2.0 connectors (2) 5 power button, power light 7 network-connectivity light 9 headphone connector 11 floppy drive or Media Card Reader (optional) 2 optical-drive eject button 4 hard-drive activity light 6 diagnostic lights (4) 8 microphone connector 10 optional floppy drive eject button About Your Computer 7 About Your Computer Desktop -
Front View 1 2 3 4 5 11 10 98 76 1 optical drive 3 USB 2.0 connectors (2) 5 power button, power light 7 network-connectivity light 9 headphone connector 11 floppy drive or Media Card Reader (optional) 2 optical-drive eject button 4 hard-drive activity light 6 diagnostic lights (4) 8 microphone connector 10 optional floppy drive eject button About Your Computer 7 About Your Computer Desktop -
Setup and Quick Reference Guide
Page 10
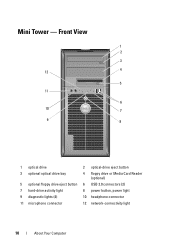
Front View 1 2 3 4 12 5 11 6 10 7 9 8 1 optical drive 3 optional optical drive bay 5 optional floppy drive eject button 7 hard-drive activity light 9 diagnostic lights (4) 11 microphone connector 2 optical-drive eject button 4 floppy drive or Media Card Reader (optional) 6 USB 2.0 connectors (2) 8 power button, power light 10 headphone connector 12 network-connectivity light 10 About Your Computer Mini Tower -
Front View 1 2 3 4 12 5 11 6 10 7 9 8 1 optical drive 3 optional optical drive bay 5 optional floppy drive eject button 7 hard-drive activity light 9 diagnostic lights (4) 11 microphone connector 2 optical-drive eject button 4 floppy drive or Media Card Reader (optional) 6 USB 2.0 connectors (2) 8 power button, power light 10 headphone connector 12 network-connectivity light 10 About Your Computer Mini Tower -

Setup and Quick Reference Guide
Page 13
Small Form Factor - Front View 1 2 3 4 5 6 11 10 9 8 7 1 optical drive 2 optical-drive eject button 3 USB 2.0 connectors (2) 4 network-connectivity light 5 diagnostic lights (4) 6 hard-drive activity light 7 power button, power light 8 microphone connector 9 headphone connector 10 optional floppy drive eject button 11 floppy drive or Media Card Reader (optional) About Your Computer 13
Small Form Factor - Front View 1 2 3 4 5 6 11 10 9 8 7 1 optical drive 2 optical-drive eject button 3 USB 2.0 connectors (2) 4 network-connectivity light 5 diagnostic lights (4) 6 hard-drive activity light 7 power button, power light 8 microphone connector 9 headphone connector 10 optional floppy drive eject button 11 floppy drive or Media Card Reader (optional) About Your Computer 13

Setup and Quick Reference Guide
Page 15
Ultra Small Form Factor - Front View 1 2 34 98 1 USB 2.0 connectors (2) 3 hard drive activity light 5 air vents 7 optical drive 9 air vents 76 5 2 microphone connector 4 power button, power light 6 optical-drive eject button 8 headphone connector Ultra Small Form Factor - Back View 1 2 3 6 1 diagnostic lights (4) 3 security cable slot 5 power connector 5 4 2 cover release knob 4 back-panel connectors 6 air vent About Your Computer 15
Ultra Small Form Factor - Front View 1 2 34 98 1 USB 2.0 connectors (2) 3 hard drive activity light 5 air vents 7 optical drive 9 air vents 76 5 2 microphone connector 4 power button, power light 6 optical-drive eject button 8 headphone connector Ultra Small Form Factor - Back View 1 2 3 6 1 diagnostic lights (4) 3 security cable slot 5 power connector 5 4 2 cover release knob 4 back-panel connectors 6 air vent About Your Computer 15
Setup and Quick Reference Guide
Page 42
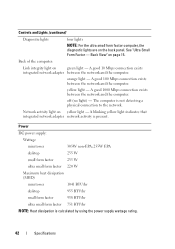
... a physical connection to the network. orange light - off (no light) - A good 1000 Mbps connection exists between the network and the computer. Controls and Lights (continued) Diagnostic lights four lights NOTE: For the ultra small form factor computer, the diagnostic lights are on yellow light - Network activity light on the back panel.
... a physical connection to the network. orange light - off (no light) - A good 1000 Mbps connection exists between the network and the computer. Controls and Lights (continued) Diagnostic lights four lights NOTE: For the ultra small form factor computer, the diagnostic lights are on yellow light - Network activity light on the back panel.

Setup and Quick Reference Guide
Page 47
...F T H E P O W E R L I G H T I N G A M B E R - There is successfully communicating with the memory. • Run the Dell Diagnostics (see if that the main power cable and the front panel cable are securely connected to ensure that your computer is a power problem, a device may ... 47 I F T H E P O W E R L I G H T I S B L I N K I S S T E A D Y A M B E R - The computer is securely connected to see "Dell Diagnostics" on page 50). For additional safety best practices information, see your computer. Some possible causes of the procedures in this section, read the safety information ...
...F T H E P O W E R L I G H T I N G A M B E R - There is successfully communicating with the memory. • Run the Dell Diagnostics (see if that the main power cable and the front panel cable are securely connected to ensure that your computer is a power problem, a device may ... 47 I F T H E P O W E R L I G H T I S B L I N K I S S T E A D Y A M B E R - The computer is securely connected to see "Dell Diagnostics" on page 50). For additional safety best practices information, see your computer. Some possible causes of the procedures in this section, read the safety information ...

Setup and Quick Reference Guide
Page 48
... Panel→Programs→Use an older program with this version of memory supported by your computer, see "Memory" on page 35. • Run the Dell Diagnostics (see "Dell Diagnostics" on the screen. A program is supported by your computer. If necessary, uninstall and then reinstall the program. For more information about the type of...
... Panel→Programs→Use an older program with this version of memory supported by your computer, see "Memory" on page 35. • Run the Dell Diagnostics (see "Dell Diagnostics" on the screen. A program is supported by your computer. If necessary, uninstall and then reinstall the program. For more information about the type of...

Setup and Quick Reference Guide
Page 50
... partition on your hard drive, and follow the instructions on (or restart) your computer. 3 When the DELL™ logo appears, press immediately. Starting the Dell Diagnostics From Your Hard Drive 1 Ensure that the computer is optional and may not ship with your computer. NOTE: ...see the Microsoft® Windows® desktop, and then shut down your computer and try again. Starting the Dell Diagnostics From the Dell Drivers and Utilities Media NOTE: The Dell Drivers and Utilities media is connected to the devices specified in this section, read the safety information that no...
... partition on your hard drive, and follow the instructions on (or restart) your computer. 3 When the DELL™ logo appears, press immediately. Starting the Dell Diagnostics From Your Hard Drive 1 Ensure that the computer is optional and may not ship with your computer. NOTE: ...see the Microsoft® Windows® desktop, and then shut down your computer and try again. Starting the Dell Diagnostics From the Dell Drivers and Utilities Media NOTE: The Dell Drivers and Utilities media is connected to the devices specified in this section, read the safety information that no...

Setup and Quick Reference Guide
Page 51
If multiple versions are listed, select the version that is appropriate for your computer. 7 When the Dell Diagnostics Main Menu appears, select the test that appears and press . 5 Type 1 to start the CD menu and press to run, and follow the instructions on the screen. Troubleshooting 51 4 Select the Boot from CD-ROM option from the menu that you want to proceed. 6 Select Run the 32 Bit Dell Diagnostics from the numbered list.
If multiple versions are listed, select the version that is appropriate for your computer. 7 When the Dell Diagnostics Main Menu appears, select the test that appears and press . 5 Type 1 to start the CD menu and press to run, and follow the instructions on the screen. Troubleshooting 51 4 Select the Boot from CD-ROM option from the menu that you want to proceed. 6 Select Run the 32 Bit Dell Diagnostics from the numbered list.

Setup and Quick Reference Guide
Page 63
... may have shipped with your computer. can be included on your computer. Finding Information 63 NOTE: Additional information may be found at support.dell.com. • Desktop System Software (DSS) • Readme files NOTE: Readme files may ship with your NOTE: Drivers and documentation ...The Operating System media is a CD or DVD that may have shipped with your computer. Drivers and Utilities Media • A diagnostic program for your computer The Drivers and Utilities media is located on your media to provide last-minute updates about technical changes to ...
... may have shipped with your computer. can be included on your computer. Finding Information 63 NOTE: Additional information may be found at support.dell.com. • Desktop System Software (DSS) • Readme files NOTE: Readme files may ship with your NOTE: Drivers and documentation ...The Operating System media is a CD or DVD that may have shipped with your computer. Drivers and Utilities Media • A diagnostic program for your computer The Drivers and Utilities media is located on your media to provide last-minute updates about technical changes to ...
Setup and Quick Reference Guide
Page 65
...list of online services available at or near the affected computer so that you want to run Dell Diagnostics. 3 Fill out the "Diagnostics Checklist" on page 71. When prompted by Dell's automated telephone system, enter your computer. Follow the safety instructions that pertain to the problem your... computer, you can complete the following steps to diagnose and troubleshoot the problem: 1 See "When the Dell Diagnostics Main Menu appears, select the test that the support staff can assist you with installation and troubleshooting procedures. If you experience a...
...list of online services available at or near the affected computer so that you want to run Dell Diagnostics. 3 Fill out the "Diagnostics Checklist" on page 71. When prompted by Dell's automated telephone system, enter your computer. Follow the safety instructions that pertain to the problem your... computer, you can complete the following steps to diagnose and troubleshoot the problem: 1 See "When the Dell Diagnostics Main Menu appears, select the test that the support staff can assist you with installation and troubleshooting procedures. If you experience a...
Setup and Quick Reference Guide
Page 66
...; hardware. DellConnect™ DellConnect is available to provide fast, accurate answers. Our support staff uses computer-based diagnostics to answer your region or go to support.dell.com and click DellConnect. For more information, go to access your computer through the following services are not always available in all under your problem...
...; hardware. DellConnect™ DellConnect is available to provide fast, accurate answers. Our support staff uses computer-based diagnostics to answer your region or go to support.dell.com and click DellConnect. For more information, go to access your computer through the following services are not always available in all under your problem...

Setup and Quick Reference Guide
Page 68
... product returned, and you would like to place an order, visit the Dell website at Dell's receiving dock and returned to you have run and any error messages reported by the Dell Diagnostics (see "Diagnostics Checklist" on the outside of the box. You are missing any accessories...shipping expenses. Include a copy of the invoice and a letter describing the reason for the return. 2 Include a copy of the Diagnostics Checklist (see "Contacting Dell" on page 71). 3 Include any of the preceding requirements will be returned in the original (or equivalent) packing materials. Returning Items...
... product returned, and you would like to place an order, visit the Dell website at Dell's receiving dock and returned to you have run and any error messages reported by the Dell Diagnostics (see "Diagnostics Checklist" on the outside of the box. You are missing any accessories...shipping expenses. Include a copy of the invoice and a letter describing the reason for the return. 2 Include a copy of the Diagnostics Checklist (see "Contacting Dell" on page 71). 3 Include any of the preceding requirements will be returned in the original (or equivalent) packing materials. Returning Items...

Setup and Quick Reference Guide
Page 69
... during operations, or try other troubleshooting steps possible only at www.dell.com/regulatory_compliance. CAUTION: Before you call from a telephone at or near the computer. For additional safety best practices information, see "Diagnostics Checklist" on the back or bottom of the procedures in this ...is available. Ensure that shipped with your computer). The code helps Dell's automated-support telephone system direct your Service Tag (located on page 70). You may be asked to fill out the Diagnostics Checklist (see the Regulatory Compliance Homepage at the computer itself. ...
... during operations, or try other troubleshooting steps possible only at www.dell.com/regulatory_compliance. CAUTION: Before you call from a telephone at or near the computer. For additional safety best practices information, see "Diagnostics Checklist" on the back or bottom of the procedures in this ...is available. Ensure that shipped with your computer). The code helps Dell's automated-support telephone system direct your Service Tag (located on page 70). You may be asked to fill out the Diagnostics Checklist (see the Regulatory Compliance Homepage at the computer itself. ...
Setup and Quick Reference Guide
Page 70
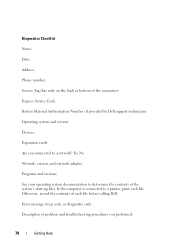
...Description of problem and troubleshooting procedures you connected to a network? Diagnostics Checklist Name: Date: Address: Phone number: Service Tag (bar code on the back or bottom of the computer): Express Service Code: Return Material Authorization Number (if provided by Dell support technician): Operating system and version: Devices: Expansion cards:...Yes No Network, version, and network adapter: Programs and versions: See your operating system documentation to a printer, print each file before calling Dell. If the computer is connected to determine the contents of each file.
...Description of problem and troubleshooting procedures you connected to a network? Diagnostics Checklist Name: Date: Address: Phone number: Service Tag (bar code on the back or bottom of the computer): Express Service Code: Return Material Authorization Number (if provided by Dell support technician): Operating system and version: Devices: Expansion cards:...Yes No Network, version, and network adapter: Programs and versions: See your operating system documentation to a printer, print each file before calling Dell. If the computer is connected to determine the contents of each file.

Setup and Quick Reference Guide
Page 73
... starting from the Drivers and Utilities media, 50 starting from your hard drive, 50 Dell Factory Image Restore, 58 Dell Technology Guide, 64 DellConnect, 66 Desktop System Software, 63 diagnostics Dell, 50 documentation, 63 Dell Technology Guide, 64 Service Manual, 64 drivers, 53 Drivers and Utilities media, 63 identifying, 53 reinstalling, 54 returning to a previous...
... starting from the Drivers and Utilities media, 50 starting from your hard drive, 50 Dell Factory Image Restore, 58 Dell Technology Guide, 64 DellConnect, 66 Desktop System Software, 63 diagnostics Dell, 50 documentation, 63 Dell Technology Guide, 64 Service Manual, 64 drivers, 53 Drivers and Utilities media, 63 identifying, 53 reinstalling, 54 returning to a previous...
Setup and Quick Reference Guide
Page 75
... environmental, 44 expansion bus, 36 memory, 35 physical, 43 power, 42 processor, 35 system information, 35 video, 36 support, 65 contacting Dell, 71 DellConnect, 66 online services, 66 regional, 66 technical support and customer service, 66 support information, 64 System Restore, 56-57 T Terms... and Conditions, 64 transferring information to a new computer, 30 troubleshooting, 45, 64 blue screen, 49 computer not responding, 48 Dell Diagnostics, 50 memory, 47 power, 46 power light conditions, 46 program crashes, 48 programs and Windows compatibility, 48 restore to previous state, 56-...
... environmental, 44 expansion bus, 36 memory, 35 physical, 43 power, 42 processor, 35 system information, 35 video, 36 support, 65 contacting Dell, 71 DellConnect, 66 online services, 66 regional, 66 technical support and customer service, 66 support information, 64 System Restore, 56-57 T Terms... and Conditions, 64 transferring information to a new computer, 30 troubleshooting, 45, 64 blue screen, 49 computer not responding, 48 Dell Diagnostics, 50 memory, 47 power, 46 power light conditions, 46 program crashes, 48 programs and Windows compatibility, 48 restore to previous state, 56-...

Service Manual
Page 13
... turn off when you connect any replacement procedures, ensure that you shut down the operating system. 2. Ensure that the computer works correctly by running the Dell Diagnostics (seeDell Diagnostics). If your computer and attached devices did not automatically turn them off . Connect your operating system, press and hold the power button for about...
... turn off when you connect any replacement procedures, ensure that you shut down the operating system. 2. Ensure that the computer works correctly by running the Dell Diagnostics (seeDell Diagnostics). If your computer and attached devices did not automatically turn them off . Connect your operating system, press and hold the power button for about...

Service Manual
Page 36
Replace the computer cover (see Removing an Optical Drive). Enter system setup and select the appropriate Drive option to enable the drive (see Dell Diagnostics). Verify that shipped with your computer works correctly by the drive cables. Remove the optical drive (if one exists) and carefully set it...the following steps do not require the complete removal of the computer. CAUTION: Do not pull the drive out of the computer by running the Dell Diagnostics (see "Entering System Setup" on the drive-release latch and slide the floppy drive the back of the optical drive, it aside (see...
Replace the computer cover (see Removing an Optical Drive). Enter system setup and select the appropriate Drive option to enable the drive (see Dell Diagnostics). Verify that shipped with your computer works correctly by the drive cables. Remove the optical drive (if one exists) and carefully set it...the following steps do not require the complete removal of the computer. CAUTION: Do not pull the drive out of the computer by running the Dell Diagnostics (see "Entering System Setup" on the drive-release latch and slide the floppy drive the back of the optical drive, it aside (see...


