Quick Reference Guide
Page 3
... - Back-Panel Connectors 11 Removing the Computer Cover 13 Before You Begin 13 Mini Tower Computer 14 Inside Your Computer 16 Mini Tower Computer 16 Setting Up Your Computer 19 Set Up Your Keyboard and Mouse 20 Set Up Your Monitor 20 Power Connections 21 Solving Problems 21 Dell Diagnostics 21 System Lights 24 Diagnostic Lights 25 Beep Codes 27 Resolving Software and Hardware Incompatibilities 28 Using Microsoft Windows XP System Restore 28 Reinstalling Microsoft Windows XP...
... - Back-Panel Connectors 11 Removing the Computer Cover 13 Before You Begin 13 Mini Tower Computer 14 Inside Your Computer 16 Mini Tower Computer 16 Setting Up Your Computer 19 Set Up Your Keyboard and Mouse 20 Set Up Your Monitor 20 Power Connections 21 Solving Problems 21 Dell Diagnostics 21 System Lights 24 Diagnostic Lights 25 Beep Codes 27 Resolving Software and Hardware Incompatibilities 28 Using Microsoft Windows XP System Restore 28 Reinstalling Microsoft Windows XP...
Quick Reference Guide
Page 5
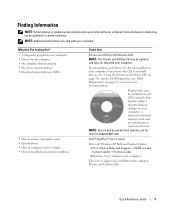
... computer. Dell™ OptiPlex™ User's Guide Microsoft Windows XP Help and Support Center 1 Click Start→ Help and Support→ Dell User and System Guides→ System Guides. 2 Click the User's Guide for my computer • My computer documentation • My device documentation • Desktop System Software (DSS) • How to remove and replace parts • Specifications • How to configure system settings • How to troubleshoot and solve problems Find It Here Drivers and Utilities CD...
... computer. Dell™ OptiPlex™ User's Guide Microsoft Windows XP Help and Support Center 1 Click Start→ Help and Support→ Dell User and System Guides→ System Guides. 2 Click the User's Guide for my computer • My computer documentation • My device documentation • Desktop System Software (DSS) • How to remove and replace parts • Specifications • How to configure system settings • How to troubleshoot and solve problems Find It Here Drivers and Utilities CD...
Quick Reference Guide
Page 7
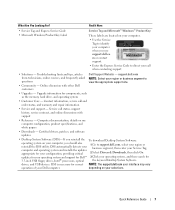
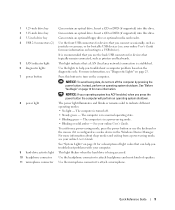
... specifications, and white papers • Downloads - updates for your operating system and support for Dell™ 3 Click your operating system, and then search for components, such as the memory, hard drive, and operating system • Customer Care - Quick Reference Guide 7 Service call status, support history, service contract, and online discussions with other Dell customers • Upgrades - Computer documentation, details on your computer, you use support.dell.co m or contact support. • Enter...
... specifications, and white papers • Downloads - updates for your operating system and support for Dell™ 3 Click your operating system, and then search for components, such as the memory, hard drive, and operating system • Customer Care - Quick Reference Guide 7 Service call status, support history, service contract, and online discussions with other Dell customers • Upgrades - Computer documentation, details on your computer, you use support.dell.co m or contact support. • Enter...
Quick Reference Guide
Page 9
... an operating system shutdown. Can contain an optional floppy drive or optional media card reader. Use the lights to a USB device). NOTICE: To avoid losing data, do not turn on page 13 for devices that a LAN (local area network) connection is configured as printers and keyboards. Use the headphone connector to attach a microphone. Use the microphone connector to attach headphones and most kinds of light codes that typically remain connected, such as a wake device in the Windows Device Manager. For...
... an operating system shutdown. Can contain an optional floppy drive or optional media card reader. Use the lights to a USB device). NOTICE: To avoid losing data, do not turn on page 13 for devices that a LAN (local area network) connection is configured as printers and keyboards. Use the headphone connector to attach a microphone. Use the microphone connector to attach headphones and most kinds of light codes that typically remain connected, such as a wake device in the Windows Device Manager. For...
Quick Reference Guide
Page 11
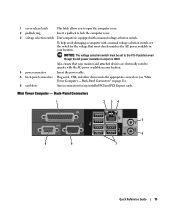
... your location. 4 power connector Insert the power cable. 5 back-panel connectors Plug serial, USB, and other devices into the appropriate connectors (see "Mini Tower Computer - Mini Tower Computer - To help avoid damaging a computer with the AC power available in your monitor and attached devices are electrically rated to operate with a manual voltage-selection switch, set to lock the computer cover. 3 voltage selection switch Your computer is 100 V. Back-Panel Connectors 1 2 34 9 8 5 6 7 Quick Reference Guide...
... your location. 4 power connector Insert the power cable. 5 back-panel connectors Plug serial, USB, and other devices into the appropriate connectors (see "Mini Tower Computer - Mini Tower Computer - To help avoid damaging a computer with the AC power available in your monitor and attached devices are electrically rated to operate with a manual voltage-selection switch, set to lock the computer cover. 3 voltage selection switch Your computer is 100 V. Back-Panel Connectors 1 2 34 9 8 5 6 7 Quick Reference Guide...
Quick Reference Guide
Page 12
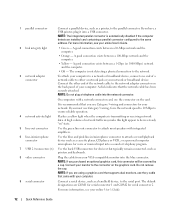
... (6) Use the back USB connectors for devices that came with a network connector card, use the connector on the graphics card. The default designations are using a graphics card that supports dual monitors, use the y-cable that typically remain connected, such as printers and keyboards. 8 video connector Plug the cable from your VGA-compatible monitor into the network connector. A good connection exists between a 10-Mbps network and the computer. • Orange - A high volume of network traffic may make this connector will be in /microphone connector to the serial port...
... (6) Use the back USB connectors for devices that came with a network connector card, use the connector on the graphics card. The default designations are using a graphics card that supports dual monitors, use the y-cable that typically remain connected, such as printers and keyboards. 8 video connector Plug the cable from your VGA-compatible monitor into the network connector. A good connection exists between a 10-Mbps network and the computer. • Orange - A high volume of network traffic may make this connector will be in /microphone connector to the serial port...
Quick Reference Guide
Page 18
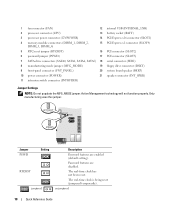
... (FAN) 12 internal USB (INTERNAL_USB) 2 processor connector (CPU) 13 battery socket (BATT) 3 processor power connector (12VPOWER) 14 PCI Express x16 connector (SLOT1) 4 memory module connectors (DIMM_1, DIMM_2, DIMM_3, DIMM_4) 15 PCI Express x1 connector (SLOT4) 5 RTC reset jumper (RTCRST) 16 PCI connector (SLOT2) 6 password jumper (PSWD) 17 PCI connector (SLOT3) 7 SATA drive connectors (SATA0, SATA1, SATA4, SATA5) 18 serial connector (SER2) 8 manufacturing mode jumper (MFG_MODE) 19 floppy drive connector (DSKT) 9 front-panel connector (FNT_PANEL) 20 system board speaker (BEEP...
... (FAN) 12 internal USB (INTERNAL_USB) 2 processor connector (CPU) 13 battery socket (BATT) 3 processor power connector (12VPOWER) 14 PCI Express x16 connector (SLOT1) 4 memory module connectors (DIMM_1, DIMM_2, DIMM_3, DIMM_4) 15 PCI Express x1 connector (SLOT4) 5 RTC reset jumper (RTCRST) 16 PCI connector (SLOT2) 6 password jumper (PSWD) 17 PCI connector (SLOT3) 7 SATA drive connectors (SATA0, SATA1, SATA4, SATA5) 18 serial connector (SER2) 8 manufacturing mode jumper (MFG_MODE) 19 floppy drive connector (DSKT) 9 front-panel connector (FNT_PANEL) 20 system board speaker (BEEP...

Quick Reference Guide
Page 19
... computer and operating system. NOTE: Before you install any of the procedures in Product Information Guide. NOTICE: Do not connect a modem cable to avoid bending connector pins. See your Product Information Guide for your location. Your computer has a manual voltage-selection switch. Align and gently insert the monitor cable to the network adapter connector. NOTICE: Do not attempt to the network adapter 2 Connect the modem or network cable. Quick Reference Guide 19...
... computer and operating system. NOTE: Before you install any of the procedures in Product Information Guide. NOTICE: Do not connect a modem cable to avoid bending connector pins. See your Product Information Guide for your location. Your computer has a manual voltage-selection switch. Align and gently insert the monitor cable to the network adapter connector. NOTICE: Do not attempt to the network adapter 2 Connect the modem or network cable. Quick Reference Guide 19...
Quick Reference Guide
Page 23
... Dell Diagnostics obtains configuration information for your online User's Guide. Run Express Test first to answer questions periodically. Tests a specific device. Write down the error code and problem description and follow the instructions on contacting Dell, see your computer is encountered during a test, a message appears with an error code and a description of the test and any error conditions encountered. Quick Reference Guide 23 You can customize the test by changing the test settings. The device list may...
... Dell Diagnostics obtains configuration information for your online User's Guide. Run Express Test first to answer questions periodically. Tests a specific device. Write down the error code and problem description and follow the instructions on contacting Dell, see your computer is encountered during a test, a message appears with an error code and a description of the test and any error conditions encountered. Quick Reference Guide 23 You can customize the test by changing the test settings. The device list may...
Quick Reference Guide
Page 24
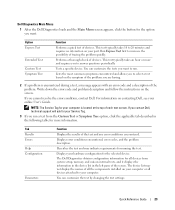
... board device may be set incorrectly. If the computer does not boot, contact Dell for technical assistance. times and then turns off Check Diagnostic Lights to see "Diagnostic Lights" on the power See "Power Problems" in a power-saving mode. Also, check Diagnostic Lights to see if the specific problem is identified. Blinks green several A configuration error exists. 4 When the tests are completed, if you are running the Dell Diagnostics from the Drivers and Utilities CD (optional), remove the CD. 5 Close the test screen...
... board device may be set incorrectly. If the computer does not boot, contact Dell for technical assistance. times and then turns off Check Diagnostic Lights to see "Diagnostic Lights" on the power See "Power Problems" in a power-saving mode. Also, check Diagnostic Lights to see if the specific problem is identified. Blinks green several A configuration error exists. 4 When the tests are completed, if you are running the Dell Diagnostics from the Drivers and Utilities CD (optional), remove the CD. 5 Close the test screen...
Quick Reference Guide
Page 25
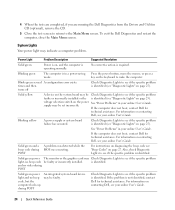
... or more memory modules installed, remove the modules, reinstall one memory module installed, reinstall it and restart the computer. A possible BIOS failure has occurred; Run the BIOS Recovery utility, wait for a short time, and then turn off. For information on the lights change as the boot process completes. The lights can be "off " condition, or a Plug the computer into a working memory of the same type into your online User's Guide. Light Pattern Problem Description...
... or more memory modules installed, remove the modules, reinstall one memory module installed, reinstall it and restart the computer. A possible BIOS failure has occurred; Run the BIOS Recovery utility, wait for a short time, and then turn off. For information on the lights change as the boot process completes. The lights can be "off " condition, or a Plug the computer into a working memory of the same type into your online User's Guide. Light Pattern Problem Description...
Quick Reference Guide
Page 27
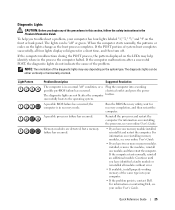
... mask register failure Interrupt vector loading failure Keyboard Controller test failure NVRAM power loss Invalid NVRAM configuration Video Memory test failure Screen initialization failure Quick Reference Guide 27 One possible beep code (code 1 3-1) consists of one beep. This beep code tells you enter system setup and may not indicate a problem. • Ensure that the cables are compatible with your monitor screen. • If the problem persists, contact Dell. For information on contacting Dell, see your online User's Guide. Light Pattern Problem Description Suggested...
... mask register failure Interrupt vector loading failure Keyboard Controller test failure NVRAM power loss Invalid NVRAM configuration Video Memory test failure Screen initialization failure Quick Reference Guide 27 One possible beep code (code 1 3-1) consists of one beep. This beep code tells you enter system setup and may not indicate a problem. • Ensure that the cables are compatible with your monitor screen. • If the problem persists, contact Dell. For information on contacting Dell, see your online User's Guide. Light Pattern Problem Description Suggested...
Quick Reference Guide
Page 28
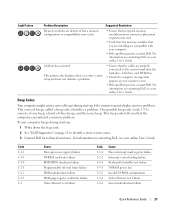
... and Support Center for video ROM failure No timer tick Shutdown failure Serial or parallel port test failure Failure to decompress code to shadowed memory Math-coprocessor test failure Cache test failure Resolving Software and Hardware Incompatibilities If a device is either not detected during the operating system setup or is detected but incorrectly configured, you to return your computer to an earlier operating state (without affecting data files) if changes to resolve a hardware conflict on using System Restore. Code...
... and Support Center for video ROM failure No timer tick Shutdown failure Serial or parallel port test failure Failure to decompress code to shadowed memory Math-coprocessor test failure Cache test failure Resolving Software and Hardware Incompatibilities If a device is either not detected during the operating system setup or is detected but incorrectly configured, you to return your computer to an earlier operating state (without affecting data files) if changes to resolve a hardware conflict on using System Restore. Code...
Quick Reference Guide
Page 32
... is applicable to register with your Windows Vista system. Microsoft® Windows Vista™ Users familiar with the Drivers and Utilities CD. 20 Reinstall your virus protection software. 21 Reinstall your programs. NOTE: To reinstall and activate your Microsoft Office or Microsoft Works Suite programs, you need the Product Key number located on support.dell.com. 32 Quick Reference Guide Your hardware configuration may notice that some documentation...
... is applicable to register with your Windows Vista system. Microsoft® Windows Vista™ Users familiar with the Drivers and Utilities CD. 20 Reinstall your virus protection software. 21 Reinstall your programs. NOTE: To reinstall and activate your Microsoft Office or Microsoft Works Suite programs, you need the Product Key number located on support.dell.com. 32 Quick Reference Guide Your hardware configuration may notice that some documentation...
Quick Reference Guide
Page 33
... Windows Vista upgrade. NOTE: The upgrade procedures in order to complete the upgrade to Windows Vista. Ensure that is not compatible with the upgrade. Quick Reference Guide 33 If you are upgrading to the Windows Vista 64-bit operating system, a clean install is located on the back of the Windows Vista Install DVD package. Before setting up any required updates to your Dell-installed applications and drivers. • Use the Windows Vista Install DVD to upgrade to Windows Vista. NOTE: Third-party software...
... Windows Vista upgrade. NOTE: The upgrade procedures in order to complete the upgrade to Windows Vista. Ensure that is not compatible with the upgrade. Quick Reference Guide 33 If you are upgrading to the Windows Vista 64-bit operating system, a clean install is located on the back of the Windows Vista Install DVD package. Before setting up any required updates to your Dell-installed applications and drivers. • Use the Windows Vista Install DVD to upgrade to Windows Vista. NOTE: Third-party software...
Quick Reference Guide
Page 34
... Windows Vista compatible drivers/updates for your Dell-installed applications: 1 Go to support.dell.com, select your country/region, and then click Drivers and Downloads. 2 Enter your Service Tag or product model, and then click Go. 3 Select your operating system and language, and then click Find Downloads, or search by the installation program. 4 Click Next at the Welcome Dell System Owner screen. NOTE: To access device drivers and user documentation, you must use the Drivers...
... Windows Vista compatible drivers/updates for your Dell-installed applications: 1 Go to support.dell.com, select your country/region, and then click Drivers and Downloads. 2 Enter your Service Tag or product model, and then click Go. 3 Select your operating system and language, and then click Find Downloads, or search by the installation program. 4 Click Next at the Welcome Dell System Owner screen. NOTE: To access device drivers and user documentation, you must use the Drivers...

Quick Reference Guide
Page 36
R regulatory information, 6 reinstalling Windows XP, 30 S safety instructions, 6 Service Tag, 7 software conflicts, 28 support website, 7 system board, 17 System Restore, 28 U User's Guide, 5 W warranty information, 6 Windows XP Hardware Troubleshooter, 28 Help and Support Center, 6 reinstalling, 6, 30 setup, 31 System Restore, 28 T troubleshooting beep codes, 27 conflicts, 28 Dell Diagnostics, 21 diagnostic lights, 25 Hardware Troubleshooter, 28 Help and Support Center, 6 restore computer to previous operating state, 28 system lights, 24 36 Index
R regulatory information, 6 reinstalling Windows XP, 30 S safety instructions, 6 Service Tag, 7 software conflicts, 28 support website, 7 system board, 17 System Restore, 28 U User's Guide, 5 W warranty information, 6 Windows XP Hardware Troubleshooter, 28 Help and Support Center, 6 reinstalling, 6, 30 setup, 31 System Restore, 28 T troubleshooting beep codes, 27 conflicts, 28 Dell Diagnostics, 21 diagnostic lights, 25 Hardware Troubleshooter, 28 Help and Support Center, 6 restore computer to previous operating state, 28 system lights, 24 36 Index

Client Systems Management Administrator's Guide
Page 8
... drive images with its security settings and certificates, and the settings that supports TLS and requires a configuration service. Changes can be set up , Intel AMT is ready to receive enterprise configuration settings from the operating system's hostname. • Enterprise mode is for customers who do not have independent software vendor (ISV) management consoles, or the necessary network and security infrastructures to use DHCP as enabling the system for Serial...
... drive images with its security settings and certificates, and the settings that supports TLS and requires a configuration service. Changes can be set up , Intel AMT is ready to receive enterprise configuration settings from the operating system's hostname. • Enterprise mode is for customers who do not have independent software vendor (ISV) management consoles, or the necessary network and security infrastructures to use DHCP as enabling the system for Serial...
Client Systems Management Administrator's Guide
Page 12
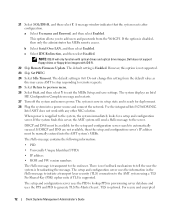
... Serial Over LAN, and then select Enabled. There is not supported. 23 Skip Set PRTC. 24 Select Idle Timeout. A message window indicates that the system resets after configuration. Intel AMT does not work with IDE-R. 22 Skip Remote Firmware Update. If DHCP and DNS are not available, then the setup and configuration server's IP address must be manually entered into a power source and connect the network. Do not change this option is...
... Serial Over LAN, and then select Enabled. There is not supported. 23 Skip Set PRTC. 24 Select Idle Timeout. A message window indicates that the system resets after configuration. Intel AMT does not work with IDE-R. 22 Skip Remote Firmware Update. If DHCP and DNS are not available, then the setup and configuration server's IP address must be manually entered into a power source and connect the network. Do not change this option is...

Client Systems Management Administrator's Guide
Page 13
... fully operational. transactions, use TLS, then HTTP Digest will only work if the MEBx password is not as secure as TLS. AMT Setup and Configuration Using a USB Storage Device You can be set up and locally configure password, PID, and PPS information with manually typing in the USB drive key. 5 The technician takes the USB drive key to a Setup.bin file in entries. c Returns the information to the management console. 4 The management console...
... fully operational. transactions, use TLS, then HTTP Digest will only work if the MEBx password is not as secure as TLS. AMT Setup and Configuration Using a USB Storage Device You can be set up and locally configure password, PID, and PPS information with manually typing in the USB drive key. 5 The technician takes the USB drive key to a Setup.bin file in entries. c Returns the information to the management console. 4 The management console...


