
Quick Reference
Page 2
... or loss of data and tells you make better use of your computer. Trademarks used in this text: Dell, the DELL logo, Inspiron, Dell Precision, Dimension, OptiPlex, Latitude, PowerEdge, PowerVault, PowerApp, and Dell OpenManage are trademarks of Dell Inc. Other trademarks and trade names may be used in trademarks and trade names other than its own...
... or loss of data and tells you make better use of your computer. Trademarks used in this text: Dell, the DELL logo, Inspiron, Dell Precision, Dimension, OptiPlex, Latitude, PowerEdge, PowerVault, PowerApp, and Dell OpenManage are trademarks of Dell Inc. Other trademarks and trade names may be used in trademarks and trade names other than its own...
Quick Reference
Page 3
Contents Finding Information 5 Before You Begin 10 Before Working Inside Your Computer 10 Adding and Replacing Parts 11 Setting Up Your Computer 13 Installing Your Computer in an Enclosure . . . . . 13 Setting Up a Home and Office Network 15 Connecting to a Network Adapter 15 Network Setup 16 Connecting to the Internet 17 Moving Information to a New Computer 19 Setting Up a Printer 23 Connecting Two Monitors 24 Power Protection Devices 26 Desktop Computer 28 Front View 28 Back View 30 Back Panel Connectors 31 Removing the Computer Cover 33 Inside View of Your Computer 35 ...
Contents Finding Information 5 Before You Begin 10 Before Working Inside Your Computer 10 Adding and Replacing Parts 11 Setting Up Your Computer 13 Installing Your Computer in an Enclosure . . . . . 13 Setting Up a Home and Office Network 15 Connecting to a Network Adapter 15 Network Setup 16 Connecting to the Internet 17 Moving Information to a New Computer 19 Setting Up a Printer 23 Connecting Two Monitors 24 Power Protection Devices 26 Desktop Computer 28 Front View 28 Back View 30 Back Panel Connectors 31 Removing the Computer Cover 33 Inside View of Your Computer 35 ...

Quick Reference
Page 4
System Board Components 36 Replacing the Computer Cover 37 Mini Tower Computer 38 Front View 38 Back View 40 Back Panel Connectors 41 Removing the Computer Cover 43 Inside View of Your Computer 45 System Board Components 46 Replacing the Computer Cover 47 Solving Problems 47 Dell Diagnostics 48 Power Lights 51 Beep Codes 53 System Messages 54 Diagnostic Lights 56 Clearing Forgotten Passwords 60 Clearing CMOS Settings 62 Flashing the BIOS 63 Index 65 4 Contents
System Board Components 36 Replacing the Computer Cover 37 Mini Tower Computer 38 Front View 38 Back View 40 Back Panel Connectors 41 Removing the Computer Cover 43 Inside View of Your Computer 45 System Board Components 46 Replacing the Computer Cover 47 Solving Problems 47 Dell Diagnostics 48 Power Lights 51 Beep Codes 53 System Messages 54 Diagnostic Lights 56 Clearing Forgotten Passwords 60 Clearing CMOS Settings 62 Flashing the BIOS 63 Index 65 4 Contents
Quick Reference
Page 5
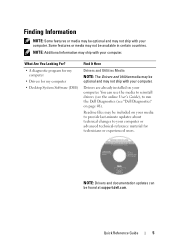
...8226; Desktop System Software (DSS) Find It Here Drivers and Utilities Media NOTE: The Drivers and Utilities media may not be found at support.dell.com. Readme files may be optional and may ship with your computer. What Are You Looking For? • A diagnostic program for my...users. NOTE: Drivers and documentation updates can use the media to reinstall drivers (see the online User's Guide), to run the Dell Diagnostics (see "Dell Diagnostics" on your media to provide last-minute updates about technical changes to your computer. Quick Reference Guide 5 You can be ...
...8226; Desktop System Software (DSS) Find It Here Drivers and Utilities Media NOTE: The Drivers and Utilities media may not be found at support.dell.com. Readme files may be optional and may ship with your computer. What Are You Looking For? • A diagnostic program for my...users. NOTE: Drivers and documentation updates can use the media to reinstall drivers (see the online User's Guide), to run the Dell Diagnostics (see "Dell Diagnostics" on your media to provide last-minute updates about technical changes to your computer. Quick Reference Guide 5 You can be ...
Quick Reference
Page 6
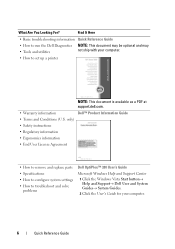
...Quick Reference Guide • How to run the Dell Diagnostics NOTE: This document may be optional and may • Tools and utilities not ship with your computer. • How to troubleshoot and solve problems Dell OptiPlex™ 330 User's Guide Microsoft Windows Help and Support Center 1... Click the Windows Vista Start button→ Help and Support→ Dell User and System Guides→ System Guides. 2 Click the User's Guide...
...Quick Reference Guide • How to run the Dell Diagnostics NOTE: This document may be optional and may • Tools and utilities not ship with your computer. • How to troubleshoot and solve problems Dell OptiPlex™ 330 User's Guide Microsoft Windows Help and Support Center 1... Click the Windows Vista Start button→ Help and Support→ Dell User and System Guides→ System Guides. 2 Click the User's Guide...
Quick Reference
Page 7
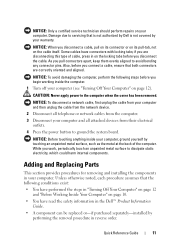
...: As an increased security measure, the newly designed Microsoft Windows license label incorporates a missing portion or "hole" to direct your computer when you use support.dell.com or contact support. • Enter the Express Service Code to discourage removal of the label.
...: As an increased security measure, the newly designed Microsoft Windows license label incorporates a missing portion or "hole" to direct your computer when you use support.dell.com or contact support. • Enter the Express Service Code to discourage removal of the label.
Quick Reference
Page 8
... updates 8 Quick Reference Guide Contact information, service call status and support history, service contract, online discussions with other Dell customers • Upgrades - Service call and order status, warranty, and repair information • Service and support - Online discussion with ...technical support • Dell Technical Update Service - Upgrade information for your region or business segment and online courses, frequently to view the appropriate support...
... updates 8 Quick Reference Guide Contact information, service call status and support history, service contract, online discussions with other Dell customers • Upgrades - Service call and order status, warranty, and repair information • Service and support - Online discussion with ...technical support • Dell Technical Update Service - Upgrade information for your region or business segment and online courses, frequently to view the appropriate support...
Quick Reference
Page 9
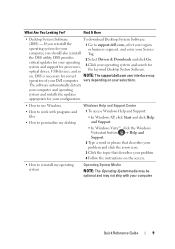
...Downloads and click Go. 3 Click your operating system and search for correct NOTE: The support.dell.com user interface may operation of your Service computer, you reinstall the 1 Go to support.dell.com, select your region operating system for your configuration. • How to use Windows ... The software automatically detects your computer and operating system and installs the updates appropriate for your or business segment, and enter your Dell computer. vary depending on . If you should also reinstall Tag. on your computer. Find It Here • Desktop System ...
...Downloads and click Go. 3 Click your operating system and search for correct NOTE: The support.dell.com user interface may operation of your Service computer, you reinstall the 1 Go to support.dell.com, select your region operating system for your configuration. • How to use Windows ... The software automatically detects your computer and operating system and installs the updates appropriate for your or business segment, and enter your Dell computer. vary depending on . If you should also reinstall Tag. on your computer. Find It Here • Desktop System ...

Quick Reference
Page 10
To reinstall your computer from potential damage and to help protect your operating system, use the Drivers and Utilities disc to ensure your computer. NOTE: The color of the procedures in this section, follow the safety instructions in the Product Information Guide. CAUTION: Before you reinstall your operating system, use the Operating System disc, and see the online User's Guide. Do not touch the components or contacts on the operating system you ordered. Find It Here The operating system is located on your own personal safety. NOTICE: Handle components and cards ...
To reinstall your computer from potential damage and to help protect your operating system, use the Drivers and Utilities disc to ensure your computer. NOTE: The color of the procedures in this section, follow the safety instructions in the Product Information Guide. CAUTION: Before you reinstall your operating system, use the Operating System disc, and see the online User's Guide. Do not touch the components or contacts on the operating system you ordered. Find It Here The operating system is located on your own personal safety. NOTICE: Handle components and cards ...
Quick Reference
Page 11
...apply power to dissipate static electricity, which could harm internal components. Unless otherwise noted, each procedure assumes that is not authorized by Dell is not covered by your computer, ground yourself by performing the removal procedure in on the cable itself. Quick Reference Guide 11...perform repairs on your computer (see "Turning Off Your Computer" on page 12). Some cables have read the safety information in the Dell™ Product Information Guide. • A component can be replaced or-if purchased separately-installed by touching an unpainted metal surface, ...
...apply power to dissipate static electricity, which could harm internal components. Unless otherwise noted, each procedure assumes that is not authorized by Dell is not covered by your computer, ground yourself by performing the removal procedure in on the cable itself. Quick Reference Guide 11...perform repairs on your computer (see "Turning Off Your Computer" on page 12). Some cables have read the safety information in the Dell™ Product Information Guide. • A component can be replaced or-if purchased separately-installed by touching an unpainted metal surface, ...
Quick Reference
Page 12
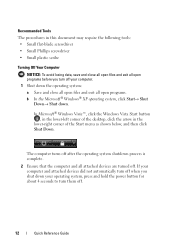
If your computer and attached devices did not automatically turn them off. 12 Quick Reference Guide Recommended Tools The procedures in the lower-right corner of the Start menu as shown below, and then click Shut Down. In Microsoft® Windows Vista™, click the Windows Vista Start button , in the lower-left corner of the desktop, click the arrow in this document may require the following tools: • Small flat-blade screwdriver • Small Phillips screwdriver • Small plastic scribe Turning Off Your Computer NOTICE: To avoid losing data, save and close all open ...
If your computer and attached devices did not automatically turn them off. 12 Quick Reference Guide Recommended Tools The procedures in the lower-right corner of the Start menu as shown below, and then click Shut Down. In Microsoft® Windows Vista™, click the Windows Vista Start button , in the lower-left corner of the desktop, click the arrow in this document may require the following tools: • Small flat-blade screwdriver • Small Phillips screwdriver • Small plastic scribe Turning Off Your Computer NOTICE: To avoid losing data, save and close all open ...

Quick Reference
Page 13
Setting Up Your Computer Installing Your Computer in an Enclosure Installing your computer in this manual reflects the maximum ambient operating temperature. For details about your computer's specifications, see the online User's Guide. • Leave a 10.2 cm (4 in an enclosure. Follow the guidelines below when installing your computer in an enclosure: NOTICE: The operating temperature specifications indicated in an enclosure can restrict the airflow and impact your computer's performance, possibly causing it to 18°F) temperature margin before you reach your computer's ...
Setting Up Your Computer Installing Your Computer in an Enclosure Installing your computer in this manual reflects the maximum ambient operating temperature. For details about your computer's specifications, see the online User's Guide. • Leave a 10.2 cm (4 in an enclosure. Follow the guidelines below when installing your computer in an enclosure: NOTICE: The operating temperature specifications indicated in an enclosure can restrict the airflow and impact your computer's performance, possibly causing it to 18°F) temperature margin before you reach your computer's ...

Quick Reference
Page 14
• If your computer is installed in a corner on a desk or under a desk, leave at least 5.1 cm (2 in an enclosure that does not allow airflow. NOTICE: Do not install your computer's performance, possibly causing it to permit the airflow required for proper ventilation. Restricting the airflow impacts your computer in ) clearance from the back of the computer to the wall to overheat. 14 Quick Reference Guide
• If your computer is installed in a corner on a desk or under a desk, leave at least 5.1 cm (2 in an enclosure that does not allow airflow. NOTICE: Do not install your computer's performance, possibly causing it to permit the airflow required for proper ventilation. Restricting the airflow impacts your computer in ) clearance from the back of the computer to the wall to overheat. 14 Quick Reference Guide

Quick Reference
Page 15
Do not plug a network cable into a telephone wall jack. 1 Connect the network cable to the network adapter connector on the computer. Quick Reference Guide 15 Insert the cable until it clicks into place, and then gently pull it to ensure that it is secure. 2 Connect the other end of the network cable to a Network Adapter To connect a network cable: NOTE: Plug the network cable into the modem connector on the back of your computer. Do not plug the network cable into the network adapter connector on the computer. Setting Up a Home and Office Network Connecting to a network device....
Do not plug a network cable into a telephone wall jack. 1 Connect the network cable to the network adapter connector on the computer. Quick Reference Guide 15 Insert the cable until it clicks into place, and then gently pull it to ensure that it is secure. 2 Connect the other end of the network cable to a Network Adapter To connect a network cable: NOTE: Plug the network cable into the modem connector on the back of your computer. Do not plug the network cable into the network adapter connector on the computer. Setting Up a Home and Office Network Connecting to a network device....

Quick Reference
Page 16
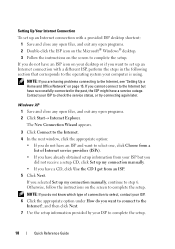
NOTE: Selecting the connection method This computer connects directly to the Internet enables the integrated firewall provided with Windows XP Service Pack 1 (SP1) or later. 4 Complete the checklist and required preparations. 5 Return to All Programs→ Accessories→ Communications, and then click Network Setup Wizard. 2 On the Network Setup Wizard welcome screen, click Next. 3 Click Checklist for creating a network. network adapter connector network adapter connector on computer network device network cable Network Setup Windows XP The Microsoft® Windows® XP operating...
NOTE: Selecting the connection method This computer connects directly to the Internet enables the integrated firewall provided with Windows XP Service Pack 1 (SP1) or later. 4 Complete the checklist and required preparations. 5 Return to All Programs→ Accessories→ Communications, and then click Network Setup Wizard. 2 On the Network Setup Wizard welcome screen, click Next. 3 Click Checklist for creating a network. network adapter connector network adapter connector on computer network device network cable Network Setup Windows XP The Microsoft® Windows® XP operating...

Quick Reference
Page 17
To connect to the Internet NOTE: ISPs and ISP offerings vary by country. Quick Reference Guide 17 With a DSL connection, you can access the Internet and use your telephone on the same line simultaneously. • Cable modem connections that provide high-speed Internet access through your local cable TV line. • Satellite modem connections that provide high-speed Internet access through a satellite television system. • Dial-up connections are considerably slower than DSL and cable (or satellite) modem connections. • Wireless LAN connections that provide Internet ...
To connect to the Internet NOTE: ISPs and ISP offerings vary by country. Quick Reference Guide 17 With a DSL connection, you can access the Internet and use your telephone on the same line simultaneously. • Cable modem connections that provide high-speed Internet access through your local cable TV line. • Satellite modem connections that provide high-speed Internet access through a satellite television system. • Dial-up connections are considerably slower than DSL and cable (or satellite) modem connections. • Wireless LAN connections that provide Internet ...
Quick Reference
Page 18
The New Connection Wizard appears. 3 Click Connect to the Internet. 4 In the next window, click the appropriate option: • If you do not have an ISP and want to select one, click Choose from a list of connection to select, contact your ISP to complete the setup. 18 Quick Reference Guide Contact your computer is using. If you do not have a CD, click Use the CD I got from your ISP but have successfully connected in the following section that corresponds to the operating system your ISP to complete the setup. Windows XP 1 Save and close any open files, and exit any ...
The New Connection Wizard appears. 3 Click Connect to the Internet. 4 In the next window, click the appropriate option: • If you do not have an ISP and want to select one, click Choose from a list of connection to select, contact your ISP to complete the setup. 18 Quick Reference Guide Contact your computer is using. If you do not have a CD, click Use the CD I got from your ISP but have successfully connected in the following section that corresponds to the operating system your ISP to complete the setup. Windows XP 1 Save and close any open files, and exit any ...

Quick Reference
Page 19
If you get one computer to another-for example, from an old computer to a new computer. The Connect to the Internet window appears. 4 Click either Broadband (PPPoE) or Dial-up, depending on the screen and use a dial-up if you transfer files and other data from a source computer to the operating system that your ISP to the Internet. Microsoft® Windows® XP (Optional) The Microsoft Windows XP operating system provides the Files and Settings Transfer Wizard to move data from one . 1 Save and close any open files, and exit any open programs. 2 Click the Windows Vista Start ...
If you get one computer to another-for example, from an old computer to a new computer. The Connect to the Internet window appears. 4 Click either Broadband (PPPoE) or Dial-up, depending on the screen and use a dial-up if you transfer files and other data from a source computer to the operating system that your ISP to the Internet. Microsoft® Windows® XP (Optional) The Microsoft Windows XP operating system provides the Files and Settings Transfer Wizard to move data from one . 1 Save and close any open files, and exit any open programs. 2 Click the Windows Vista Start ...

Quick Reference
Page 20
This information may not be available in Windows XP. screen, click I /O) ports of the two computers. This media is this? To prepare a new computer for transfer to the new computer. screen, click New Computer→ Next. 4 On the Do you have a Windows XP CD? Do not click Next at this process or you can create a wizard disk with certain computers. For instructions on removable media, such as setting up a direct cable connection between two computers, see Microsoft Knowledge Base Article #305621, titled How to the input/output (I will use the optional Operating System media ...
This information may not be available in Windows XP. screen, click I /O) ports of the two computers. This media is this? To prepare a new computer for transfer to the new computer. screen, click New Computer→ Next. 4 On the Do you have a Windows XP CD? Do not click Next at this process or you can create a wizard disk with certain computers. For instructions on removable media, such as setting up a direct cable connection between two computers, see Microsoft Knowledge Base Article #305621, titled How to the input/output (I will use the optional Operating System media ...
Quick Reference
Page 21
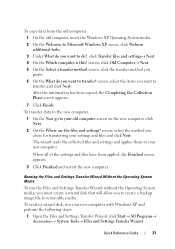
After the information has been copied, the Completing the Collection Phase screen appears. 7 Click Finish. When all of the settings and files have been applied, the Finished screen appears. 3 Click Finished and restart the new computer. Running the Files and Settings Transfer Wizard Without the Operating System Media To run the Files and Settings Transfer Wizard without the Operating System media, you must create a wizard disk that will allow you want to do?, click Transfer files and settings→ Next. 4 On the Which computer is this? To copy data from the old computer: 1 On the old ...
After the information has been copied, the Completing the Collection Phase screen appears. 7 Click Finish. When all of the settings and files have been applied, the Finished screen appears. 3 Click Finished and restart the new computer. Running the Files and Settings Transfer Wizard Without the Operating System Media To run the Files and Settings Transfer Wizard without the Operating System media, you must create a wizard disk that will allow you want to do?, click Transfer files and settings→ Next. 4 On the Which computer is this? To copy data from the old computer: 1 On the old ...
