
User Guide
Page 2
... own. All rights reserved. DLP and DLP logo are trademarks of your projector. A00 NOTICE: A NOTICE indicates either potential damage to avoid the problem. Microsoft and Windows are trademarks of Dell Inc. Dell Inc. Reproduction of these materials in any proprietary interest in this document to... refer to change without the written permission of Dell Inc.; Model M410HD December 2009 Rev. is subject to either trademarks or registered trademarks of data and tells you make better use ...
... own. All rights reserved. DLP and DLP logo are trademarks of your projector. A00 NOTICE: A NOTICE indicates either potential damage to avoid the problem. Microsoft and Windows are trademarks of Dell Inc. Dell Inc. Reproduction of these materials in any proprietary interest in this document to... refer to change without the written permission of Dell Inc.; Model M410HD December 2009 Rev. is subject to either trademarks or registered trademarks of data and tells you make better use ...
User Guide
Page 3
... Dell Projector 5 About Your Projector 6 2 Connecting Your Projector 8 Connecting to a Computer 9 Connecting a Computer Using a VGA Cable 9 Connecting a DVD Player 10 Connecting a DVD Player Using an S-video Cable . . . 10 Connecting a DVD Player Using a Composite Video Cable 11 Connecting a DVD Player Using a Component Video Cable 12 Connecting a DVD Player Using an HDMI Cable. . . . . . 13 3 Using Your Projector...
... Dell Projector 5 About Your Projector 6 2 Connecting Your Projector 8 Connecting to a Computer 9 Connecting a Computer Using a VGA Cable 9 Connecting a DVD Player 10 Connecting a DVD Player Using an S-video Cable . . . 10 Connecting a DVD Player Using a Composite Video Cable 11 Connecting a DVD Player Using a Component Video Cable 12 Connecting a DVD Player Using an HDMI Cable. . . . . . 13 3 Using Your Projector...
User Guide
Page 4
Using the Control Panel 18 Using the Remote Control 21 Installing the Remote Control Batteries 24 Operating Range With Remote Control 25 Using the On-Screen Display 26 Main Menu 26 AUTO-ADJUST 26 INPUT SELECT 27 PICTURE (in PC Mode 28 PICTURE (in Video Mode 28 DISPLAY (in PC Mode 30 DISPLAY (in Video Mode 31 LAMP 32 SET UP 32 INFORMATION 34 OTHERS 34 4 Troubleshooting Your Projector 41 Guiding Signals 45 Changing the Lamp 47 5 Specifications 49 6 Contacting Dell 53 7 Appendix: Glossary 54 4 Contents
Using the Control Panel 18 Using the Remote Control 21 Installing the Remote Control Batteries 24 Operating Range With Remote Control 25 Using the On-Screen Display 26 Main Menu 26 AUTO-ADJUST 26 INPUT SELECT 27 PICTURE (in PC Mode 28 PICTURE (in Video Mode 28 DISPLAY (in PC Mode 30 DISPLAY (in Video Mode 31 LAMP 32 SET UP 32 INFORMATION 34 OTHERS 34 4 Troubleshooting Your Projector 41 Guiding Signals 45 Changing the Lamp 47 5 Specifications 49 6 Contacting Dell 53 7 Appendix: Glossary 54 4 Contents
User Guide
Page 5
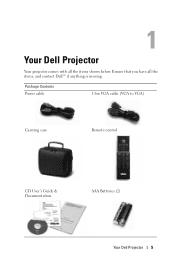
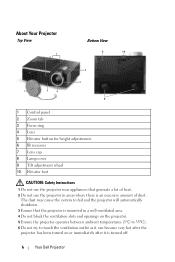
Package Contents Power cable 1.8m VGA cable (VGA to VGA) Carrying case Remote control CD User's Guide & Documentation AAA Batteries (2) Your Dell Projector 5 1 Your Dell Projector Your projector comes with all the items, and contact Dell™ if anything is missing. Ensure that you have all the items shown below.
Package Contents Power cable 1.8m VGA cable (VGA to VGA) Carrying case Remote control CD User's Guide & Documentation AAA Batteries (2) Your Dell Projector 5 1 Your Dell Projector Your projector comes with all the items, and contact Dell™ if anything is missing. Ensure that you have all the items shown below.
User Guide
Page 6
... 9 Tilt adjustment wheel 10 Elevator foot CAUTION: Safety Instructions 1 Do not use the projector near appliances that the projector is mounted in areas where there is turned off. 6 Your Dell Projector The dust may cause the system to fail and the projector will automatically shutdown. 3 Ensure that generate a lot of heat. 2 Do not use the...
... 9 Tilt adjustment wheel 10 Elevator foot CAUTION: Safety Instructions 1 Do not use the projector near appliances that the projector is mounted in areas where there is turned off. 6 Your Dell Projector The dust may cause the system to fail and the projector will automatically shutdown. 3 Ensure that generate a lot of heat. 2 Do not use the...

User Guide
Page 7
7 Do not look into the lens while the projector is on as it may cause the object to your eyes. 8 Do not place any objects near or in front of the projector or cover its lens while the projector is shipped with your projector. NOTE: For more information, see the Safety Information that is on as the heat may cause injury to melt or burn. Your Dell Projector 7
7 Do not look into the lens while the projector is on as it may cause the object to your eyes. 8 Do not place any objects near or in front of the projector or cover its lens while the projector is shipped with your projector. NOTE: For more information, see the Safety Information that is on as the heat may cause injury to melt or burn. Your Dell Projector 7
User Guide
Page 8
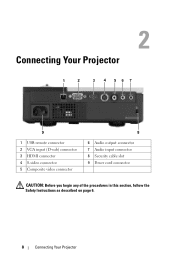
2 Connecting Your Projector 1 2 3 4 56 7 9 1 USB remote connector 2 VGA input (D-sub) connector 3 HDMI connector 4 S-video connector 5 Composite video connector 8 6 Audio output connector 7 Audio input connector 8 Security cable slot 9 Power cord connector CAUTION: Before you begin any of the procedures in this section, follow the Safety Instructions as described on page 6. 8 Connecting Your Projector
2 Connecting Your Projector 1 2 3 4 56 7 9 1 USB remote connector 2 VGA input (D-sub) connector 3 HDMI connector 4 S-video connector 5 Composite video connector 8 6 Audio output connector 7 Audio input connector 8 Security cable slot 9 Power cord connector CAUTION: Before you begin any of the procedures in this section, follow the Safety Instructions as described on page 6. 8 Connecting Your Projector
User Guide
Page 9
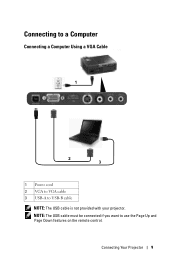
Connecting to a Computer Connecting a Computer Using a VGA Cable 1 2 3 1 Power cord 2 VGA to VGA cable 3 USB-A to use the Page Up and Page Down features on the remote control. Connecting Your Projector 9 NOTE: The USB cable must be connected if you want to USB-B cable NOTE: The USB cable is not provided with your projector.
Connecting to a Computer Connecting a Computer Using a VGA Cable 1 2 3 1 Power cord 2 VGA to VGA cable 3 USB-A to use the Page Up and Page Down features on the remote control. Connecting Your Projector 9 NOTE: The USB cable must be connected if you want to USB-B cable NOTE: The USB cable is not provided with your projector.
User Guide
Page 10
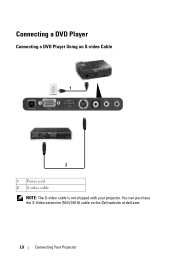
You can purchase the S-Video extension (50 ft/100 ft) cable on the Dell website at dell.com. 10 Connecting Your Projector Connecting a DVD Player Connecting a DVD Player Using an S-video Cable 1 2 1 Power cord 2 S-video cable NOTE: The S-video cable is not shipped with your projector.
You can purchase the S-Video extension (50 ft/100 ft) cable on the Dell website at dell.com. 10 Connecting Your Projector Connecting a DVD Player Connecting a DVD Player Using an S-video Cable 1 2 1 Power cord 2 S-video cable NOTE: The S-video cable is not shipped with your projector.
User Guide
Page 11
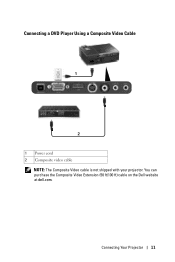
Connecting a DVD Player Using a Composite Video Cable 1 2 1 Power cord 2 Composite video cable NOTE: The Composite Video cable is not shipped with your projector. You can purchase the Composite Video Extension (50 ft/100 ft) cable on the Dell website at dell.com. Connecting Your Projector 11
Connecting a DVD Player Using a Composite Video Cable 1 2 1 Power cord 2 Composite video cable NOTE: The Composite Video cable is not shipped with your projector. You can purchase the Composite Video Extension (50 ft/100 ft) cable on the Dell website at dell.com. Connecting Your Projector 11
User Guide
Page 12
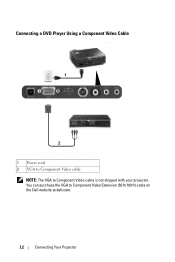
You can purchase the VGA to Component Video cable is not shipped with your projector. Connecting a DVD Player Using a Component Video Cable 1 2 1 Power cord 2 VGA to Component Video cable NOTE: The VGA to Component Video Extension (50 ft/100 ft) cable on the Dell website at dell.com. 12 Connecting Your Projector
You can purchase the VGA to Component Video cable is not shipped with your projector. Connecting a DVD Player Using a Component Video Cable 1 2 1 Power cord 2 VGA to Component Video cable NOTE: The VGA to Component Video Extension (50 ft/100 ft) cable on the Dell website at dell.com. 12 Connecting Your Projector
User Guide
Page 13
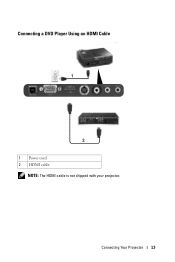
Connecting Your Projector 13 Connecting a DVD Player Using an HDMI Cable 1 2 1 Power cord 2 HDMI cable NOTE: The HDMI cable is not shipped with your projector.
Connecting Your Projector 13 Connecting a DVD Player Using an HDMI Cable 1 2 1 Power cord 2 HDMI cable NOTE: The HDMI cable is not shipped with your projector.
User Guide
Page 14
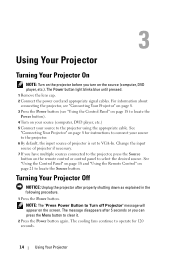
... "Using the Control Panel" on page 18 to locate the Power button). 4 Turn on page 8 for 120 seconds. 14 Using Your Projector NOTE: The "Press Power Button to Turn off Projector" message will appear on page 21 to locate the Source button. The cooling fans continue to operate for instructions to connect... necessary. 7 If you can press the Menu button to clear it. 2 Press the Power button again. Change the input source of projector is set to VGA-In. See "Using the Control Panel" on page 18 and "Using the Remote Control" on the screen. The Power button light ...
... "Using the Control Panel" on page 18 to locate the Power button). 4 Turn on page 8 for 120 seconds. 14 Using Your Projector NOTE: The "Press Power Button to Turn off Projector" message will appear on page 21 to locate the Source button. The cooling fans continue to operate for instructions to connect... necessary. 7 If you can press the Menu button to clear it. 2 Press the Power button again. Change the input source of projector is set to VGA-In. See "Using the Control Panel" on page 18 and "Using the Remote Control" on the screen. The Power button light ...
User Guide
Page 15
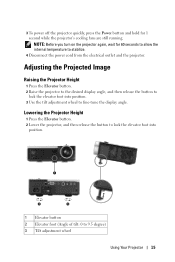
... the elevator foot into position. 3 Use the tilt adjustment wheel to 9.5 degree) 3 Tilt adjustment wheel Using Your Projector 15 3 To power off the projector quickly, press the Power button and hold for 60 seconds to allow the internal temperature to stabilize. 4 Disconnect the ...cord from the electrical outlet and the projector. NOTE: Before you turn on the projector again, wait for 1 second while the projector's cooling fans are still running. Adjusting the Projected Image Raising the Projector Height 1 Press the Elevator button. 2 Raise the projector to the desired display angle, and ...
... the elevator foot into position. 3 Use the tilt adjustment wheel to 9.5 degree) 3 Tilt adjustment wheel Using Your Projector 15 3 To power off the projector quickly, press the Power button and hold for 60 seconds to allow the internal temperature to stabilize. 4 Disconnect the ...cord from the electrical outlet and the projector. NOTE: Before you turn on the projector again, wait for 1 second while the projector's cooling fans are still running. Adjusting the Projected Image Raising the Projector Height 1 Press the Elevator button. 2 Raise the projector to the desired display angle, and ...
User Guide
Page 16
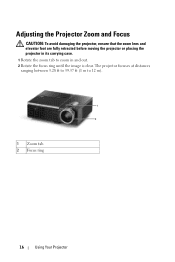
Adjusting the Projector Zoom and Focus CAUTION: To avoid damaging the projector, ensure that the zoom lens and elevator foot are fully retracted before moving the projector or placing the projector in its carrying case. 1 Rotate the zoom tab to 12 m). 1 2 1 Zoom tab 2 Focus ring 16 Using Your Projector The projector focuses at distances ranging between 3.28 ft to 39.37 ft (1 m to zoom in and out. 2 Rotate the focus ring until the image is clear.
Adjusting the Projector Zoom and Focus CAUTION: To avoid damaging the projector, ensure that the zoom lens and elevator foot are fully retracted before moving the projector or placing the projector in its carrying case. 1 Rotate the zoom tab to 12 m). 1 2 1 Zoom tab 2 Focus ring 16 Using Your Projector The projector focuses at distances ranging between 3.28 ft to 39.37 ft (1 m to zoom in and out. 2 Rotate the focus ring until the image is clear.
User Guide
Page 17
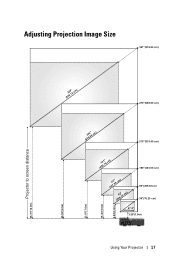
Adjusting Projection Image Size 361"(916.94 cm) Projector to screen distance 39.37'(12.0m) 29.53'(9.0m) 22.97'(7.0m) 16.40'(5.0m) 9.84'(3.0m) (833238.1"2 cm) 270"(685.80 cm) (622446.8"4 cm) 210"(533.40 cm) (418951.1"4 cm) 150"(381.00 cm) (314377.9"8 cm) (20882."28 cm) 90"(288.60cm) 30"(76.20 cm) 27.2" (69.09 cm) 3.28'(1.0m) Using Your Projector 17
Adjusting Projection Image Size 361"(916.94 cm) Projector to screen distance 39.37'(12.0m) 29.53'(9.0m) 22.97'(7.0m) 16.40'(5.0m) 9.84'(3.0m) (833238.1"2 cm) 270"(685.80 cm) (622446.8"4 cm) 210"(533.40 cm) (418951.1"4 cm) 150"(381.00 cm) (314377.9"8 cm) (20882."28 cm) 90"(288.60cm) 30"(76.20 cm) 27.2" (69.09 cm) 3.28'(1.0m) Using Your Projector 17
User Guide
Page 18
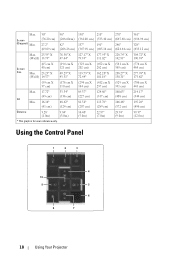
Using the Control Panel 1 2 3 10 9 8 4 5 6 7 18 Using Your Projector Max. Screen (Diagonal) Min. 30" (76.20 cm) 27.2" (69.09 cm) 90" 150" 210" 270" 361" (288.60cm) (381.00 cm) (533.40 cm) (...
Using the Control Panel 1 2 3 10 9 8 4 5 6 7 18 Using Your Projector Max. Screen (Diagonal) Min. 30" (76.20 cm) 27.2" (69.09 cm) 90" 150" 210" 270" 361" (288.60cm) (381.00 cm) (533.40 cm) (...
User Guide
Page 19
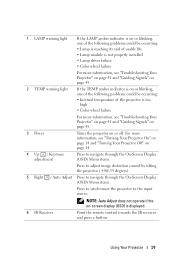
...35 degrees). 5 Right / Auto Adjust Press to navigate through the On-Screen Display (OSD) Menu items. Press to synchronize the projector to the input source. Using Your Projector 19 1 LAMP warning light If the LAMP amber indicator is on or blinking, one of the following problems could be occurring: ...usable life • Lamp module is not properly installed • Lamp driver failure • Color wheel failure For more information, see "Troubleshooting Your Projector" on page 41 and "Guiding Signals" on page 45. 2 TEMP warning light If the TEMP amber indicator is on or blinking, one of ...
...35 degrees). 5 Right / Auto Adjust Press to navigate through the On-Screen Display (OSD) Menu items. Press to synchronize the projector to the input source. Using Your Projector 19 1 LAMP warning light If the LAMP amber indicator is on or blinking, one of the following problems could be occurring: ...usable life • Lamp module is not properly installed • Lamp driver failure • Color wheel failure For more information, see "Troubleshooting Your Projector" on page 41 and "Guiding Signals" on page 45. 2 TEMP warning light If the TEMP amber indicator is on or blinking, one of ...
User Guide
Page 20
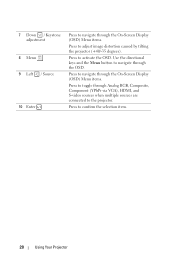
Use the directional keys and the Menu button to confirm the selection item. 20 Using Your Projector Press to navigate through the OSD. Press to navigate through the On-Screen Display (OSD) Menu items. Press to toggle through Analog RGB, Composite, ...Component (YPbPr via VGA), HDMI, and S-video sources when multiple sources are connected to adjust image distortion caused by tilting the projector (+40/-35 degrees). 7 Down / Keystone adjustment 8 Menu 9 Left / Source 10 Enter Press to navigate through the On-Screen Display (OSD) Menu items. Press to...
Use the directional keys and the Menu button to confirm the selection item. 20 Using Your Projector Press to navigate through the OSD. Press to navigate through the On-Screen Display (OSD) Menu items. Press to toggle through Analog RGB, Composite, ...Component (YPbPr via VGA), HDMI, and S-video sources when multiple sources are connected to adjust image distortion caused by tilting the projector (+40/-35 degrees). 7 Down / Keystone adjustment 8 Menu 9 Left / Source 10 Enter Press to navigate through the On-Screen Display (OSD) Menu items. Press to...
User Guide
Page 21
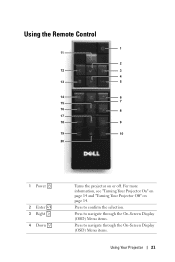
Using the Remote Control 1 11 2 12 3 4 13 5 14 6 15 7 16 8 17 18 9 19 10 20 1 Power 2 Enter 3 Right 4 Down Turns the projector on page 14. Press to navigate through the On-Screen Display (OSD) Menu items. Press to confirm the selection. For more information, see "Turning Your Projector On" on page 14 and "Turning Your Projector Off" on or off. Press to navigate through the On-Screen Display (OSD) Menu items. Using Your Projector 21
Using the Remote Control 1 11 2 12 3 4 13 5 14 6 15 7 16 8 17 18 9 19 10 20 1 Power 2 Enter 3 Right 4 Down Turns the projector on page 14. Press to navigate through the On-Screen Display (OSD) Menu items. Press to confirm the selection. For more information, see "Turning Your Projector On" on page 14 and "Turning Your Projector Off" on or off. Press to navigate through the On-Screen Display (OSD) Menu items. Using Your Projector 21


