User's Guide
Page 4
Using the Control Panel 18 Using the Remote Control 21 Installing the Remote Control Batteries 24 Operating Range With Remote Control 25 Using the On-Screen Display 26 Main Menu 26 AUTO-ADJUST 26 INPUT SELECT 27 PICTURE (in PC Mode 28 PICTURE (in Video Mode 28 DISPLAY (in PC Mode 30 DISPLAY (in Video Mode 31 LAMP 32 SET UP 32 INFORMATION 34 OTHERS 34 4 Troubleshooting Your Projector 41 Guiding Signals 45 Changing the Lamp 47 5 Specifications 49 6 Contacting Dell 53 7 Appendix: Glossary 54 4 Contents
Using the Control Panel 18 Using the Remote Control 21 Installing the Remote Control Batteries 24 Operating Range With Remote Control 25 Using the On-Screen Display 26 Main Menu 26 AUTO-ADJUST 26 INPUT SELECT 27 PICTURE (in PC Mode 28 PICTURE (in Video Mode 28 DISPLAY (in PC Mode 30 DISPLAY (in Video Mode 31 LAMP 32 SET UP 32 INFORMATION 34 OTHERS 34 4 Troubleshooting Your Projector 41 Guiding Signals 45 Changing the Lamp 47 5 Specifications 49 6 Contacting Dell 53 7 Appendix: Glossary 54 4 Contents

User's Guide
Page 6
About Your Projector Top View 1 6 Bottom View 8 10 2 3 7 5 4 9 1 Control panel 2 Zoom tab 3 Focus ring 4 Lens 5 Elevator button for height adjustments 6 IR receivers 7 Lens cap 8 Lamp cover 9 Tilt adjustment wheel 10 Elevator foot CAUTION: Safety Instructions 1 Do not use the projector near appliances that the projector is mounted in areas where there is turned off. 6 Your Dell Projector The dust may cause the system to fail and the projector will automatically shutdown. 3 Ensure that generate a lot...
About Your Projector Top View 1 6 Bottom View 8 10 2 3 7 5 4 9 1 Control panel 2 Zoom tab 3 Focus ring 4 Lens 5 Elevator button for height adjustments 6 IR receivers 7 Lens cap 8 Lamp cover 9 Tilt adjustment wheel 10 Elevator foot CAUTION: Safety Instructions 1 Do not use the projector near appliances that the projector is mounted in areas where there is turned off. 6 Your Dell Projector The dust may cause the system to fail and the projector will automatically shutdown. 3 Ensure that generate a lot...

User's Guide
Page 8
2 Connecting Your Projector 1 2 3 4 56 7 9 1 USB remote connector 2 VGA input (D-sub) connector 3 HDMI connector 4 S-video connector 5 Composite video connector 8 6 Audio output connector 7 Audio input connector 8 Security cable slot 9 Power cord connector CAUTION: Before you begin any of the procedures in this section, follow the Safety Instructions as described on page 6. 8 Connecting Your Projector
2 Connecting Your Projector 1 2 3 4 56 7 9 1 USB remote connector 2 VGA input (D-sub) connector 3 HDMI connector 4 S-video connector 5 Composite video connector 8 6 Audio output connector 7 Audio input connector 8 Security cable slot 9 Power cord connector CAUTION: Before you begin any of the procedures in this section, follow the Safety Instructions as described on page 6. 8 Connecting Your Projector
User's Guide
Page 14
... Power button. Follow the instruction displayed on screen to locate the Source button. See "Connecting Your Projector" on page 21 to properly turn on the source (computer, DVD player, etc.). The Power button light blinks blue until pressed. 1 Remove the lens cap. 2 Connect the power cord and appropriate signal cables to select the desired source. See "Using the Control Panel" on page 18 and "Using the Remote Control" on page 8 for 120 seconds. 14 Using Your Projector The cooling fans continue to operate for instructions to connect...
... Power button. Follow the instruction displayed on screen to locate the Source button. See "Connecting Your Projector" on page 21 to properly turn on the source (computer, DVD player, etc.). The Power button light blinks blue until pressed. 1 Remove the lens cap. 2 Connect the power cord and appropriate signal cables to select the desired source. See "Using the Control Panel" on page 18 and "Using the Remote Control" on page 8 for 120 seconds. 14 Using Your Projector The cooling fans continue to operate for instructions to connect...

User's Guide
Page 19
... installed • Lamp driver failure • Color wheel failure For more information, see "Troubleshooting Your Projector" on page 41 and "Guiding Signals" on page 45. 2 TEMP warning light If the TEMP amber indicator is on or blinking, one of the following problems could be occurring: • Internal temperature of the projector is displayed. 6 IR Receiver Point the remote control towards the IR receiver and press a button. Using Your Projector 19 NOTE: Auto Adjust does not operate if the on-screen display...
... installed • Lamp driver failure • Color wheel failure For more information, see "Troubleshooting Your Projector" on page 41 and "Guiding Signals" on page 45. 2 TEMP warning light If the TEMP amber indicator is on or blinking, one of the following problems could be occurring: • Internal temperature of the projector is displayed. 6 IR Receiver Point the remote control towards the IR receiver and press a button. Using Your Projector 19 NOTE: Auto Adjust does not operate if the on-screen display...
User's Guide
Page 27
... the Auto Source mode is on, it automatically finds the next available input signal. VGA-Press to Off, you can manually select the input signal. INPUT SELECT ADVANCED The Input Select Advanced menu allows you to lock the current input signal. Using Your Projector 27 AUTO SOURCE-Select Off (the default) to enable or disable input sources. If you press the Source button when the projector is set to detect VGA signal. ADVANCED-Press to enable or disable S-Video input. S-VIDEO-Use...
... the Auto Source mode is on, it automatically finds the next available input signal. VGA-Press to Off, you can manually select the input signal. INPUT SELECT ADVANCED The Input Select Advanced menu allows you to lock the current input signal. Using Your Projector 27 AUTO SOURCE-Select Off (the default) to enable or disable input sources. If you press the Source button when the projector is set to detect VGA signal. ADVANCED-Press to enable or disable S-Video input. S-VIDEO-Use...

User's Guide
Page 29
... the amount of green in the Color Adjust menu, the Custom mode is from black and white to adjust the video source from Composite or S-Video. PICTURE ADVANCED Using the Picture Advanced menu, you adjust the settings for NTSC only). COLOR TEMP-Allows you to fully saturated color. Using Your Projector 29 NOTE: If you can adjust the display settings of red in the image. BRIGHTNESS-Use and to adjust the brightness of color in the image (available for Brightness...
... the amount of green in the Color Adjust menu, the Custom mode is from black and white to adjust the video source from Composite or S-Video. PICTURE ADVANCED Using the Picture Advanced menu, you adjust the settings for NTSC only). COLOR TEMP-Allows you to fully saturated color. Using Your Projector 29 NOTE: If you can adjust the display settings of red in the image. BRIGHTNESS-Use and to adjust the brightness of color in the image (available for Brightness...

User's Guide
Page 32
... Mode operates at full power level. LAMP Using the Lamp menu, you to adjust settings for Language, Projector Mode, Keystone, and 3D Display. 32 Using Your Projector Normal mode operates at a lower power level which may provide longer lamp life, quieter operation, and dimmer luminance output on the screen. LAMP HOUR-Displays the operating hours since the last lamp timer reset. The Lamp menu provides the following options: LAMP MODE-Allows you to reset the lamp timer. LAMP HOUR RESET-Select Yes to select between Normal and ECO mode. SET UP The Set...
... Mode operates at full power level. LAMP Using the Lamp menu, you to adjust settings for Language, Projector Mode, Keystone, and 3D Display. 32 Using Your Projector Normal mode operates at a lower power level which may provide longer lamp life, quieter operation, and dimmer luminance output on the screen. LAMP HOUR-Displays the operating hours since the last lamp timer reset. The Lamp menu provides the following options: LAMP MODE-Allows you to reset the lamp timer. LAMP HOUR RESET-Select Yes to select between Normal and ECO mode. SET UP The Set...
User's Guide
Page 36
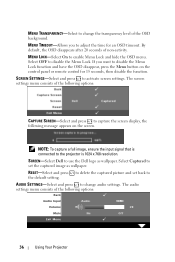
... enable Menu Lock and hide the OSD menu. NOTE: To capture a full image, ensure the input signal that is 1024 x 768 resolution. By default, the OSD disappears after 20 seconds of the following options: CAPTURE SCREEN-Select and press to activate screen settings. AUDIO SETTINGS-Select and press to the projector is connected to change the transparency level of the following message appears on the control panel or remote control for...
... enable Menu Lock and hide the OSD menu. NOTE: To capture a full image, ensure the input signal that is 1024 x 768 resolution. By default, the OSD disappears after 20 seconds of the following options: CAPTURE SCREEN-Select and press to activate screen settings. AUDIO SETTINGS-Select and press to the projector is connected to change the transparency level of the following message appears on the control panel or remote control for...

User's Guide
Page 37
... power on the projector press the Power button. Using Your Projector 37 You can be set to turn on screen showing a 60-second countdown before switching to increase the volume. If an input signal is the time you try to disable Power Saving mode. POWER SETTINGS-Select and press to enter power saving mode. The projector will run at full speed for audio input and audio output. AUDIO INPUT-Select the Audio input source, options are: Audio and HDMI. The power settings menu...
... power on the projector press the Power button. Using Your Projector 37 You can be set to turn on screen showing a 60-second countdown before switching to increase the volume. If an input signal is the time you try to disable Power Saving mode. POWER SETTINGS-Select and press to enter power saving mode. The projector will run at full speed for audio input and audio output. AUDIO INPUT-Select the Audio input source, options are: Audio and HDMI. The power settings menu...
User's Guide
Page 42
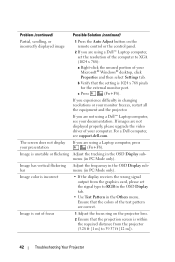
... Dell™. If images are not displayed properly, please upgrade the video driver of your respective documentation. Ensure that all the cables are correct. For other computers, see support.dell.com. • Ensure that the colors of the connectors are using a Dell™ Laptop computer, press (Fn+F8). For Dell computer, see your computer. Troubleshooting Your Projector 41 Cannot switch to Advanced Enable/Disable Sources, ensure that particular Input Source...
... Dell™. If images are not displayed properly, please upgrade the video driver of your respective documentation. Ensure that all the cables are correct. For other computers, see support.dell.com. • Ensure that the colors of the connectors are using a Dell™ Laptop computer, press (Fn+F8). For Dell computer, see your computer. Troubleshooting Your Projector 41 Cannot switch to Advanced Enable/Disable Sources, ensure that particular Input Source...
User's Guide
Page 43
... upgrade the video driver of focus 1 Adjust the focus ring on the remote control or the control panel. 2 If you are using a Dell™ Laptop computer, set the signal type to RGB in the OSD Display tab. • Use Test Pattern in PC Mode only). Ensure that the setting is 1024 x 768 pixels for the external monitor port. Problem (continued) Possible Solution (continued) Partial, scrolling, or incorrectly displayed image 1 Press the Auto Adjust button on the projector lens...
... upgrade the video driver of focus 1 Adjust the focus ring on the remote control or the control panel. 2 If you are using a Dell™ Laptop computer, set the signal type to RGB in the OSD Display tab. • Use Test Pattern in PC Mode only). Ensure that the setting is 1024 x 768 pixels for the external monitor port. Problem (continued) Possible Solution (continued) Partial, scrolling, or incorrectly displayed image 1 Press the Auto Adjust button on the projector lens...
User's Guide
Page 44
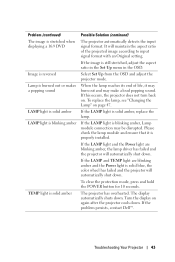
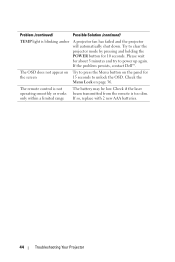
... the Power light is blinking amber, Lamp module connection may make a loud popping sound. If the LAMP and TEMP light are blinking amber, the lamp driver has failed and the projector will maintain the aspect ratio of life, it is solid amber Possible Solution (continued) The projector automatically detects the input signal format. It will automatically shut down . The display automatically shuts down . When the lamp reaches its end of the projected image...
... the Power light is blinking amber, Lamp module connection may make a loud popping sound. If the LAMP and TEMP light are blinking amber, the lamp driver has failed and the projector will maintain the aspect ratio of life, it is solid amber Possible Solution (continued) The projector automatically detects the input signal format. It will automatically shut down . The display automatically shuts down . When the lamp reaches its end of the projected image...
User's Guide
Page 45
... the Menu button on page 36. If so, replace with 2 new AAA batteries. 44 Troubleshooting Your Projector Please wait for 10 seconds. If the problem persists, contact Dell™. The remote control is not operating smoothly or works only within a limited range The battery may be low. Check the Menu Lock on the panel for the screen 15 seconds to clear the projector mode by pressing and holding the POWER button...
... the Menu button on page 36. If so, replace with 2 new AAA batteries. 44 Troubleshooting Your Projector Please wait for 10 seconds. If the problem persists, contact Dell™. The remote control is not operating smoothly or works only within a limited range The battery may be low. Check the Menu Lock on the panel for the screen 15 seconds to clear the projector mode by pressing and holding the POWER button...

User's Guide
Page 46
... projector cools down. Projector takes some time to cool down . If the problem persists, contact Dell. Ensure that the air vents are not blocked and that the ambient temperature is not accessed. The projector takes 60 seconds to warm up mode Lamp on . The lamp driver is cooling to display an image. Guiding Signals Projector Status Description Control Buttons Power Menu Others Standby mode Warming up and power on the projector. Ready to power on Cooling mode Power Saving mode...
... projector cools down. Projector takes some time to cool down . If the problem persists, contact Dell. Ensure that the air vents are not blocked and that the ambient temperature is not accessed. The projector takes 60 seconds to warm up mode Lamp on . The lamp driver is cooling to display an image. Guiding Signals Projector Status Description Control Buttons Power Menu Others Standby mode Warming up and power on the projector. Ready to power on Cooling mode Power Saving mode...

User's Guide
Page 48
... www.dell.com/hg. 1 Turn off the projector and disconnect the power cord. 2 Let the projector cool for the address of the nearest deposit site. 6 Replace with the new lamp. 7 Tighten the two screws that secure the lamp. 5 Pull the lamp up by its useful life in the operation. Replacement suggested! CAUTION: Use an original lamp to state, local, or federal law. CAUTION: Do not touch the bulb or the lamp...
... www.dell.com/hg. 1 Turn off the projector and disconnect the power cord. 2 Let the projector cool for the address of the nearest deposit site. 6 Replace with the new lamp. 7 Tighten the two screws that secure the lamp. 5 Pull the lamp up by its useful life in the operation. Replacement suggested! CAUTION: Use an original lamp to state, local, or federal law. CAUTION: Do not touch the bulb or the lamp...

User's Guide
Page 51
... 5000 hours in eco mode) 50 Specifications Variable audio output: One 3.5 mm stereo mini phone jack (Green). HDMI input: One HDMI connector for analog RGB/Component input signals. HDCP compliant. C14 inlet) VGA input: One 15-pin D-sub connector (Blue), for supporting HDMI 1.3. S-Video input: One standard 4-pin min-DIN S-Video connector for CVBS signal. Composite video input: One Yellow RCA jack for Y/C signal. Analog Audio input: One 3.5 mm stereo mini phone jack (Blue). OSRAM 165 W user-replaceable lamp...
... 5000 hours in eco mode) 50 Specifications Variable audio output: One 3.5 mm stereo mini phone jack (Green). HDMI input: One HDMI connector for analog RGB/Component input signals. HDCP compliant. C14 inlet) VGA input: One 15-pin D-sub connector (Blue), for supporting HDMI 1.3. S-Video input: One standard 4-pin min-DIN S-Video connector for CVBS signal. Composite video input: One Yellow RCA jack for Y/C signal. Analog Audio input: One 3.5 mm stereo mini phone jack (Blue). OSRAM 165 W user-replaceable lamp...

User's Guide
Page 52
The actual operating life span of a projector lamp will most likely result in a lamp's shortened operating life span or possible lamp failure. Specifications 51 Usage of a projector in any projector is a measure of the rated lumens for the time it takes a lamp to operating conditions and usage patterns. Lamp life is not guaranteed in stressful conditions which may include dusty environments, under high temperatures, many hours per day and abrupt powering-off...
The actual operating life span of a projector lamp will most likely result in a lamp's shortened operating life span or possible lamp failure. Specifications 51 Usage of a projector in any projector is a measure of the rated lumens for the time it takes a lamp to operating conditions and usage patterns. Lamp life is not guaranteed in stressful conditions which may include dusty environments, under high temperatures, many hours per day and abrupt powering-off...

User's Guide
Page 57
RGB - SXGA - Zoom Lens - Red, Green, Blue - A French and international broadcast standard for video and broadcasting, closely related to PAL but with a variable focal length that allows operator to move the view in a normal forward projection environment text, graphics, etc. VGA - Video Graphics Array - 640 x 480 pixels count. Lens with a different method of the three colors. SECAM - SVGA - Is the ratio between the smallest...
RGB - SXGA - Zoom Lens - Red, Green, Blue - A French and international broadcast standard for video and broadcasting, closely related to PAL but with a variable focal length that allows operator to move the view in a normal forward projection environment text, graphics, etc. VGA - Video Graphics Array - 640 x 480 pixels count. Lens with a different method of the three colors. SECAM - SVGA - Is the ratio between the smallest...
User's Guide
Page 59
... Auto-Adjust 28 Display (in PC Mode) 30 Display (in Video Mode) 31 Input Select 27 Lamp 32 Main Menu 26 Others 34 Picture (in PC Mode) 28 Picture (in Video Mode) 28 Set Up 32 P Password 37 phone numbers 53 Power Saving 36 Power Settings 36 Powering On/Off the Projector Powering Off the Projector 14 Powering On the Projector 14 Q Quick Shutdown 36 58 Index R Remote Control 21 IR receiver 19 Reset 35 Reset, Factory 40 S Screen 35 Screen Settings 35 Security Settings 37 Specifications Audio...
... Auto-Adjust 28 Display (in PC Mode) 30 Display (in Video Mode) 31 Input Select 27 Lamp 32 Main Menu 26 Others 34 Picture (in PC Mode) 28 Picture (in Video Mode) 28 Set Up 32 P Password 37 phone numbers 53 Power Saving 36 Power Settings 36 Powering On/Off the Projector Powering Off the Projector 14 Powering On the Projector 14 Q Quick Shutdown 36 58 Index R Remote Control 21 IR receiver 19 Reset 35 Reset, Factory 40 S Screen 35 Screen Settings 35 Security Settings 37 Specifications Audio...


