
User Guide
Page 2
...is subject to change without the written permission of these materials in this text: Dell and the DELL logo are not followed. disclaims any manner whatsoever without notice. © 2011 Dell Inc. Trademarks used in any proprietary interest in this document is strictly forbidden. ...trademarks of Microsoft Corporation in this document to refer to hardware or loss of data if instructions are trademarks of your projector. A00 Model M110 October 2011 Rev. Information in trademarks and trade names other countries. CAUTION: A CAUTION indicates potential damage to either...
...is subject to change without the written permission of these materials in this text: Dell and the DELL logo are not followed. disclaims any manner whatsoever without notice. © 2011 Dell Inc. Trademarks used in any proprietary interest in this document is strictly forbidden. ...trademarks of Microsoft Corporation in this document to refer to hardware or loss of data if instructions are trademarks of your projector. A00 Model M110 October 2011 Rev. Information in trademarks and trade names other countries. CAUTION: A CAUTION indicates potential damage to either...

User Guide
Page 3
Contents 1 Your Dell Projector 6 About Your Projector 8 2 Connecting Your Projector 10 Connecting to a Computer 11 Connecting a Computer Using a VGA Cable . . . . 11 Connecting a Computer by USB Cable 12 Connecting a Computer Using Wireless Dongle (Optional 13 Connecting a ... a HDMI Cable . . 15 Connecting to Multi-Media 16 Connecting Multi-Media Using a USB Flash Disk . 16 Connecting Multi-Media Using a MicroSD Card . . 17 3 Using Your Projector 18 Turning Your Projector On 18 Turning Your Projector Off 18 Adjusting the Projected Image 19 Raising the...
Contents 1 Your Dell Projector 6 About Your Projector 8 2 Connecting Your Projector 10 Connecting to a Computer 11 Connecting a Computer Using a VGA Cable . . . . 11 Connecting a Computer by USB Cable 12 Connecting a Computer Using Wireless Dongle (Optional 13 Connecting a ... a HDMI Cable . . 15 Connecting to Multi-Media 16 Connecting Multi-Media Using a USB Flash Disk . 16 Connecting Multi-Media Using a MicroSD Card . . 17 3 Using Your Projector 18 Turning Your Projector On 18 Turning Your Projector Off 18 Adjusting the Projected Image 19 Raising the...

User Guide
Page 4
Adjusting the Projector Focus 20 Adjusting Projection Image Size 21 Using the Control Panel 23 Installing the Remote Control Battery (Optional) . . . . 27 Operating Range with Remote Control 28 ... Multi-Media SETUP for USB, Micro SD, and Internal Memory 50 PHOTO SETUP 50 VIDEO SETUP 51 MUSIC SETUP 51 FIRMWARE UPDATE 52 4 Troubleshooting Your Projector 53 Guiding Signals 56 4 Contents
Adjusting the Projector Focus 20 Adjusting Projection Image Size 21 Using the Control Panel 23 Installing the Remote Control Battery (Optional) . . . . 27 Operating Range with Remote Control 28 ... Multi-Media SETUP for USB, Micro SD, and Internal Memory 50 PHOTO SETUP 50 VIDEO SETUP 51 MUSIC SETUP 51 FIRMWARE UPDATE 52 4 Troubleshooting Your Projector 53 Guiding Signals 56 4 Contents

User Guide
Page 6
Package Contents Power cable Universal 24-pin to VGA cable CD User's Guide and Documentation Carrying case Informacion Importante DellTM M110/QMu1i1c0kHSDetPurpojGecutiodre DOCOMENTATION DellTM M110/M110HD Projector oduct IDneflol TrM PmroajteicotnorGs uide AC adapter 6 Your Dell Projector 1 Your Dell Projector Your projector comes with all the items, and contact Dell™ if anything is missing. Ensure that you have all the items shown below.
Package Contents Power cable Universal 24-pin to VGA cable CD User's Guide and Documentation Carrying case Informacion Importante DellTM M110/QMu1i1c0kHSDetPurpojGecutiodre DOCOMENTATION DellTM M110/M110HD Projector oduct IDneflol TrM PmroajteicotnorGs uide AC adapter 6 Your Dell Projector 1 Your Dell Projector Your projector comes with all the items, and contact Dell™ if anything is missing. Ensure that you have all the items shown below.

User Guide
Page 8
The dust may cause the object to melt or burn. 9 Do not use alcohol to wipe the lens. 10 Do not use the wireless projector near or in areas where there is on as the heat may cause the system to your eyes. 8 Do not place any objects near ...cardiac pacemakers. 8 Your Dell Projector About Your Projector Top View 1 Bottom View 4 2 5 3 1 Control panel 2 Focus ring 3 Lens 4 Tilt adjusting wheel 5 Mounting hole for tripod: Insert nut 1/4"*20 UNC CAUTION: Safety Instructions 1 ...
The dust may cause the object to melt or burn. 9 Do not use alcohol to wipe the lens. 10 Do not use the wireless projector near or in areas where there is on as the heat may cause the system to your eyes. 8 Do not place any objects near ...cardiac pacemakers. 8 Your Dell Projector About Your Projector Top View 1 Bottom View 4 2 5 3 1 Control panel 2 Focus ring 3 Lens 4 Tilt adjusting wheel 5 Mounting hole for tripod: Insert nut 1/4"*20 UNC CAUTION: Safety Instructions 1 ...

User Guide
Page 9
NOTE: • Recommended Projector Tripod Kit (VXJN3). Your Dell Projector 9 For more information, see the Dell Support website at support.dell.com. • For more information, see the Safety Information that shipped with your projector. 11 Do not use the wireless projector near medical equipment. 12 Do not use the wireless projector near microwave ovens.
NOTE: • Recommended Projector Tripod Kit (VXJN3). Your Dell Projector 9 For more information, see the Dell Support website at support.dell.com. • For more information, see the Safety Information that shipped with your projector. 11 Do not use the wireless projector near medical equipment. 12 Do not use the wireless projector near microwave ovens.

User Guide
Page 10
... USB 6 Universal I/O connector for VGA display, multi-media playback input and Audio output (Video/Audio/Photo), USB memory storage access (USB flash drive/internal memory), projector firmware upgrade, and supporting optional wireless dongle and mobishow 3 DC input connector 7 Security cable slot 4 Audio/Video input connector CAUTION: Before you begin any of...
... USB 6 Universal I/O connector for VGA display, multi-media playback input and Audio output (Video/Audio/Photo), USB memory storage access (USB flash drive/internal memory), projector firmware upgrade, and supporting optional wireless dongle and mobishow 3 DC input connector 7 Security cable slot 4 Audio/Video input connector CAUTION: Before you begin any of...

User Guide
Page 11
Connecting to a Computer Connecting a Computer Using a VGA Cable 2 3 1 1 Power cord 2 AC adapter 3 Universal 24-pin to VGA cable NOTE: Only one universal 24-pin to VGA and Audio out cable can be purchased on the Dell website at www.dell.com. Connecting Your Projector 11 An additional universal 24-pin to VGA cable or 24-pin to VGA cable is shipped with your projector.
Connecting to a Computer Connecting a Computer Using a VGA Cable 2 3 1 1 Power cord 2 AC adapter 3 Universal 24-pin to VGA cable NOTE: Only one universal 24-pin to VGA and Audio out cable can be purchased on the Dell website at www.dell.com. Connecting Your Projector 11 An additional universal 24-pin to VGA cable or 24-pin to VGA cable is shipped with your projector.

User Guide
Page 12
The USB (USB A to A) cable on the Dell website at www.dell.com. 12 Connecting Your Projector You can purchase the USB (USB A to A) cable is not shipped with your projector. MOLEX MOLEX Connecting a Computer by USB Cable 2 3 1 1 Power cord 2 AC adapter 3 USB-A to USB-A cable NOTE: Plug and Play.
The USB (USB A to A) cable on the Dell website at www.dell.com. 12 Connecting Your Projector You can purchase the USB (USB A to A) cable is not shipped with your projector. MOLEX MOLEX Connecting a Computer by USB Cable 2 3 1 1 Power cord 2 AC adapter 3 USB-A to USB-A cable NOTE: Plug and Play.
User Guide
Page 13
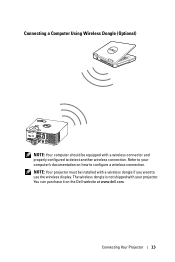
Refer to your projector. You can purchase it on how to configure a wireless connection. The wireless dongle is not shipped with your computer's documentation on the Dell website at www.dell.com. NOTE: Your projector must be equipped with a wireless connector and properly configured to detect another wireless connection. FSUCZ-C IWUD5:205C Connecting a Computer Using Wireless Dongle (Optional) NOTE: Your computer should be installed with a wireless dongle if you want to use the wireless display. Connecting Your Projector 13
Refer to your projector. You can purchase it on how to configure a wireless connection. The wireless dongle is not shipped with your computer's documentation on the Dell website at www.dell.com. NOTE: Your projector must be equipped with a wireless connector and properly configured to detect another wireless connection. FSUCZ-C IWUD5:205C Connecting a Computer Using Wireless Dongle (Optional) NOTE: Your computer should be installed with a wireless dongle if you want to use the wireless display. Connecting Your Projector 13
User Guide
Page 14
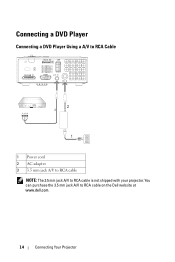
You can purchase the 3.5 mm jack A/V to RCA cable is not shipped with your projector. Connecting a DVD Player Connecting a DVD Player Using a A/V to RCA Cable 2 3 1 1 Power cord 2 AC adapter 3 3.5 mm jack A/V to RCA cable NOTE: The 3.5 mm jack A/V to RCA cable on the Dell website at www.dell.com. 14 Connecting Your Projector
You can purchase the 3.5 mm jack A/V to RCA cable is not shipped with your projector. Connecting a DVD Player Connecting a DVD Player Using a A/V to RCA Cable 2 3 1 1 Power cord 2 AC adapter 3 3.5 mm jack A/V to RCA cable NOTE: The 3.5 mm jack A/V to RCA cable on the Dell website at www.dell.com. 14 Connecting Your Projector

User Guide
Page 15
You can purchase the HDMI cable on the Dell website at www.dell.com. Connecting Your Projector 15 Connecting a DVD Player Using a HDMI Cable 2 3 1 1 Power cord 2 AC adapter 3 HDMI cable NOTE: The HDMI cable is not shipped with your projector.
You can purchase the HDMI cable on the Dell website at www.dell.com. Connecting Your Projector 15 Connecting a DVD Player Using a HDMI Cable 2 3 1 1 Power cord 2 AC adapter 3 HDMI cable NOTE: The HDMI cable is not shipped with your projector.

User Guide
Page 16
Connecting to Multi-Media Connecting Multi-Media Using a USB Flash Disk 3 2 1 1 Power cord 2 AC adapter 3 USB flash disk NOTE: The USB flash disk is not shipped with your projector. 16 Connecting Your Projector
Connecting to Multi-Media Connecting Multi-Media Using a USB Flash Disk 3 2 1 1 Power cord 2 AC adapter 3 USB flash disk NOTE: The USB flash disk is not shipped with your projector. 16 Connecting Your Projector

User Guide
Page 17
Connecting Your Projector 17 Connecting Multi-Media Using a MicroSD Card 3 2 1 1 Power cord 2 AC adapter 3 MicroSD card NOTE: The microSD card is not shipped with your projector.
Connecting Your Projector 17 Connecting Multi-Media Using a MicroSD Card 3 2 1 1 Power cord 2 AC adapter 3 MicroSD card NOTE: The microSD card is not shipped with your projector.
User Guide
Page 18
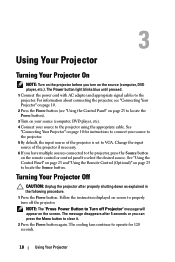
... message disappears after properly shutting down as explained in the following procedure. 1 Press the Power button. The cooling fans continue to the projector. Follow the instruction displayed on screen to properly turn on the remote control or control panel to locate the Source button. For information... about connecting the projector, see "Connecting Your Projector" on page 10. 2 Press the Power button (see "Using the Control Panel" on page 23 to locate the Power button...
... message disappears after properly shutting down as explained in the following procedure. 1 Press the Power button. The cooling fans continue to the projector. Follow the instruction displayed on screen to properly turn on the remote control or control panel to locate the Source button. For information... about connecting the projector, see "Connecting Your Projector" on page 10. 2 Press the Power button (see "Using the Control Panel" on page 23 to locate the Power button...

User Guide
Page 19
... adjustment wheel to fine-tune the display angle. 1 1c 1 Front tilt adjustment wheel (Angle of tilt: 0 to 6 degrees) Using Your Projector 19 Lowering the Projector Height 1 Lower the projector, and use the front tilt adjustment wheel to fine-tune the display angle. NOTE: Before you turn on the... projector again, wait for 1 second while the projector's cooling fans are still running. 3 To power off the projector quickly, press the Power button and hold for 60 seconds to allow the internal temperature...
... adjustment wheel to fine-tune the display angle. 1 1c 1 Front tilt adjustment wheel (Angle of tilt: 0 to 6 degrees) Using Your Projector 19 Lowering the Projector Height 1 Lower the projector, and use the front tilt adjustment wheel to fine-tune the display angle. NOTE: Before you turn on the... projector again, wait for 1 second while the projector's cooling fans are still running. 3 To power off the projector quickly, press the Power button and hold for 60 seconds to allow the internal temperature...

User Guide
Page 20
Adjusting the Projector Focus CAUTION: To avoid damaging the projector, ensure that the adjustment wheels are fully retracted before moving the projector or placing the projector in its carrying case. 1 Rotate the focus tab until the image is clear. The projector focuses at distances ranging between 3.18 ft to 8.48 ft (97 cm to 258 cm). 1 1 Focus tab 20 Using Your Projector
Adjusting the Projector Focus CAUTION: To avoid damaging the projector, ensure that the adjustment wheels are fully retracted before moving the projector or placing the projector in its carrying case. 1 Rotate the focus tab until the image is clear. The projector focuses at distances ranging between 3.18 ft to 8.48 ft (97 cm to 258 cm). 1 1 Focus tab 20 Using Your Projector

User Guide
Page 21
Adjusting Projection Image Size 80" (203.2 cm) Projector to screen distance 8.48' (2.58 m) 7.41' (2.26 m) 6.36' (1.94 m) 5.28' (1.61 m) 4.23' (1.29 m) 70" (177.8 cm) 60" (152.4 cm) 50" (127.0 cm) 40" (101.6 cm) 30" (76.2 cm) 3.18' (0.97 m) Using Your Projector 21
Adjusting Projection Image Size 80" (203.2 cm) Projector to screen distance 8.48' (2.58 m) 7.41' (2.26 m) 6.36' (1.94 m) 5.28' (1.61 m) 4.23' (1.29 m) 70" (177.8 cm) 60" (152.4 cm) 50" (127.0 cm) 40" (101.6 cm) 30" (76.2 cm) 3.18' (0.97 m) Using Your Projector 21

User Guide
Page 22
..." (203.2 cm) 67.72" X 42.52" (172 cm X 108 cm) 42.52" (108 cm) 8.48' (2.58 m) Height (Hd): 81 cm Distance:1.94 m 22 Using Your Projector
..." (203.2 cm) 67.72" X 42.52" (172 cm X 108 cm) 42.52" (108 cm) 8.48' (2.58 m) Height (Hd): 81 cm Distance:1.94 m 22 Using Your Projector

User Guide
Page 23
... degrees). 3 Right / Auto Adjust Press to navigate through the On-Screen Display (OSD) Menu items. Press to synchronize the projector to the input source. NOTE: Auto Adjust does not operate if the on-screen display (OSD) is displayed. 4 TEMP LED If the ...indicator is on or blinking, one of the following problems could be occurring: • Internal temperature of the projector is too high For more information, see "Troubleshooting Your Projector" on page 53 and "Guiding Signals" on or off. Using Your Projector 23 Using the Control Panel 12 3 9 4 8 5 7 6 1 Power Turns the...
... degrees). 3 Right / Auto Adjust Press to navigate through the On-Screen Display (OSD) Menu items. Press to synchronize the projector to the input source. NOTE: Auto Adjust does not operate if the on-screen display (OSD) is displayed. 4 TEMP LED If the ...indicator is on or blinking, one of the following problems could be occurring: • Internal temperature of the projector is too high For more information, see "Troubleshooting Your Projector" on page 53 and "Guiding Signals" on or off. Using Your Projector 23 Using the Control Panel 12 3 9 4 8 5 7 6 1 Power Turns the...


