Service Manual
Page 1
...Information in this document is subject to hardware or loss of 2) [2/28/2004 8:26:18 AM] file:///F|/Service%20Manuals/Dell/Latitude/x300/index.htm (1 of data and tells you make better use of your computer. NOTICE: A NOTICE indicates either potential damage to ...change without notice. Dell Latitude X300 Service Manual Dell™ Latitude™ X300 Service Manual Before You Begin Dell Diagnostics System Components Battery Memory, Modem, and Mini PCI Card Modules Keyboard Palm Rest Hard Drive Hinge...
...Information in this document is subject to hardware or loss of 2) [2/28/2004 8:26:18 AM] file:///F|/Service%20Manuals/Dell/Latitude/x300/index.htm (1 of data and tells you make better use of your computer. NOTICE: A NOTICE indicates either potential damage to ...change without notice. Dell Latitude X300 Service Manual Dell™ Latitude™ X300 Service Manual Before You Begin Dell Diagnostics System Components Battery Memory, Modem, and Mini PCI Card Modules Keyboard Palm Rest Hard Drive Hinge...

Service Manual
Page 2
q You have performed the steps in "Shutting Down Your Computer." Before You Begin: Dell Latitude X300 Service Manual Back to Contents Page Before You Begin Dell™ Latitude™ X300 Service Manual Recommended Tools Shutting Down Your Computer Computer Orientation Screw Identification Placemat This section provides procedures for removing and installing ...-blade screwdriver q Phillips screwdriver q Small plastic scribe q Flash BIOS update program floppy disk or CD Shutting Down Your Computer file:///F|/Service%20Manuals/Dell/Latitude/x300/before.htm (1 of 7) [2/28/2004 8:26:24 AM]
q You have performed the steps in "Shutting Down Your Computer." Before You Begin: Dell Latitude X300 Service Manual Back to Contents Page Before You Begin Dell™ Latitude™ X300 Service Manual Recommended Tools Shutting Down Your Computer Computer Orientation Screw Identification Placemat This section provides procedures for removing and installing ...-blade screwdriver q Phillips screwdriver q Small plastic scribe q Flash BIOS update program floppy disk or CD Shutting Down Your Computer file:///F|/Service%20Manuals/Dell/Latitude/x300/before.htm (1 of 7) [2/28/2004 8:26:24 AM]

Service Manual
Page 3
...card. Some cables have a connector with care. If your computer and attached devices did not automatically turn off . file:///F|/Service%20Manuals/Dell/Latitude/x300/before you connect a cable, ensure that both connectors are disconnecting this section, follow the safety instructions in on your computer, press and... hold the power button for instructions. Before You Begin: Dell Latitude X300 Service Manual Use the following steps before you begin any of the procedures in this type of 7) [2/28/2004 8:26:24...
...card. Some cables have a connector with care. If your computer and attached devices did not automatically turn off . file:///F|/Service%20Manuals/Dell/Latitude/x300/before you connect a cable, ensure that both connectors are disconnecting this section, follow the safety instructions in on your computer, press and... hold the power button for instructions. Before You Begin: Dell Latitude X300 Service Manual Use the following steps before you begin any of the procedures in this type of 7) [2/28/2004 8:26:24...

Service Manual
Page 4
file:///F|/Service%20Manuals/Dell/Latitude/x300/before you must remove the main battery before .htm (3 of the computer, and then remove the battery from their electrical outlets, and then press the ... upside down on the bottom of 7) [2/28/2004 8:26:24 AM] Remove any installed PC Cards from the Secure Digital memory slot. 9. Before You Begin: Dell Latitude X300 Service Manual 6. Disconnect your computer and all attached devices from the bay. Slide and hold the battery-bay latch release on a flat work surface.
file:///F|/Service%20Manuals/Dell/Latitude/x300/before you must remove the main battery before .htm (3 of the computer, and then remove the battery from their electrical outlets, and then press the ... upside down on the bottom of 7) [2/28/2004 8:26:24 AM] Remove any installed PC Cards from the Secure Digital memory slot. 9. Before You Begin: Dell Latitude X300 Service Manual 6. Disconnect your computer and all attached devices from the bay. Slide and hold the battery-bay latch release on a flat work surface.
Service Manual
Page 5
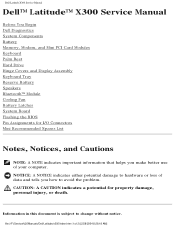
Before You Begin: Dell Latitude X300 Service Manual 1 battery latch release (2) G0767 11. Computer Orientation 1 front 2 left 3 back 4 right file:///F|/Service%20Manuals/Dell/Latitude/x300/before.htm (4 of 7) [2/28/2004 8:26:24 AM] Remove any installed modules, including a second battery, if installed. 12. Remove the hard drive.
Before You Begin: Dell Latitude X300 Service Manual 1 battery latch release (2) G0767 11. Computer Orientation 1 front 2 left 3 back 4 right file:///F|/Service%20Manuals/Dell/Latitude/x300/before.htm (4 of 7) [2/28/2004 8:26:24 AM] Remove any installed modules, including a second battery, if installed. 12. Remove the hard drive.

Service Manual
Page 6
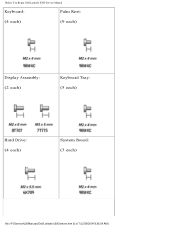
The placemat provides the number of 7) [2/28/2004 8:26:24 AM] NOTICE: When reinstalling a screw, you are removing and replacing components, photocopy the placemat as a tool to lay out and keep track of the screws. file:///F|/Service%20Manuals/Dell/Latitude/x300/before.htm (5 of screws and their sizes. Before You Begin: Dell Latitude X300 Service Manual Screw Identification Placemat When you must use a screw of the correct diameter and length. Ensure that the screw is properly aligned with its corresponding hole, and avoid overtightening.
The placemat provides the number of 7) [2/28/2004 8:26:24 AM] NOTICE: When reinstalling a screw, you are removing and replacing components, photocopy the placemat as a tool to lay out and keep track of the screws. file:///F|/Service%20Manuals/Dell/Latitude/x300/before.htm (5 of screws and their sizes. Before You Begin: Dell Latitude X300 Service Manual Screw Identification Placemat When you must use a screw of the correct diameter and length. Ensure that the screw is properly aligned with its corresponding hole, and avoid overtightening.
Service Manual
Page 7
Before You Begin: Dell Latitude X300 Service Manual Keyboard: Palm Rest: (4 each) (9 each) Display Assembly: (2 each) Keyboard Tray: (5 each) Hard Drive: (4 each) System Board: (3 each) file:///F|/Service%20Manuals/Dell/Latitude/x300/before.htm (6 of 7) [2/28/2004 8:26:24 AM]
Before You Begin: Dell Latitude X300 Service Manual Keyboard: Palm Rest: (4 each) (9 each) Display Assembly: (2 each) Keyboard Tray: (5 each) Hard Drive: (4 each) System Board: (3 each) file:///F|/Service%20Manuals/Dell/Latitude/x300/before.htm (6 of 7) [2/28/2004 8:26:24 AM]

Service Manual
Page 9
...'s Guide or Owner's Manual and run . q Access help you do contact Dell, the test results can provide important information for technical assistance. Dell Diagnostics: Dell Latitude X300 Service Manual Back to Contents Page Dell Diagnostics Dell™ Latitude™ X300 Service Manual When to Use the Dell Diagnostics Starting the Dell Diagnostics When to : q Perform tests on a symptom of 4) [2/28/2004...
...'s Guide or Owner's Manual and run . q Access help you do contact Dell, the test results can provide important information for technical assistance. Dell Diagnostics: Dell Latitude X300 Service Manual Back to Contents Page Dell Diagnostics Dell™ Latitude™ X300 Service Manual When to Use the Dell Diagnostics Starting the Dell Diagnostics When to : q Perform tests on a symptom of 4) [2/28/2004...
Service Manual
Page 10
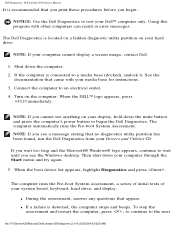
... next file:///F|/Service%20Manuals/Dell/Latitude/x300/diag.htm (2 of your hard drive. Using this program with your computer cannot display a screen image, contact Dell. 1. If the computer is recommended that no diagnostics utility partition has been found, run the Dell Diagnostics from your display,...If you wait too long and the Microsoft® Windows® logo appears, continue to wait until you see the Windows desktop. Dell Diagnostics: Dell Latitude X300 Service Manual It is connected to a media base (docked), undock it. q If a failure is located on a hidden diagnostic ...
... next file:///F|/Service%20Manuals/Dell/Latitude/x300/diag.htm (2 of your hard drive. Using this program with your computer cannot display a screen image, contact Dell. 1. If the computer is recommended that no diagnostics utility partition has been found, run the Dell Diagnostics from your display,...If you wait too long and the Microsoft® Windows® logo appears, continue to wait until you see the Windows desktop. Dell Diagnostics: Dell Latitude X300 Service Manual It is connected to a media base (docked), undock it. q If a failure is located on a hidden diagnostic ...
Service Manual
Page 11
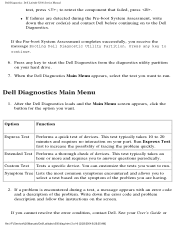
... test you to run . Write down the error code(s) and contact Dell before continuing on to start the Dell Diagnostics from the diagnostics utility partition on the symptom of tracing the problem quickly. Dell Diagnostics: Dell Latitude X300 Service Manual test, press ; Press any key to 20 minutes and ...screen. Option Function Express Test Performs a quick test of devices. See your User's Guide or file:///F|/Service%20Manuals/Dell/Latitude/x300/diag.htm (3 of the problem. If the Pre-boot System Assessment completes successfully, you cannot resolve the error condition, contact...
... test you to run . Write down the error code(s) and contact Dell before continuing on to start the Dell Diagnostics from the diagnostics utility partition on the symptom of tracing the problem quickly. Dell Diagnostics: Dell Latitude X300 Service Manual test, press ; Press any key to 20 minutes and ...screen. Option Function Express Test Performs a quick test of devices. See your User's Guide or file:///F|/Service%20Manuals/Dell/Latitude/x300/diag.htm (3 of the problem. If the Pre-boot System Assessment completes successfully, you cannot resolve the error condition, contact...

Service Manual
Page 12
... applicable tab described in the left pane of each test screen. Dell Diagnostics: Dell Latitude X300 Service Manual Owner's Manual for the selected device. Parameters The Dell Diagnostics obtains configuration information for your Service Tag. 3. To exit the Dell Diagnostics and restart the computer, close the test screen to return ...to Contents Page file:///F|/Service%20Manuals/Dell/Latitude/x300/diag.htm (4 of the test and any error conditions encountered. NOTE: The Service Tag for all devices attached to...
... applicable tab described in the left pane of each test screen. Dell Diagnostics: Dell Latitude X300 Service Manual Owner's Manual for the selected device. Parameters The Dell Diagnostics obtains configuration information for your Service Tag. 3. To exit the Dell Diagnostics and restart the computer, close the test screen to return ...to Contents Page file:///F|/Service%20Manuals/Dell/Latitude/x300/diag.htm (4 of the test and any error conditions encountered. NOTE: The Service Tag for all devices attached to...

Service Manual
Page 13
Damage due to Contents Page System Components Dell™ Latitude™ X300 Service Manual NOTICE: Only a certified service technician should perform repairs on your warranty. NOTICE: Unless otherwise noted, each procedure in reverse order. file:///F|/Service%20Manuals/Dell/Latitude/x300/system.htm (1 of 2) [2/28/2004 8:26:26 AM] System Components: Dell Latitude X300 Service Manual Back to servicing that a part can be replaced by performing the removal procedure in this manual assumes that is not authorized by Dell is not covered by your computer.
Damage due to Contents Page System Components Dell™ Latitude™ X300 Service Manual NOTICE: Only a certified service technician should perform repairs on your warranty. NOTICE: Unless otherwise noted, each procedure in reverse order. file:///F|/Service%20Manuals/Dell/Latitude/x300/system.htm (1 of 2) [2/28/2004 8:26:26 AM] System Components: Dell Latitude X300 Service Manual Back to servicing that a part can be replaced by performing the removal procedure in this manual assumes that is not authorized by Dell is not covered by your computer.
Service Manual
Page 14
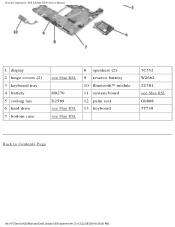
System Components: Dell Latitude X300 Service Manual 1 display 2 hinge covers (2) 3 keyboard tray 4 battery 5 cooling fan 6 hard drive 7 bottom case see Mini RSL M0270 D2589 see Mini RSL see Mini RSL 8 speakers (2) 9 reserve battery 10 Bluetooth™ module 11 system board 12 palm rest 13 keyboard 7C552 W2662 2U381 see Mini RSL G0808 5Y730 Back to Contents Page file:///F|/Service%20Manuals/Dell/Latitude/x300/system.htm (2 of 2) [2/28/2004 8:26:26 AM]
System Components: Dell Latitude X300 Service Manual 1 display 2 hinge covers (2) 3 keyboard tray 4 battery 5 cooling fan 6 hard drive 7 bottom case see Mini RSL M0270 D2589 see Mini RSL see Mini RSL 8 speakers (2) 9 reserve battery 10 Bluetooth™ module 11 system board 12 palm rest 13 keyboard 7C552 W2662 2U381 see Mini RSL G0808 5Y730 Back to Contents Page file:///F|/Service%20Manuals/Dell/Latitude/x300/system.htm (2 of 2) [2/28/2004 8:26:26 AM]

Service Manual
Page 15
... CAUTION: Before performing these procedures, disconnect the modem from the bay. CAUTION: Before you begin any of 3) [2/28/2004 8:26:26 AM] file:///F|/Service%20Manuals/Dell/Latitude/x300/battery.htm (1 of the procedures in this . 1. Slide the battery latch releases on the bottom of the computer and remove the battery from the telephone...
... CAUTION: Before performing these procedures, disconnect the modem from the bay. CAUTION: Before you begin any of 3) [2/28/2004 8:26:26 AM] file:///F|/Service%20Manuals/Dell/Latitude/x300/battery.htm (1 of the procedures in this . 1. Slide the battery latch releases on the bottom of the computer and remove the battery from the telephone...

Service Manual
Page 16
file:///F|/Service%20Manuals/Dell/Latitude/x300/battery.htm (2 of 3) [2/28/2004 8:26:26 AM] Battery: Dell Latitude X300 Service Manual 1 battery latch release (2) G0767 Installing the Battery To install the battery, slide the battery or the optional extended battery into the bay until the latch release clicks.
file:///F|/Service%20Manuals/Dell/Latitude/x300/battery.htm (2 of 3) [2/28/2004 8:26:26 AM] Battery: Dell Latitude X300 Service Manual 1 battery latch release (2) G0767 Installing the Battery To install the battery, slide the battery or the optional extended battery into the bay until the latch release clicks.

Service Manual
Page 18
...under your media base for instructions. 4. Memory, Modem, and Mini PCI Card Modules: Dell Latitude X300 Service Manual -cBack to Contents Page Memory, Modem, and Mini PCI Card Modules Dell™ Latitude™ X300 Service Manual Adding Memory Replacing a Modem Adding a Mini PCI Card Adding Memory You can...your computer. Wait 10 to 20 seconds, and then disconnect any of 14) [2/28/2004 8:26:28 AM] file:///F|/Service%20Manuals/Dell/Latitude/x300/upgrades.htm (1 of the procedures in this section, follow the safety instructions in your System Information Guide for your computer memory by...
...under your media base for instructions. 4. Memory, Modem, and Mini PCI Card Modules: Dell Latitude X300 Service Manual -cBack to Contents Page Memory, Modem, and Mini PCI Card Modules Dell™ Latitude™ X300 Service Manual Adding Memory Replacing a Modem Adding a Mini PCI Card Adding Memory You can...your computer. Wait 10 to 20 seconds, and then disconnect any of 14) [2/28/2004 8:26:28 AM] file:///F|/Service%20Manuals/Dell/Latitude/x300/upgrades.htm (1 of the procedures in this section, follow the safety instructions in your System Information Guide for your computer memory by...

Service Manual
Page 19
... to the memory module connector, do not use tools to ground yourself periodically during this procedure. 7. file:///F|/Service%20Manuals/Dell/Latitude/x300/upgrades.htm (2 of the computer. Memory, Modem, and Mini PCI Card Modules: Dell Latitude X300 Service Manual NOTICE: Handle components and cards by touching a metal connector on the back of 14) [2/28/2004 8:26...
... to the memory module connector, do not use tools to ground yourself periodically during this procedure. 7. file:///F|/Service%20Manuals/Dell/Latitude/x300/upgrades.htm (2 of the computer. Memory, Modem, and Mini PCI Card Modules: Dell Latitude X300 Service Manual NOTICE: Handle components and cards by touching a metal connector on the back of 14) [2/28/2004 8:26...

Service Manual
Page 20
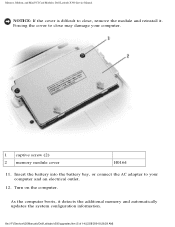
... the securing clips on the back of the computer. Remove the module from the connector. 1 memory module 2 securing clips (2) see Mini RSL file:///F|/Service%20Manuals/Dell/Latitude/x300/upgrades.htm (3 of the memory module connector until the module pops up. a. Ground yourself by their edges, and avoid touching pins and contacts. Memory, Modem...
... the securing clips on the back of the computer. Remove the module from the connector. 1 memory module 2 securing clips (2) see Mini RSL file:///F|/Service%20Manuals/Dell/Latitude/x300/upgrades.htm (3 of the memory module connector until the module pops up. a. Ground yourself by their edges, and avoid touching pins and contacts. Memory, Modem...

Service Manual
Page 21
Memory, Modem, and Mini PCI Card Modules: Dell Latitude X300 Service Manual 9. Slide the module firmly into place. b. If you do not hear the click, remove the module and reinstall it clicks into the slot ... 10. Align the notch in the module edge connector with the tab in the center of 14) [2/28/2004 8:26:29 AM] file:///F|/Service%20Manuals/Dell/Latitude/x300/upgrades.htm (4 of the connector slot.
Memory, Modem, and Mini PCI Card Modules: Dell Latitude X300 Service Manual 9. Slide the module firmly into place. b. If you do not hear the click, remove the module and reinstall it clicks into the slot ... 10. Align the notch in the module edge connector with the tab in the center of 14) [2/28/2004 8:26:29 AM] file:///F|/Service%20Manuals/Dell/Latitude/x300/upgrades.htm (4 of the connector slot.
Service Manual
Page 22
... NOTICE: If the cover is difficult to close may damage your computer and an electrical outlet. 12. As the computer boots, it . file:///F|/Service%20Manuals/Dell/Latitude/x300/upgrades.htm (5 of 14) [2/28/2004 8:26:29 AM] Insert the battery into the battery bay, or connect the AC adapter to close , remove the...
... NOTICE: If the cover is difficult to close may damage your computer and an electrical outlet. 12. As the computer boots, it . file:///F|/Service%20Manuals/Dell/Latitude/x300/upgrades.htm (5 of 14) [2/28/2004 8:26:29 AM] Insert the battery into the battery bay, or connect the AC adapter to close , remove the...


