Intel Responsiveness Technologies Guide
Page 31
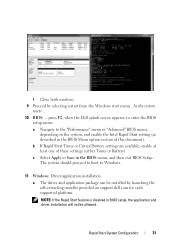
...the BIOS menu, and then exit BIOS Setup. Rapid Start System Configuration 31 The system should proceed to boot to the "Performance" menu or "Advanced" BIOS menu, depending on support.dell.com for each supported platform. a The driver and application package can be allowed. As the system resets...... 10 BIOS: ....press F2, when the Dell splash screen appears, to enter the BIOS setup menu: a Navigate to Windows. 11 Windows: Driver/application installation. NOTE: If the Rapid ...
...the BIOS menu, and then exit BIOS Setup. Rapid Start System Configuration 31 The system should proceed to boot to the "Performance" menu or "Advanced" BIOS menu, depending on support.dell.com for each supported platform. a The driver and application package can be allowed. As the system resets...... 10 BIOS: ....press F2, when the Dell splash screen appears, to enter the BIOS setup menu: a Navigate to Windows. 11 Windows: Driver/application installation. NOTE: If the Rapid ...

Intel Responsiveness Technologies Guide
Page 39
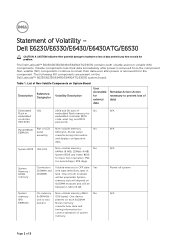
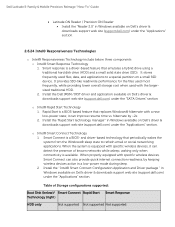
Supported Storage Configurations Boot Disk (below)/ Smart Connect Rapid Start Technology (right) Smart Response HDD only Not supported Not supported Not supported HDD + SSD Not supported HDD + ...
Supported Storage Configurations Boot Disk (below)/ Smart Connect Rapid Start Technology (right) Smart Response HDD only Not supported Not supported Not supported HDD + SSD Not supported HDD + ...
Statement of Volatility
Page 1
...1. N/A N/A N/A Power off system N/A Page 1 of system memory. One device one or two present on the Dell Latitude™ E6230/E6330/E6430/E6430ATG/E6530 system board. The following NV components are present on each SoDIMM. System Memory - Stores panel assembly manufacturing information and display... of LCD Non-volatile memory No EEPROM panel 64K bytes. Dell E6230/E6330/E6430/E6430ATG/E6530 CAUTION: A CAUTION indicates either potential damage to hardware or loss of No embedded Flash memory for basic boot operation, PSA (on SoDIMM modules and will be between 1...
...1. N/A N/A N/A Power off system N/A Page 1 of system memory. One device one or two present on the Dell Latitude™ E6230/E6330/E6430/E6430ATG/E6530 system board. The following NV components are present on each SoDIMM. System Memory - Stores panel assembly manufacturing information and display... of LCD Non-volatile memory No EEPROM panel 64K bytes. Dell E6230/E6330/E6430/E6430ATG/E6530 CAUTION: A CAUTION indicates either potential damage to hardware or loss of No embedded Flash memory for basic boot operation, PSA (on SoDIMM modules and will be between 1...
Statement of Volatility
Page 3
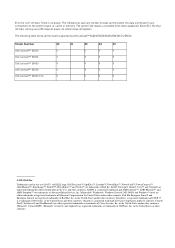
... does not save any component on which clears all the states supported by Dell Latitude™ E6230/E6330/E6430/E6430ATG/E6530 Model Number Dell Latitude™ E6230 Dell Latitude™ E6330 Dell Latitude™ E6430 Dell Latitude™ E6530 Dell Latitude™ E6430 ATG S0 S1 S3 S4 S5 X X X X X X X X X X X X X X X X X X X X © 2012 Dell Inc. and other countries. Novell® is a registered trademark and SUSE ™ is...
... does not save any component on which clears all the states supported by Dell Latitude™ E6230/E6330/E6430/E6430ATG/E6530 Model Number Dell Latitude™ E6230 Dell Latitude™ E6330 Dell Latitude™ E6430 Dell Latitude™ E6530 Dell Latitude™ E6430 ATG S0 S1 S3 S4 S5 X X X X X X X X X X X X X X X X X X X X © 2012 Dell Inc. and other countries. Novell® is a registered trademark and SUSE ™ is...
Latitude E-Family Re-Imaging Guide
Page 15
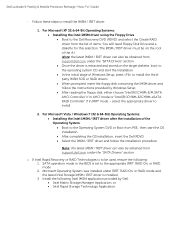
... Once the driver is extracted and stored on the root of items. You will need Floppy Disk Drive and a diskette for this selection. Dell Latitude E-Family & Mobile Precision Reimage "How-To" Guide - Follow these steps to install 2. SATA operation mode in IRRT mode - Install the following ...) Operating Systems: Installing the Intel IMSM / IRST driver after the installation of the Operating System Boot to the Operating System DVD or Boot from support.dell.com under IRRT, RAID On, or RAID mode and the latest Intel Storage IMSM / IRST driver is to be obtained...
... Once the driver is extracted and stored on the root of items. You will need Floppy Disk Drive and a diskette for this selection. Dell Latitude E-Family & Mobile Precision Reimage "How-To" Guide - Follow these steps to install 2. SATA operation mode in IRRT mode - Install the following ...) Operating Systems: Installing the Intel IMSM / IRST driver after the installation of the Operating System Boot to the Operating System DVD or Boot from support.dell.com under IRRT, RAID On, or RAID mode and the latest Intel Storage IMSM / IRST driver is to be obtained...
Latitude E-Family Re-Imaging Guide
Page 29
... software to install, boot to Latitude ON / Precision ON modes, Dell recommends installing the appropriate software. ARM module is installed: Install the "Control Point Button Service" in Windows available on Dell's driver & downloads support web site (support.dell.com) under the ...to hibernate Windows when switching to the system BIOS and check the following: 1. Dell Latitude E-Family & Mobile Precision Reimage "How-To" Guide 2.6.22 Windows Update o Dell recommends performing Microsoft Windows updates to ensure the latest security, reliability, and compatibility updates...
... software to install, boot to Latitude ON / Precision ON modes, Dell recommends installing the appropriate software. ARM module is installed: Install the "Control Point Button Service" in Windows available on Dell's driver & downloads support web site (support.dell.com) under the ...to hibernate Windows when switching to the system BIOS and check the following: 1. Dell Latitude E-Family & Mobile Precision Reimage "How-To" Guide 2.6.22 Windows Update o Dell recommends performing Microsoft Windows updates to ensure the latest security, reliability, and compatibility updates...
Latitude E-Family Re-Imaging Guide
Page 30
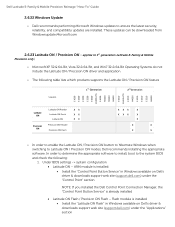
it can detect the presence of Storage configurations supported: Boot Disk (below three components o Intel® Smart Response Technology 1. o Intel® Smart Connect Technology 1 Smart Connect is a driver-based ...known networks while asleep, waking only when connectivity is available. Dell Latitude E-Family & Mobile Precision Reimage "How-To" Guide Latitude ON Reader / Precision ON Reader Install the "Reader 2.0" in Windows available on Dell's driver & downloads support web site (support.dell.com) under the "Applications" section 2.6.24 Intel® Responsiveness...
it can detect the presence of Storage configurations supported: Boot Disk (below three components o Intel® Smart Response Technology 1. o Intel® Smart Connect Technology 1 Smart Connect is a driver-based ...known networks while asleep, waking only when connectivity is available. Dell Latitude E-Family & Mobile Precision Reimage "How-To" Guide Latitude ON Reader / Precision ON Reader Install the "Reader 2.0" in Windows available on Dell's driver & downloads support web site (support.dell.com) under the "Applications" section 2.6.24 Intel® Responsiveness...
Latitude E-Family Re-Imaging Guide
Page 42
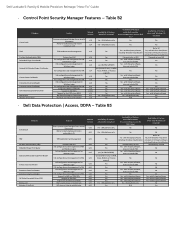
...3rd party software Yes - with 3rd party software Yes - Dell Latitude E-Family & Mobile Precision Reimage "How-To" Guide - Table B2 Category ControlVault TPM Pre-Boot Authentication (PBA) Embedded Finger Print Reader External Dell Branded Finger Print Reader Contact Smart Card Reader Contacless Smart Card... DCP does not interact with 3rd party software Yes - Table B3 Category ControlVault TPM Pre-Boot Authentication (PBA) Embedded Finger Print Reader External Dell Branded Finger Print Reader Contact Smart Card Reader Contacless Smart Card Reader Contacless Smart Card Reader ...
...3rd party software Yes - with 3rd party software Yes - Dell Latitude E-Family & Mobile Precision Reimage "How-To" Guide - Table B2 Category ControlVault TPM Pre-Boot Authentication (PBA) Embedded Finger Print Reader External Dell Branded Finger Print Reader Contact Smart Card Reader Contacless Smart Card... DCP does not interact with 3rd party software Yes - Table B3 Category ControlVault TPM Pre-Boot Authentication (PBA) Embedded Finger Print Reader External Dell Branded Finger Print Reader Contact Smart Card Reader Contacless Smart Card Reader Contacless Smart Card Reader ...
Owners Manual
Page 5
Boot Sequence...63 Navigation Keys...63 System Setup Options...64 Updating the BIOS ...72 System and Setup Password...72 Assigning a System Password and Setup Password 72 Deleting or Changing an Existing System and/or Setup Password 73 5 Diagnostics...75 Enhanced Pre-Boot System Assessment (ePSA) Diagnostics 75 6 Troubleshooting Your Computer 77 Device Status Lights...77 Battery Status Lights...78 7 Technical Specifications...79 8 Contacting Dell ...87
Boot Sequence...63 Navigation Keys...63 System Setup Options...64 Updating the BIOS ...72 System and Setup Password...72 Assigning a System Password and Setup Password 72 Deleting or Changing an Existing System and/or Setup Password 73 5 Diagnostics...75 Enhanced Pre-Boot System Assessment (ePSA) Diagnostics 75 6 Troubleshooting Your Computer 77 Device Status Lights...77 Battery Status Lights...78 7 Technical Specifications...79 8 Contacting Dell ...87
Owners Manual
Page 63
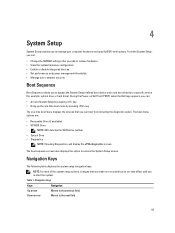
... allows you to bypass the System Setup‐defined boot device order and boot directly to a specific device (for example: optical drive or hard drive). During the Power-on Self Test (POST), when the Dell logo appears, you can : • Change the NVRAM settings after you add or remove hardware • View the...
... allows you to bypass the System Setup‐defined boot device order and boot directly to a specific device (for example: optical drive or hard drive). During the Power-on Self Test (POST), when the Dell logo appears, you can : • Change the NVRAM settings after you add or remove hardware • View the...

Owners Manual
Page 64
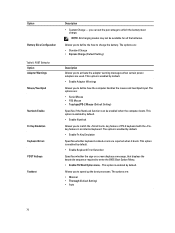
... Description This section lists the primary hardware features of your computer. • System Information • Memory Information • Processor Information • Device Information Battery Information Boot Sequence Displays the charge status of the battery. The options are: • Legacy (Default Setting) • UEFI Date/Time Allows you to set the date... selected. • Diskette Drive • Internal HDD • USB Storage Device • CD/DVD/CD-RW Drive • Onboard NIC You can also choose the Boot List option.
... Description This section lists the primary hardware features of your computer. • System Information • Memory Information • Processor Information • Device Information Battery Information Boot Sequence Displays the charge status of the battery. The options are: • Legacy (Default Setting) • UEFI Date/Time Allows you to set the date... selected. • Diskette Drive • Internal HDD • USB Storage Device • CD/DVD/CD-RW Drive • Onboard NIC You can also choose the Boot List option.

Owners Manual
Page 66
... option is disabled by default. • Enable USB PowerShare Allows you to configure the behavior of the keyboard illumination feature. The options are: • Enable Boot Support • Enable External USB Port Default Setting: both the options are enabled This option is disabled by default. Allows you to choose the operating...
... option is disabled by default. • Enable USB PowerShare Allows you to configure the behavior of the keyboard illumination feature. The options are: • Enable Boot Support • Enable External USB Port Default Setting: both the options are enabled This option is disabled by default. Allows you to choose the operating...

Owners Manual
Page 68
... the additional cores. The performance of the processor. Default Setting: Enable Intel SpeedStep Allows you to enter the Option ROM Configuration screens using hotkeys during boot. Default Setting: Enable Intel TurboBoost 68 The options are : • All (Default Setting) •1 •2 Allows you to prevent users from entering Setup when an...
... the additional cores. The performance of the processor. Default Setting: Enable Intel SpeedStep Allows you to enter the Option ROM Configuration screens using hotkeys during boot. Default Setting: Enable Intel TurboBoost 68 The options are : • All (Default Setting) •1 •2 Allows you to prevent users from entering Setup when an...
Owners Manual
Page 70
...displays a message, that displays the keystroke sequence required to activate the adapter warning messages when certain power adapters are reported when it boots. Allows you to define the how to which the battery must charge. Option Battery Slice Configuration Table 8. NOTE: All charging ...an internal keyboard. The options are: • Standard Charge • Express Charge (Default Setting) Description Allows you to speed up the boot processes. This option is enabled by default. • Enable Adapter Warnings Allows you can be available for all the batteries. This option...
...displays a message, that displays the keystroke sequence required to activate the adapter warning messages when certain power adapters are reported when it boots. Allows you to define the how to which the battery must charge. Option Battery Slice Configuration Table 8. NOTE: All charging ...an internal keyboard. The options are: • Standard Charge • Express Charge (Default Setting) Description Allows you to speed up the boot processes. This option is enabled by default. • Enable Adapter Warnings Allows you can be available for all the batteries. This option...

Owners Manual
Page 73
... press . Select System Password, alter or delete the existing system password and press or . 4. To enter a system setup, press immediately after a power-on or re-boot. 1. In the System Security screen, verify that you need not provide the system password to log on to save the changes. 8. Select System Password , enter...
... press . Select System Password, alter or delete the existing system password and press or . 4. To enter a system setup, press immediately after a power-on or re-boot. 1. In the System Security screen, verify that you need not provide the system password to log on to save the changes. 8. Select System Password , enter...

Owners Manual
Page 75
...computer. Power-on a specific device, press and click Yes to run the ePSA diagnostics before contacting Dell for specific devices require user interaction. As the computer boots, press the key as system diagnostics) performs a complete check of options for particular devices or device...'s hardware without requiring additional equipment or risking data loss. On the boot menu screen, select the Diagnostics option. Enhanced Pre-Boot System Assessment (ePSA) Diagnostics The ePSA diagnostics (also known as the Dell logo appears. 3. Using this program with the BIOS and is embedded...
...computer. Power-on a specific device, press and click Yes to run the ePSA diagnostics before contacting Dell for specific devices require user interaction. As the computer boots, press the key as system diagnostics) performs a complete check of options for particular devices or device...'s hardware without requiring additional equipment or risking data loss. On the boot menu screen, select the Diagnostics option. Enhanced Pre-Boot System Assessment (ePSA) Diagnostics The ePSA diagnostics (also known as the Dell logo appears. 3. Using this program with the BIOS and is embedded...


