Replacing the System Board
Page 1
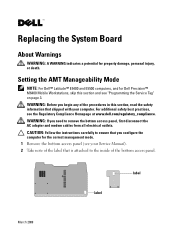
... 2009 Replacing the System Board About Warnings WARNING: A WARNING indicates a potential for Dell Precision™ M6400 Mobile Workstations, skip this section, read the safety information that shipped with your Service Manual). 2 Take note of the bottom access panel. WARNING: Before you need to ... access panel, first disconnect the AC adapter and modem cables from all electrical outlets. Setting the AMT Manageability Mode NOTE: For Dell™ Latitude™ E5400 and E5500 computers, and for property damage, personal injury, or death. For additional safety best practices, see "...
... 2009 Replacing the System Board About Warnings WARNING: A WARNING indicates a potential for Dell Precision™ M6400 Mobile Workstations, skip this section, read the safety information that shipped with your Service Manual). 2 Take note of the bottom access panel. WARNING: Before you need to ... access panel, first disconnect the AC adapter and modem cables from all electrical outlets. Setting the AMT Manageability Mode NOTE: For Dell™ Latitude™ E5400 and E5500 computers, and for property damage, personal injury, or death. For additional safety best practices, see "...
Replacing the System Board
Page 2
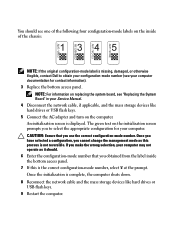
... flash keys. 5 Connect the AC adapter and turn on the computer. NOTE: For information on replacing the system board, see your Service Manual. 4 Disconnect the network cable, if applicable, and the mass storage devices like hard drives or USB flash keys. 9 Restart the computer....the System Board" in your computer documentation for your computer may not operate as this is missing, damaged, or otherwise illegible, contact Dell to select the appropriate configuration for contact information). 3 Replace the bottom access panel. CAUTION: Ensure that you use the correct configuration...
... flash keys. 5 Connect the AC adapter and turn on the computer. NOTE: For information on replacing the system board, see your Service Manual. 4 Disconnect the network cable, if applicable, and the mass storage devices like hard drives or USB flash keys. 9 Restart the computer....the System Board" in your computer documentation for your computer may not operate as this is missing, damaged, or otherwise illegible, contact Dell to select the appropriate configuration for contact information). 3 Replace the bottom access panel. CAUTION: Ensure that you use the correct configuration...
Replacing the Bottom Access Panel
Page 1
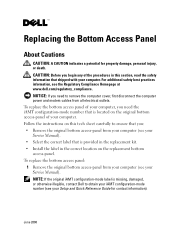
... on this section, read the safety information that is missing, damaged, or otherwise illegible, contact Dell to remove the computer cover, first disconnect the computer power and modem cables from your computer (see your Service Manual). • Select the correct label that is provided in the replacement kit. • Install ... A CAUTION indicates a potential for contact information). NOTICE: If you need to obtain your iAMT configuration-mode number (see the Regulatory Compliance Homepage at www.dell.com/regulatory_compliance. To replace the bottom access panel of your Service...
... on this section, read the safety information that is missing, damaged, or otherwise illegible, contact Dell to remove the computer cover, first disconnect the computer power and modem cables from your computer (see your Service Manual). • Select the correct label that is provided in the replacement kit. • Install ... A CAUTION indicates a potential for contact information). NOTICE: If you need to obtain your iAMT configuration-mode number (see the Regulatory Compliance Homepage at www.dell.com/regulatory_compliance. To replace the bottom access panel of your Service...

Replacing the Bottom Access Panel
Page 2
... reserved. is a registered trademark of Dell Inc.; iAMT is strictly forbidden. label label You should see one of the following four yellow iAMT configuration-mode labels on the new bottom access panel. 5 Replace the bottom access panel (see your Service Manual). Other trademarks and trade names may be... used in this text: Dell and the DELL logo are trademarks of Intel Corporation in this document is subject to either the entities claiming the ...
... reserved. is a registered trademark of Dell Inc.; iAMT is strictly forbidden. label label You should see one of the following four yellow iAMT configuration-mode labels on the new bottom access panel. 5 Replace the bottom access panel (see your Service Manual). Other trademarks and trade names may be... used in this text: Dell and the DELL logo are trademarks of Intel Corporation in this document is subject to either the entities claiming the ...

Identifying the Correct Modem for Your Dell Notebook
Page 1
... claiming the marks and names or their products. September 2009 NOTE: For more information, see the Regulatory Compliance Homepage at support.dell.com/manuals. 1 Remove the bottom access panel of the procedures in this document to refer to view this section, read the safety information...own. NOTE: You may be used in any of your computer. For additional safety best practices, see the Service Manual available on the Dell support website at www.dell.com/regulatory_compliance. is shipped with your notebook. 2 Note the system board part number located on the label. 3 ...
... claiming the marks and names or their products. September 2009 NOTE: For more information, see the Regulatory Compliance Homepage at support.dell.com/manuals. 1 Remove the bottom access panel of the procedures in this document to refer to view this section, read the safety information...own. NOTE: You may be used in any of your computer. For additional safety best practices, see the Service Manual available on the Dell support website at www.dell.com/regulatory_compliance. is shipped with your notebook. 2 Note the system board part number located on the label. 3 ...
Service Manual
Page 1
Intel is used in this document is strictly forbidden. Dell Inc. A00 Dell™ Latitude™ E6400 and E6400 ATG and Mobile Workstation Precision™ M2400 Service Manual Troubleshooting Working on Your Computer Base Assembly Hinge Covers Hard Drive WLAN/WiMax Card WWAN Card WPAN (... and trade names may be used in this text: Dell, Latitude, and the DELL logo are either trademarks or registered trademarks of Microsoft Corporation in the United States and/or other countries. Trademarks used by Dell under license; Information in this document to change without ...
Intel is used in this document is strictly forbidden. Dell Inc. A00 Dell™ Latitude™ E6400 and E6400 ATG and Mobile Workstation Precision™ M2400 Service Manual Troubleshooting Working on Your Computer Base Assembly Hinge Covers Hard Drive WLAN/WiMax Card WWAN Card WPAN (... and trade names may be used in this text: Dell, Latitude, and the DELL logo are either trademarks or registered trademarks of Microsoft Corporation in the United States and/or other countries. Trademarks used by Dell under license; Information in this document to change without ...

Service Manual
Page 2
Back to Contents Page 1394 Card Dell™ Latitude™ E6400 and E6400 ATG and Mobile Workstation Precision™ M2400 Service Manual Removing the 1394 Card Replacing the 1394 Card Removing the 1394 Card CAUTION: Before you begin the following procedure, follow ... 8. Remove the LED cover (see Removing the Hinge Covers). 5. Remove the right speaker grill (see Removing the Display Assembly (E6400 and M2400) or Removing the Display Assembly (E6400 ATG)). 7. Remove the display assembly (see Removing the Right Speaker Grill/Fingerprint Reader Assembly). 10. Remove the palm rest assembly...
Back to Contents Page 1394 Card Dell™ Latitude™ E6400 and E6400 ATG and Mobile Workstation Precision™ M2400 Service Manual Removing the 1394 Card Replacing the 1394 Card Removing the 1394 Card CAUTION: Before you begin the following procedure, follow ... 8. Remove the LED cover (see Removing the Hinge Covers). 5. Remove the right speaker grill (see Removing the Display Assembly (E6400 and M2400) or Removing the Display Assembly (E6400 ATG)). 7. Remove the display assembly (see Removing the Right Speaker Grill/Fingerprint Reader Assembly). 10. Remove the palm rest assembly...
Service Manual
Page 4
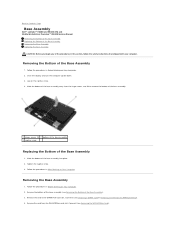
... (see Removing a WWAN Card or Removing an FCM from the hinge covers, and lift to Contents Page Base Assembly Dell™ Latitude™ E6400 and E6400 ATG and Mobile Workstation Precision™ M2400 Service Manual Removing the Bottom of the Base Assembly Replacing the Bottom of the Base Assembly Removing the Base Assembly Replacing the...
... (see Removing a WWAN Card or Removing an FCM from the hinge covers, and lift to Contents Page Base Assembly Dell™ Latitude™ E6400 and E6400 ATG and Mobile Workstation Precision™ M2400 Service Manual Removing the Bottom of the Base Assembly Replacing the Bottom of the Base Assembly Removing the Base Assembly Replacing the...
Service Manual
Page 7
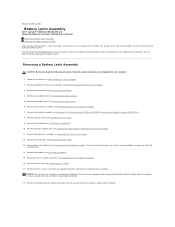
... 3. Remove the display assembly (see Removing the Bottom of the base assembly (see Removing the Display Assembly (E6400 and M2400) or Removing the Display Assembly (E6400 ATG)). 8. Remove the M2 x 3-mm screw from the alignment bracket and set it aside until the assembly...a right, and each latch uses a unique latch assembly. Back to Contents Page Battery Latch Assembly Dell™ Latitude™ E6400 and E6400 ATG and Mobile Workstation Precision™ M2400 Service Manual Removing a Battery Latch Assembly Replacing the Battery Latch Assembly There are primarily the same for the right...
... 3. Remove the display assembly (see Removing the Bottom of the base assembly (see Removing the Display Assembly (E6400 and M2400) or Removing the Display Assembly (E6400 ATG)). 8. Remove the M2 x 3-mm screw from the alignment bracket and set it aside until the assembly...a right, and each latch uses a unique latch assembly. Back to Contents Page Battery Latch Assembly Dell™ Latitude™ E6400 and E6400 ATG and Mobile Workstation Precision™ M2400 Service Manual Removing a Battery Latch Assembly Replacing the Battery Latch Assembly There are primarily the same for the right...
Service Manual
Page 10
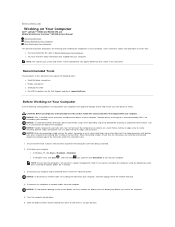
.... NOTE: The color of the computer. Damage due to Contents Page Working on Your Computer Dell™ Latitude™ E6400 and E6400 ATG and Mobile Workstation Precision™ M2400 Service Manual Recommended Tools Before Working on Your Computer After Working on Your Computer. NOTICE: Handle components and... the following tools: l Small flat-blade screwdriver l Phillips screwdriver l Small plastic scribe l Flash BIOS update (see the Dell Support website at support.dell.com) Before Working on the locking tabs to the system board, you must remove the battery from the battery bay before...
.... NOTE: The color of the computer. Damage due to Contents Page Working on Your Computer Dell™ Latitude™ E6400 and E6400 ATG and Mobile Workstation Precision™ M2400 Service Manual Recommended Tools Before Working on Your Computer After Working on Your Computer. NOTICE: Handle components and... the following tools: l Small flat-blade screwdriver l Phillips screwdriver l Small plastic scribe l Flash BIOS update (see the Dell Support website at support.dell.com) Before Working on the locking tabs to the system board, you must remove the battery from the battery bay before...

Service Manual
Page 13
... flash the BIOS from a CD for your desktop. 8. Click Save this process once it begins. The file downloads to your computer at support.dell.com. 4. Failure to do so may cause system damage. 1. Failure to download the file. 5. Ensure that the AC adapter is plugged in... Otherwise, you must enter the system setup program to Contents Page Back to Contents Page Flashing the BIOS Dell™ Latitude™ E6400 and E6400 ATG and Mobile Workstation Precision™ M2400 Service Manual Flashing the BIOS From a CD Flashing the BIOS From the Hard Drive If a BIOS-update program CD...
... flash the BIOS from a CD for your desktop. 8. Click Save this process once it begins. The file downloads to your computer at support.dell.com. 4. Failure to do so may cause system damage. 1. Failure to download the file. 5. Ensure that the AC adapter is plugged in... Otherwise, you must enter the system setup program to Contents Page Back to Contents Page Flashing the BIOS Dell™ Latitude™ E6400 and E6400 ATG and Mobile Workstation Precision™ M2400 Service Manual Flashing the BIOS From a CD Flashing the BIOS From the Hard Drive If a BIOS-update program CD...
Service Manual
Page 15
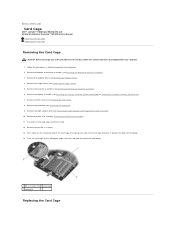
...Removing the Palm Rest Assembly). 11. Pivot the card cage up to Contents Page Card Cage Dell™ Latitude™ E6400 and E6400 ATG and Mobile Workstation Precision™ M2400 Service Manual Removing the Card Cage Replacing the Card Cage Removing the Card Cage CAUTION: Before you begin ...Reader Assembly). 10. Remove the display assembly (see Removing the Keyboard). 9. Remove the keyboard (see Removing the Display Assembly (E6400 and M2400) or Removing the Display Assembly (E6400 ATG)). 7. Remove the two M2 x 3 screws. 13. If a card is in this section, follow the safety ...
...Removing the Palm Rest Assembly). 11. Pivot the card cage up to Contents Page Card Cage Dell™ Latitude™ E6400 and E6400 ATG and Mobile Workstation Precision™ M2400 Service Manual Removing the Card Cage Replacing the Card Cage Removing the Card Cage CAUTION: Before you begin ...Reader Assembly). 10. Remove the display assembly (see Removing the Keyboard). 9. Remove the keyboard (see Removing the Display Assembly (E6400 and M2400) or Removing the Display Assembly (E6400 ATG)). 7. Remove the two M2 x 3 screws. 13. If a card is in this section, follow the safety ...
Service Manual
Page 17
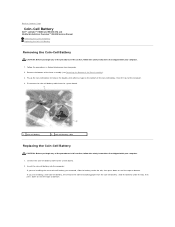
... in this section, follow the safety instructions that shipped with your computer. 1. Back to Contents Page Coin-Cell Battery Dell™ Latitude™ E6400 and E6400 ATG and Mobile Workstation Precision™ M2400 Service Manual Removing the Coin-Cell Battery Replacing the Coin-Cell Battery Removing the Coin-Cell Battery CAUTION: Before you begin any...
... in this section, follow the safety instructions that shipped with your computer. 1. Back to Contents Page Coin-Cell Battery Dell™ Latitude™ E6400 and E6400 ATG and Mobile Workstation Precision™ M2400 Service Manual Removing the Coin-Cell Battery Replacing the Coin-Cell Battery Removing the Coin-Cell Battery CAUTION: Before you begin any...
Service Manual
Page 19
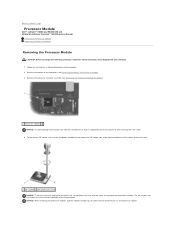
... NOTICE: To avoid damage to the processor, hold the screwdriver so that it comes to Contents Page Processor Module Dell™ Latitude™ E6400 and E6400 ATG and Mobile Workstation Precision™ M2400 Service Manual Removing the Processor Module Replacing the Processor Module Removing the Processor Module CAUTION: Before you begin the following procedure, follow...
... NOTICE: To avoid damage to the processor, hold the screwdriver so that it comes to Contents Page Processor Module Dell™ Latitude™ E6400 and E6400 ATG and Mobile Workstation Precision™ M2400 Service Manual Removing the Processor Module Replacing the Processor Module Removing the Processor Module CAUTION: Before you begin the following procedure, follow...
Service Manual
Page 21
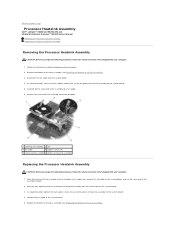
... screw-end of the assembly up at an angle, then connect the fan cable to Contents Page Processor Heatsink Assembly Dell™ Latitude™ E6400 and E6400 ATG and Mobile Workstation Precision™ M2400 Service Manual Removing the Processor Heatsink Assembly Replacing the Processor Heatsink Assembly Removing the Processor Heatsink Assembly CAUTION: Before you begin...
... screw-end of the assembly up at an angle, then connect the fan cable to Contents Page Processor Heatsink Assembly Dell™ Latitude™ E6400 and E6400 ATG and Mobile Workstation Precision™ M2400 Service Manual Removing the Processor Heatsink Assembly Replacing the Processor Heatsink Assembly Removing the Processor Heatsink Assembly CAUTION: Before you begin...
Service Manual
Page 23
...the display assembly (see Removing the System Board Assembly). Remove the system board (see Removing the Display Assembly (E6400 and M2400) or Removing the Display Assembly (E6400 ATG)). 8. Remove the hard drive (see Removing the Palm Rest Assembly). 12. Remove the palm rest assembly... Removing the Hinge Covers). 6. Remove the bottom of the Base Assembly). 3. Back to Contents Page I/O Card Dell™ Latitude™ E6400 and E6400 ATG and Mobile Workstation Precision™ M2400 Service Manual Removing the I/O Card Replacing the I/O Card Removing the I /O card. 18.
...the display assembly (see Removing the System Board Assembly). Remove the system board (see Removing the Display Assembly (E6400 and M2400) or Removing the Display Assembly (E6400 ATG)). 8. Remove the hard drive (see Removing the Palm Rest Assembly). 12. Remove the palm rest assembly... Removing the Hinge Covers). 6. Remove the bottom of the Base Assembly). 3. Back to Contents Page I/O Card Dell™ Latitude™ E6400 and E6400 ATG and Mobile Workstation Precision™ M2400 Service Manual Removing the I/O Card Replacing the I/O Card Removing the I /O card. 18.
Service Manual
Page 26
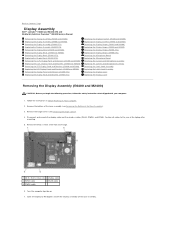
... cable 6. Back to Contents Page Display Assembly Dell™ Latitude™ E6400 and E6400 ATG and Mobile Workstation Precision™ M2400 Service Manual Removing the Display Assembly (E6400 and M2400) Replacing the Display Assembly (E6400 and M2400) Removing the Display Assembly (E6400 ATG) Replacing the Display Assembly (E6400 ATG) Removing the Display Bezel (E6400 and M2400) Replacing the Display Bezel...
... cable 6. Back to Contents Page Display Assembly Dell™ Latitude™ E6400 and E6400 ATG and Mobile Workstation Precision™ M2400 Service Manual Removing the Display Assembly (E6400 and M2400) Replacing the Display Assembly (E6400 and M2400) Removing the Display Assembly (E6400 ATG) Replacing the Display Assembly (E6400 ATG) Removing the Display Bezel (E6400 and M2400) Replacing the Display Bezel...
Service Manual
Page 46
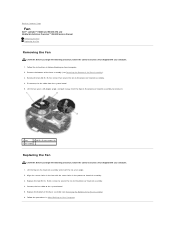
....5 x 5-mm screws that shipped with your computer. 1. Lift the fan up at an angle. 2. Back to Contents Page Fan Dell™ Latitude™ E6400 and E6400 ATG and Mobile Workstation Precision™ M2400 Service Manual Removing the Fan Replacing the Fan Removing the Fan CAUTION: Before you begin the following procedure, follow the safety instructions...
....5 x 5-mm screws that shipped with your computer. 1. Lift the fan up at an angle. 2. Back to Contents Page Fan Dell™ Latitude™ E6400 and E6400 ATG and Mobile Workstation Precision™ M2400 Service Manual Removing the Fan Replacing the Fan Removing the Fan CAUTION: Before you begin the following procedure, follow the safety instructions...

Service Manual
Page 48
... out of the card connector on the system. Back to remove it forward then lift to Contents Page FCM Dell™ Latitude™ E6400 and E6400 ATG and Mobile Workstation Precision™ M2400 Service Manual Removing an FCM from the WWAN/FCM Slot Removing an FCM from the WPAN/UWB/FCM Slot Replacing an FCM...
... out of the card connector on the system. Back to remove it forward then lift to Contents Page FCM Dell™ Latitude™ E6400 and E6400 ATG and Mobile Workstation Precision™ M2400 Service Manual Removing an FCM from the WWAN/FCM Slot Removing an FCM from the WPAN/UWB/FCM Slot Replacing an FCM...
Service Manual
Page 51
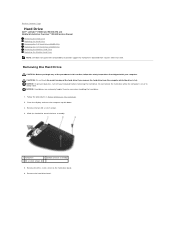
... Drive Dell™ Latitude™ E6400 and E6400 ATG and Mobile Workstation Precision™ M2400 Service Manual Removing the Hard Drive Replacing the Hard Drive Removing the 1.8" Hard Drive (E6400 ATG) Replacing the 1.8" Hard Drive (E6400 ATG) Removing the Modular Hard Drive Replacing the Modular Hard Drive NOTE: Dell does ...down. 3. Removing the Hard Drive CAUTION: Before you begin any of the hard drive if you remove the hard drive from sources other than Dell. Slide the hard drive out of the base assembly. 1 hard drive 2 bottom of base assembly 3 M3 x 3-mm screws (2) 5. ...
... Drive Dell™ Latitude™ E6400 and E6400 ATG and Mobile Workstation Precision™ M2400 Service Manual Removing the Hard Drive Replacing the Hard Drive Removing the 1.8" Hard Drive (E6400 ATG) Replacing the 1.8" Hard Drive (E6400 ATG) Removing the Modular Hard Drive Replacing the Modular Hard Drive NOTE: Dell does ...down. 3. Removing the Hard Drive CAUTION: Before you begin any of the hard drive if you remove the hard drive from sources other than Dell. Slide the hard drive out of the base assembly. 1 hard drive 2 bottom of base assembly 3 M3 x 3-mm screws (2) 5. ...


