Setup and Features Information Tech Sheet
Page 1
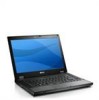
... 19 touchpad 20 trackstick and trackstick buttons (optional) 21 left speaker 22 device status lights 23 keyboard status lights Regulatory Models: P06G and P05F Regulatory Types: P06G001 and P05F001 May 2010 Dell™ Latitude™ E5410/E5510 Setup and Features Information About Warnings WARNING: A WARNING indicates a potential for property damage, personal injury, or death. Latitude E5410 -
... 19 touchpad 20 trackstick and trackstick buttons (optional) 21 left speaker 22 device status lights 23 keyboard status lights Regulatory Models: P06G and P05F Regulatory Types: P06G001 and P05F001 May 2010 Dell™ Latitude™ E5410/E5510 Setup and Features Information About Warnings WARNING: A WARNING indicates a potential for property damage, personal injury, or death. Latitude E5410 -

Setup and Features Information Tech Sheet
Page 3
Latitude E5510 - Front View 1 23 4 5 6 7 24 23 22 21 20 19 18 17 16 8 9 10 14 15 11 12 13 1 display latch 2 built-in microphone 3 camera ... 10 right speaker 11 serial connector 12 USB 2.0 connectors (2) 13 network connector 14 optical drive 15 optical drive eject button 16 fingerprint reader (optional) 17 keyboard 18 touchpad buttons 19 wireless switch 20 touchpad 21 trackstick and trackstick buttons (optional) 22 left speaker 23 device status lights 24...
Latitude E5510 - Front View 1 23 4 5 6 7 24 23 22 21 20 19 18 17 16 8 9 10 14 15 11 12 13 1 display latch 2 built-in microphone 3 camera ... 10 right speaker 11 serial connector 12 USB 2.0 connectors (2) 13 network connector 14 optical drive 15 optical drive eject button 16 fingerprint reader (optional) 17 keyboard 18 touchpad buttons 19 wireless switch 20 touchpad 21 trackstick and trackstick buttons (optional) 22 left speaker 23 device status lights 24...
Setup and Features Information Tech Sheet
Page 5
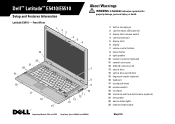
... AC adapter to the AC adapter connector on the portable computer and to the electrical outlet. 3 Connect USB devices, such as a mouse or a keyboard (optional). 5 Open the computer display and press the power button to turn on and shut down your computer. Quick Setup WARNING: Before you begin any...the computer to avoid damaging the cable. NOTE: Some devices may cause fire or equipment damage. For additional best practices information, see www.dell.com/regulatory_compliance. WARNING: The AC adapter works with your computer at least once before you install any of the connector on the AC ...
... AC adapter to the AC adapter connector on the portable computer and to the electrical outlet. 3 Connect USB devices, such as a mouse or a keyboard (optional). 5 Open the computer display and press the power button to turn on and shut down your computer. Quick Setup WARNING: Before you begin any...the computer to avoid damaging the cable. NOTE: Some devices may cause fire or equipment damage. For additional best practices information, see www.dell.com/regulatory_compliance. WARNING: The AC adapter works with your computer at least once before you install any of the connector on the AC ...
Service Manual
Page 4
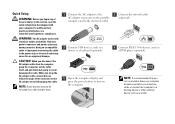
... best practices information, see the Regulatory Compliance Homepage at www.dell.com/regulatory_compliance. Remove the battery from the computer. 7. Remove the keyboard from the computer. 3. Remove the screws securing the bottom of the display assembly to Contents Page Display Assembly Dell™ Latitude™ E5410 Discrete Service Manual WARNING: Before working inside your computer, read...
... best practices information, see the Regulatory Compliance Homepage at www.dell.com/regulatory_compliance. Remove the battery from the computer. 7. Remove the keyboard from the computer. 3. Remove the screws securing the bottom of the display assembly to Contents Page Display Assembly Dell™ Latitude™ E5410 Discrete Service Manual WARNING: Before working inside your computer, read...
Service Manual
Page 11
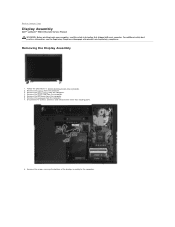
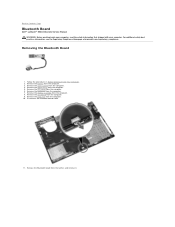
Back to Contents Page Bluetooth Board Dell™ Latitude™ E5410 Discrete Service Manual WARNING: Before working inside your computer, read the safety information that shipped with your computer. For additional safety best practices information, see the Regulatory Compliance Homepage at www.dell.com/regulatory_compliance. Remove the access panel from the computer. 6. Remove the LED...
Back to Contents Page Bluetooth Board Dell™ Latitude™ E5410 Discrete Service Manual WARNING: Before working inside your computer, read the safety information that shipped with your computer. For additional safety best practices information, see the Regulatory Compliance Homepage at www.dell.com/regulatory_compliance. Remove the access panel from the computer. 6. Remove the LED...
Service Manual
Page 13
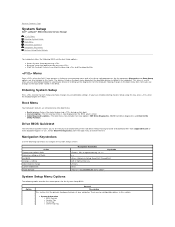
...in the boot menu does not make changes to user-definable settings. Back to Contents Page System Setup Dell™ Latitude™ E5410 Discrete Service Manual Menu Entering System Setup Boot Menu Drive BIOS Quicktest Navigation Keystrokes System Setup Menu Options ... (90/90 hard drive diagnostics) and Boot to navigate the System Setup screens. Select IDE Drive Diagnostics from support.dell.com or make bootable floppies or CDs. l System Information ¡ BIOS Version ¡ Service Tag ¡ Asset... to the boot order stored in this key, press when the keyboard lights first flash.
...in the boot menu does not make changes to user-definable settings. Back to Contents Page System Setup Dell™ Latitude™ E5410 Discrete Service Manual Menu Entering System Setup Boot Menu Drive BIOS Quicktest Navigation Keystrokes System Setup Menu Options ... (90/90 hard drive diagnostics) and Boot to navigate the System Setup screens. Select IDE Drive Diagnostics from support.dell.com or make bootable floppies or CDs. l System Information ¡ BIOS Version ¡ Service Tag ¡ Asset... to the boot order stored in this key, press when the keyboard lights first flash.
Service Manual
Page 14
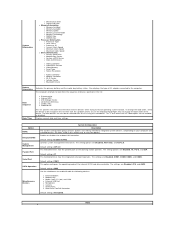
.... The boot devices can be de-selected from the sequence of devices specified in the list then click the up/down arrows or use the keyboard PgUp/PgDn keys to change the boot order, select the device to be changed in this section may or may not appear.) Enables or disables...
.... The boot devices can be de-selected from the sequence of devices specified in the list then click the up/down arrows or use the keyboard PgUp/PgDn keys to change the boot order, select the device to be changed in this section may or may not appear.) Enables or disables...
Service Manual
Page 16
...on LAN/WLAN Use the checkbox to use the key on by a special wireless LAN signal. USB keyboards will remove power from the LAN or wireless LAN. ExpressCharge™ = Dell fast charging technology (not available for your configuration. The BIOS displays these messages if you use a... power adapter that the system might not notice immediately when an external keyboard is Thorough. This field lets you use the ...
...on LAN/WLAN Use the checkbox to use the key on by a special wireless LAN signal. USB keyboards will remove power from the LAN or wireless LAN. ExpressCharge™ = Dell fast charging technology (not available for your configuration. The BIOS displays these messages if you use a... power adapter that the system might not notice immediately when an external keyboard is Thorough. This field lets you use the ...
Service Manual
Page 22
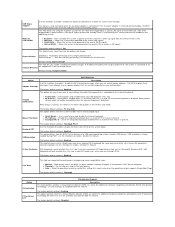
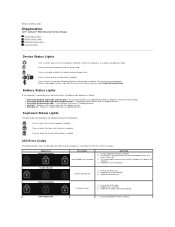
... on when wireless networking is enabled. l Alternately blinking amber light with AC adapter present. Keyboard Status Lights The green lights located above the keyboard indicate the following table shows the possible LED codes that may display in the system tray and...-FLASH LCD panel error 1. An unauthenticated or unsupported non-Dell AC adapter is enabled. Replace the processor. Back to Contents Page Diagnostics Dell™ Latitude™ E5410 Discrete Service Manual Device Status Lights Battery Status Lights Keyboard Status Lights LED Error Codes Device Status Lights Turns on...
... on when wireless networking is enabled. l Alternately blinking amber light with AC adapter present. Keyboard Status Lights The green lights located above the keyboard indicate the following table shows the possible LED codes that may display in the system tray and...-FLASH LCD panel error 1. An unauthenticated or unsupported non-Dell AC adapter is enabled. Replace the processor. Back to Contents Page Diagnostics Dell™ Latitude™ E5410 Discrete Service Manual Device Status Lights Battery Status Lights Keyboard Status Lights LED Error Codes Device Status Lights Turns on...
Service Manual
Page 26
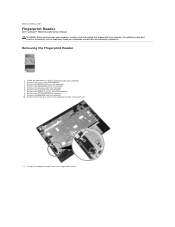
... the fingerprint reader cover at www.dell.com/regulatory_compliance. Remove the keyboard from the computer. 3. Remove the LED board from the computer. 6. Remove the screw that shipped with your computer, read the safety information that secures the fingerprint reader to Contents Page Fingerprint Reader Dell™ Latitude™ E5410 Discrete Service Manual WARNING: Before working...
... the fingerprint reader cover at www.dell.com/regulatory_compliance. Remove the keyboard from the computer. 3. Remove the LED board from the computer. 6. Remove the screw that shipped with your computer, read the safety information that secures the fingerprint reader to Contents Page Fingerprint Reader Dell™ Latitude™ E5410 Discrete Service Manual WARNING: Before working...
Service Manual
Page 34
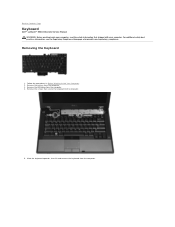
Remove the screws that secure the keyboard to Contents Page Keyboard Dell™ Latitude™ E5410 Discrete Service Manual WARNING: Before working inside your computer, read the safety information that shipped with your computer. Follow the procedures in Before Working Inside ...
Remove the screws that secure the keyboard to Contents Page Keyboard Dell™ Latitude™ E5410 Discrete Service Manual WARNING: Before working inside your computer, read the safety information that shipped with your computer. Follow the procedures in Before Working Inside ...

Service Manual
Page 35
Back to Contents Page Replacing the Keyboard To replace the keyboard, perform the above steps in reverse order.
Back to Contents Page Replacing the Keyboard To replace the keyboard, perform the above steps in reverse order.
Service Manual
Page 36
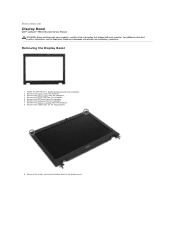
... the computer. 8. Remove the display assembly from the computer. 5. Back to the display cover. Remove the keyboard from the computer. 6. Remove the screws securing the display bezel to Contents Page Display Bezel Dell™ Latitude™ E5410 Discrete Service Manual WARNING: Before working inside your computer, read the safety information that shipped with your...
... the computer. 8. Remove the display assembly from the computer. 5. Back to the display cover. Remove the keyboard from the computer. 6. Remove the screws securing the display bezel to Contents Page Display Bezel Dell™ Latitude™ E5410 Discrete Service Manual WARNING: Before working inside your computer, read the safety information that shipped with your...

Service Manual
Page 39
Remove the keyboard from the display assembly. 10. Remove the display panel, bracket and hinges from the computer. 7. Remove the LED cover from the computer. 5. For additional safety best practices information, see the Regulatory Compliance Homepage at www.dell.com/regulatory_compliance. Remove the ... Disconnect the display camera data cable. 11. Lift up the display camera and remove. Back to Contents Page Camera Dell™ Latitude™ E5410 Discrete Service Manual WARNING: Before working inside your computer, read the safety information that shipped with your computer. Remove ...
Remove the keyboard from the display assembly. 10. Remove the display panel, bracket and hinges from the computer. 7. Remove the LED cover from the computer. 5. For additional safety best practices information, see the Regulatory Compliance Homepage at www.dell.com/regulatory_compliance. Remove the ... Disconnect the display camera data cable. 11. Lift up the display camera and remove. Back to Contents Page Camera Dell™ Latitude™ E5410 Discrete Service Manual WARNING: Before working inside your computer, read the safety information that shipped with your computer. Remove ...
Service Manual
Page 41
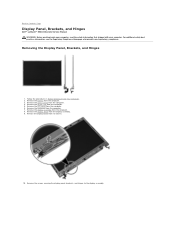
...Remove the screws securing the display panel, brackets, and hinges to Contents Page Display Panel, Brackets, and Hinges Dell™ Latitude™ E5410 Discrete Service Manual WARNING: Before working inside your computer, read the safety information that shipped with your computer. Remove... from its latches. 10. Remove the keyboard from the computer. 4. Remove the access panel from the computer. 7. Back to the display assembly. For additional safety best practices information, see the Regulatory Compliance Homepage at www.dell.com/regulatory_compliance. Removing the Display Panel,...
...Remove the screws securing the display panel, brackets, and hinges to Contents Page Display Panel, Brackets, and Hinges Dell™ Latitude™ E5410 Discrete Service Manual WARNING: Before working inside your computer, read the safety information that shipped with your computer. Remove... from its latches. 10. Remove the keyboard from the computer. 4. Remove the access panel from the computer. 7. Back to the display assembly. For additional safety best practices information, see the Regulatory Compliance Homepage at www.dell.com/regulatory_compliance. Removing the Display Panel,...

Service Manual
Page 45
... from the computer. 4. Disconnect the LED Board cable. Removing the LED Board 1. Remove the LED cover from the computer. 3. Back to Contents Page LED Board Dell™ Latitude™ E5410 Discrete Service Manual WARNING: Before working inside your computer, read the safety information that shipped with your computer. Remove the...
... from the computer. 4. Disconnect the LED Board cable. Removing the LED Board 1. Remove the LED cover from the computer. 3. Back to Contents Page LED Board Dell™ Latitude™ E5410 Discrete Service Manual WARNING: Before working inside your computer, read the safety information that shipped with your computer. Remove the...
Service Manual
Page 51
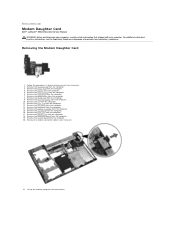
...card from the computer. 15. Remove the system board from the computer. 13. Back to Contents Page Modem Daughter Card Dell™ Latitude™ E5410 Discrete Service Manual WARNING: Before working inside your computer, read the safety information that shipped with your computer. Remove the LED...the computer. 3. Remove the coin-cell battery from the computer. 17. Remove the palm rest from the computer. 10. Remove the keyboard from the computer. 8. Follow the procedures in Before Working Inside Your Computer. 2. Remove the optical drive from the computer. 14. ...
...card from the computer. 15. Remove the system board from the computer. 13. Back to Contents Page Modem Daughter Card Dell™ Latitude™ E5410 Discrete Service Manual WARNING: Before working inside your computer, read the safety information that shipped with your computer. Remove the LED...the computer. 3. Remove the coin-cell battery from the computer. 17. Remove the palm rest from the computer. 10. Remove the keyboard from the computer. 8. Follow the procedures in Before Working Inside Your Computer. 2. Remove the optical drive from the computer. 14. ...
Service Manual
Page 55
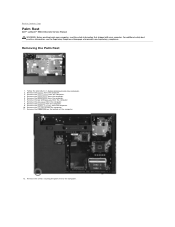
...the computer. 10. Remove the display assembly from the computer. 7. Remove the screws securing the palm rest to Contents Page Palm Rest Dell™ Latitude™ E5410 Discrete Service Manual WARNING: Before working inside your computer, read the safety information that shipped with your computer. Remove the LED cover ...12. Remove the access panel from the computer. 11. For additional safety best practices information, see the Regulatory Compliance Homepage at www.dell.com/regulatory_compliance. Remove the LED Board from the computer. 4. Remove the keyboard from the computer. 9.
...the computer. 10. Remove the display assembly from the computer. 7. Remove the screws securing the palm rest to Contents Page Palm Rest Dell™ Latitude™ E5410 Discrete Service Manual WARNING: Before working inside your computer, read the safety information that shipped with your computer. Remove the LED cover ...12. Remove the access panel from the computer. 11. For additional safety best practices information, see the Regulatory Compliance Homepage at www.dell.com/regulatory_compliance. Remove the LED Board from the computer. 4. Remove the keyboard from the computer. 9.

Service Manual
Page 61
Back to Contents Page Adding and Replacing Parts Dell™ Latitude™ E5410 Discrete Service Manual Battery Phone SIM Access Panel LED Cover WLAN Card Memory Coin-Cell Battery Hard Drive Optical Drive Keyboard Memory Card Fan Heat Sink Processor LED Board Display Assembly Display Bezel Display Panel, Bracket and Hinges Display Camera Palm Rest Fingerprint Reader WWAN Card Speakers Bluetooth Board System Board Modem Daughter Card Back to Contents Page
Back to Contents Page Adding and Replacing Parts Dell™ Latitude™ E5410 Discrete Service Manual Battery Phone SIM Access Panel LED Cover WLAN Card Memory Coin-Cell Battery Hard Drive Optical Drive Keyboard Memory Card Fan Heat Sink Processor LED Board Display Assembly Display Bezel Display Panel, Bracket and Hinges Display Camera Palm Rest Fingerprint Reader WWAN Card Speakers Bluetooth Board System Board Modem Daughter Card Back to Contents Page

Service Manual
Page 66
Remove the battery from the computer. 7. Remove the keyboard from the computer. 3. Remove the LED board from the computer. 5. Remove the screws securing the touchpad cover bracket to Contents Page Speakers Dell™ Latitude™ E5410 Discrete Service Manual WARNING: Before working inside your computer, read the safety information that shipped with your computer. Lift...
Remove the battery from the computer. 7. Remove the keyboard from the computer. 3. Remove the LED board from the computer. 5. Remove the screws securing the touchpad cover bracket to Contents Page Speakers Dell™ Latitude™ E5410 Discrete Service Manual WARNING: Before working inside your computer, read the safety information that shipped with your computer. Lift...


