
Quick Reference Guide
Page 11
Left Side View 1 2 345 6 7 89 1 security cable slot 2 air vents 4 smart card slot (with blank) 5 1394 connector 7 Wi-Fi Catcher™ light 8 PC Card/ExpressCard slot Right Side View 3 audio connectors (2) 6 wireless switch 9 hard drive 1 1 optical drive in media bay 2 media-bay device latch release 2 3 3 USB connectors (2) Quick Reference Guide 11
Left Side View 1 2 345 6 7 89 1 security cable slot 2 air vents 4 smart card slot (with blank) 5 1394 connector 7 Wi-Fi Catcher™ light 8 PC Card/ExpressCard slot Right Side View 3 audio connectors (2) 6 wireless switch 9 hard drive 1 1 optical drive in media bay 2 media-bay device latch release 2 3 3 USB connectors (2) Quick Reference Guide 11
Quick Reference Guide
Page 12
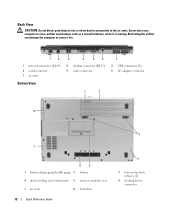
... 8 7 6 5 1 battery charge gauge/health gauge 2 battery 4 device locking screw (if present) 5 memory module cover 7 air vents 8 hard drive 12 Quick Reference Guide 3 4 3 battery-bay latch releases (2) 6 docking device connector Back View CAUTION: Do not block, push objects into, or allow dust to accumulate in a low-airflow environment, such as a closed briefcase...
... 8 7 6 5 1 battery charge gauge/health gauge 2 battery 4 device locking screw (if present) 5 memory module cover 7 air vents 8 hard drive 12 Quick Reference Guide 3 4 3 battery-bay latch releases (2) 6 docking device connector Back View CAUTION: Do not block, push objects into, or allow dust to accumulate in a low-airflow environment, such as a closed briefcase...
Quick Reference Guide
Page 14
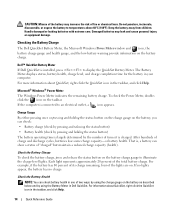
...equipment damage. Damaged batteries may increase the risk of fire or chemical burn. Dell™ QuickSet Battery Meter If Dell QuickSet is charged. Check the Battery Charge To check the battery charge, press and release the status button on the battery, you can check battery health in one ... lose some charge capacity-or battery health. Check the Battery Health NOTE: You can check: • Battery charge (check by pressing and releasing the status button) • Battery health (check by pressing and holding the status button) The battery operating time is largely determined by using...
...equipment damage. Damaged batteries may increase the risk of fire or chemical burn. Dell™ QuickSet Battery Meter If Dell QuickSet is charged. Check the Battery Charge To check the battery charge, press and release the status button on the battery, you can check battery health in one ... lose some charge capacity-or battery health. Check the Battery Health NOTE: You can check: • Battery charge (check by pressing and releasing the status button) • Battery health (check by pressing and holding the status button) The battery operating time is largely determined by using...
Quick Reference Guide
Page 16
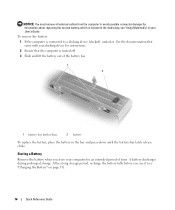
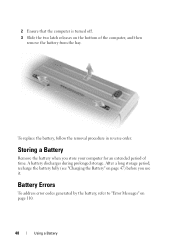
... computer to a docking device (docked), undock it (see "Using Multimedia" in your docking device for an extended period of the battery bay. 1 2 1 battery-bay latch release 2 battery To replace the battery, place the battery in the media bay, see "Charging the Battery" on page 15). 16 Quick Reference Guide Storing a Battery... avoid possible connector damage.For information about replacing the second battery, which is located in the bay and press down until the battery-bay latch release clicks.
... computer to a docking device (docked), undock it (see "Using Multimedia" in your docking device for an extended period of the battery bay. 1 2 1 battery-bay latch release 2 battery To replace the battery, place the battery in the media bay, see "Charging the Battery" on page 15). 16 Quick Reference Guide Storing a Battery... avoid possible connector damage.For information about replacing the second battery, which is located in the bay and press down until the battery-bay latch release clicks.
User's Guide
Page 23
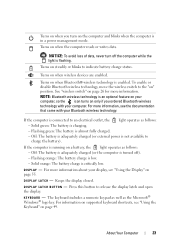
...® logo key. For more information about your display, see "Using the Keyboard" on page 49. KE Y BOA RD - Turns on steadily or blinks to release the display latch and open the display. If the computer is low. - For more information. D I S P L A Y L A T C H - NOTICE: To avoid loss of data, never turn on the...
...® logo key. For more information about your display, see "Using the Keyboard" on page 49. KE Y BOA RD - Turns on steadily or blinks to release the display latch and open the display. If the computer is low. - For more information. D I S P L A Y L A T C H - NOTICE: To avoid loss of data, never turn on the...
User's Guide
Page 28
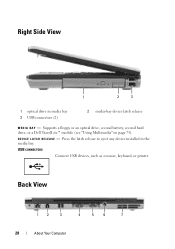
Press the latch release to eject any device installed in media bay 3 USB connectors (2) 2 media-bay device latch release M E D I C E L A T C H R E L EA S E - Back View 12 3 4 5 6 7 28 About Your Computer Supports a floppy or an optical drive, second battery, second hard drive, or a Dell TravelLite™ module (see "Using Multimedia" on page 73). D E V I A B A Y - Right Side View 1 2 3 1 optical drive in the media bay. USB CONNECTORS Connect USB devices, such as a mouse, keyboard, or printer.
Press the latch release to eject any device installed in media bay 3 USB connectors (2) 2 media-bay device latch release M E D I C E L A T C H R E L EA S E - Back View 12 3 4 5 6 7 28 About Your Computer Supports a floppy or an optical drive, second battery, second hard drive, or a Dell TravelLite™ module (see "Using Multimedia" on page 73). D E V I A B A Y - Right Side View 1 2 3 1 optical drive in the media bay. USB CONNECTORS Connect USB devices, such as a mouse, keyboard, or printer.
User's Guide
Page 32
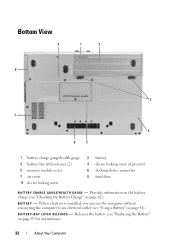
... S - Provides information on the battery charge (see "Checking the Battery Charge" on page 47 for instructions). 32 About Your Computer Releases the battery (see "Using a Battery" on page 41). When a battery is installed, you can use the computer without connecting the...the Battery" on page 42). B A T T E RY - Bottom View 9 1 2 8 3 7 4 6 5 1 battery charge gauge/health gauge 3 battery-bay latch releases (2) 5 memory module cover 7 air vents 9 device locking screw 2 battery 4 device locking screw (if present) 6 docking-device connector 8 hard drive B A T T E R Y C H A R G ...
... S - Provides information on the battery charge (see "Checking the Battery Charge" on page 47 for instructions). 32 About Your Computer Releases the battery (see "Using a Battery" on page 41). When a battery is installed, you can use the computer without connecting the...the Battery" on page 42). B A T T E RY - Bottom View 9 1 2 8 3 7 4 6 5 1 battery charge gauge/health gauge 3 battery-bay latch releases (2) 5 memory module cover 7 air vents 9 device locking screw 2 battery 4 device locking screw (if present) 6 docking-device connector 8 hard drive B A T T E R Y C H A R G ...
User's Guide
Page 43
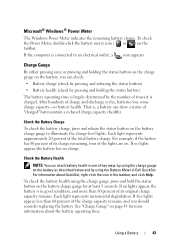
... described below and by the number of times it is in good condition, and more information about QuickSet, right-click the icon in Dell QuickSet. Each light represents incremental degradation. If the computer is , a battery can check battery health in one of the charge capacity remains..., and you can check: • Battery charge (check by pressing and releasing the status button) • Battery health (check by pressing and holding the status button) The battery operating time is largely determined by using the...
... described below and by the number of times it is in good condition, and more information about QuickSet, right-click the icon in Dell QuickSet. Each light represents incremental degradation. If the computer is , a battery can check battery health in one of the charge capacity remains..., and you can check: • Battery charge (check by pressing and releasing the status button) • Battery health (check by pressing and holding the status button) The battery operating time is largely determined by using the...
User's Guide
Page 48
2 Ensure that the computer is turned off. 3 Slide the two latch releases on page 47) before you store your computer for an extended period of the computer, and then remove the battery from the bay. A battery discharges ...
2 Ensure that the computer is turned off. 3 Slide the two latch releases on page 47) before you store your computer for an extended period of the computer, and then remove the battery from the bay. A battery discharges ...

User's Guide
Page 173
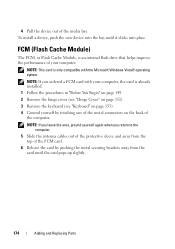
... Remove Hardware icon on top of the computer. 2 If the computer is not present, you want to eject, and click Stop. 3 Press the device latch release. 1 2 1 optical drive 2 device latch release Adding and Replacing Parts 173
... Remove Hardware icon on top of the computer. 2 If the computer is not present, you want to eject, and click Stop. 3 Press the device latch release. 1 2 1 optical drive 2 device latch release Adding and Replacing Parts 173
User's Guide
Page 174
... 152). 3 Remove the keyboard (see "Keyboard" on page 153). 4 Ground yourself by touching one of the metal connectors on the back of the FCM card. 6 Release the card by pushing the metal securing brackets away from the top of the computer. FCM (Flash Cache Module) The FCM, or Flash Cache Module...
... 152). 3 Remove the keyboard (see "Keyboard" on page 153). 4 Ground yourself by touching one of the metal connectors on the back of the FCM card. 6 Release the card by pushing the metal securing brackets away from the top of the computer. FCM (Flash Cache Module) The FCM, or Flash Cache Module...


