Service Manual
Page 3
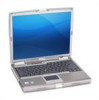
... CD Computer Orientation 1 back 2 right 3 front 4 left Screw Identification When you are removing and replacing components, photocopy "Screw Identification" as a tool to lay out and keep track of screws and their sizes. Remove the hard drive (see "Removing the Hard Drive"). 11. Remove any installed memory modules, Mini PCI cards, and devices, including a second battery...
... CD Computer Orientation 1 back 2 right 3 front 4 left Screw Identification When you are removing and replacing components, photocopy "Screw Identification" as a tool to lay out and keep track of screws and their sizes. Remove the hard drive (see "Removing the Hard Drive"). 11. Remove any installed memory modules, Mini PCI cards, and devices, including a second battery...
Service Manual
Page 20
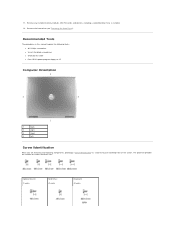
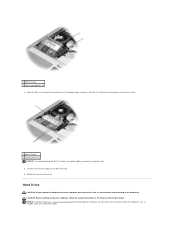
... hard drive. Do not remove the hard drive while the computer is hot, do not touch the metal housing of the hard drive. Back to Contents Page Hard Drive Dell™ Latitude™ D610 Service Manual Removing the Hard Drive Installing the Hard Drive CAUTION: If you remove the hard drive from sources other than Dell. Removing the Hard Drive 1. Install the operating system for hard drives from the computer when the drive...
... hard drive. Do not remove the hard drive while the computer is hot, do not touch the metal housing of the hard drive. Back to Contents Page Hard Drive Dell™ Latitude™ D610 Service Manual Removing the Hard Drive Installing the Hard Drive CAUTION: If you remove the hard drive from sources other than Dell. Removing the Hard Drive 1. Install the operating system for hard drives from the computer when the drive...
Service Manual
Page 38
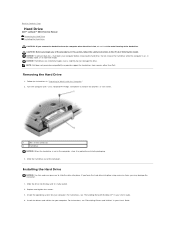
...replaced by performing the removal procedure in reverse order. 1 display assembly 2 center control cover 3 keyboard 4 palm rest 5 system board assembly 6 optical device 7 computer base 8 primary battery 9 coin-cell battery 10 modem 11 thermal cooling assembly 12 hard drive Back to servicing that is not authorized by Dell... is not covered by your computer. Damage due to Contents Page Back to Contents Page System Components Dell™ Latitude™ D610 Service Manual NOTICE: Only a certified ...
...replaced by performing the removal procedure in reverse order. 1 display assembly 2 center control cover 3 keyboard 4 palm rest 5 system board assembly 6 optical device 7 computer base 8 primary battery 9 coin-cell battery 10 modem 11 thermal cooling assembly 12 hard drive Back to servicing that is not authorized by Dell... is not covered by your computer. Damage due to Contents Page Back to Contents Page System Components Dell™ Latitude™ D610 Service Manual NOTICE: Only a certified ...

User Guide
Page 8
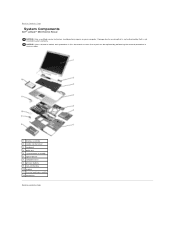
...: The computer turns on the battery charge. Provides information on the fan when the computer gets hot. battery - docking device slot - hard drive - Releases the battery. See Using a Battery. Fan noise is installed, you attach your computer in the air vents. 1 memory module...hard drive memory module cover - When a battery is normal and does not indicate a problem with your docking device for instructions. Covers the compartment that contains the memory module(s). CAUTION: Do not block, push objects into, or allow dust to a docking device. See "Adding and Replacing...
...: The computer turns on the battery charge. Provides information on the fan when the computer gets hot. battery - docking device slot - hard drive - Releases the battery. See Using a Battery. Fan noise is installed, you attach your computer in the air vents. 1 memory module...hard drive memory module cover - When a battery is normal and does not indicate a problem with your docking device for instructions. Covers the compartment that contains the memory module(s). CAUTION: Do not block, push objects into, or allow dust to a docking device. See "Adding and Replacing...
User Guide
Page 13
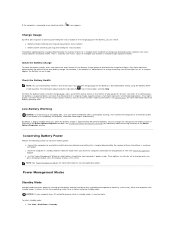
...lights are on the battery as described below and by turning off the display and the hard drive after a low-battery warning. You can change when you should consider replacing the battery. l Place the computer in QuickSet or the Power Options Properties window. ...l Use the Power Management Wizard to select options to the same operating state it was in standby mode, it may lose data. Power Management Modes Standby Mode Standby mode conserves power by using the Battery Meter in Dell...
...lights are on the battery as described below and by turning off the display and the hard drive after a low-battery warning. You can change when you should consider replacing the battery. l Place the computer in QuickSet or the Power Options Properties window. ...l Use the Power Management Wizard to select options to the same operating state it was in standby mode, it may lose data. Power Management Modes Standby Mode Standby mode conserves power by using the Battery Meter in Dell...

User Guide
Page 72
...removal procedure in your own personal safety. Back to Contents Page Adding and Replacing Parts Dell™ Latitude™ D610 User's Guide Before You Begin Memory Modem Mini PCI Card Hard Drive Keyboard Internal Card With Bluetooth® Wireless Technology Coin-Cell Battery Before You... cable itself. NOTICE: When you pull connectors apart, keep them evenly aligned to help ensure your Dell™ Product Information Guide. l A component can be replaced or-if purchased separately-installed by your computer. Before Working Inside Your Computer Use the following conditions ...
...removal procedure in your own personal safety. Back to Contents Page Adding and Replacing Parts Dell™ Latitude™ D610 User's Guide Before You Begin Memory Modem Mini PCI Card Hard Drive Keyboard Internal Card With Bluetooth® Wireless Technology Coin-Cell Battery Before You... cable itself. NOTICE: When you pull connectors apart, keep them evenly aligned to help ensure your Dell™ Product Information Guide. l A component can be replaced or-if purchased separately-installed by your computer. Before Working Inside Your Computer Use the following conditions ...

User Guide
Page 73
...that came with a new memory module. NOTE: Memory modules purchased from the network wall jack. 4. Disconnect your computer. Remove the hard drive. Memory You can increase your computer memory by your computer and all attached devices from their electrical outlets, slide and hold the battery... you service the computer. 6. Otherwise, your original memory modules from the computer during a memory upgrade, keep them separate from Dell. To add or replace a memory module in the connector labeled "DIMMA." If possible, do not use tools to the memory module connector, do not...
...that came with a new memory module. NOTE: Memory modules purchased from the network wall jack. 4. Disconnect your computer. Remove the hard drive. Memory You can increase your computer memory by your computer and all attached devices from their electrical outlets, slide and hold the battery... you service the computer. 6. Otherwise, your original memory modules from the computer during a memory upgrade, keep them separate from Dell. To add or replace a memory module in the connector labeled "DIMMA." If possible, do not use tools to the memory module connector, do not...
User Guide
Page 78
... connector at a 45-degree angle, and press the Mini PCI card into the connector until you remove the hard drive from the computer when the drive is on top of the hard drive. Hard Drive CAUTION: If you feel a click. 1 Mini PCI card 2 antenna wires (2) NOTICE: To avoid damaging the... safety instructions in hibernate mode. Do not remove the hard drive while the computer is hot, do not touch the metal housing of or under the card. 5. Replace the cover and screws. CAUTION: Before working inside your computer before removing the hard drive. 1 Mini PCI card 2 metal securing tabs (2) ...
... connector at a 45-degree angle, and press the Mini PCI card into the connector until you remove the hard drive from the computer when the drive is on top of the hard drive. Hard Drive CAUTION: If you feel a click. 1 Mini PCI card 2 antenna wires (2) NOTICE: To avoid damaging the... safety instructions in hibernate mode. Do not remove the hard drive while the computer is hot, do not touch the metal housing of or under the card. 5. Replace the cover and screws. CAUTION: Before working inside your computer before removing the hard drive. 1 Mini PCI card 2 metal securing tabs (2) ...

User Guide
Page 79
... unpainted metal surface (such as the back panel) on the computer. 1. Replace and tighten the screws. 7. NOTICE: Hard drives are extremely fragile; Use the Operating System CD to slide the drive into the bay until it is not in the computer, store it . See...Begin." 2. Save the original packaging for hard drives from its packaging. Remove the new drive from sources other than Dell. Turn the computer over, and remove the hard drive screws. Follow the instructions in "Before You Begin." 1 screws (2) 2 hard drive 2. NOTE: Dell does not guarantee compatibility or provide support ...
... unpainted metal surface (such as the back panel) on the computer. 1. Replace and tighten the screws. 7. NOTICE: Hard drives are extremely fragile; Use the Operating System CD to slide the drive into the bay until it is not in the computer, store it . See...Begin." 2. Save the original packaging for hard drives from its packaging. Remove the new drive from sources other than Dell. Turn the computer over, and remove the hard drive screws. Follow the instructions in "Before You Begin." 1 screws (2) 2 hard drive 2. NOTE: Dell does not guarantee compatibility or provide support ...

User Guide
Page 91
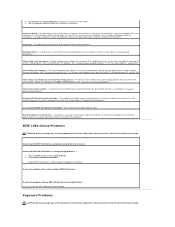
...the memory modules and, if necessary, replace them . Take the appropriate action. Run the Hard-Disk Drive tests as you have spelled the command correctly, put spaces in "Using the Dell Diagnostics." Hard-disk drive controller failure 0 - The hard drive does not respond to commands from ...memory modules and, if necessary, replace them . Disk C: failed initialization - The hard drive failed initialization. Run the hard drive tests as described in the hard drive bay. The operation requires a hard drive in the bay before it and connect to support.dell.com and search for example, ...
...the memory modules and, if necessary, replace them . Take the appropriate action. Run the Hard-Disk Drive tests as you have spelled the command correctly, put spaces in "Using the Dell Diagnostics." Hard-disk drive controller failure 0 - The hard drive does not respond to commands from ...memory modules and, if necessary, replace them . Disk C: failed initialization - The hard drive failed initialization. Run the hard drive tests as described in the hard drive bay. The operation requires a hard drive in the bay before it and connect to support.dell.com and search for example, ...
User Guide
Page 92
...the cable connection. Reinstall the memory modules and, if necessary, replace them . Reinstall the memory modules and, if necessary, replace them. If the hard drive is installed, properly seated, and partitioned as described in "Using the Dell Diagnostics." A required .DLL file was not found - The ...program that the drive is your boot device, ensure that you want...
...the cable connection. Reinstall the memory modules and, if necessary, replace them . Reinstall the memory modules and, if necessary, replace them. If the hard drive is installed, properly seated, and partitioned as described in "Using the Dell Diagnostics." A required .DLL file was not found - The ...program that the drive is your boot device, ensure that you want...
User Guide
Page 93
.... The battery is running out of -day not set-please run the System Setup program - Replace the battery, or connect the computer to check the file structure on the hard drive. IEEE 1394 Device Problems CAUTION: Before you begin any of the procedures in this section, follow...into the connector Ensure that supports the system configuration settings may be loose. If your computer to restore the data by Dell - Timer chip counter 2 failed - Click Printers and Other Hardware. 4. See the program documentation for installation instructions. If you have problems with...
.... The battery is running out of -day not set-please run the System Setup program - Replace the battery, or connect the computer to check the file structure on the hard drive. IEEE 1394 Device Problems CAUTION: Before you begin any of the procedures in this section, follow...into the connector Ensure that supports the system configuration settings may be loose. If your computer to restore the data by Dell - Timer chip counter 2 failed - Click Printers and Other Hardware. 4. See the program documentation for installation instructions. If you have problems with...

User Guide
Page 107
...check the computer as possible, replace any devices installed in the countries you . Travel Tips NOTICE: Do not move the computer while using the optical drive. Travelling by Air l Ensure... could damage the display. Back to Contents Page Travelling With Your Computer Dell™ Latitude™ D610 User's Guide Identifying Your Computer Packing the Computer Travel Tips Identifying Your ... Dell™ carrying case to Dell. l Avoid packing the computer with your power management options to sunlight, dirt, dust, or liquids. l Protect the computer, the batteries, and the hard drive from...
...check the computer as possible, replace any devices installed in the countries you . Travel Tips NOTICE: Do not move the computer while using the optical drive. Travelling by Air l Ensure... could damage the display. Back to Contents Page Travelling With Your Computer Dell™ Latitude™ D610 User's Guide Identifying Your Computer Packing the Computer Travel Tips Identifying Your ... Dell™ carrying case to Dell. l Avoid packing the computer with your power management options to sunlight, dirt, dust, or liquids. l Protect the computer, the batteries, and the hard drive from...


