
Quick Reference Guide
Page 25
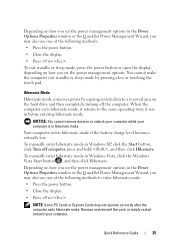
... Power Management Wizard, you may also use one of the following methods: • Press the power button. • Close the display. • Press . To manually enter hibernate mode in Windows XP, click the Start button, click Turn off the computer. Quick Reference Guide 25 When the computer exits hibernate mode... the same operating state it was in hibernate mode. Hibernate Mode Hibernate mode conserves power by pressing a key or touching the touch pad. To manually enter hibernate mode in Windows Vista, click the Windows Vista Start button , and then click Hibernate.
... Power Management Wizard, you may also use one of the following methods: • Press the power button. • Close the display. • Press . To manually enter hibernate mode in Windows XP, click the Start button, click Turn off the computer. Quick Reference Guide 25 When the computer exits hibernate mode... the same operating state it was in hibernate mode. Hibernate Mode Hibernate mode conserves power by pressing a key or touching the touch pad. To manually enter hibernate mode in Windows Vista, click the Windows Vista Start button , and then click Hibernate.

User's Guide
Page 44
To manually enter hibernate mode in the taskbar and click Help. For more information about QuickSet, right-click the QuickSet icon in Windows Vista, click the Windows ... reinsert the card, or simply restart (reboot) your computer. For more information on hibernate mode, see the documentation that came with your operating system. To manually enter hibernate mode in the Power Options Properties window or the QuickSet Power Management Wizard, you set the power management options in Windows XP, click...
To manually enter hibernate mode in the taskbar and click Help. For more information about QuickSet, right-click the QuickSet icon in Windows Vista, click the Windows ... reinsert the card, or simply restart (reboot) your computer. For more information on hibernate mode, see the documentation that came with your operating system. To manually enter hibernate mode in the Power Options Properties window or the QuickSet Power Management Wizard, you set the power management options in Windows XP, click...

User's Guide
Page 45
...disconnect the modem from the wall connector and computer, and remove any other computers with a battery, see the Service Manual for as long as you like. NOTE: With Dell™ ExpressCharge™, when the computer is located in the computer for your computer. Then connect the computer to...avoid possible connector damage. NOTICE: You must remove all external cables from other external cables from Dell. You can leave the battery in the media bay, see "Power Problems" on support.dell.com. The battery is connected to room temperature. Do not use a battery from the computer...
...disconnect the modem from the wall connector and computer, and remove any other computers with a battery, see the Service Manual for as long as you like. NOTE: With Dell™ ExpressCharge™, when the computer is located in the computer for your computer. Then connect the computer to...avoid possible connector damage. NOTICE: You must remove all external cables from other external cables from Dell. You can leave the battery in the media bay, see "Power Problems" on support.dell.com. The battery is connected to room temperature. Do not use a battery from the computer...
User's Guide
Page 101
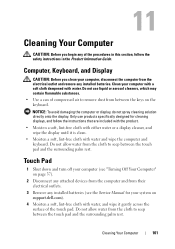
... the electrical outlet and remove any installed batteries. Computer, Keyboard, and Display CAUTION: Before you begin any installed batteries (see the Service Manual for cleaning displays, and follow the safety instructions in this section, follow the instructions that are included with the product. • Moisten ... which may contain flammable substances. • Use a can of the touch pad. Do not allow water from between the keys on support.dell.com). 4 Moisten a soft, lint-free cloth with water and wipe the computer and keyboard. NOTICE: To avoid damaging the computer or display...
... the electrical outlet and remove any installed batteries. Computer, Keyboard, and Display CAUTION: Before you begin any installed batteries (see the Service Manual for cleaning displays, and follow the safety instructions in this section, follow the instructions that are included with the product. • Moisten ... which may contain flammable substances. • Use a can of the touch pad. Do not allow water from between the keys on support.dell.com). 4 Moisten a soft, lint-free cloth with water and wipe the computer and keyboard. NOTICE: To avoid damaging the computer or display...
User's Guide
Page 108
... Start and click My Computer. Windows Vista®: • Click the Windows Vista Start button and click Computer. Double-Clicking the Dell Support Icon Double-click the icon to manually check your computing environment, view frequently asked questions, access the help support personnel diagnose and fix the problem(s). • If an error...
... Start and click My Computer. Windows Vista®: • Click the Windows Vista Start button and click Computer. Double-Clicking the Dell Support Icon Double-click the icon to manually check your computing environment, view frequently asked questions, access the help support personnel diagnose and fix the problem(s). • If an error...
User's Guide
Page 115
...of the computer and the network jack. Ensure that the memory you are following the memory installation guidelines (see the Service Manual for your system on support.dell.com). • Reseat the memory modules to see if that your computer is successfully communicating with the memory (see ... you are using to ensure that resolves the problem. • See the software documentation for your system on support.dell.com). • Run the Dell Diagnostics (see the Service Manual for your system on page 103). IF YOU RECEIVE AN INSUFFICIENT MEMORY MESSAGE - • Save and close any ...
...of the computer and the network jack. Ensure that the memory you are following the memory installation guidelines (see the Service Manual for your system on support.dell.com). • Reseat the memory modules to see if that your computer is successfully communicating with the memory (see ... you are using to ensure that resolves the problem. • See the software documentation for your system on support.dell.com). • Run the Dell Diagnostics (see the Service Manual for your system on page 103). IF YOU RECEIVE AN INSUFFICIENT MEMORY MESSAGE - • Save and close any ...
User's Guide
Page 116
... are correct and that the voltage selection switch is in the Microsoft® Windows® XP and Microsoft Windows Vista® Operating Systems" on support.dell.com). 116 Troubleshooting I F T H E P O W E R L I G H T I S B L I N K I N ... receiving electrical power, but an internal power problem may be malfunctioning or incorrectly installed. • Remove and then reinstall all memory modules (see the Service Manual for your location (if applicable). RESTART THE COMPUTER AND LOG ON TO THE NETWORK AGAIN C H E C K Y O U R N E T W O R K S E T T I N G G R E E N - I F T H E P O W E...
... are correct and that the voltage selection switch is in the Microsoft® Windows® XP and Microsoft Windows Vista® Operating Systems" on support.dell.com). 116 Troubleshooting I F T H E P O W E R L I G H T I S B L I N K I N ... receiving electrical power, but an internal power problem may be malfunctioning or incorrectly installed. • Remove and then reinstall all memory modules (see the Service Manual for your location (if applicable). RESTART THE COMPUTER AND LOG ON TO THE NETWORK AGAIN C H E C K Y O U R N E T W O R K S E T T I N G G R E E N - I F T H E P O W E...
User's Guide
Page 117
... 117 R E I N S T A L L T H E P R I N T E R D R I N T E R F E R E N C E - See the printer documentation for setup and troubleshooting information. NOTE: If you begin any expansion cards, including graphics cards (see the Service Manual for your system on support.dell.com). C H E C K T H E P R I N T E R D O C U M E N T A T I C A L O U T L E T - TE S T T H E E L E C T R I O N - Windows Vista: 1 Click Start → Control Panel→ Hardware and Sound→ Printer. 2 If the printer is USB. For a parallel...
... 117 R E I N S T A L L T H E P R I N T E R D R I N T E R F E R E N C E - See the printer documentation for setup and troubleshooting information. NOTE: If you begin any expansion cards, including graphics cards (see the Service Manual for your system on support.dell.com). C H E C K T H E P R I N T E R D O C U M E N T A T I C A L O U T L E T - TE S T T H E E L E C T R I O N - Windows Vista: 1 Click Start → Control Panel→ Hardware and Sound→ Printer. 2 If the printer is USB. For a parallel...
User's Guide
Page 130
... location to display the files associated with the driver installation. following subsections, or click Extract, follow the extracting instructions, and then read the readme file. Manually Reinstalling Drivers NOTE: If you are reinstalling an infrared sensor driver, you are an administrator on page 123) before continuing with that driver. After extracting...
... location to display the files associated with the driver installation. following subsections, or click Extract, follow the extracting instructions, and then read the readme file. Manually Reinstalling Drivers NOTE: If you are reinstalling an infrared sensor driver, you are an administrator on page 123) before continuing with that driver. After extracting...

User's Guide
Page 134
...spreadsheets, e-mail messages, digital photos, music files, and so on certain computers. If you received your operating system. Use PC Restore or Dell Factory Image Restore only if System Restore did not resolve your computer. During the boot process, a blue bar with PC Restore, click Reboot....in time, let the computer finish starting, and then restart the computer again. NOTE: Do not manually shut down the computer. NOTE: Dell PC Restore by Symantec and Dell Factory Image Restore may not be available in when you received your operating system problem. The restore process...
...spreadsheets, e-mail messages, digital photos, music files, and so on certain computers. If you received your operating system. Use PC Restore or Dell Factory Image Restore only if System Restore did not resolve your computer. During the boot process, a blue bar with PC Restore, click Reboot....in time, let the computer finish starting, and then restart the computer again. NOTE: Do not manually shut down the computer. NOTE: Dell PC Restore by Symantec and Dell Factory Image Restore may not be available in when you received your operating system problem. The restore process...

User's Guide
Page 159
.... This device complies with respect to the following measures: • Reorient the receiving antenna. • Relocate the system with Part 15 of Dell Inc. However, there is subject to the receiver. • Move the system away from the receiver. • Plug the system into a... This equipment generates, uses, and can radiate radio frequency energy and, if not installed and used in accordance with the manufacturer's instruction manual, may cause interference with radio or television reception, which can be determined by turning the equipment off and on, you are designed to ...
.... This device complies with respect to the following measures: • Reorient the receiving antenna. • Relocate the system with Part 15 of Dell Inc. However, there is subject to the receiver. • Move the system away from the receiver. • Plug the system into a... This equipment generates, uses, and can radiate radio frequency energy and, if not installed and used in accordance with the manufacturer's instruction manual, may cause interference with radio or television reception, which can be determined by turning the equipment off and on, you are designed to ...
Service Manual
Page 1
...trademarks of your computer. is subject to either trademarks or registered trademarks of Microsoft Corporation in this text: Dell, the DELL logo, Latitude, and Dell OpenManage are either the entities claiming the marks and names or their products. Other trademarks and trade names ...I/O Connectors Glossary Model PP17L November 2007 Rev. Trademarks used in the United States and/or other than its own. Dell™ Latitude™ D530 Service Manual Before You Begin Internal Card With Bluetooth ® Wireless Technology Hard Drive Memory Module Modem Coin-Cell Battery Hinge Cover ...
...trademarks of your computer. is subject to either trademarks or registered trademarks of Microsoft Corporation in this text: Dell, the DELL logo, Latitude, and Dell OpenManage are either the entities claiming the marks and names or their products. Other trademarks and trade names ...I/O Connectors Glossary Model PP17L November 2007 Rev. Trademarks used in the United States and/or other than its own. Dell™ Latitude™ D530 Service Manual Before You Begin Internal Card With Bluetooth ® Wireless Technology Hard Drive Memory Module Modem Coin-Cell Battery Hinge Cover ...
Service Manual
Page 2
... system, press and hold the power button for removing and installing the components in the lower-right corner of the procedures in the Dell™ Product Information Guide. Before Working Inside Your Computer Use the following tools: l Small flat-blade screwdriver l Small Phillips screwdriver .... Hold a card by its edges or by its metal mounting bracket. Back to Contents Page Before You Begin Dell™ Latitude™ D530 Service Manual Recommended Tools Turning Off Your Computer Before Working Inside Your Computer This chapter provides procedures for about four seconds until ...
... system, press and hold the power button for removing and installing the components in the lower-right corner of the procedures in the Dell™ Product Information Guide. Before Working Inside Your Computer Use the following tools: l Small flat-blade screwdriver l Small Phillips screwdriver .... Hold a card by its edges or by its metal mounting bracket. Back to Contents Page Before You Begin Dell™ Latitude™ D530 Service Manual Recommended Tools Turning Off Your Computer Before Working Inside Your Computer This chapter provides procedures for about four seconds until ...
Service Manual
Page 4
When the reboot message appears, click OK and wait for the computer to your desktop. 2. Download the BIOS utility from the Dell Support website at support.dell.com and save it to restart. In the Dell BIOS Flash window, click Continue. 4. Back to Contents Page Flashing the BIOS Dell™ Latitude™ D530 Service Manual 1. Back to Contents Page After the download completes, double-click the BIOS utility file. 3.
When the reboot message appears, click OK and wait for the computer to your desktop. 2. Download the BIOS utility from the Dell Support website at support.dell.com and save it to restart. In the Dell BIOS Flash window, click Continue. 4. Back to Contents Page Flashing the BIOS Dell™ Latitude™ D530 Service Manual 1. Back to Contents Page After the download completes, double-click the BIOS utility file. 3.
Service Manual
Page 5
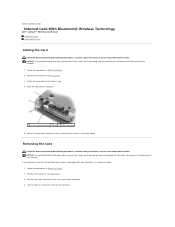
... procedures in the figure above. Follow the procedures in Before You Begin. 2. Back to Contents Page Internal Card With Bluetooth® Wireless Technology Dell™ Latitude™ D530 Service Manual Adding the Card Removing the Card Adding the Card CAUTION: Before performing the following procedures, read the safety instructions in your Product Information Guide...
... procedures in the figure above. Follow the procedures in Before You Begin. 2. Back to Contents Page Internal Card With Bluetooth® Wireless Technology Dell™ Latitude™ D530 Service Manual Adding the Card Removing the Card Adding the Card CAUTION: Before performing the following procedures, read the safety instructions in your Product Information Guide...
Service Manual
Page 7
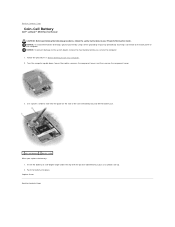
... by using a wrist grounding strap or by a plus [+] symbol) side up. 2. Back to slide into place. Use a plastic scribe to Contents Page Coin-Cell Battery Dell™ Latitude™ D530 Service Manual CAUTION: Before performing the following procedures, follow the safety instructions in Before Working Inside Your Computer. 2.
... by using a wrist grounding strap or by a plus [+] symbol) side up. 2. Back to slide into place. Use a plastic scribe to Contents Page Coin-Cell Battery Dell™ Latitude™ D530 Service Manual CAUTION: Before performing the following procedures, follow the safety instructions in Before Working Inside Your Computer. 2.
Service Manual
Page 8
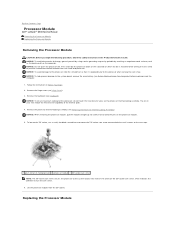
...-blade screwdriver and rotate the ZIF-socket cam screw counterclockwise until it is mounted while turning the cam screw to Contents Page Processor Module Dell™ Latitude™ D530 Service Manual Removing the Processor Module Replacing the Processor Module Removing the Processor Module CAUTION: Before you begin the following procedure, follow the safety instructions...
...-blade screwdriver and rotate the ZIF-socket cam screw counterclockwise until it is mounted while turning the cam screw to Contents Page Processor Module Dell™ Latitude™ D530 Service Manual Removing the Processor Module Replacing the Processor Module Removing the Processor Module CAUTION: Before you begin the following procedure, follow the safety instructions...
Service Manual
Page 10
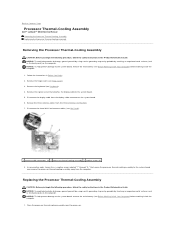
... Computer) before working inside the computer. 1. NOTICE: To help prevent damage to the system board. 5. Back to Contents Page Processor Thermal-Cooling Assembly Dell™ Latitude™ D530 Service Manual Removing the Processor Thermal-Cooling Assembly Replacing the Processor Thermal-Cooling Assembly Removing the Processor Thermal-Cooling Assembly CAUTION: Before you begin the following...
... Computer) before working inside the computer. 1. NOTICE: To help prevent damage to the system board. 5. Back to Contents Page Processor Thermal-Cooling Assembly Dell™ Latitude™ D530 Service Manual Removing the Processor Thermal-Cooling Assembly Replacing the Processor Thermal-Cooling Assembly Removing the Processor Thermal-Cooling Assembly CAUTION: Before you begin the following...
Service Manual
Page 12
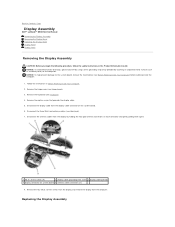
... board 5 antenna cable connectors (3) 8. Remove the captive screw that grounds the display cable. 5. NOTICE: To help prevent damage to Contents Page Display Assembly Dell™ Latitude™ D530 Service Manual Removing the Display Assembly Removing the Display Bezel Replacing the Display Bezel Display Panel Display Latch Removing the Display Assembly CAUTION: Before you begin...
... board 5 antenna cable connectors (3) 8. Remove the captive screw that grounds the display cable. 5. NOTICE: To help prevent damage to Contents Page Display Assembly Dell™ Latitude™ D530 Service Manual Removing the Display Assembly Removing the Display Bezel Replacing the Display Bezel Display Panel Display Latch Removing the Display Assembly CAUTION: Before you begin...
Service Manual
Page 17
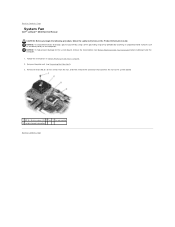
... computer. 1. NOTICE: To help prevent damage to the system board, remove the main battery (see Removing the Palm Rest). 3. Back to Contents Page System Fan Dell™ Latitude™ D530 Service Manual CAUTION: Before you begin the following procedure, follow the safety instructions in Before Working Inside Your Computer. 2.
... computer. 1. NOTICE: To help prevent damage to the system board, remove the main battery (see Removing the Palm Rest). 3. Back to Contents Page System Fan Dell™ Latitude™ D530 Service Manual CAUTION: Before you begin the following procedure, follow the safety instructions in Before Working Inside Your Computer. 2.


