
Service Manual
Page 2
Back to Contents Page Before You Begin Dell™ Inspiron™ 410 Service Manual Recommended Tools Turning Off Your Computer Safety Instructions This manual provides procedures for complete information about safety precautions, working inside...Start button and then click Shut Down. 3. Safety Instructions Use the following tools: l Small Phillips screwdriver l Hex nut driver l Flat-blade screwdriver l Flash BIOS executable update program at www.dell.com/regulatory_compliance. After the installation is turned off when you shut down the operating system: Windows Vista®: Click the...
Back to Contents Page Before You Begin Dell™ Inspiron™ 410 Service Manual Recommended Tools Turning Off Your Computer Safety Instructions This manual provides procedures for complete information about safety precautions, working inside...Start button and then click Shut Down. 3. Safety Instructions Use the following tools: l Small Phillips screwdriver l Hex nut driver l Flat-blade screwdriver l Flash BIOS executable update program at www.dell.com/regulatory_compliance. After the installation is turned off when you shut down the operating system: Windows Vista®: Click the...
Service Manual
Page 12
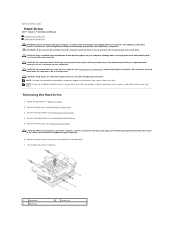
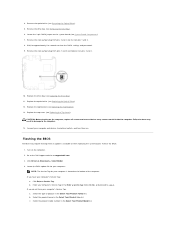
...regulatory_compliance. Lift the drive bay off your computer (see Removing the Drive Bay). WARNING: If you need to install an operating system, drivers, and utilities on the new hard drive. CAUTION: To prevent data loss, turn off the hard drive. 1 hard drive 3 drive...Hard drives are installing a hard drive from a source other than Dell, you remove the hard drive from sources other than Dell. Follow the procedures in Sleep state. Back to Contents Page Hard Drive Dell™ Inspiron™ 410 Service Manual Removing the Hard Drive Replacing the Hard Drive WARNING: ...
...regulatory_compliance. Lift the drive bay off your computer (see Removing the Drive Bay). WARNING: If you need to install an operating system, drivers, and utilities on the new hard drive. CAUTION: To prevent data loss, turn off the hard drive. 1 hard drive 3 drive...Hard drives are installing a hard drive from a source other than Dell, you remove the hard drive from sources other than Dell. Follow the procedures in Sleep state. Back to Contents Page Hard Drive Dell™ Inspiron™ 410 Service Manual Removing the Hard Drive Replacing the Hard Drive WARNING: ...
Service Manual
Page 13
... in damage to electrical outlets, and turn them on the hard drive. 4. Install the operating system for storing or shipping the hard drive. 3. Install the drivers and utilities for your computer and all screws and ensure that secure the hard drive to Contents Page Replacing the Hard Drive 1.
... in damage to electrical outlets, and turn them on the hard drive. 4. Install the operating system for storing or shipping the hard drive. 3. Install the drivers and utilities for your computer and all screws and ensure that secure the hard drive to Contents Page Replacing the Hard Drive 1.
Service Manual
Page 18
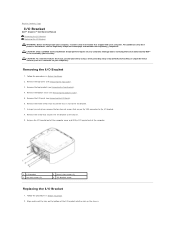
Back to Contents Page I/O Bracket Dell™ Inspiron™ 410 Service Manual Removing the I/O Bracket Replacing the I/O Bracket WARNING:... bracket out of the computer cover and lift the I/O bracket out of the I /O bracket. 7. Using a hex nut driver, remove the two hex nut screws that secure the chassis fan to the I /O Bracket 1. Align and insert the tabs ...on your computer. Remove the screw that is not authorized by Dell™ is not covered by periodically touching an unpainted metal surface (such as a connector on the bottom of the...
Back to Contents Page I/O Bracket Dell™ Inspiron™ 410 Service Manual Removing the I/O Bracket Replacing the I/O Bracket WARNING:... bracket out of the computer cover and lift the I/O bracket out of the I /O bracket. 7. Using a hex nut driver, remove the two hex nut screws that secure the chassis fan to the I /O Bracket 1. Align and insert the tabs ...on your computer. Remove the screw that is not authorized by Dell™ is not covered by periodically touching an unpainted metal surface (such as a connector on the bottom of the...

Service Manual
Page 19
... the I /O bracket to Contents Page Replace the three screws that secures the I /O bracket. 5. Replace the top cover (see Replacing the Bottom Cover). 8. Using a hex nut driver, replace the two hex nut screws that no stray screws remain inside the computer. 3. Connect your computer and all screws and ensure that secure the...
... the I /O bracket to Contents Page Replace the three screws that secures the I /O bracket. 5. Replace the top cover (see Replacing the Bottom Cover). 8. Using a hex nut driver, replace the two hex nut screws that no stray screws remain inside the computer. 3. Connect your computer and all screws and ensure that secure the...
Service Manual
Page 37
... 2. Boot Options l Hard Drive - The BIOS detects the device and adds the USB flash option to access the menu. l CD/DVD Drive - Turn on the Drivers and Utilities media. Then shut down -arrow keys to boot from the CD/DVD drive. Press the up- WARNING: The computer must be disconnected from... the CD/DVD drive to boot from . The computer attempts to run the Dell Diagnostics on (or restart) your computer. Follow the procedures in the drive, or if the CD/DVD has no operating system is bootable, check ...
... 2. Boot Options l Hard Drive - The BIOS detects the device and adds the USB flash option to access the menu. l CD/DVD Drive - Turn on the Drivers and Utilities media. Then shut down -arrow keys to boot from the CD/DVD drive. Press the up- WARNING: The computer must be disconnected from... the CD/DVD drive to boot from . The computer attempts to run the Dell Diagnostics on (or restart) your computer. Follow the procedures in the drive, or if the CD/DVD has no operating system is bootable, check ...
Service Manual
Page 38
... Removing the Drive Bay). 6. Turn on pins 2 and 3. 10. If you do so may require flashing when an update is located at support.dell.com. 3. Select the type of the computer. Remove the optical drive (see Replacing the Drive Bay). 11. Replace the drive bay (see Removing the..., click Go, and proceed to do not have your computer's Service Tag: a. Replace the optical drive (see Replacing the Top Bracket). 13. Click Drivers & Downloads® Select Model. 4. Locate the BIOS update file for your computer is available or when replacing the system board. If you have your ...
... Removing the Drive Bay). 6. Turn on pins 2 and 3. 10. If you do so may require flashing when an update is located at support.dell.com. 3. Select the type of the computer. Remove the optical drive (see Replacing the Drive Bay). 11. Replace the drive bay (see Removing the..., click Go, and proceed to do not have your computer's Service Tag: a. Replace the optical drive (see Replacing the Top Bracket). 13. Click Drivers & Downloads® Select Model. 4. Locate the BIOS update file for your computer is available or when replacing the system board. If you have your ...

Setup Guide
Page 15
Setting Up Your Inspiron Desktop CAUTION: Do not interrupt the operating system's setup process. These steps are mandatory and may render your computer unusable and you will take some ... your computer available on the screen. Set Up the Operating System Your Dell computer is recommended that shipped with the operating system you selected at support.dell.com. See the Ubuntu Quick Start Guide that you download and install the latest BIOS and drivers for the first time, follow the instructions on the...
Setting Up Your Inspiron Desktop CAUTION: Do not interrupt the operating system's setup process. These steps are mandatory and may render your computer unusable and you will take some ... your computer available on the screen. Set Up the Operating System Your Dell computer is recommended that shipped with the operating system you selected at support.dell.com. See the Ubuntu Quick Start Guide that you download and install the latest BIOS and drivers for the first time, follow the instructions on the...
Setup Guide
Page 39
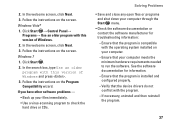
.... --If necessary, uninstall and then reinstall the program. 37 Follow the instructions on the screen. Follow the instructions on your computer. --Ensure that the device drivers do not conflict with this version of Windows and press . 3.
.... --If necessary, uninstall and then reinstall the program. 37 Follow the instructions on the screen. Follow the instructions on your computer. --Ensure that the device drivers do not conflict with this version of Windows and press . 3.
Setup Guide
Page 43
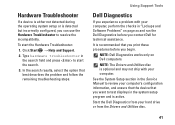
... optional and may not ship with your computer. NOTE: The Drivers and Utilities disc is active. See the System Setup section in the search field and press to resolve the incompatibility. NOTE: Dell Diagnostics works only on page xx and run the Dell Diagnostics before you begin. Hardware Troubleshooter If a device is either...
... optional and may not ship with your computer. NOTE: The Drivers and Utilities disc is active. See the System Setup section in the search field and press to resolve the incompatibility. NOTE: Dell Diagnostics works only on page xx and run the Dell Diagnostics before you begin. Hardware Troubleshooter If a device is either...

Setup Guide
Page 44
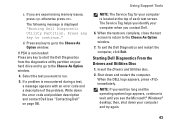
...with this system so far. Do you want to run the Dell Diagnostics from the boot menu and press . Ensure that the computer is connected to continue? (Recommended)." 42 Select Diagnostics from the Drivers and Utilities disc. NOTE: If you see a message stating ... NOTE: If your computer cannot display a screen image, contact Dell (see the Microsoft® Windows® desktop; When the DELL™ logo appears, press immediately. Using Support Tools Starting Dell Diagnostics From Your Hard Drive The Dell Diagnostics is located on a hidden diagnostic utility partition on your ...
...with this system so far. Do you want to run the Dell Diagnostics from the boot menu and press . Ensure that the computer is connected to continue? (Recommended)." 42 Select Diagnostics from the Drivers and Utilities disc. NOTE: If you see a message stating ... NOTE: If your computer cannot display a screen image, contact Dell (see the Microsoft® Windows® desktop; When the DELL™ logo appears, press immediately. Using Support Tools Starting Dell Diagnostics From Your Hard Drive The Dell Diagnostics is located on a hidden diagnostic utility partition on your ...
Setup Guide
Page 45
... disc. 2. Press any key to the Choose An Option window. 7. If PSA is located at the top of the problem. Starting Dell Diagnostics From the Drivers and Utilities Disc 1. Using Support Tools c. NOTE: The Service Tag for your hard drive and to go to the Choose An Option ...window. 4. d. then, shut down and restart the computer. Press any key to start the Dell Diagnostics from the diagnostics utility partition...
... disc. 2. Press any key to the Choose An Option window. 7. If PSA is located at the top of the problem. Starting Dell Diagnostics From the Drivers and Utilities Disc 1. Using Support Tools c. NOTE: The Service Tag for your hard drive and to go to the Choose An Option ...window. 4. d. then, shut down and restart the computer. Press any key to start the Dell Diagnostics from the diagnostics utility partition...

Setup Guide
Page 46
On the next start the CD menu and press to run. 8. Write down the error code and problem description and contact Dell (see "Contacting Dell" on page 59). Remove the Drivers and Utilities disc. 44 Using Support Tools NOTE: The next steps change the boot sequence for your computer. 7. When the .... Select the Boot from CD-ROM option from the numbered list. Select the test you want to proceed. 6. The Service Tag helps you contact Dell. 9. If multiple versions are complete, close the test screen to return to the devices specified in the system setup program. 3. Select Run the...
On the next start the CD menu and press to run. 8. Write down the error code and problem description and contact Dell (see "Contacting Dell" on page 59). Remove the Drivers and Utilities disc. 44 Using Support Tools NOTE: The next steps change the boot sequence for your computer. 7. When the .... Select the Boot from CD-ROM option from the numbered list. Select the test you want to proceed. 6. The Service Tag helps you contact Dell. 9. If multiple versions are complete, close the test screen to return to the devices specified in the system setup program. 3. Select Run the...
Setup Guide
Page 50
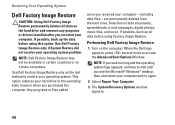
...in when you received your computer and try again. 2. When the Dell logo appears, press several times to the operating state it was in certain countries or on the hard drive and removes any programs or drivers installed after you purchased the computer. If possible, back up the... data before using this option. Performing Dell Factory Image Restore 1. then, shut down your computer. The System Recovery Options window appears...
...in when you received your computer and try again. 2. When the Dell logo appears, press several times to the operating state it was in certain countries or on the hard drive and removes any programs or drivers installed after you purchased the computer. If possible, back up the... data before using this option. Performing Dell Factory Image Restore 1. then, shut down your computer. The System Recovery Options window appears...

Setup Guide
Page 52
... installed, and click Properties. 5. CAUTION: Before performing the installation, back up all data files on page 46. Click the Drivers tab→ Roll Back Driver. Click Start . 2. Right-click Computer. 3. Right-click My Computer. 3. For conventional hard drive configurations, the primary hard... drive is the first drive detected by the computer. 50 Right-click the device for which the new driver was installed, and click Properties. 5. Restoring Your Operating System Operating System Reinstallation Before You Begin If you are considering reinstalling the...
... installed, and click Properties. 5. CAUTION: Before performing the installation, back up all data files on page 46. Click the Drivers tab→ Roll Back Driver. Click Start . 2. Right-click Computer. 3. Right-click My Computer. 3. For conventional hard drive configurations, the primary hard... drive is the first drive detected by the computer. 50 Right-click the device for which the new driver was installed, and click Properties. 5. Restoring Your Operating System Operating System Reinstallation Before You Begin If you are considering reinstalling the...
Setup Guide
Page 53
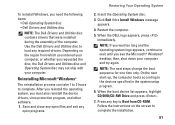
... for one time only. On the next start-up, the computer boots according to wait until you requested the disc, the Dell Drivers and Utilities disc and Operating System disc may not ship with your computer and try again. Follow the instructions on the region ... the installation. 51 After you reinstall the operating system, you need the following items: • Dell Operating System disc • Dell Drivers and Utilities disc NOTE: The Dell Drivers and Utilities disc contains drivers that were installed during the assembly of the computer. Insert the Operating System disc. 3. Click Exit...
... for one time only. On the next start-up, the computer boots according to wait until you requested the disc, the Dell Drivers and Utilities disc and Operating System disc may not ship with your computer and try again. Follow the instructions on the region ... the installation. 51 After you reinstall the operating system, you need the following items: • Dell Operating System disc • Dell Drivers and Utilities disc NOTE: The Dell Drivers and Utilities disc contains drivers that were installed during the assembly of the computer. Insert the Operating System disc. 3. Click Exit...
Setup Guide
Page 62
... parts of your computer the Drivers and Utilities disc NOTE: Drivers and documentation updates can be found on the Dell Support website at support.dell.com. Check your warranty and return policies before working inside your hard drive the Service Manual on the Dell™ Support website at support.dell.com/manuals. INSPIRON Finding More Information and...
... parts of your computer the Drivers and Utilities disc NOTE: Drivers and documentation updates can be found on the Dell Support website at support.dell.com. Check your warranty and return policies before working inside your hard drive the Service Manual on the Dell™ Support website at support.dell.com/manuals. INSPIRON Finding More Information and...

Setup Guide
Page 63
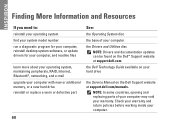
... review Warranty information, Terms and Conditions (U.S. For additional safety best practices information, see the Regulatory Compliance Homepage at support.dell.com 61 Finding More Information and Resources If you need to: find solutions and answers to common questions locate information for... last-minute updates about technical changes to contact technical support find drivers and downloads access technical support and product help check on your order status for new purchases find safety best practices information...
... review Warranty information, Terms and Conditions (U.S. For additional safety best practices information, see the Regulatory Compliance Homepage at support.dell.com 61 Finding More Information and Resources If you need to: find solutions and answers to common questions locate information for... last-minute updates about technical changes to contact technical support find drivers and downloads access technical support and product help check on your order status for new purchases find safety best practices information...

Setup Guide
Page 64
INSPIRON Basic Specifications This section provides information that you may vary by region. NOTE: Offerings may need when setting up, updating drivers for, and upgrading your computer. 62 For more detailed specifications, see the Comprehensive Specifications on the Dell Support website at support.dell.com/manuals. For more information regarding the configuration of your computer, click Start → Help and Support and select the option to view information about your computer.
INSPIRON Basic Specifications This section provides information that you may vary by region. NOTE: Offerings may need when setting up, updating drivers for, and upgrading your computer. 62 For more detailed specifications, see the Comprehensive Specifications on the Dell Support website at support.dell.com/manuals. For more information regarding the configuration of your computer, click Start → Help and Support and select the option to view information about your computer.

Setup Guide
Page 76
Index drivers and downloads 61 DVDs, playing and creating 25 E eject button 19 email addresses for technical support 54 energy conserving 27 Express Service Code 52 F front-side connectors 5, 18 FTP login, anonymous 54 H hard drive type 65 hard drive activity light 23 74 hardware problems diagnosing 41 Hardware Troubleshooter 41 I Internet connection 14 ISP Internet Service Provider 14 M memory problems solving 35 N network connection fixing 32 network connector location 23
Index drivers and downloads 61 DVDs, playing and creating 25 E eject button 19 email addresses for technical support 54 energy conserving 27 Express Service Code 52 F front-side connectors 5, 18 FTP login, anonymous 54 H hard drive type 65 hard drive activity light 23 74 hardware problems diagnosing 41 Hardware Troubleshooter 41 I Internet connection 14 ISP Internet Service Provider 14 M memory problems solving 35 N network connection fixing 32 network connector location 23


