
Owners Manual
Page 23
For additional safety best practices information, see "Turning Off Your Computer" on the new hard drive. CAUTION: To prevent data loss, turn off your computer (see the Regulatory Compliance Homepage at dell.com/regulatory_compliance. Removing the Hard Drive 1 Follow the instructions in Sleep state. See "Removing ...covered by your computer. WARNING: If you are extremely fragile. NOTE: If you remove the hard drive from a source other than Dell, you need to servicing that is not authorized by periodically touching an unpainted metal surface (such as a connector on page 11. 2...
For additional safety best practices information, see "Turning Off Your Computer" on the new hard drive. CAUTION: To prevent data loss, turn off your computer (see the Regulatory Compliance Homepage at dell.com/regulatory_compliance. Removing the Hard Drive 1 Follow the instructions in Sleep state. See "Removing ...covered by your computer. WARNING: If you are extremely fragile. NOTE: If you remove the hard drive from a source other than Dell, you need to servicing that is not authorized by periodically touching an unpainted metal surface (such as a connector on page 11. 2...
Owners Manual
Page 57
... on page 19. 3 Remove the rear-stand assembly. Coin-Cell Battery 57 For additional safety best practices information, see the Regulatory Compliance Homepage at dell.com/regulatory_compliance. See "Removing the Rear-Stand Assembly" on page 39. 5 Remove the side I /O cover. CAUTION: To avoid electrostatic discharge, ... Setup" on page 11 and record all the screens in system setup utility. Replace the battery only with your computer. WARNING: A new battery can explode if it is not covered by your computer). 13 Coin-Cell Battery WARNING: Before working inside your computer, read the...
... on page 19. 3 Remove the rear-stand assembly. Coin-Cell Battery 57 For additional safety best practices information, see the Regulatory Compliance Homepage at dell.com/regulatory_compliance. See "Removing the Rear-Stand Assembly" on page 39. 5 Remove the side I /O cover. CAUTION: To avoid electrostatic discharge, ... Setup" on page 11 and record all the screens in system setup utility. Replace the battery only with your computer. WARNING: A new battery can explode if it is not covered by your computer). 13 Coin-Cell Battery WARNING: Before working inside your computer, read the...
Owners Manual
Page 58
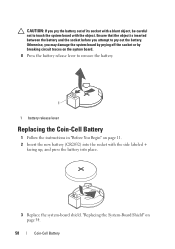
... Battery 1 Follow the instructions in "Before You Begin" on page 54. 58 Coin-Cell Battery "Replacing the System-Board Shield" on page 11. 2 Insert the new battery (CR2032) into the socket with the object. CAUTION: If you pry the battery out of its socket with a blunt object, be careful not to...
... Battery 1 Follow the instructions in "Before You Begin" on page 54. 58 Coin-Cell Battery "Replacing the System-Board Shield" on page 11. 2 Insert the new battery (CR2032) into the socket with the object. CAUTION: If you pry the battery out of its socket with a blunt object, be careful not to...
Owners Manual
Page 83
...it outwards to release it from the tab that secures it. 9 Extend the release lever completely to servicing that is not authorized by Dell is ready for the new processor. See "Removing the Rear I/O Cover" on page 39. 5 Remove the side I /O Cover" on your warranty. See "... You Begin" on page 53. 7 Remove the processor heat-sink. For additional safety best practices information, see the Regulatory Compliance Homepage at dell.com/regulatory_compliance. CAUTION: To avoid electrostatic discharge, ground yourself by using a wrist grounding strap or by your computer. See "Removing the Rear...
...it outwards to release it from the tab that secures it. 9 Extend the release lever completely to servicing that is not authorized by Dell is ready for the new processor. See "Removing the Rear I/O Cover" on page 39. 5 Remove the side I /O Cover" on your warranty. See "... You Begin" on page 53. 7 Remove the processor heat-sink. For additional safety best practices information, see the Regulatory Compliance Homepage at dell.com/regulatory_compliance. CAUTION: To avoid electrostatic discharge, ground yourself by using a wrist grounding strap or by your computer. See "Removing the Rear...

Owners Manual
Page 84
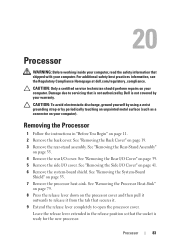
CAUTION: Ground yourself by touching an unpainted metal surface or the computer stand. 84 Processor 1 2 3 1 processor cover 3 release lever 2 tab 10 Gently lift the processor to remove it from the socket. 2 1 1 socket 2 processor Replacing the Processor 1 Follow the instructions in "Before You Begin" on page 11. 2 Unpack the new processor, being careful not to touch the underside of the processor.
CAUTION: Ground yourself by touching an unpainted metal surface or the computer stand. 84 Processor 1 2 3 1 processor cover 3 release lever 2 tab 10 Gently lift the processor to remove it from the socket. 2 1 1 socket 2 processor Replacing the Processor 1 Follow the instructions in "Before You Begin" on page 11. 2 Unpack the new processor, being careful not to touch the underside of the processor.

Owners Manual
Page 86
... seated and secure. 10 Replace the processor heat-sink. See "Replacing the Processor Heat-Sink" on page 54. 86 Processor CAUTION: Ensure that you apply new thermal grease. 4 5 6 3 1 2 1 alignment post 3 processor cover 5 processor 2 tab 4 release lever 6 processor cover notch 8 Clean the thermal grease... from the bottom of the heat sink. 9 Apply the new thermal grease to the processor. New thermal grease is critical for optimal processor operation. See "Replacing the System-Board Shield" on page 80. 11 Replace the ...
... seated and secure. 10 Replace the processor heat-sink. See "Replacing the Processor Heat-Sink" on page 54. 86 Processor CAUTION: Ensure that you apply new thermal grease. 4 5 6 3 1 2 1 alignment post 3 processor cover 5 processor 2 tab 4 release lever 6 processor cover notch 8 Clean the thermal grease... from the bottom of the heat sink. 9 Apply the new thermal grease to the processor. New thermal grease is critical for optimal processor operation. See "Replacing the System-Board Shield" on page 80. 11 Replace the ...


