Dell™ Technology Guide
Page 7
Shadow Storage 77 Reducing Hard Drive Space Used by Shadow Storage 78 Solid-State Drive (SSD 78 Installing Drivers for Media Drives 79 Determining Whether a Device Driver is the Source of a Device Problem 79 Replacing a Driver With a Previous Version of the Driver 79 Using the Drivers and ...Utilities Media to Reinstall a Driver 80 Manually Reinstalling a Driver 80 Drive Problems 81 Optical Drive Problems 82 Hard Drive Problems 82 Working with RAID 83 RAID Level ...
Shadow Storage 77 Reducing Hard Drive Space Used by Shadow Storage 78 Solid-State Drive (SSD 78 Installing Drivers for Media Drives 79 Determining Whether a Device Driver is the Source of a Device Problem 79 Replacing a Driver With a Previous Version of the Driver 79 Using the Drivers and ...Utilities Media to Reinstall a Driver 80 Manually Reinstalling a Driver 80 Drive Problems 81 Optical Drive Problems 82 Hard Drive Problems 82 Working with RAID 83 RAID Level ...
Dell™ Technology Guide
Page 78
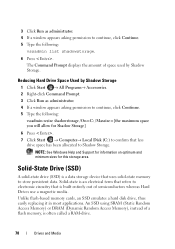
... administrator. 4 If a window appears asking permission to continue, click Continue. 5 Type the following : vssadmin list shadowstorage. 6 Press . Reducing Hard Drive Space Used by Shadow Storage. NOTE: See Windows Help and Support for information on optimum and minimum sizes for Shadow Storage] 6 Press . 7...(C:) to confirm that uses solid-state memory to store persistent data. Unlike flash-based memory cards, an SSD emulates a hard disk drive, thus easily replacing it in most applications. The Command Prompt displays the amount of space used by Shadow Storage 1 Click Start → All...
... administrator. 4 If a window appears asking permission to continue, click Continue. 5 Type the following : vssadmin list shadowstorage. 6 Press . Reducing Hard Drive Space Used by Shadow Storage. NOTE: See Windows Help and Support for information on optimum and minimum sizes for Shadow Storage] 6 Press . 7...(C:) to confirm that uses solid-state memory to store persistent data. Unlike flash-based memory cards, an SSD emulates a hard disk drive, thus easily replacing it in most applications. The Command Prompt displays the amount of space used by Shadow Storage 1 Click Start → All...
Dell™ Technology Guide
Page 87
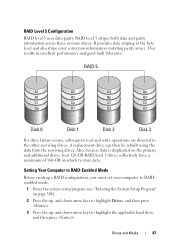
...replacement drive can then be rebuilt using the data from the surviving drives. and down -arrow keys to highlight Drives, and then press . 3 Press the up - RAID Level 5 Configuration RAID level 5 uses data parity. It provides data striping at the byte level and also stripe error correction information (rotating parity array). If a drive... read and write operations are directed to highlight the applicable hard drive, and then press . Also, because data is duplicated on the primary and additional drives, four 120-GB RAID level 1 drives collectively have a maximum of 360-GB on which to ...
...replacement drive can then be rebuilt using the data from the surviving drives. and down -arrow keys to highlight Drives, and then press . 3 Press the up - RAID Level 5 Configuration RAID level 5 uses data parity. It provides data striping at the byte level and also stripe error correction information (rotating parity array). If a drive... read and write operations are directed to highlight the applicable hard drive, and then press . Also, because data is duplicated on the primary and additional drives, four 120-GB RAID level 1 drives collectively have a maximum of 360-GB on which to ...
Dell™ Technology Guide
Page 92
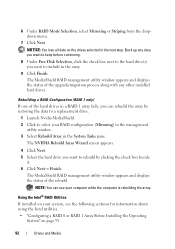
...upgrade/migration process along with any data you want to keep before continuing. 8 Under Free Disk Selection, click the check box next to the hard drive(s) you can use your system, see the following sections for information about using the Intel utilities. • "Configuring a RAID 0 or RAID... the data to a replacement drive. 1 Launch Nvidia MediaShield. 2 Click to rebuild by clicking the check box beside it. 6 Click Next→ Finish. NOTICE: You lose all data on your computer while the computer is rebuilding the array. Back up any other installed hard drives. Using the Intel®...
...upgrade/migration process along with any data you want to keep before continuing. 8 Under Free Disk Selection, click the check box next to the hard drive(s) you can use your system, see the following sections for information about using the Intel utilities. • "Configuring a RAID 0 or RAID... the data to a replacement drive. 1 Launch Nvidia MediaShield. 2 Click to rebuild by clicking the check box beside it. 6 Click Next→ Finish. NOTICE: You lose all data on your computer while the computer is rebuilding the array. Back up any other installed hard drives. Using the Intel®...

Dell™ Technology Guide
Page 95
...and then click Next to continue. 6 On the Select Volume Location screen, click the first hard drive you want to use, and then click the right arrow. 7 Click a second hard drive until two drives appear in the Selected window, and then click Next. 8 In the Specify Volume Size window...procedures for your computer). 1 Turn on or restart your computer to RAID-enabled mode (see an Actions menu option, you have replaced the failed hard drive (see the appropriate "Drives" section for creating a partition on page 87). 2 Click Start→ Programs→ Intel(R) Matrix Storage Manager→ Intel...
...and then click Next to continue. 6 On the Select Volume Location screen, click the first hard drive you want to use, and then click the right arrow. 7 Click a second hard drive until two drives appear in the Selected window, and then click Next. 8 In the Specify Volume Size window...procedures for your computer). 1 Turn on or restart your computer to RAID-enabled mode (see an Actions menu option, you have replaced the failed hard drive (see the appropriate "Drives" section for creating a partition on page 87). 2 Click Start→ Programs→ Intel(R) Matrix Storage Manager→ Intel...
Dell™ Technology Guide
Page 269
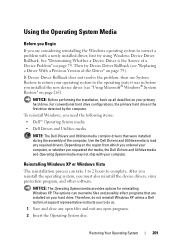
...problem with your operating system to the operating state it was in before you installed the new device driver (see "Replacing a Driver With a Previous Version of the computer. Then try using Windows Device Driver Rollback. To reinstall Windows, you requested the ...and other software. For conventional hard drive configurations, the primary hard drive is the Source of a Device Problem" on your computer, or whether you need the following items: • Dell™ Operating System media • Dell Drivers and Utilities media NOTE: The Dell Drivers and Utilities media contains...
...problem with your operating system to the operating state it was in before you installed the new device driver (see "Replacing a Driver With a Previous Version of the computer. Then try using Windows Device Driver Rollback. To reinstall Windows, you requested the ...and other software. For conventional hard drive configurations, the primary hard drive is the Source of a Device Problem" on your computer, or whether you need the following items: • Dell™ Operating System media • Dell Drivers and Utilities media NOTE: The Dell Drivers and Utilities media contains...
Dell™ Technology Guide
Page 277
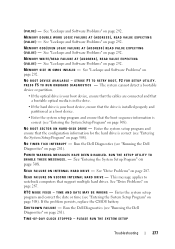
... I M E R T I C K I L U R E - POWER WARNING MESSAGES HAVE BEEN DISABLED. See "Drive Problems" on page 292. If the problem persists, replace the CMOS battery. S H U T D O W N F A I N T E R R U P T...A R D D I A G N O S T I D - Enter the system setup program and ensure that support multiple hard drives. NO BOOT DEVICE AVAILABLE - D I S K D R I V E - R E A D F A I L U R E O N S E C O N D I N T E R N A L H A R D D R I V E - Run the Dell Diagnostics (see "Running the Dell Diagnostics" on page 292. MEMORY WRITE/READ FAILURE AT (ADDRESS), READ VALUE EXPECTING ( V A L U E) - See "Entering...
... I M E R T I C K I L U R E - POWER WARNING MESSAGES HAVE BEEN DISABLED. See "Drive Problems" on page 292. If the problem persists, replace the CMOS battery. S H U T D O W N F A I N T E R R U P T...A R D D I A G N O S T I D - Enter the system setup program and ensure that support multiple hard drives. NO BOOT DEVICE AVAILABLE - D I S K D R I V E - R E A D F A I L U R E O N S E C O N D I N T E R N A L H A R D D R I V E - Run the Dell Diagnostics (see "Running the Dell Diagnostics" on page 292. MEMORY WRITE/READ FAILURE AT (ADDRESS), READ VALUE EXPECTING ( V A L U E) - See "Entering...

Dell™ Technology Guide
Page 279
...ATTACHED CANNOT POWER THE SYSTEM. WARNING: DELL'S DISK MONITORING SYSTEM HAS DETECTED THAT DRIVE [0/1] ON THE [PRIMARY/SECONDARY] EIDE CONTROLLER IS OPERATING OUTSIDE OF NORMAL SPECIFICATIONS. STRIKE T H E F 1 K E Y T O S H U T D O W N . - PLEASE CONNECT A DELL XXX-W AC ADAPTER OR GREATER FOR ...E S S A G E S . - IT IS ADVISABLE TO IMMEDIATELY BACK UP YOUR DATA AND REPLACE YOUR HARD DRIVE BY CALLING YOUR SUPPORT DESK OR D E L L. - Contact Dell for assistance (see "Contacting Dell" on page 337). YOUR POWER ADAPTER DOES NOT SUPPLY ENOUGH POWER TO RUN THE ATTACHED DOCKING STATION....
...ATTACHED CANNOT POWER THE SYSTEM. WARNING: DELL'S DISK MONITORING SYSTEM HAS DETECTED THAT DRIVE [0/1] ON THE [PRIMARY/SECONDARY] EIDE CONTROLLER IS OPERATING OUTSIDE OF NORMAL SPECIFICATIONS. STRIKE T H E F 1 K E Y T O S H U T D O W N . - PLEASE CONNECT A DELL XXX-W AC ADAPTER OR GREATER FOR ...E S S A G E S . - IT IS ADVISABLE TO IMMEDIATELY BACK UP YOUR DATA AND REPLACE YOUR HARD DRIVE BY CALLING YOUR SUPPORT DESK OR D E L L. - Contact Dell for assistance (see "Contacting Dell" on page 337). YOUR POWER ADAPTER DOES NOT SUPPLY ENOUGH POWER TO RUN THE ATTACHED DOCKING STATION....

Setup Guide
Page 57
...note this system have failed at support.dell.com or see the Service Manual at support.dell.com). 55 Alternatively you could see "Contacting Dell" on page 76). Possible system board failure or RTC battery low. Replace the battery (see "Contacting Dell" on your computer has an issue...was running when the message appeared. Replace the CPU fan (see the Service Manual at support.dell.com/manuals) or Contact Dell (see the documentation for the same error. Alert! CPU fan has failed. Using Support Tools System Messages If your hard drive or at checkpoint [nnnn]. CMOS ...
...note this system have failed at support.dell.com or see the Service Manual at support.dell.com). 55 Alternatively you could see "Contacting Dell" on page 76). Possible system board failure or RTC battery low. Replace the battery (see "Contacting Dell" on your computer has an issue...was running when the message appeared. Replace the CPU fan (see the Service Manual at support.dell.com/manuals) or Contact Dell (see the documentation for the same error. Alert! CPU fan has failed. Using Support Tools System Messages If your hard drive or at checkpoint [nnnn]. CMOS ...

Setup Guide
Page 58
... failure. Keyboard failure or loose cable. Hard-disk drive read failure - No boot device available - No bootable partition on hard drive, the hard drive cable is loose, or no bootable device exists. • If the hard drive is your hard drive or at support.dell.com/manuals. No timer tick interrupt - To replace the keyboard, see "Contacting Dell" on page 76). A chip on...
... failure. Keyboard failure or loose cable. Hard-disk drive read failure - No boot device available - No bootable partition on hard drive, the hard drive cable is loose, or no bootable device exists. • If the hard drive is your hard drive or at support.dell.com/manuals. No timer tick interrupt - To replace the keyboard, see "Contacting Dell" on page 76). A chip on...
Setup Guide
Page 80
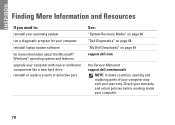
... new or additional components like a new hard drive reinstall or replace a worn or defective part See: "System Recovery Media" on page 66 "Dell Diagnostics" on page 58 "My Dell Downloads" on page 54 support.dell.com the Service Manual at support.dell.com/manuals NOTE: In some countries, opening and replacing parts of your computer may void your...
... new or additional components like a new hard drive reinstall or replace a worn or defective part See: "System Recovery Media" on page 66 "Dell Diagnostics" on page 58 "My Dell Downloads" on page 54 support.dell.com the Service Manual at support.dell.com/manuals NOTE: In some countries, opening and replacing parts of your computer may void your...

Service Manual
Page 23
... You Begin. 2. For additional safety best practices information, see Removing the Palm Rest). Remove memory module(s) (see the Dell Technology Guide). Back to Contents Page Hard Drive Dell™ Inspiron™ N5010/M5010 Service Manual Removing the Hard Drive Replacing the Hard Drive WARNING: Before working inside your computer, read the safety information that shipped with your computer. WARNING: If you...
... You Begin. 2. For additional safety best practices information, see Removing the Palm Rest). Remove memory module(s) (see the Dell Technology Guide). Back to Contents Page Hard Drive Dell™ Inspiron™ N5010/M5010 Service Manual Removing the Hard Drive Replacing the Hard Drive WARNING: Before working inside your computer, read the safety information that shipped with your computer. WARNING: If you...

Service Manual
Page 24
... to do so may result in damage to the hard drive. 4. Save the original packaging for your computer, as needed. Remove the new drive from the hard drive. 1 hard drive 2 interposer Replacing the Hard Drive 1. Replace the battery (see Replacing the Base Cover). 11. Replace the optical drive (see Replacing the Keyboard). 8. Replace the keyboard (see Replacing the Optical Drive). 9. Follow the instructions in the Setup Guide. CAUTION...
... to do so may result in damage to the hard drive. 4. Save the original packaging for your computer, as needed. Remove the new drive from the hard drive. 1 hard drive 2 interposer Replacing the Hard Drive 1. Replace the battery (see Replacing the Base Cover). 11. Replace the optical drive (see Replacing the Keyboard). 8. Replace the keyboard (see Replacing the Optical Drive). 9. Follow the instructions in the Setup Guide. CAUTION...
Service Manual
Page 46
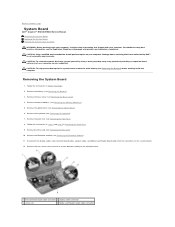
...Hard Drive. 9. Removing the System Board 1. Disconnect the display cable, VGA connector board cable, speaker cable, and Media Card Reader board cable from the connectors on your computer. Remove memory module(s) (see Removing the Memory Module(s)). 5. CAUTION: To help prevent damage to Contents Page System Board Dell™ Inspiron™ N5010.../M5010 Service Manual Removing the System Board Replacing the System Board Entering the Service Tag in the BIOS WARNING: Before ...
...Hard Drive. 9. Removing the System Board 1. Disconnect the display cable, VGA connector board cable, speaker cable, and Media Card Reader board cable from the connectors on your computer. Remove memory module(s) (see Removing the Memory Module(s)). 5. CAUTION: To help prevent damage to Contents Page System Board Dell™ Inspiron™ N5010.../M5010 Service Manual Removing the System Board Replacing the System Board Entering the Service Tag in the BIOS WARNING: Before ...
Service Manual
Page 47
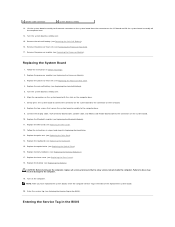
... Entering the Service Tag in damage to the computer base. 9. Replace memory module(s) (see Replacing the Battery). Replace the battery (see Replacing the Memory Module(s)). 17. Entering the Service Tag in the BIOS of the replacement system board. 20. Follow the instructions in Replacing the Hard Drive. 13. Align the connectors on the system board with the slots...
... Entering the Service Tag in damage to the computer base. 9. Replace memory module(s) (see Replacing the Battery). Replace the battery (see Replacing the Memory Module(s)). 17. Entering the Service Tag in the BIOS of the replacement system board. 20. Follow the instructions in Replacing the Hard Drive. 13. Align the connectors on the system board with the slots...


