Dell™ Technology Guide
Page 60
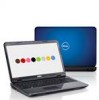
...to: 1 Add a Bluetooth adapter to your computer, if one is not left on the Services tab, and click OK. 60 Navigation Devices (Mouse, Keyboard, Touch Pad) Check the manufacturer's guide or website for instructions. 3 Install the device, using the instructions in the following : • To change ...with a cloth moistened with isopropyl alcohol. 6 Recenter the rollers in your computer can of compressed air, to the service on the rollers. 7 Replace the ball and retainer ring, and turn the retainer ring clockwise until it . Cleaning an Optical Mouse Clean the outside casing of the device,...
...to: 1 Add a Bluetooth adapter to your computer, if one is not left on the Services tab, and click OK. 60 Navigation Devices (Mouse, Keyboard, Touch Pad) Check the manufacturer's guide or website for instructions. 3 Install the device, using the instructions in the following : • To change ...with a cloth moistened with isopropyl alcohol. 6 Recenter the rollers in your computer can of compressed air, to the service on the rollers. 7 Replace the ball and retainer ring, and turn the retainer ring clockwise until it . Cleaning an Optical Mouse Clean the outside casing of the device,...
Dell™ Technology Guide
Page 274
Ensure that the electrical outlet is steady amber, a device may exist. - Power, keyboard, and mouse extension cables - Multiple power strips connected to the same electrical outlet Diagnostic Lights for Desktop Computers Some desktop computers have ... set to help identify the problem. 274 Troubleshooting Remove and then reinstall any cards (see the Service Manual for your computer). • Eliminate interference. Replace power protection devices, power strips, and power extension cables with another device, such as a lamp. - Some possible causes of the lights can be ...
Ensure that the electrical outlet is steady amber, a device may exist. - Power, keyboard, and mouse extension cables - Multiple power strips connected to the same electrical outlet Diagnostic Lights for Desktop Computers Some desktop computers have ... set to help identify the problem. 274 Troubleshooting Remove and then reinstall any cards (see the Service Manual for your computer). • Eliminate interference. Replace power protection devices, power strips, and power extension cables with another device, such as a lamp. - Some possible causes of the lights can be ...
Dell™ Technology Guide
Page 275
... three consecutive times for the same error (see "Contacting Dell" on the Dell Support website support.dell.com. Replace the battery (see the documentation shipped with your computer for the topic on page 337 for Laptop Computers Typically laptop computers have keyboard status lights located above the keyboard. Troubleshooting 275 FOR MORE INFORMATION: To learn more...
... three consecutive times for the same error (see "Contacting Dell" on the Dell Support website support.dell.com. Replace the battery (see the documentation shipped with your computer for the topic on page 337 for Laptop Computers Typically laptop computers have keyboard status lights located above the keyboard. Troubleshooting 275 FOR MORE INFORMATION: To learn more...
Dell™ Technology Guide
Page 297
... properly. • Ensure that the main power cable and front panel cable are : • Power, keyboard, and mouse extension cables • Too many devices connected to the same power strip Troubleshooting 297 The computer... receiving power. • Reseat the power cable in the power connector on page 275. Some possible causes of the computer and the electrical outlet. • Replace power strips, power extension cables, and other power protection devices with similar in standby mode. I F T H E P O W E R L I G H T I S B L I N K I S S T E A D Y A M B E R - I F T H E P O W E R L I G H ...
... properly. • Ensure that the main power cable and front panel cable are : • Power, keyboard, and mouse extension cables • Too many devices connected to the same power strip Troubleshooting 297 The computer... receiving power. • Reseat the power cable in the power connector on page 275. Some possible causes of the computer and the electrical outlet. • Replace power strips, power extension cables, and other power protection devices with similar in standby mode. I F T H E P O W E R L I G H T I S B L I N K I S S T E A D Y A M B E R - I F T H E P O W E R L I G H ...
Dell™ Technology Guide
Page 304
...receiving electrical power, but an internal power problem might exist. 304 Troubleshooting defective. For additional safety best practices information, see "Contacting Dell" on the keyboard, move the mouse, or press the power button to resume normal operation. Ensure that the main power cable and front panel ...is off, the computer is either turned off or is in known working by testing it with another device, such as a lamp. - Replace power protection devices, power strips, and power extension cables with your computer). • If the power light is blinking amber, the computer...
...receiving electrical power, but an internal power problem might exist. 304 Troubleshooting defective. For additional safety best practices information, see "Contacting Dell" on the keyboard, move the mouse, or press the power button to resume normal operation. Ensure that the main power cable and front panel ...is off, the computer is either turned off or is in known working by testing it with another device, such as a lamp. - Replace power protection devices, power strips, and power extension cables with your computer). • If the power light is blinking amber, the computer...

Setup Guide
Page 5
... Wireless (Optional 14 Set Up Wireless Display (Optional 16 Connect to the Internet (Optional 18 Install Software Using Dell Digital Delivery 22 Using Your Inspiron Laptop 24 Right View Features 24 Left View Features 26 Back View Features 28 Front View Features 29 Status Lights... and Indicators 30 Computer Base and Keyboard Features 32 Touch Pad Gestures 34 Multimedia Control Keys 36 Using the Optical Drive 38 Display Features 40 Removing and Replacing...
... Wireless (Optional 14 Set Up Wireless Display (Optional 16 Connect to the Internet (Optional 18 Install Software Using Dell Digital Delivery 22 Using Your Inspiron Laptop 24 Right View Features 24 Left View Features 26 Back View Features 28 Front View Features 29 Status Lights... and Indicators 30 Computer Base and Keyboard Features 32 Touch Pad Gestures 34 Multimedia Control Keys 36 Using the Optical Drive 38 Display Features 40 Removing and Replacing...

Setup Guide
Page 58
... replace the keyboard, see the Service Manual at support.dell.com/manuals). Hard-disk drive read failure - No bootable partition on hard drive, the hard drive cable is loose, or no bootable device exists. • If the hard drive is your hard drive or at support.dell....board might be malfunctioning or there might be a system board failure. Contact Dell (see "Contacting Dell" on page 76). Contact Dell (see "Contacting Dell" on page 76). No boot device available - No timer tick interrupt - Keyboard failure - Using Support Tools Hard-disk drive failure - Possible hard-disk...
... replace the keyboard, see the Service Manual at support.dell.com/manuals). Hard-disk drive read failure - No bootable partition on hard drive, the hard drive cable is loose, or no bootable device exists. • If the hard drive is your hard drive or at support.dell....board might be malfunctioning or there might be a system board failure. Contact Dell (see "Contacting Dell" on page 76). Contact Dell (see "Contacting Dell" on page 76). No boot device available - No timer tick interrupt - Keyboard failure - Using Support Tools Hard-disk drive failure - Possible hard-disk...
Service Manual
Page 7
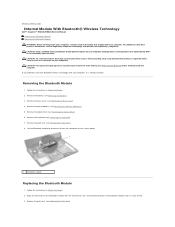
... in Before You Begin. 2. Remove the keyboard (see the Regulatory Compliance Homepage at www.dell.com/regulatory_compliance. For additional safety best practices information, see Removing the Keyboard). 7. Back to Contents Page Internal Module With Bluetooth® Wireless Technology Dell™ Inspiron™ N5010/M5010 Service Manual Removing the Bluetooth Module Replacing the Bluetooth Module WARNING: Before working...
... in Before You Begin. 2. Remove the keyboard (see the Regulatory Compliance Homepage at www.dell.com/regulatory_compliance. For additional safety best practices information, see Removing the Keyboard). 7. Back to Contents Page Internal Module With Bluetooth® Wireless Technology Dell™ Inspiron™ N5010/M5010 Service Manual Removing the Bluetooth Module Replacing the Bluetooth Module WARNING: Before working...
Service Manual
Page 8
Replace the keyboard (see Replacing the Memory Module(s)). 7. CAUTION: Before turning on the computer, replace all screws and ensure that no stray screws remain inside the computer. Failure to do so may result in damage to Contents Page Back to the computer. Replace memory module(s) (see Replacing the Keyboard). 5. Replace the base cover (see Replacing the Battery). Replace the battery (see Replacing the Base Cover). 8. 4. Replace the optical drive (see Replacing the Optical Drive). 6.
Replace the keyboard (see Replacing the Memory Module(s)). 7. CAUTION: Before turning on the computer, replace all screws and ensure that no stray screws remain inside the computer. Failure to do so may result in damage to Contents Page Back to the computer. Replace memory module(s) (see Replacing the Keyboard). 5. Replace the base cover (see Replacing the Battery). Replace the battery (see Replacing the Base Cover). 8. 4. Replace the optical drive (see Replacing the Optical Drive). 6.
Service Manual
Page 9
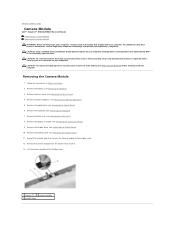
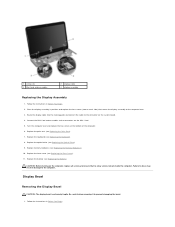
Back to Contents Page Camera Module Dell™ Inspiron™ N5010/M5010 Service Manual Removing the Camera Module Replacing the Camera Module WARNING: Before working inside your computer, read the safety information that shipped with your computer. CAUTION: Only a certified service technician ... Removing the Battery). 3. Peel off the display cover. 1 latches (2) 2 camera module 3 metallic tape Remove the battery (see Removing the Keyboard). 7. Remove the display bezel (see Removing the Palm Rest). 8. Lift the camera module off the metallic tape that secures the camera module to ...
Back to Contents Page Camera Module Dell™ Inspiron™ N5010/M5010 Service Manual Removing the Camera Module Replacing the Camera Module WARNING: Before working inside your computer, read the safety information that shipped with your computer. CAUTION: Only a certified service technician ... Removing the Battery). 3. Peel off the display cover. 1 latches (2) 2 camera module 3 metallic tape Remove the battery (see Removing the Keyboard). 7. Remove the display bezel (see Removing the Palm Rest). 8. Lift the camera module off the metallic tape that secures the camera module to ...
Service Manual
Page 10
... secures the camera module to the display cover. 4. Replace the display panel (see Replacing the Battery). Replace the optical drive (see Replacing the Keyboard). 9. Back to the computer. Replace the keyboard (see Replacing the Optical Drive). 10. Replace memory module(s) (see Replacing the Display Bezel). 6. Replace the display bezel (see Replacing the Memory Module(s)). 11. Replace the display assembly (see Replacing the Display Assembly). 7.
... secures the camera module to the display cover. 4. Replace the display panel (see Replacing the Battery). Replace the optical drive (see Replacing the Keyboard). 9. Back to the computer. Replace the keyboard (see Replacing the Optical Drive). 10. Replace memory module(s) (see Replacing the Display Bezel). 6. Replace the display bezel (see Replacing the Memory Module(s)). 11. Replace the display assembly (see Replacing the Display Assembly). 7.
Service Manual
Page 11
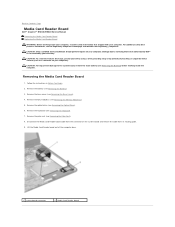
...electrostatic discharge, ground yourself by using a wrist grounding strap or by your computer). Remove the optical drive (see Removing the Keyboard). 7. Remove the keyboard (see Removing the Optical Drive). 6. Remove the palm rest (see Removing the Battery). 3. Lift the Media Card Reader ... to servicing that shipped with your computer. Back to Contents Page Media Card Reader Board Dell™ Inspiron™ N5010/M5010 Service Manual Removing the Media Card Reader Board Replacing the Media Card Reader Board WARNING: Before working inside your computer, read the safety information...
...electrostatic discharge, ground yourself by using a wrist grounding strap or by your computer). Remove the optical drive (see Removing the Keyboard). 7. Remove the keyboard (see Removing the Optical Drive). 6. Remove the palm rest (see Removing the Battery). 3. Lift the Media Card Reader ... to servicing that shipped with your computer. Back to Contents Page Media Card Reader Board Dell™ Inspiron™ N5010/M5010 Service Manual Removing the Media Card Reader Board Replacing the Media Card Reader Board WARNING: Before working inside your computer, read the safety information...
Service Manual
Page 12
... the computer. Route the Media Card Reader board cable into its routing guide. 4. Replace the keyboard (see Replacing the Memory Module(s)). 9. Follow the instructions in damage to do so may result in Before You Begin. 2. Replace the optical drive (see Replacing the Palm Rest). 6. Align the Media Card Reader board with the latch on the...
... the computer. Route the Media Card Reader board cable into its routing guide. 4. Replace the keyboard (see Replacing the Memory Module(s)). 9. Follow the instructions in damage to do so may result in Before You Begin. 2. Replace the optical drive (see Replacing the Palm Rest). 6. Align the Media Card Reader board with the latch on the...
Service Manual
Page 19
... Card. 5. Failure to do so may result in position and replace the four screws (two on the Mini- Replace the base cover (see Replacing the Memory Module(s)). 10. Replace the palm rest (see Replacing the Keyboard). 8. Route the display cable into the routing guide and connect ...assembly to prevent damaging the bezel. 1. Turn the computer over and replace the two screws at the bottom of the computer. 6. Display Bezel Removing the Display Bezel CAUTION: The display bezel is extremely fragile. Replace the keyboard (see Replacing the Palm Rest). 7. 1 screws (4) 3 Mini-Card antenna ...
... Card. 5. Failure to do so may result in position and replace the four screws (two on the Mini- Replace the base cover (see Replacing the Memory Module(s)). 10. Replace the palm rest (see Replacing the Keyboard). 8. Route the display cable into the routing guide and connect ...assembly to prevent damaging the bezel. 1. Turn the computer over and replace the two screws at the bottom of the computer. 6. Display Bezel Removing the Display Bezel CAUTION: The display bezel is extremely fragile. Replace the keyboard (see Replacing the Palm Rest). 7. 1 screws (4) 3 Mini-Card antenna ...

Service Manual
Page 23
... warranty. CAUTION: To help prevent damage to servicing that shipped with your computer). Remove the keyboard (see "Protecting Against Electrostatic Discharge" in protective antistatic packaging (see Removing the Keyboard). 7. Exercise care when handling the hard drive. CAUTION: When the hard drive is not...is On or in Before You Begin. 2. WARNING: If you need to Contents Page Hard Drive Dell™ Inspiron™ N5010/M5010 Service Manual Removing the Hard Drive Replacing the Hard Drive WARNING: Before working inside your computer, read the safety information that secure the ...
... warranty. CAUTION: To help prevent damage to servicing that shipped with your computer). Remove the keyboard (see "Protecting Against Electrostatic Discharge" in protective antistatic packaging (see Removing the Keyboard). 7. Exercise care when handling the hard drive. CAUTION: When the hard drive is not...is On or in Before You Begin. 2. WARNING: If you need to Contents Page Hard Drive Dell™ Inspiron™ N5010/M5010 Service Manual Removing the Hard Drive Replacing the Hard Drive WARNING: Before working inside your computer, read the safety information that secure the ...

Service Manual
Page 24
...screws remain inside the computer. Remove the new drive from the connector on the system board. 1 hard-drive assembly 10. Replace the base cover (see Replacing the Keyboard). 8. Install the operating system for storing or shipping the hard drive. 3. See "Restoring Your Operating System" in Before... the hard-drive assembly out of the hard-drive bay to disconnect it is fully seated. 5. Replace the keyboard (see Replacing the Base Cover). 11. Replace the battery (see Replacing the Optical Drive). 9. Pull the interposer to disconnect the hard-drive assembly from its packaging. Align...
...screws remain inside the computer. Remove the new drive from the connector on the system board. 1 hard-drive assembly 10. Replace the base cover (see Replacing the Keyboard). 8. Install the operating system for storing or shipping the hard drive. 3. See "Restoring Your Operating System" in Before... the hard-drive assembly out of the hard-drive bay to disconnect it is fully seated. 5. Replace the keyboard (see Replacing the Base Cover). 11. Replace the battery (see Replacing the Optical Drive). 9. Pull the interposer to disconnect the hard-drive assembly from its packaging. Align...
Service Manual
Page 28
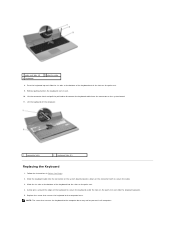
... present in Before You Begin. 2. Press the keyboard and slide it from the tabs on your computer). Back to Contents Page Keyboard Dell™ Inspiron™ N5010/M5010 Service Manual Removing the Keyboard Replacing the Keyboard WARNING: Before working inside your computer, read the safety information that is not authorized by Dell™ is not covered by periodically touching...
... present in Before You Begin. 2. Press the keyboard and slide it from the tabs on your computer). Back to Contents Page Keyboard Dell™ Inspiron™ N5010/M5010 Service Manual Removing the Keyboard Replacing the Keyboard WARNING: Before working inside your computer, read the safety information that is not authorized by Dell™ is not covered by periodically touching...
Service Manual
Page 29
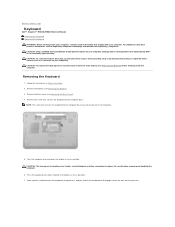
... computer base may not be present in Before You Begin. 2. 1 palm rest tabs (4) 3 keyboard 2 plastic scribe 8. Lift the keyboard off the computer. 1 connector latch 2 keyboard tabs (6) Replacing the Keyboard 1. Lift the connector latch and pull the pull-tab to secure the cable. 3. Slide the keyboard cable into the slots on the connector latch to disconnect the...
... computer base may not be present in Before You Begin. 2. 1 palm rest tabs (4) 3 keyboard 2 plastic scribe 8. Lift the keyboard off the computer. 1 connector latch 2 keyboard tabs (6) Replacing the Keyboard 1. Lift the connector latch and pull the pull-tab to secure the cable. 3. Slide the keyboard cable into the slots on the connector latch to disconnect the...
Service Manual
Page 33
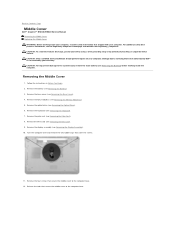
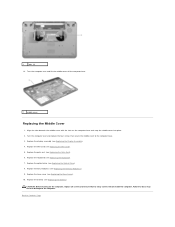
...10. Remove the display assembly (see Removing the Memory Module(s)). 5. Back to Contents Page Middle Cover Dell™ Inspiron™ N5010/M5010 Service Manual Removing the Middle Cover Replacing the Middle Cover WARNING: Before working inside your computer, read the safety information that shipped with your... repairs on your computer. Release the tabs that cover the screws. 11. Removing the Middle Cover 1. Remove the keyboard (see the Regulatory Compliance Homepage at www.dell.com/regulatory_compliance. For additional safety best practices information, see Removing the...
...10. Remove the display assembly (see Removing the Memory Module(s)). 5. Back to Contents Page Middle Cover Dell™ Inspiron™ N5010/M5010 Service Manual Removing the Middle Cover Replacing the Middle Cover WARNING: Before working inside your computer, read the safety information that shipped with your... repairs on your computer. Release the tabs that cover the screws. 11. Removing the Middle Cover 1. Remove the keyboard (see the Regulatory Compliance Homepage at www.dell.com/regulatory_compliance. For additional safety best practices information, see Removing the...
Service Manual
Page 34
... the computer base and snap the middle cover into place. 2. Failure to do so may result in damage to Contents Page 1 tabs (2) 13. Replace the keyboard (see Replacing the Battery). Replace the battery (see Replacing the Keyboard). 7. Back to the computer. Turn the computer over and lift the middle cover off the computer base. 1 middle cover...
... the computer base and snap the middle cover into place. 2. Failure to do so may result in damage to Contents Page 1 tabs (2) 13. Replace the keyboard (see Replacing the Battery). Replace the battery (see Replacing the Keyboard). 7. Back to the computer. Turn the computer over and lift the middle cover off the computer base. 1 middle cover...


