Inspiron Duo Service Manual
Page 1
.... A00 Trademarks used in this document is strictly forbidden. Dell™ Inspiron™ 1090 Service Manual Before You Begin Hard-Drive Assembly Label Door Coin-Cell Battery Keyboard Display Palm-Rest Assembly Battery Memory Module AC-Adapter Connector Processor Fan and Heat-Sink Assembly ... Board Connector Covers Speakers Wireless Mini-Card(s) Flashing the BIOS Notes, Cautions, and Warnings NOTE: A NOTE indicates important information that helps you make better use of these materials in any manner whatsoever without notice. © 2010 Dell Inc. Information in the United...
.... A00 Trademarks used in this document is strictly forbidden. Dell™ Inspiron™ 1090 Service Manual Before You Begin Hard-Drive Assembly Label Door Coin-Cell Battery Keyboard Display Palm-Rest Assembly Battery Memory Module AC-Adapter Connector Processor Fan and Heat-Sink Assembly ... Board Connector Covers Speakers Wireless Mini-Card(s) Flashing the BIOS Notes, Cautions, and Warnings NOTE: A NOTE indicates important information that helps you make better use of these materials in any manner whatsoever without notice. © 2010 Dell Inc. Information in the United...
Inspiron Duo Service Manual
Page 2
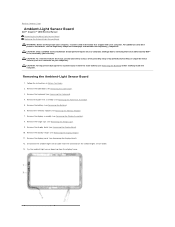
... Ambient-Light Sensor Board Dell™ Inspiron™ 1090 Service Manual Removing the Ambient-Light Sensor Board Replacing the Ambient-Light Sensor Board WARNING: Before working inside your computer, read the safety information that is not authorized by Dell™ is not covered...the ambient-light sensor cable from the display frame. Remove the memory module (see the Regulatory Compliance Homepage at www.dell.com/regulatory_compliance. For additional safety best practices information, see Removing the Memory Module). 7. CAUTION: To help prevent damage to servicing that shipped...
... Ambient-Light Sensor Board Dell™ Inspiron™ 1090 Service Manual Removing the Ambient-Light Sensor Board Replacing the Ambient-Light Sensor Board WARNING: Before working inside your computer, read the safety information that is not authorized by Dell™ is not covered...the ambient-light sensor cable from the display frame. Remove the memory module (see the Regulatory Compliance Homepage at www.dell.com/regulatory_compliance. For additional safety best practices information, see Removing the Memory Module). 7. CAUTION: To help prevent damage to servicing that shipped...
Inspiron Duo Service Manual
Page 3
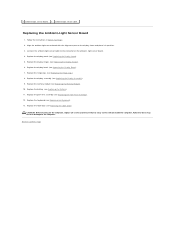
...display hinges (see Replacing the Hinge Caps). 8. Replace the hinge caps (see Replacing the Display Hinges). 6. Replace the keyboard (see Replacing the Memory Module). 10. Failure to do so may result in damage to the connector on the ambient- Connect the ambient-light sensor cable to the ...computer. Replace the memory module (see Replacing the Keyboard). 13. Replace the palm-rest assembly (see Replacing the Label Door). Back to Contents Page Replace the label...
...display hinges (see Replacing the Hinge Caps). 8. Replace the hinge caps (see Replacing the Display Hinges). 6. Replace the keyboard (see Replacing the Memory Module). 10. Failure to do so may result in damage to the connector on the ambient- Connect the ambient-light sensor cable to the ...computer. Replace the memory module (see Replacing the Keyboard). 13. Replace the palm-rest assembly (see Replacing the Label Door). Back to Contents Page Replace the label...
Inspiron Duo Service Manual
Page 9
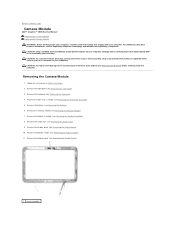
...door (see Removing the Battery). 6. Back to Contents Page Camera Module Dell™ Inspiron™ 1090 Service Manual Removing the Camera Module Replacing the Camera Module WARNING: Before ...working inside your computer, read the safety information that is not authorized by Dell... 1 camera module Remove the display panel (see the Regulatory Compliance Homepage at www.dell.com/regulatory_compliance. CAUTION: To avoid electrostatic discharge, ground yourself by using a wrist grounding...
...door (see Removing the Battery). 6. Back to Contents Page Camera Module Dell™ Inspiron™ 1090 Service Manual Removing the Camera Module Replacing the Camera Module WARNING: Before ...working inside your computer, read the safety information that is not authorized by Dell... 1 camera module Remove the display panel (see the Regulatory Compliance Homepage at www.dell.com/regulatory_compliance. CAUTION: To avoid electrostatic discharge, ground yourself by using a wrist grounding...
Inspiron Duo Service Manual
Page 10
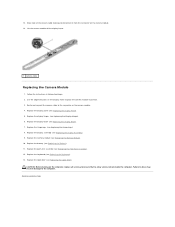
... the display panel (see Replacing the Hinge Caps). 8. Replace the hinge caps (see Replacing the Display Panel). 5. Replace the memory module (see Replacing the Keyboard). 13. Replace the keyboard (see Replacing the Memory Module). 10. Replace the label door (see Replacing the Battery). 11. Replace the battery (see Replacing the Label Door...
... the display panel (see Replacing the Hinge Caps). 8. Replace the hinge caps (see Replacing the Display Panel). 5. Replace the memory module (see Replacing the Keyboard). 13. Replace the keyboard (see Replacing the Memory Module). 10. Replace the label door (see Replacing the Battery). 11. Replace the battery (see Replacing the Label Door...
Inspiron Duo Service Manual
Page 11
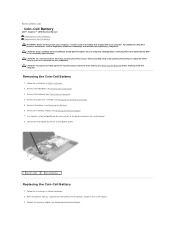
... your computer. Remove the memory module (see Removing the Keyboard). 4. Replace the memory module (see Removing the Label Door). 3. Remove the label door (see Replacing the Memory Module). Remove the battery (see the Regulatory Compliance Homepage at www.dell.com/regulatory_compliance. Follow the ...CAUTION: Only a certified service technician should perform repairs on your computer). Back to Contents Page Coin-Cell Battery Dell™ Inspiron™ 1090 Service Manual Removing the Coin-Cell Battery Replacing the Coin-Cell Battery WARNING: Before working inside your computer, ...
... your computer. Remove the memory module (see Removing the Keyboard). 4. Replace the memory module (see Removing the Label Door). 3. Remove the label door (see Replacing the Memory Module). Remove the battery (see the Regulatory Compliance Homepage at www.dell.com/regulatory_compliance. Follow the ...CAUTION: Only a certified service technician should perform repairs on your computer). Back to Contents Page Coin-Cell Battery Dell™ Inspiron™ 1090 Service Manual Removing the Coin-Cell Battery Replacing the Coin-Cell Battery WARNING: Before working inside your computer, ...
Inspiron Duo Service Manual
Page 13
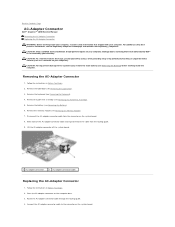
... Before You Begin. 2. Damage due to servicing that shipped with your computer. Back to Contents Page AC-Adapter Connector Dell™ Inspiron™ 1090 Service Manual Removing the AC-Adapter Connector Replacing the AC-Adapter Connector WARNING: Before working inside your computer, read the ...safety information that is not authorized by Dell™ is not covered by periodically touching an unpainted metal surface (such as a connector on your computer). Remove the label door (see Removing the Memory Module). 7. Remove the memory module (see Removing the Label Door). 3....
... Before You Begin. 2. Damage due to servicing that shipped with your computer. Back to Contents Page AC-Adapter Connector Dell™ Inspiron™ 1090 Service Manual Removing the AC-Adapter Connector Replacing the AC-Adapter Connector WARNING: Before working inside your computer, read the ...safety information that is not authorized by Dell™ is not covered by periodically touching an unpainted metal surface (such as a connector on your computer). Remove the label door (see Removing the Memory Module). 7. Remove the memory module (see Removing the Label Door). 3....
Inspiron Duo Service Manual
Page 14
Failure to do so may result in damage to Contents Page Replace the palm-rest assembly (see Replacing the Keyboard). 9. 5. Replace the keyboard (see Replacing the Palm-Rest Assembly). 8. Replace the label door (see Replacing the Memory Module). 6. Back to the computer. CAUTION: Before turning on the computer, replace all screws and ensure that no stray screws remain inside the computer. Replace the memory module (see Replacing the Label Door). Replace the battery (see Replacing the Battery). 7.
Failure to do so may result in damage to Contents Page Replace the palm-rest assembly (see Replacing the Keyboard). 9. 5. Replace the keyboard (see Replacing the Palm-Rest Assembly). 8. Replace the label door (see Replacing the Memory Module). 6. Back to the computer. CAUTION: Before turning on the computer, replace all screws and ensure that no stray screws remain inside the computer. Replace the memory module (see Replacing the Label Door). Replace the battery (see Replacing the Battery). 7.

Inspiron Duo Service Manual
Page 15
... from the routing guides. Remove the label door (see Removing the Keyboard). 4. Back to Contents Page Display Dell™ Inspiron™ 1090 Service Manual Display Assembly Hinge Caps Display Bezel Display Hinges Display Panel Display Cable WARNING: Before working inside your computer...(s). 8. Note the routing of the Mini-Card antenna cables and remove the cables from their connectors on the system board. 9. Display Assembly Removing the Display Assembly 1. Remove the keyboard (see Removing the Label Door). 3. Remove the memory module (see Removing the Battery). 6. ...
... from the routing guides. Remove the label door (see Removing the Keyboard). 4. Back to Contents Page Display Dell™ Inspiron™ 1090 Service Manual Display Assembly Hinge Caps Display Bezel Display Hinges Display Panel Display Cable WARNING: Before working inside your computer...(s). 8. Note the routing of the Mini-Card antenna cables and remove the cables from their connectors on the system board. 9. Display Assembly Removing the Display Assembly 1. Remove the keyboard (see Removing the Label Door). 3. Remove the memory module (see Removing the Battery). 6. ...
Inspiron Duo Service Manual
Page 16
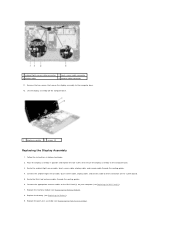
..., touch-screen cable, display cable, and camera cable through the routing guides. 6. Route the Mini-Card antenna cables through the routing guides. 4. Replace the battery (see Replacing the Memory Module). 8. Place the display assembly in Before You Begin. 2. Connect the ambient-light sensor ...cable, touch-screen cable, display cable, and camera cable to the computer base. 12. Replace the memory module (see Replacing the Battery). 9. Replace the palm-rest assembly (see Replacing the Mini-Card(s)). 7. Connect the appropriate antenna cables to the computer base. 3.
..., touch-screen cable, display cable, and camera cable through the routing guides. 6. Route the Mini-Card antenna cables through the routing guides. 4. Replace the battery (see Replacing the Memory Module). 8. Place the display assembly in Before You Begin. 2. Connect the ambient-light sensor ...cable, touch-screen cable, display cable, and camera cable to the computer base. 12. Replace the memory module (see Replacing the Battery). 9. Replace the palm-rest assembly (see Replacing the Mini-Card(s)). 7. Connect the appropriate antenna cables to the computer base. 3.
Inspiron Duo Service Manual
Page 23
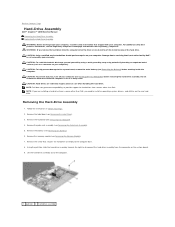
...(see Removing the Keyboard). 4. Remove the screw that secures the hard-drive assembly to Contents Page Hard-Drive Assembly Dell™ Inspiron™ 1090 Service Manual Removing the Hard-Drive Assembly Replacing the Hard-Drive Assembly WARNING: Before working inside your warranty. WARNING:... installing a hard drive from a source other than Dell, you are extremely fragile. Lift the hard-drive assembly out of the hard drive. Remove the memory module (see the Regulatory Compliance Homepage at www.dell.com/regulatory_compliance. For additional safety best practices information,...
...(see Removing the Keyboard). 4. Remove the screw that secures the hard-drive assembly to Contents Page Hard-Drive Assembly Dell™ Inspiron™ 1090 Service Manual Removing the Hard-Drive Assembly Replacing the Hard-Drive Assembly WARNING: Before working inside your warranty. WARNING:... installing a hard drive from a source other than Dell, you are extremely fragile. Lift the hard-drive assembly out of the hard drive. Remove the memory module (see the Regulatory Compliance Homepage at www.dell.com/regulatory_compliance. For additional safety best practices information,...
Inspiron Duo Service Manual
Page 24
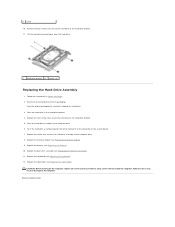
... instructions in the computer base. 6. Replace the four screws that no stray screws remain inside the computer. Replace the memory module (see Replacing the Label Door). Replace the label door (see Replacing the Memory Module). 9. Push the hard-drive assembly towards the left to connect it to the computer base. 8. Replace the...
... instructions in the computer base. 6. Replace the four screws that no stray screws remain inside the computer. Replace the memory module (see Replacing the Label Door). Replace the label door (see Replacing the Memory Module). 9. Push the hard-drive assembly towards the left to connect it to the computer base. 8. Replace the...

Inspiron Duo Service Manual
Page 25
Back to Contents Page Processor Fan and Heat-Sink Assembly Dell™ Inspiron™ 1090 Service Manual Removing the Processor Fan and Heat-Sink Assembly Replacing the Processor Fan and Heat-Sink Assembly WARNING: Before ...the computer. In sequential order (indicated on your computer). For additional safety best practices information, see Removing the Memory Module). 7. Remove the memory module (see the Regulatory Compliance Homepage at www.dell.com/regulatory_compliance. Removing the Processor Fan and Heat-Sink Assembly 1. CAUTION: To help prevent damage to the ...
Back to Contents Page Processor Fan and Heat-Sink Assembly Dell™ Inspiron™ 1090 Service Manual Removing the Processor Fan and Heat-Sink Assembly Replacing the Processor Fan and Heat-Sink Assembly WARNING: Before ...the computer. In sequential order (indicated on your computer). For additional safety best practices information, see Removing the Memory Module). 7. Remove the memory module (see the Regulatory Compliance Homepage at www.dell.com/regulatory_compliance. Removing the Processor Fan and Heat-Sink Assembly 1. CAUTION: To help prevent damage to the ...
Inspiron Duo Service Manual
Page 26
... fan and heat-sink assembly and reapply it. 3. Replace the label door (see Replacing the Palm-Rest Assembly). 8. Replace the keyboard (see Replacing the Memory Module). 6. Replace the memory module (see Replacing the Keyboard). 9. CAUTION: Before turning on the system board. 5. Follow the instructions in damage to the connector on the computer...
... fan and heat-sink assembly and reapply it. 3. Replace the label door (see Replacing the Palm-Rest Assembly). 8. Replace the keyboard (see Replacing the Memory Module). 6. Replace the memory module (see Replacing the Keyboard). 9. CAUTION: Before turning on the system board. 5. Follow the instructions in damage to the connector on the computer...
Inspiron Duo Service Manual
Page 33
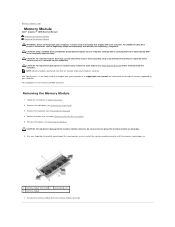
... securing clips. 6. Remove the keyboard (see Removing the Battery) before working inside the computer. Use your computer. Back to Contents Page Memory Module Dell™ Inspiron™ 1090 Service Manual Removing the Memory Module Replacing the Memory Module WARNING: Before working inside your computer, read the safety information that shipped with your computer or at www...
... securing clips. 6. Remove the keyboard (see Removing the Battery) before working inside the computer. Use your computer. Back to Contents Page Memory Module Dell™ Inspiron™ 1090 Service Manual Removing the Memory Module Replacing the Memory Module WARNING: Before working inside your computer, read the safety information that shipped with your computer or at www...
Inspiron Duo Service Manual
Page 34
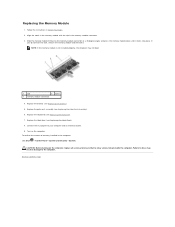
... Replacing the Keyboard). 7. Replace the palm-rest assembly (see Replacing the Label Door). 8. To confirm the amount of memory installed in the memory- NOTE: If the memory module is not installed properly, the computer may result in Before You Begin. 2. Replace the label door (see Replacing... Page Replacing the Memory Module 1. Follow the instructions in damage to do not hear the click, remove the memory module and reinstall it clicks into place. Slide the memory module firmly into the memory-module connector at a 45-degree angle, and press the memory module down until ...
... Replacing the Keyboard). 7. Replace the palm-rest assembly (see Replacing the Label Door). 8. To confirm the amount of memory installed in the memory- NOTE: If the memory module is not installed properly, the computer may result in Before You Begin. 2. Replace the label door (see Replacing... Page Replacing the Memory Module 1. Follow the instructions in damage to do not hear the click, remove the memory module and reinstall it clicks into place. Slide the memory module firmly into the memory-module connector at a 45-degree angle, and press the memory module down until ...
Inspiron Duo Service Manual
Page 43
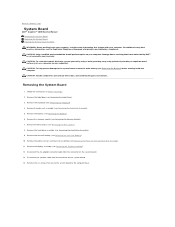
...the keyboard (see Removing the Display Assembly). 12. Remove the hard-drive assembly (see Removing the Mini-Card(s)). 8. Back to Contents Page System Board Dell™ Inspiron™ 1090 Service Manual Removing the System Board Replacing the System Board Entering the Service Tag in Before You Begin...). 10. Disconnect the speaker cable from the connector on the system board. 14. Remove the coin-cell battery (see Removing the Memory Module). 7. CAUTION: Handle components and cards by periodically touching an unpainted metal surface (such as a connector on your computer). Removing...
...the keyboard (see Removing the Display Assembly). 12. Remove the hard-drive assembly (see Removing the Mini-Card(s)). 8. Back to Contents Page System Board Dell™ Inspiron™ 1090 Service Manual Removing the System Board Replacing the System Board Entering the Service Tag in Before You Begin...). 10. Disconnect the speaker cable from the connector on the system board. 14. Remove the coin-cell battery (see Removing the Memory Module). 7. CAUTION: Handle components and cards by periodically touching an unpainted metal surface (such as a connector on your computer). Removing...
Inspiron Duo Service Manual
Page 44
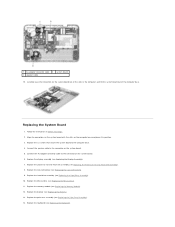
...Begin. 2. Connect the speaker cable to the connector on the system board. 5. Replace the coin-cell battery (see Replacing the Mini-Card(s)). 11. Replace the Mini-Card(s) (see Replacing the Coin-Cell Battery). 9. Replace the palm-rest assembly (see Replacing the Hard-Drive Assembly). 10....-Rest Assembly). 14. 1 AC-adapter connector cable 2 3 speaker cable system board 15. Replace the battery (see Replacing the Memory Module). 12. Replace the memory module (see Replacing the Battery). 13. Replace the six screws that secure the system board to the computer base. 4. Replace the...
...Begin. 2. Connect the speaker cable to the connector on the system board. 5. Replace the coin-cell battery (see Replacing the Mini-Card(s)). 11. Replace the Mini-Card(s) (see Replacing the Coin-Cell Battery). 9. Replace the palm-rest assembly (see Replacing the Hard-Drive Assembly). 10....-Rest Assembly). 14. 1 AC-adapter connector cable 2 3 speaker cable system board 15. Replace the battery (see Replacing the Memory Module). 12. Replace the memory module (see Replacing the Battery). 13. Replace the six screws that secure the system board to the computer base. 4. Replace the...

Inspiron Duo Setup Guide
Page 5
... or Disable Wireless (Optional 14 Connect to the Internet (Optional 17 User Interface Modes 19 Set Up the Tablet Mode 20 Using Your Inspiron Laptop 22 Right View Features 22 Left View Features 24 Status Lights and Indicators 26 Disabling Battery Charging 27 Computer Base and Keyboard Features ...28 Touch Pad Gestures 30 Multimedia Control Keys 32 Display Features 34 Using the Touch Screen 36 Software Features 40 Dell DataSafe Online Backup 41 Free Fall Sensor 41 Solving Problems 42 Beep Codes 42 Touch Screen Problems 43 Network Problems 44 Power Problems ...
... or Disable Wireless (Optional 14 Connect to the Internet (Optional 17 User Interface Modes 19 Set Up the Tablet Mode 20 Using Your Inspiron Laptop 22 Right View Features 22 Left View Features 24 Status Lights and Indicators 26 Disabling Battery Charging 27 Computer Base and Keyboard Features ...28 Touch Pad Gestures 30 Multimedia Control Keys 32 Display Features 34 Using the Touch Screen 36 Software Features 40 Dell DataSafe Online Backup 41 Free Fall Sensor 41 Solving Problems 42 Beep Codes 42 Touch Screen Problems 43 Network Problems 44 Power Problems ...

Inspiron Duo Setup Guide
Page 44
... 42 Possible Problem Possible system board failure - If you installed or replaced the memory module, ensure that the memory module is seated properly. If this occurs, note down the beep code and contact Dell (see "Contacting Dell" on page 72. INSPIRON Solving Problems This section provides troubleshooting information for your problem using the following guidelines...
... 42 Possible Problem Possible system board failure - If you installed or replaced the memory module, ensure that the memory module is seated properly. If this occurs, note down the beep code and contact Dell (see "Contacting Dell" on page 72. INSPIRON Solving Problems This section provides troubleshooting information for your problem using the following guidelines...


