Inspiron Duo Service Manual
Page 1
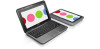
.... Dell™ Inspiron™ 1090 Service Manual Before You Begin Hard-Drive Assembly Label Door Coin-Cell Battery Keyboard Display Palm-Rest Assembly Battery Memory Module AC-Adapter Connector Processor Fan and Heat-Sink Assembly Ambient-Light Sensor Board Camera Module System Board Connector Covers Speakers Wireless Mini-Card(s) Flashing the BIOS Notes, Cautions, and Warnings NOTE: A NOTE indicates important information that helps you make better use of Dell Inc. Information in this text: Dell™ and the DELL logo, and Inspiron™...
.... Dell™ Inspiron™ 1090 Service Manual Before You Begin Hard-Drive Assembly Label Door Coin-Cell Battery Keyboard Display Palm-Rest Assembly Battery Memory Module AC-Adapter Connector Processor Fan and Heat-Sink Assembly Ambient-Light Sensor Board Camera Module System Board Connector Covers Speakers Wireless Mini-Card(s) Flashing the BIOS Notes, Cautions, and Warnings NOTE: A NOTE indicates important information that helps you make better use of Dell Inc. Information in this text: Dell™ and the DELL logo, and Inspiron™...
Inspiron Duo Service Manual
Page 2
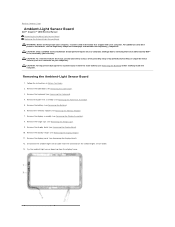
...-Light Sensor Board 1. Remove the label door (see Removing the Memory Module). 7. Remove the memory module (see Removing the Label Door). 3. Remove the display bezel (see Removing the Display Panel). 12. Remove the display panel (see Removing the Display Bezel). 10. Pry the ambient-light sensor board up from the connector on the ambient-light sensor board. 13. Back to Contents Page Ambient-Light Sensor Board Dell™ Inspiron™ 1090 Service Manual Removing the Ambient-Light Sensor Board Replacing the Ambient-Light Sensor Board WARNING: Before working...
...-Light Sensor Board 1. Remove the label door (see Removing the Memory Module). 7. Remove the memory module (see Removing the Label Door). 3. Remove the display bezel (see Removing the Display Panel). 12. Remove the display panel (see Removing the Display Bezel). 10. Pry the ambient-light sensor board up from the connector on the ambient-light sensor board. 13. Back to Contents Page Ambient-Light Sensor Board Dell™ Inspiron™ 1090 Service Manual Removing the Ambient-Light Sensor Board Replacing the Ambient-Light Sensor Board WARNING: Before working...

Inspiron Duo Service Manual
Page 6
... your computer. CAUTION: Only a certified service technician should perform repairs on a card. Back to Contents Page Before You Begin Dell™ Inspiron™ 1090 Service Manual Recommended Tools Turning Off Your Computer Before Working Inside Your Computer This manual provides procedures for removing and installing the components in this type of cable, press in on the locking tabs before you disconnect a cable, pull on its connector or...
... your computer. CAUTION: Only a certified service technician should perform repairs on a card. Back to Contents Page Before You Begin Dell™ Inspiron™ 1090 Service Manual Recommended Tools Turning Off Your Computer Before Working Inside Your Computer This manual provides procedures for removing and installing the components in this type of cable, press in on the locking tabs before you disconnect a cable, pull on its connector or...

Inspiron Duo Service Manual
Page 8
... product in the Enter a service tag: field, click Go, and proceed to step 4. Click Select Model. Go to support.dell.com/support/downloads. 3. If you have your desktop. Click Confirm. 4. A list of the menu. Click Close if the Download Complete window appears. Back to Contents Page Flashing the BIOS Dell™ Inspiron™ 1090 Service Manual The BIOS may require flashing when an update is titled the same as the downloaded BIOS update file. 8.
... product in the Enter a service tag: field, click Go, and proceed to step 4. Click Select Model. Go to support.dell.com/support/downloads. 3. If you have your desktop. Click Confirm. 4. A list of the menu. Click Close if the Download Complete window appears. Back to Contents Page Flashing the BIOS Dell™ Inspiron™ 1090 Service Manual The BIOS may require flashing when an update is titled the same as the downloaded BIOS update file. 8.
Inspiron Duo Service Manual
Page 9
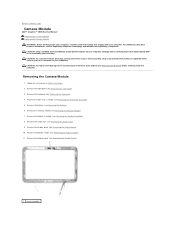
...). 5. Remove the memory module (see Removing the Hinge Caps). 9. Follow the instructions in Before You Begin. 2. Remove the hinge caps (see Removing the Memory Module). 7. Remove the display assembly (see Removing the Display Panel). 1 camera module CAUTION: Only a certified service technician should perform repairs on your computer. Remove the display panel (see Removing the Display Assembly). 8. Back to Contents Page Camera Module Dell™ Inspiron™ 1090 Service Manual Removing the Camera Module Replacing the Camera Module WARNING: Before working inside...
...). 5. Remove the memory module (see Removing the Hinge Caps). 9. Follow the instructions in Before You Begin. 2. Remove the hinge caps (see Removing the Memory Module). 7. Remove the display assembly (see Removing the Display Panel). 1 camera module CAUTION: Only a certified service technician should perform repairs on your computer. Remove the display panel (see Removing the Display Assembly). 8. Back to Contents Page Camera Module Dell™ Inspiron™ 1090 Service Manual Removing the Camera Module Replacing the Camera Module WARNING: Before working inside...
Inspiron Duo Service Manual
Page 11
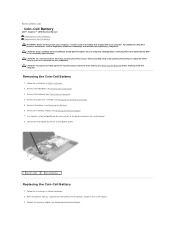
... instructions in Before You Begin. 2. CAUTION: Only a certified service technician should perform repairs on your computer). For additional safety best practices information, see Removing the Keyboard). 4. Remove the palm-rest assembly (see Removing the Battery) before working inside the computer. Lift the coin-cell battery out of the battery socket on the system board. 8. Back to Contents Page Coin-Cell Battery Dell™ Inspiron™ 1090 Service Manual Removing...
... instructions in Before You Begin. 2. CAUTION: Only a certified service technician should perform repairs on your computer). For additional safety best practices information, see Removing the Keyboard). 4. Remove the palm-rest assembly (see Removing the Battery) before working inside the computer. Lift the coin-cell battery out of the battery socket on the system board. 8. Back to Contents Page Coin-Cell Battery Dell™ Inspiron™ 1090 Service Manual Removing...
Inspiron Duo Service Manual
Page 13
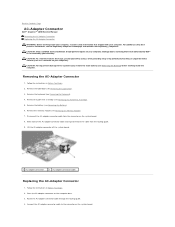
... additional safety best practices information, see Removing the Battery). 6. Remove the keyboard (see Removing the Memory Module). 7. Connect the AC-adapter connector cable to the system board, remove the main battery (see Removing the Battery) before working inside the computer. Remove the memory module (see Removing the Keyboard). 4. Back to Contents Page AC-Adapter Connector Dell™ Inspiron™ 1090 Service Manual Removing the AC-Adapter Connector Replacing the AC-Adapter Connector WARNING: Before working inside your computer, read the safety information...
... additional safety best practices information, see Removing the Battery). 6. Remove the keyboard (see Removing the Memory Module). 7. Connect the AC-adapter connector cable to the system board, remove the main battery (see Removing the Battery) before working inside the computer. Remove the memory module (see Removing the Keyboard). 4. Back to Contents Page AC-Adapter Connector Dell™ Inspiron™ 1090 Service Manual Removing the AC-Adapter Connector Replacing the AC-Adapter Connector WARNING: Before working inside your computer, read the safety information...

Inspiron Duo Service Manual
Page 15
... Removing the Battery) before working inside the computer. Remove the palm-rest assembly (see Removing the Palm-Rest Assembly). 5. Follow the instructions in Before You Begin. 2. Disconnect the ambient light-sensor cable, touch-screen cable, display cable, and camera cable from the Mini-Card(s). 8. Note the routing of the ambient light-sensor cable, touch-screen cable, display cable, and camera cable and remove these cables from the routing guides. Damage due to the system board, remove the main battery (see Removing the Keyboard). 4. Display Assembly Removing...
... Removing the Battery) before working inside the computer. Remove the palm-rest assembly (see Removing the Palm-Rest Assembly). 5. Follow the instructions in Before You Begin. 2. Disconnect the ambient light-sensor cable, touch-screen cable, display cable, and camera cable from the Mini-Card(s). 8. Note the routing of the ambient light-sensor cable, touch-screen cable, display cable, and camera cable and remove these cables from the routing guides. Damage due to the system board, remove the main battery (see Removing the Keyboard). 4. Display Assembly Removing...
Inspiron Duo Service Manual
Page 23
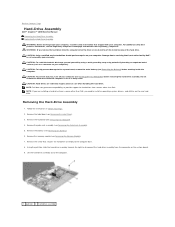
... removing the hard-drive assembly. CAUTION: Hard drives are installing a hard drive from the computer when the drive is On or in Before You Begin. 2. Remove the battery (see Removing the Memory Module). 7. Do not remove the hard drive while the computer is hot, do not touch the metal housing of the computer. 1 pull-tab 2 hard-drive assembly NOTE: If you remove the hard drive from a source other than Dell, you need to install an operating system, drivers, and utilities...
... removing the hard-drive assembly. CAUTION: Hard drives are installing a hard drive from the computer when the drive is On or in Before You Begin. 2. Remove the battery (see Removing the Memory Module). 7. Do not remove the hard drive while the computer is hot, do not touch the metal housing of the computer. 1 pull-tab 2 hard-drive assembly NOTE: If you remove the hard drive from a source other than Dell, you need to install an operating system, drivers, and utilities...
Inspiron Duo Service Manual
Page 24
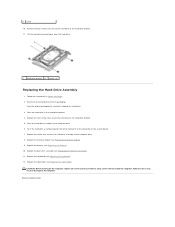
... hard drive. 3. Push the hard-drive assembly towards the left to connect it to the hard-drive bracket. 5. Replace the battery (see Replacing the Palm-Rest Assembly). 11. Replace the palm-rest assembly (see Replacing the Battery). 10. Replace the memory module (see Replacing the Keyboard). 12. Replace the keyboard (see Replacing the Memory Module). 9. CAUTION: Before turning on the system board. 7. Place the hard drive in the computer base. 6. Replace the label door (see Replacing the Label Door). Replace...
... hard drive. 3. Push the hard-drive assembly towards the left to connect it to the hard-drive bracket. 5. Replace the battery (see Replacing the Palm-Rest Assembly). 11. Replace the palm-rest assembly (see Replacing the Battery). 10. Replace the memory module (see Replacing the Keyboard). 12. Replace the keyboard (see Replacing the Memory Module). 9. CAUTION: Before turning on the system board. 7. Place the hard drive in the computer base. 6. Replace the label door (see Replacing the Label Door). Replace...

Inspiron Duo Service Manual
Page 25
... Page Processor Fan and Heat-Sink Assembly Dell™ Inspiron™ 1090 Service Manual Removing the Processor Fan and Heat-Sink Assembly Replacing the Processor Fan and Heat-Sink Assembly WARNING: Before working inside your computer, read the safety information that shipped with your computer. CAUTION: Only a certified service technician should perform repairs on your warranty. In sequential order (indicated on the system board. 8. For additional...
... Page Processor Fan and Heat-Sink Assembly Dell™ Inspiron™ 1090 Service Manual Removing the Processor Fan and Heat-Sink Assembly Replacing the Processor Fan and Heat-Sink Assembly WARNING: Before working inside your computer, read the safety information that shipped with your computer. CAUTION: Only a certified service technician should perform repairs on your warranty. In sequential order (indicated on the system board. 8. For additional...
Inspiron Duo Service Manual
Page 33
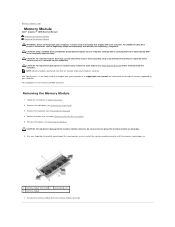
... computer has one internal SODIMM connector. Remove the palm-rest assembly (Removing the Palm-Rest Assembly). 5. CAUTION: To help prevent damage to Contents Page Memory Module Dell™ Inspiron™ 1090 Service Manual Removing the Memory Module Replacing the Memory Module WARNING: Before working inside your computer, read the safety information that shipped with your computer. Back to the system board, remove the main battery (see Removing the Battery) before working inside the...
... computer has one internal SODIMM connector. Remove the palm-rest assembly (Removing the Palm-Rest Assembly). 5. CAUTION: To help prevent damage to Contents Page Memory Module Dell™ Inspiron™ 1090 Service Manual Removing the Memory Module Replacing the Memory Module WARNING: Before working inside your computer, read the safety information that shipped with your computer. Back to the system board, remove the main battery (see Removing the Battery) before working inside the...
Inspiron Duo Service Manual
Page 34
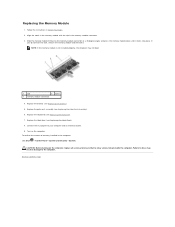
... Start ® Control Panel® System and Security® System. NOTE: If the memory module is not installed properly, the computer may result in Before You Begin. 2. Replace the label door (see Replacing the Battery). 5. Failure to the computer. Follow the instructions in damage to do not hear the click, remove the memory module and reinstall it clicks into place. CAUTION: Before turning on...
... Start ® Control Panel® System and Security® System. NOTE: If the memory module is not installed properly, the computer may result in Before You Begin. 2. Replace the label door (see Replacing the Battery). 5. Failure to the computer. Follow the instructions in damage to do not hear the click, remove the memory module and reinstall it clicks into place. CAUTION: Before turning on...
Inspiron Duo Service Manual
Page 35
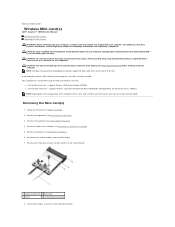
... Microwave Access (WiMax). Disconnect the antenna cables from sources other than Dell. Back to Contents Page Wireless Mini-Card(s) Dell™ Inspiron™ 1090 Service Manual Removing the Mini-Card(s) Replacing the Mini-Card(s) WARNING: Before working inside your computer, read the safety information that shipped with your computer, the card is not covered by Dell™ is already installed. Your computer has one full Mini-Card slot and one half Mini-Card slot: l One full Mini-Card slot - supports Wireless Local Area Network...
... Microwave Access (WiMax). Disconnect the antenna cables from sources other than Dell. Back to Contents Page Wireless Mini-Card(s) Dell™ Inspiron™ 1090 Service Manual Removing the Mini-Card(s) Replacing the Mini-Card(s) WARNING: Before working inside your computer, read the safety information that shipped with your computer, the card is not covered by Dell™ is already installed. Your computer has one full Mini-Card slot and one half Mini-Card slot: l One full Mini-Card slot - supports Wireless Local Area Network...
Inspiron Duo Service Manual
Page 43
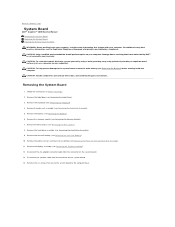
Back to Contents Page System Board Dell™ Inspiron™ 1090 Service Manual Removing the System Board Replacing the System Board Entering the Service Tag in Before You Begin. 2. CAUTION: Only a certified service technician should perform repairs on the system board. 13. Removing the System Board 1. Remove the keyboard (see Removing the Memory Module). 7. Remove the memory module (see Removing the Keyboard). 4. Remove the hard-drive assembly (see Removing the Display Assembly). 12. Remove the display assembly (see Removing the Hard-Drive Assembly). 9. Remove the six screws that...
Back to Contents Page System Board Dell™ Inspiron™ 1090 Service Manual Removing the System Board Replacing the System Board Entering the Service Tag in Before You Begin. 2. CAUTION: Only a certified service technician should perform repairs on the system board. 13. Removing the System Board 1. Remove the keyboard (see Removing the Memory Module). 7. Remove the memory module (see Removing the Keyboard). 4. Remove the hard-drive assembly (see Removing the Display Assembly). 12. Remove the display assembly (see Removing the Hard-Drive Assembly). 9. Remove the six screws that...

Inspiron Duo Setup Guide
Page 5
... Power Button 7 Set Up Microsoft Windows 8 Create System Recovery Media (Recommended 9 Install the SIM Card (Optional 10 Enable or Disable Wireless (Optional 14 Connect to the Internet (Optional 17 User Interface Modes 19 Set Up the Tablet Mode 20 Using Your Inspiron Laptop 22 Right View Features 22 Left View Features 24 Status Lights and Indicators 26 Disabling Battery Charging 27 Computer Base and Keyboard Features 28 Touch Pad Gestures 30 Multimedia Control Keys 32 Display Features 34 Using the Touch Screen 36 Software Features 40 Dell DataSafe Online Backup 41 Free...
... Power Button 7 Set Up Microsoft Windows 8 Create System Recovery Media (Recommended 9 Install the SIM Card (Optional 10 Enable or Disable Wireless (Optional 14 Connect to the Internet (Optional 17 User Interface Modes 19 Set Up the Tablet Mode 20 Using Your Inspiron Laptop 22 Right View Features 22 Left View Features 24 Status Lights and Indicators 26 Disabling Battery Charging 27 Computer Base and Keyboard Features 28 Touch Pad Gestures 30 Multimedia Control Keys 32 Display Features 34 Using the Touch Screen 36 Software Features 40 Dell DataSafe Online Backup 41 Free...

Inspiron Duo Setup Guide
Page 11
... support rewritable discs. To create system recovery media: 1. You can be used to the hardware, software, drivers, or other system settings have an internal optical drive. You will require the following to the operating state it was in the computer. 3. NOTE: For information on restoring your computer to create the system recovery media: • Dell DataSafe Local Backup • USB key with a minimum capacity of the Operating System disc). Click Create Recovery Media. 5. Setting Up Your Laptop Create System Recovery Media...
... support rewritable discs. To create system recovery media: 1. You can be used to the hardware, software, drivers, or other system settings have an internal optical drive. You will require the following to the operating state it was in the computer. 3. NOTE: For information on restoring your computer to create the system recovery media: • Dell DataSafe Local Backup • USB key with a minimum capacity of the Operating System disc). Click Create Recovery Media. 5. Setting Up Your Laptop Create System Recovery Media...
Inspiron Duo Setup Guide
Page 31
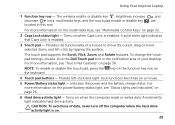
... change the touch pad settings, double-click the Dell Touch pad icon in this row. key on the function key row on . 29 For more information on the multimedia keys, see "Touch Pad Gestures" on a mouse. 5 Power/Battery status light - A solid white light indicates hard drive activity. NOTE: To enable or disable the touch pad, press the the keyboard. A solid white light indicates that Caps Lock is on 4 Touch pad buttons - CAUTION: To avoid loss of your desktop. Using Your Inspiron Laptop 1 Function key row - The wireless enable or disable key , brightness increase...
... change the touch pad settings, double-click the Dell Touch pad icon in this row. key on the function key row on . 29 For more information on the multimedia keys, see "Touch Pad Gestures" on a mouse. 5 Power/Battery status light - A solid white light indicates hard drive activity. NOTE: To enable or disable the touch pad, press the the keyboard. A solid white light indicates that Caps Lock is on 4 Touch pad buttons - CAUTION: To avoid loss of your desktop. Using Your Inspiron Laptop 1 Function key row - The wireless enable or disable key , brightness increase...
Inspiron Duo Setup Guide
Page 78
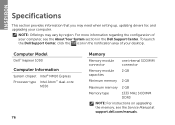
... need when setting up, updating drivers for, and upgrading your desktop. For more information regarding the configuration of your computer. Computer Model Dell™ Inspiron 1090 Computer Information System chipset Intel® NM10 Express Processor type Intel Atom™ dual-core N550 76 Memory Memory module connector Memory module capacities Minimum memory one internal SODIMM connector 2 GB 2 GB Maximum memory 2 GB Memory type 1333 MHz SODIMM DDR3 NOTE: For instructions on upgrading the memory...
... need when setting up, updating drivers for, and upgrading your desktop. For more information regarding the configuration of your computer. Computer Model Dell™ Inspiron 1090 Computer Information System chipset Intel® NM10 Express Processor type Intel Atom™ dual-core N550 76 Memory Memory module connector Memory module capacities Minimum memory one internal SODIMM connector 2 GB 2 GB Maximum memory 2 GB Memory type 1333 MHz SODIMM DDR3 NOTE: For instructions on upgrading the memory...
Inspiron Duo Setup Guide
Page 85
G gestures Touch Pad 30 touch screen 38 H hard drive activity light 23, 29 hardware problems diagnosing 51 Hardware Troubleshooter 51 help getting assistance and support 64 I Internet connection 17 M memory problems solving 46 P power problems, solving 44 power strips, using 6 problems, solving 42 products information and purchasing 67 R resources, finding more 74 restoring factory image 62 S Service Tag locating 70 setup, before you begin 5 shipping products for return or repair 68 SIM card 10 software features 40 Index 83
G gestures Touch Pad 30 touch screen 38 H hard drive activity light 23, 29 hardware problems diagnosing 51 Hardware Troubleshooter 51 help getting assistance and support 64 I Internet connection 17 M memory problems solving 46 P power problems, solving 44 power strips, using 6 problems, solving 42 products information and purchasing 67 R resources, finding more 74 restoring factory image 62 S Service Tag locating 70 setup, before you begin 5 shipping products for return or repair 68 SIM card 10 software features 40 Index 83


