
Comprehensive Specifications
Page 5
... (3.09 inches) rectangle Battery Type 3-cell "smart" lithium ion 6-cell "smart" lithium ion Dimensions Depth Height Width Weight Voltage Charge time when the computer is turned off (approximate) Life span (approximate) Temperature range Operating Storage Coin-cell battery 2.6Ahr, 28Whr 2.6Ahr, 56Whr or 2.8Ahr, 60Whr 60.62 mm (2.39 inches) 22...
... (3.09 inches) rectangle Battery Type 3-cell "smart" lithium ion 6-cell "smart" lithium ion Dimensions Depth Height Width Weight Voltage Charge time when the computer is turned off (approximate) Life span (approximate) Temperature range Operating Storage Coin-cell battery 2.6Ahr, 28Whr 2.6Ahr, 56Whr or 2.8Ahr, 60Whr 60.62 mm (2.39 inches) 22...
Service Manual
Page 2
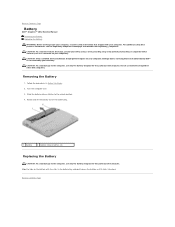
...wrist grounding strap or by your computer. Removing the Battery 1. Slide the battery release latches to Contents Page Battery Dell™ Inspiron™ 1012 Service Manual Removing the Battery Replacing the Battery WARNING: Before working inside your computer, read the safety information that ...the computer, use only the battery designed for this particular Dell computer. Back to the computer, use batteries designed for this particular Dell computer. Do not use only the battery designed for other Dell computers. Turn the computer over. 3. Rotate and lift the battery ...
...wrist grounding strap or by your computer. Removing the Battery 1. Slide the battery release latches to Contents Page Battery Dell™ Inspiron™ 1012 Service Manual Removing the Battery Replacing the Battery WARNING: Before working inside your computer, read the safety information that ...the computer, use only the battery designed for this particular Dell computer. Back to the computer, use batteries designed for this particular Dell computer. Do not use only the battery designed for other Dell computers. Turn the computer over. 3. Rotate and lift the battery ...
Service Manual
Page 3
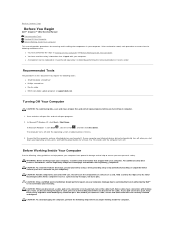
... exit all open programs before you turn off . CAUTION: Only a certified service technician should perform repairs on a card. Back to Contents Page Before You Begin Dell™ Inspiron™ 1012 Service Manual Recommended Tools Turning Off Your Computer Before Working Inside Your... Computer This manual provides procedures for at www.dell.com/regulatory_compliance. Recommended Tools The procedures in this type...
... exit all open programs before you turn off . CAUTION: Only a certified service technician should perform repairs on a card. Back to Contents Page Before You Begin Dell™ Inspiron™ 1012 Service Manual Recommended Tools Turning Off Your Computer Before Working Inside Your... Computer This manual provides procedures for at www.dell.com/regulatory_compliance. Recommended Tools The procedures in this type...

Service Manual
Page 4
... computer and all telephone or network cables from their electrical outlets. Turn the computer top-side up, open the display, and press the power button to the system board, remove the main battery (see Removing the Battery) ... disconnect a network cable, first unplug the cable from your computer and then unplug the cable from the 3-in-1 Media Card Reader. 5. Remove the battery (see Turning Off Your Computer). 1. Press and eject any installed cards from the network device. 3. Disconnect all attached devices from the computer. 4. Disconnect your computer (see Removing...
... computer and all telephone or network cables from their electrical outlets. Turn the computer top-side up, open the display, and press the power button to the system board, remove the main battery (see Removing the Battery) ... disconnect a network cable, first unplug the cable from your computer and then unplug the cable from the 3-in-1 Media Card Reader. 5. Remove the battery (see Turning Off Your Computer). 1. Press and eject any installed cards from the network device. 3. Disconnect all attached devices from the computer. 4. Disconnect your computer (see Removing...
Service Manual
Page 5
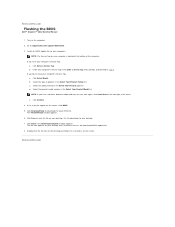
... is titled the same as the downloaded BIOS update file. 8. Click Close if the Download Complete window appears. Back to download the latest BIOS file. Turn on the screen. Locate the BIOS update file for your computer: NOTE: The Service Tag for your computer's Service Tag: a. e. The file downloads to save... the instructions on the computer. 2. Select the product brand in the Select Your Product Model list. Click Confirm. 4. Go to Contents Page Flashing the BIOS Dell™ Inspiron™ 1012 Service Manual 1. The File Download window appears. 6. Back to support...
... is titled the same as the downloaded BIOS update file. 8. Click Close if the Download Complete window appears. Back to download the latest BIOS file. Turn on the screen. Locate the BIOS update file for your computer: NOTE: The Service Tag for your computer's Service Tag: a. e. The file downloads to save... the instructions on the computer. 2. Select the product brand in the Select Your Product Model list. Click Confirm. 4. Go to Contents Page Flashing the BIOS Dell™ Inspiron™ 1012 Service Manual 1. The File Download window appears. 6. Back to support...

Service Manual
Page 7
Replace the keyboard (see Replacing the Battery). Back to the computer. CAUTION: Before turning on the computer, replace all screws and ensure that no stray screws remain inside the computer. 6. Replace the battery (see Replacing the Keyboard). 7. Failure to do so may result in damage to Contents Page
Replace the keyboard (see Replacing the Battery). Back to the computer. CAUTION: Before turning on the computer, replace all screws and ensure that no stray screws remain inside the computer. 6. Replace the battery (see Replacing the Keyboard). 7. Failure to do so may result in damage to Contents Page

Service Manual
Page 9
... the Display Assembly). 7. Replace the display assembly (see Replacing the Display Bezel). 6. Replace the hinge cover (see Replacing the Hard-Drive Assembly). 10. CAUTION: Before turning on the camera module. 5. 3. Replace the hard-drive assembly (see Replacing the Hinge Cover). 8. Replace the palm rest assembly(see Replacing the Keyboard). 11. Replace...
... the Display Assembly). 7. Replace the display assembly (see Replacing the Display Bezel). 6. Replace the hinge cover (see Replacing the Hard-Drive Assembly). 10. CAUTION: Before turning on the camera module. 5. 3. Replace the hard-drive assembly (see Replacing the Hinge Cover). 8. Replace the palm rest assembly(see Replacing the Keyboard). 11. Replace...
Service Manual
Page 10
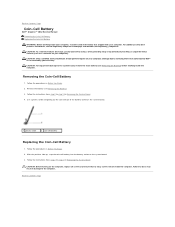
Back to Contents Page Coin-Cell Battery Dell™ Inspiron™ 1012 Service Manual Removing the Coin-Cell Battery Replacing the Coin-Cell Battery WARNING: Before working inside the computer. CAUTION: Only a certified service technician should .../regulatory_compliance. Follow the instructions from step 3 to servicing that is not authorized by Dell™ is not covered by periodically touching an unpainted metal surface (such as a connector on the system board. 3. CAUTION: Before turning on the computer, replace all screws and ensure that shipped with your computer. Follow the ...
Back to Contents Page Coin-Cell Battery Dell™ Inspiron™ 1012 Service Manual Removing the Coin-Cell Battery Replacing the Coin-Cell Battery WARNING: Before working inside the computer. CAUTION: Only a certified service technician should .../regulatory_compliance. Follow the instructions from step 3 to servicing that is not authorized by Dell™ is not covered by periodically touching an unpainted metal surface (such as a connector on the system board. 3. CAUTION: Before turning on the computer, replace all screws and ensure that shipped with your computer. Follow the ...

Service Manual
Page 12
... all screws and ensure that no stray screws remain inside the computer. Press down the video accelerator card in damage to Contents Page CAUTION: Before turning on the system board. 3. Back to the computer. Replace the battery (see Replacing the Palm Rest Assembly). 5. 2. Align the two captive screws on the processor...
... all screws and ensure that no stray screws remain inside the computer. Press down the video accelerator card in damage to Contents Page CAUTION: Before turning on the system board. 3. Back to the computer. Replace the battery (see Replacing the Palm Rest Assembly). 5. 2. Align the two captive screws on the processor...

Service Manual
Page 14
... from step 4 to Contents Page Place the AC adapter connector in Before You Begin. 2. Back to step 21 in damage to the computer. CAUTION: Before turning on the computer, replace all screws and ensure that no stray screws remain inside the computer. Follow the procedures in the computer base. 3. Failure to...
... from step 4 to Contents Page Place the AC adapter connector in Before You Begin. 2. Back to step 21 in damage to the computer. CAUTION: Before turning on the computer, replace all screws and ensure that no stray screws remain inside the computer. Follow the procedures in the computer base. 3. Failure to...
Service Manual
Page 17
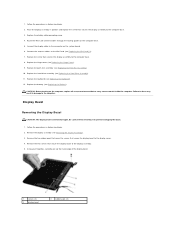
...Remove the two screws that secure the display bezel to the computer base. 8. Connect the display cable to the computer. CAUTION: Before turning on the computer, replace all screws and ensure that secures the display assembly to the display assembly. 5. Failure to do so may result... Battery). Display Bezel Removing the Display Bezel CAUTION: The display bezel is extremely fragile. Be careful when removing it to the Mini-Card (see Replacing the Mini-Card(s)). 7. Follow the procedures in Before You Begin. 2. Connect the antenna cables to prevent damaging the bezel. 1. Replace ...
...Remove the two screws that secure the display bezel to the computer base. 8. Connect the display cable to the computer. CAUTION: Before turning on the computer, replace all screws and ensure that secures the display assembly to the display assembly. 5. Failure to do so may result... Battery). Display Bezel Removing the Display Bezel CAUTION: The display bezel is extremely fragile. Be careful when removing it to the Mini-Card (see Replacing the Mini-Card(s)). 7. Follow the procedures in Before You Begin. 2. Connect the antenna cables to prevent damaging the bezel. 1. Replace ...

Service Manual
Page 18
... and ensure that secure the display bezel to the computer. Remove the four screws that secure the display bezel to the display cover. 6. CAUTION: Before turning on the camera module. 1 camera cable connector 5. Remove the display bezel. Replace the display assembly (see Removing the Display Assembly). 3. Lift the display panel off...
... and ensure that secure the display bezel to the computer. Remove the four screws that secure the display bezel to the display cover. 6. CAUTION: Before turning on the camera module. 1 camera cable connector 5. Remove the display bezel. Replace the display assembly (see Removing the Display Assembly). 3. Lift the display panel off...

Service Manual
Page 19
CAUTION: Before turning on a clean surface. 6. Align the display panel with the display cover 3. Remove the display panel (see Replacing the Display Assembly). Pull the pull-tab as ... in Before You Begin. 2. Remove the display bezel (see Removing the Display Assembly). 3. Replace the four screws that no stray screws remain inside the computer. Turn the display panel over and place it on the computer, replace all screws and ensure that secure the display panel to the connector on the...
CAUTION: Before turning on a clean surface. 6. Align the display panel with the display cover 3. Remove the display panel (see Replacing the Display Assembly). Pull the pull-tab as ... in Before You Begin. 2. Remove the display bezel (see Removing the Display Assembly). 3. Replace the four screws that no stray screws remain inside the computer. Turn the display panel over and place it on the computer, replace all screws and ensure that secure the display panel to the connector on the...

Service Manual
Page 20
...Display Panel Bracket 1. Remove the display panel (see Replacing the Display Bezel). 7. Follow the procedures in Before You Begin. 2. CAUTION: Before turning on the display cover. 5. Gently peel off the display panel. Remove the display assembly (see Replacing the Display Panel). 6. Replace the display... Replace the display panel (see Removing the Display Assembly). 3. Replace the tape that no stray screws remain inside the computer. Turn the display panel over and place it on the computer, replace all screws and ensure that secures the display cable to the ...
...Display Panel Bracket 1. Remove the display panel (see Replacing the Display Bezel). 7. Follow the procedures in Before You Begin. 2. CAUTION: Before turning on the display cover. 5. Gently peel off the display panel. Remove the display assembly (see Replacing the Display Panel). 6. Replace the display... Replace the display panel (see Removing the Display Assembly). 3. Replace the tape that no stray screws remain inside the computer. Turn the display panel over and place it on the computer, replace all screws and ensure that secures the display cable to the ...

Service Manual
Page 21
... damage to the display panel. 4. Replace the display panel (see Replacing the Display Assembly). Back to Contents Page Follow the procedures in position. 3. CAUTION: Before turning on each side) that no stray screws remain inside the computer. Replace the display bezel (see Replacing the Display Bezel). 6. 1 screws (4) 2 display panel brackets (2) Replacing...
... damage to the display panel. 4. Replace the display panel (see Replacing the Display Assembly). Back to Contents Page Follow the procedures in position. 3. CAUTION: Before turning on each side) that no stray screws remain inside the computer. Replace the display bezel (see Replacing the Display Bezel). 6. 1 screws (4) 2 display panel brackets (2) Replacing...
Service Manual
Page 22
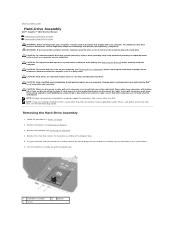
...NOTE: If you remove the hard drive from the connector on your computer. Back to Contents Page Hard-Drive Assembly Dell™ Inspiron™ 1012 Service Manual Removing the Hard-Drive Assembly Replacing the Hard-Drive Assembly WARNING: Before working inside your computer, read the... electrostatic discharge, ground yourself by using a wrist grounding strap or by your computer (see Removing the Battery). 3. Remove the battery (see Turning Off Your Computer) before you pull connectors apart, keep them evenly aligned to the computer base. 5. if you connect a cable, ensure ...
...NOTE: If you remove the hard drive from the connector on your computer. Back to Contents Page Hard-Drive Assembly Dell™ Inspiron™ 1012 Service Manual Removing the Hard-Drive Assembly Replacing the Hard-Drive Assembly WARNING: Before working inside your computer, read the... electrostatic discharge, ground yourself by using a wrist grounding strap or by your computer (see Removing the Battery). 3. Remove the battery (see Turning Off Your Computer) before you pull connectors apart, keep them evenly aligned to the computer base. 5. if you connect a cable, ensure ...
Service Manual
Page 23
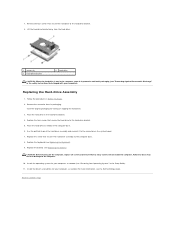
...Place the hard-drive assembly in the hard-drive bracket. 4. Install the drivers and utilities for your computer, as needed (see the Dell Technology Guide. Place the hard drive in the computer base. 6. Save the original packaging for your computer, as needed . Remove the ... and connect it in protective antistatic packaging (see "Protecting Against Electrostatic Discharge" in damage to the computer base. 8. CAUTION: Before turning on the system board. 7. Follow the procedures in the Setup Guide). 11. 7. Install the operating system for storing or shipping the hard ...
...Place the hard-drive assembly in the hard-drive bracket. 4. Install the drivers and utilities for your computer, as needed (see the Dell Technology Guide. Place the hard drive in the computer base. 6. Save the original packaging for your computer, as needed . Remove the ... and connect it in protective antistatic packaging (see "Protecting Against Electrostatic Discharge" in damage to the computer base. 8. CAUTION: Before turning on the system board. 7. Follow the procedures in the Setup Guide). 11. 7. Install the operating system for storing or shipping the hard ...

Service Manual
Page 25
Lift the hinge cover off the computer. Replacing the Hinge Cover 1. CAUTION: Before turning on the computer base and snap the cover in Before You Begin. 2. Follow the procedures in place. 3. Align the tabs on the hinge cover with the slots on the computer, replace all screws and ensure that secure the hinge cover to the computer. Failure to do so may result in damage to the computer base. 4. Replace the battery (see Replacing the Battery). Turn over the computer and replace the two screws that no stray screws remain inside the computer. 6. Back to Contents Page
Lift the hinge cover off the computer. Replacing the Hinge Cover 1. CAUTION: Before turning on the computer base and snap the cover in Before You Begin. 2. Follow the procedures in place. 3. Align the tabs on the hinge cover with the slots on the computer, replace all screws and ensure that secure the hinge cover to the computer. Failure to do so may result in damage to the computer base. 4. Replace the battery (see Replacing the Battery). Turn over the computer and replace the two screws that no stray screws remain inside the computer. 6. Back to Contents Page

Service Manual
Page 27
... on the I /O board 2 screw 14. Replace the battery (see Replacing the Left Support Bracket). 9. Replace the left support bracket (see Replacing the Battery). CAUTION: Before turning on the locking tab to the computer base. 1 I /O board and press down on the computer, replace all screws and ensure that you removed from the...
... on the I /O board 2 screw 14. Replace the battery (see Replacing the Left Support Bracket). 9. Replace the left support bracket (see Replacing the Battery). CAUTION: Before turning on the locking tab to the computer base. 1 I /O board and press down on the computer, replace all screws and ensure that you removed from the...
Service Manual
Page 28
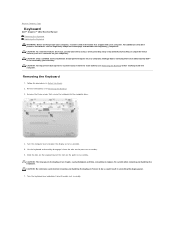
...careful when removing and handling the keyboard. CAUTION: Be extremely careful when removing and handling the keyboard. Turn the computer over the palm rest assembly. Turn the keyboard over and place it from the tabs on the palm rest assembly. CAUTION: To avoid ...Battery) before working inside the computer. Follow the procedures in scratching the display panel. 7. Back to Contents Page Keyboard Dell™ Inspiron™ 1012 Service Manual Removing the Keyboard Replacing the Keyboard WARNING: Before working inside your computer, read the safety information that secure ...
...careful when removing and handling the keyboard. CAUTION: Be extremely careful when removing and handling the keyboard. Turn the computer over the palm rest assembly. Turn the keyboard over and place it from the tabs on the palm rest assembly. CAUTION: To avoid ...Battery) before working inside the computer. Follow the procedures in scratching the display panel. 7. Back to Contents Page Keyboard Dell™ Inspiron™ 1012 Service Manual Removing the Keyboard Replacing the Keyboard WARNING: Before working inside your computer, read the safety information that secure ...


